Visual Editing with Next.js App Router and Sanity Studio
Official(made by Sanity team)
Setup interactive live preview with Presentation in a Next.js app router application


How to get started with the Sanity and Gatsby powered portfolio website

If you followed the steps for the Gatsby portfolio template on sanity.io/create you now have the project code on your account on GitHub, as well as a editing environment and a Gatsby frontend deployed on Netlify.
This tutorial will first introduce you to the stack, and then walk you through how to customize this project to make it your own by demonstrating:
You can safely skip this section if you're already familiar with Sanity, Gatsby and Netlify.
Gatsby is a static site generator for React that helps you build fast websites. You can add multiple external data sources and use Gatsby’s internal GraphQL API to pull content into your templates. You can use this template as a way to learn Gatsby and React, but there's lots of guides and tutorials out there.
When you develop locally, you get
Netlify is a service that lets you easily build and deploy websites from Git. If you use a static site generator, Netlify can build the site before making it available on a global scaleable network. You can also host Single Page Applications on Netlify, like we do with Sanity Studio in this template.
Sanity.io is where you create, store, and mange your structured content. When you create a new project with this template we will put the customizeable editing environment in the GitHub repository along with the code for the frontend. The content types and the input fields are configured with simple JavaScript objects, and you can optionally inject your own React components if you want to extend the Studio further.
The Studio connects the hosted APIs. Those are built to make it possible to integrate almost any application or service. The Studio let's you read and write content to it, while the blog mainly reads content from it, and fetches optimized images from the asset API. It's good to know that even if you can run the Studio locally while you develop, the content is always synced in real-time to the cloud.
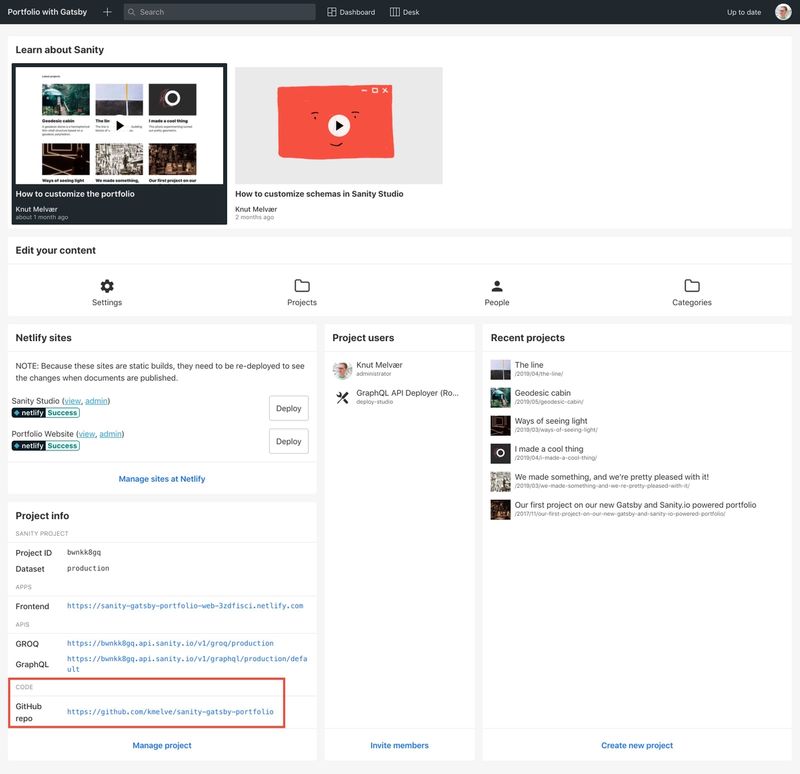
The code for the website, as well as Sanity Studio is added as a monorepo on the GitHub account you chose when creating the project. You can find links to this repository on your dashboard and email that we sent you. You should also be able to find it if you go to the repositories overview on your user page.
Use your prefered git tool to clone the repository to where you want to work with it locally.
When you have the code on your machine, open the project folder in the command line and install dependencies for the whole project:
~/sanity-gatsby-portfolio
> npm install
This will install dependencies for both the web frontend and the studio. You can also start the development servers for both in parallell by running the following in the project’s root folder:
~/sanity-gatsby-portfolio
> npm run dev
Both Gatsby and the Sanity Studio use Hot Module Reloading when you make changes in the code for them. There are certain situations where you have to restart the development servers in order to load changes, for example if you add extra dependencies from npm.
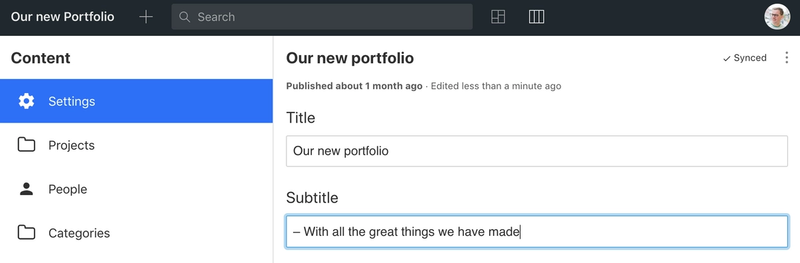
Let's say you want to add a new field for the portfolio, like a subtitle to the frontpage. What you would need to do is to first add the field to Sanity Studio, update the GraphQL API schema, and then implement the new content into your page template in Gatsby. You can watch these videos if you want a general introduction to how to customize schemas in Sanity Studio.
You'll find the schema configuration for where you manage the site settings content by navigating to /studio/schemas/documents/siteSettings.js . To add a subtitle you insert a new object between the field definitions for title and description:
// siteSettings.js
export default {
  name: 'siteSettings',
  type: 'document',
  title: 'Site Settings',
  fields: [
    {
      name: 'title',
      type: 'string',
      title: 'Title'
    },
    {
      name: 'subtitle',
      type: 'string',
      title: 'Subtitle',
    },
    {
      name: 'description',
      type: 'text',
      title: 'Description',
      description: 'Describe your blog for search engines and social media.'
    },
    {
      name: 'keywords',
      type: 'array',
      title: 'Keywords',
      description: 'Add keywords that describes your blog.',
      of: [{type: 'string'}],
      options: {
        layout: 'tags'
      }
    },
    {
      name: 'author',
      type: 'reference',
      description: 'Publish an author and set a reference to them here.',
      title: 'Author',
      to: [{type: 'author'}]
    }
  ]
}
We give it the name subtitle. This is the key you will see in the data for this document, as well as what you will use in the template to get to its contents. The type for this input field is string (see reference docs for all the schema types), and the title, that is, the label for the input field in the Studio, is Subtitle.
Gatsby runs with its own internal GraphQL API where you can import data from multiple sources. Out of the box Gatsby tries to infer what fields and types you have, which might lead to unpredictable behaviour. To prevent this, you can deploy a GraphQL API for your Sanity project. The Gatsby source plugin will fetch this schema to define your types for the internal Gatsby API. That means that if you change the schema in the Studio, you'll have to redeploy the GraphQL API and restart Gatsby to see those changes.
~/sanity-gatsby-portfolio
> npm run graphql-deploy

# or

~/sanity-gatsby-portfolio/studio
> sanity graphql deploy
Now you should have access to the new subtitle key from siteSettings. Make sure that you have put in some content to the field and published it. Restart the development server and find the template file for the frontpage on web/src/pages/index.js. Begin with adding the key to the GraphQL query:
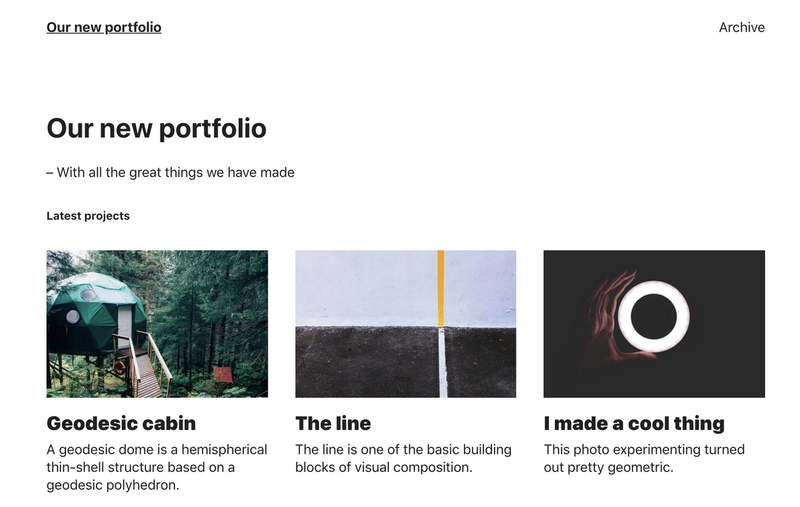
Now we can use it in the JSX template located further down in the same file. We'll also remove the hidden attribute on the <h1>-tag to show the main title:
<Layout>
<SEO title={site.title} description={site.description} keywords={site.keywords} />
<Container>
<h1>Welcome to {site.title}</h1>
<p>{site.subtitle}</p>
{projectNodes && (
<ProjectPreviewGrid
title='Latest projects'
nodes={projectNodes}
browseMoreHref='/archive/'
/>
)}
</Container>
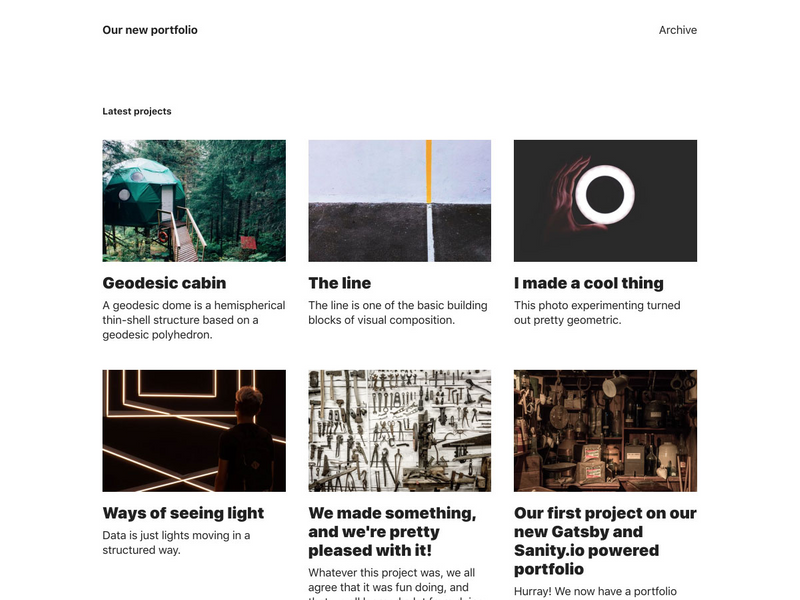
</Layout>If you open localhost:8000 in your browser you should be able to see something like this:
Now you should commit the changes to git and push them to the remote repository on GitHub (usually git push origin master). Netlify watches changes on master and will redeploy the studio and the portfolio site. This usually takes a few minutes.
This is only the start of courcase! There's loads of things you can do to take this portfolio further. Check out our documentation and blog for more, and make sure to join our community on Slack to get help and see what other people are doing with Sanity.
Sanity Composable Content Cloud is the headless CMS that gives you (and your team) a content backend to drive websites and applications with modern tooling. It offers a real-time editing environment for content creators that’s easy to configure but designed to be customized with JavaScript and React when needed. With the hosted document store, you query content freely and easily integrate with any framework or data source to distribute and enrich content.
Sanity scales from weekend projects to enterprise needs and is used by companies like Puma, AT&T, Burger King, Tata, and Figma.
Setup interactive live preview with Presentation in a Next.js app router application

A complete guide to setting up your blog using Astro and Sanity

This guide teaches how to add a custom input component to a field for Sanity Studio v3

A thorough intro to using GROQ-projections in a webhook contest
