# Course: Day one content operations
https://www.sanity.io/learn/course/day-one-with-sanity-studio
Get a top-level understanding of the entire Sanity Content Operating System while building out a multi-application monorepo. With callouts to take other course material to go deeper.
---
## Navigation
**Track:** [Mastering content operations](https://www.sanity.io/learn/track/sanity-developer-essentials) · [View as markdown](https://www.sanity.io/learn/track/sanity-developer-essentials.md)
## Contents
1. [Welcome](https://www.sanity.io/learn/course/day-one-with-sanity-studio/prerequisites) · [markdown](https://www.sanity.io/learn/course/day-one-with-sanity-studio/prerequisites.md)
2. [Hello, Studio](https://www.sanity.io/learn/course/day-one-with-sanity-studio/hello-studio) · [markdown](https://www.sanity.io/learn/course/day-one-with-sanity-studio/hello-studio.md)
3. [Local development](https://www.sanity.io/learn/course/day-one-with-sanity-studio/getting-started) · [markdown](https://www.sanity.io/learn/course/day-one-with-sanity-studio/getting-started.md)
4. [Creating a schema](https://www.sanity.io/learn/course/day-one-with-sanity-studio/creating-a-schema) · [markdown](https://www.sanity.io/learn/course/day-one-with-sanity-studio/creating-a-schema.md)
5. [Deploying your Studio](https://www.sanity.io/learn/course/day-one-with-sanity-studio/deploying-your-studio) · [markdown](https://www.sanity.io/learn/course/day-one-with-sanity-studio/deploying-your-studio.md)
6. [Studio excellence](https://www.sanity.io/learn/course/day-one-with-sanity-studio/studio-excellence) · [markdown](https://www.sanity.io/learn/course/day-one-with-sanity-studio/studio-excellence.md)
7. [Just enough GROQ](https://www.sanity.io/learn/course/day-one-with-sanity-studio/a-taste-of-groq) · [markdown](https://www.sanity.io/learn/course/day-one-with-sanity-studio/a-taste-of-groq.md)
8. [Between GROQ and a hard place](https://www.sanity.io/learn/course/day-one-with-sanity-studio/between-groq-and-a-hard-place) · [markdown](https://www.sanity.io/learn/course/day-one-with-sanity-studio/between-groq-and-a-hard-place.md)
9. [Prepare your monorepo](https://www.sanity.io/learn/course/day-one-with-sanity-studio/prepare-your-monorepo) · [markdown](https://www.sanity.io/learn/course/day-one-with-sanity-studio/prepare-your-monorepo.md)
10. [Display content in Next.js](https://www.sanity.io/learn/course/day-one-with-sanity-studio/bringing-content-to-a-next-js-front-end) · [markdown](https://www.sanity.io/learn/course/day-one-with-sanity-studio/bringing-content-to-a-next-js-front-end.md)
11. [Rendering assets](https://www.sanity.io/learn/course/day-one-with-sanity-studio/rendering-assets) · [markdown](https://www.sanity.io/learn/course/day-one-with-sanity-studio/rendering-assets.md)
12. [Generating types](https://www.sanity.io/learn/course/day-one-with-sanity-studio/generating-types) · [markdown](https://www.sanity.io/learn/course/day-one-with-sanity-studio/generating-types.md)
13. [Handling schema changes confidently](https://www.sanity.io/learn/course/day-one-with-sanity-studio/handling-schema-changes-confidently) · [markdown](https://www.sanity.io/learn/course/day-one-with-sanity-studio/handling-schema-changes-confidently.md)
14. [Build a content application](https://www.sanity.io/learn/course/day-one-with-sanity-studio/create-a-content-application) · [markdown](https://www.sanity.io/learn/course/day-one-with-sanity-studio/create-a-content-application.md)
15. [Build content apps with Sanity App SDK](https://www.sanity.io/learn/course/day-one-with-sanity-studio/build-content-apps-with-sanity-app-sdk) · [markdown](https://www.sanity.io/learn/course/day-one-with-sanity-studio/build-content-apps-with-sanity-app-sdk.md)
16. [Automate anything with Functions](https://www.sanity.io/learn/course/day-one-with-sanity-studio/create-a-function) · [markdown](https://www.sanity.io/learn/course/day-one-with-sanity-studio/create-a-function.md)
17. [Agent Actions](https://www.sanity.io/learn/course/day-one-with-sanity-studio/ai-agent-actions) · [markdown](https://www.sanity.io/learn/course/day-one-with-sanity-studio/ai-agent-actions.md)
18. [Day one quiz](https://www.sanity.io/learn/course/day-one-with-sanity-studio/day-one-quiz) · [markdown](https://www.sanity.io/learn/course/day-one-with-sanity-studio/day-one-quiz.md)
---
## Lesson 1: Welcome
https://www.sanity.io/learn/course/day-one-with-sanity-studio/prerequisites
In this course you'll make first contact with most parts of the Sanity Content Operating System while building out a best-practice, multi-application monorepo.
> [Video: Welcome](https://www.sanity.io/learn/course/day-one-with-sanity-studio/prerequisites)
## About you
The lessons in this course are written at a level that assumes you have some** **experience in web application development. As such, it rapidly and lightly touches almost every part of the Sanity Content Operating System.
### About me
My name is Simeon Griggs, and I've been building content-editable applications for almost my entire career. I'm enthusiastic about the vast array of options that Sanity gives developers to create content-editable applications.
Through these courses, I hope to inspire you to see what's possible so that you will go above and beyond default settings and cookie-cutter CMSes for your next build and to the benefit of content creators.
## Alternative learning paths
This track, [Mastering content operations](https://www.sanity.io/learn/track/sanity-developer-essentials), covers the entire Sanity Content Operating System with the end goal of preparing you for the **Sanity Certified Content Operator** exam—which unlocks upon completion of all courses in this track.
- If you'd prefer to work frontend-first with a **focus on websites**, consider the [Work-ready Next.js](https://www.sanity.io/learn/track/work-ready-next-js) track.
- If you're looking for **AI-specific** guidance take the [AI-powered Sanity development](https://www.sanity.io/learn/course/code-with-ai) course.
- If you're in a **hurry**—or Next.js isn't your favorite—see [Getting started with Sanity](https://www.sanity.io/learn/getting-started) for other framework specific guides which are optimized to get you going in no time.
- If you're feeling **confident**, see the [Templates](https://www.sanity.io/templates) page for a variety of framework-specific templates ranging from clean to fully-featured.
## What you'll need
To complete this course, you will need the following:
- A free Sanity account to create new Sanity projects. If you do not yet have an account, you'll be prompted to create one from the terminal.
- Some familiarity with running commands from the terminal. Wes Bos' [Command Line Power User](https://commandlinepoweruser.com/) video course is free and can get you up to speed with the basics.
- [Node (version 20 or greater)](https://docs.npmjs.com/downloading-and-installing-node-js-and-npm) installed (or [an npm-compatible JavaScript runtime](https://developer.mozilla.org/en-US/docs/Learn/Tools_and_testing/Understanding_client-side_tools/Package_management#what_exactly_is_a_package_manager)) to install and run Sanity tools locally.
- Some familiarity with JavaScript. The code examples in this course can all be copied and pasted and are written in TypeScript, but you will not need advanced knowledge of TypeScript.
> [!TIP]
> See [Installation](https://www.sanity.io/learn/studio/installation) in the documentation for more options when starting new Sanity projects
Be aware of some opinionated tooling decisions made in this track of courses:
- We prefer you use [PNPM over NPM](https://pnpm.io/) as you will be configuring a PNPM workspace in this track. This will make it simpler to develop multiple separate but related applications.
- In videos we use [VS Code](https://code.visualstudio.com/) or [Cursor](https://www.cursor.com/) as our IDE with the [Sanity VS Code extension](https://github.com/sanity-io/vscode-sanity) installed for syntax highlighting of GROQ queries.
## Feedback? Questions?
If you're stuck or have feedback [join the Sanity Community](https://www.sanity.io/community/join?utm_source=learn-day-one) or use the Feedback form at the bottom of every lesson.
Let's get started!
---
## Lesson 2: Hello, Studio
https://www.sanity.io/learn/course/day-one-with-sanity-studio/hello-studio
Create a new Sanity project from the command line and learn the boundaries of where Sanity ends and your work begins.
> [Video: Hello, Studio](https://www.sanity.io/learn/course/day-one-with-sanity-studio/hello-studio)
## How is Sanity different?
If you've heard of Sanity, it's likely that you think of it as a CMS. It can be that, but it is also so much more. We believe in modeling content as data—not its presentation—and giving developers tools to create great content experiences for authoring teams.
Sanity provides a hosted backend for your text content and assets called the Content Lake. Within the Content Lake, you must create a **project** and a **dataset**
- A **dataset** is a collection of content within a project hosted in Sanity. See [Store and query structured content](https://www.sanity.io/learn/content-lake) for more.
- A **project** can have many datasets and also contains project-level settings like members and API tokens. You can see these in [sanity.io/manage](https://www.sanity.io/manage).
- An **organization** can have many projects which you would colocate for billing and administration purposes. Most companies using Sanity only have one "organization," but an agency may make a unique organization for each client.
Locally, you will configure **Sanity Studio** with TypeScript. Think of it like a "headless CMS," "admin panel" or "content dashboard" which is configured with code but reads from and writes to the Content Lake in real-time.
In this course, you will deploy the Studio to Sanity's provided hosting, but know that you can host it with most web hosting providers.
## Initialize a project and Studio
The command below will create a new project and dataset within the content lake and scaffold the local files required to develop Sanity Studio.
- [ ] **Run** the following to create a new free project and Studio from the command line
```sh
pnpm create sanity@latest --template clean --create-project "Day One Content Operations" --dataset production --typescript --output-path day-one/apps/studio
```
This command set this path so that the Studio would be installed in an `apps` directory. Eventually in this track you'll create a front-end, Sanity Functions and a custom content application which will all be colocated in this `apps` directory.
The folder structure created in the command above should look like this:
```text
day-one/
└── apps/
└── studio/ <- Sanity Studio
```
With a Studio installed, let's get it running in the next lesson.
---
## Lesson 3: Local development
https://www.sanity.io/learn/course/day-one-with-sanity-studio/getting-started
With a new Sanity project created and a new Studio installed, you're ready to get started with local development.
> [Video: Local development](https://www.sanity.io/learn/course/day-one-with-sanity-studio/getting-started)
With the Studio files and dependencies installed in the last lesson, you are now ready to start the local development server for Sanity Studio. It allows you to open the Studio in a browser and instantly see the changes reflected when you update its configuration.
From the command line and inside the folder where your Studio was installed, start the development server by running this command:
```sh
# inside apps/studio
pnpm run dev
```
Sanity Studio uses [Vite](https://vitejs.dev/) as its default development and build tooling to provide rapid updates as you make configuration changes.
Also consider that the Studio is "just" a React dependency and can be used with most modern development tooling and even be embedded in most modern web frameworks.
## Log in to the Studio
Open the Studio running locally in your preferred browser on [http://localhost:3333](http://localhost:3333).
You should now see a screen like the one below prompting you to log in to the Studio. Use the same service (Google, GitHub, or email) that you used to access [sanity.io/manage](https://sanity.io/manage) when you authenticated with the CLI.
- [ ] Log in to your local Sanity Studio

## Studio configuration
Once logged in, you'll see a screen saying your Studio does not yet have any document types registered to its schema.

Why is it empty? The central point of all your Studio's configuration takes place in the file `sanity.config.ts`, including declaring all your schema types.
Take a look at your configuration file. It exports a helper function `defineConfig` by default and contains a single Sanity Studio **workspace**.
> [!TIP]
> Learn more about defining multiple [Workspaces](https://www.sanity.io/learn/studio/workspaces) in the documentation.
```typescript:apps/studio/sanity.config.ts
// ...all other imports
import {schemaTypes} from './schemaTypes'
export default defineConfig({
// ...all other config
schema: {
types: schemaTypes,
},
})
```
In this file, you can see the schema types for this config are imported from another file `schemaTypes/index.ts`, which currently contains an empty array.
```typescript:apps/studio/schemaTypes/index.ts
export const schemaTypes = []
```
So when you create new schema types, they must be added to this array, which is then loaded into the Studio configuration.
Let's do that!
---
## Lesson 4: Creating a schema
https://www.sanity.io/learn/course/day-one-with-sanity-studio/creating-a-schema
Configure a schema for Sanity Studio that defines your content model and builds out an editorial interface.
> [Video: Creating a schema](https://www.sanity.io/learn/course/day-one-with-sanity-studio/creating-a-schema)
Let’s start with some foundational knowledge of how your Sanity Studio and Content Lake are integrated and how to think about the “schema.” You can skip right to the code part and return to this later if you prefer to be hands-on first.
## What is a schema?
The "schema" for a Sanity Studio workspace defines what document types and fields are visible to authors. In the schema configuration you define much of the editorial experience for these documents and fields, like field descriptions, validation, initial value, and so on.
If you have used other CMSes, the “schema” will be similar to what is commonly referred to as “content model,” “fields and entities,” “custom types,” “advanced custom fields,” etc.
It's important to note that the schema is confined to a Studio workspace, not to the Sanity Content Lake dataset, which is considered "schemaless." That means that you can store any JSON documents in Content Lake, as long as it has a value for the `_type` property.
Primarily, configuring the schema is configuring the content types that an author can **create** and **edit** in the Studio. This is also where you shape how and what content you can query in applications.
## Planning schema types
In a production project, you should first consult with your wider team of designers, content creators, and others to work with them to design a content model that best represents your business and your goals.
> [!TIP]
> See [Implementing Sanity successfully](https://www.sanity.io/learn/course/implementing-sanity-successfully) for guidance on how to work with a team to set yourself up for success.
> [!TIP]
> Visually create and collaborate on Sanity Studio schema types with our [schema.club](https://schema.club) app.
In the following lessons, you'll be building the content model from the [Hello, Structured Content](https://www.sanity.io/learn/course/hello-structured-content) course. Configuring schema types to represent a live music production company.
> [!TIP]
> See [Content Modeling](https://www.sanity.io/learn/course/hello-structured-content/content-modeling-lesson) for a lesson in identifying content types in an organization.
## Create a new document type
Create and open a new file in your Studio’s `schemaTypes` folder called `eventType.ts`. Copy-paste the following code into it:
- [ ] **Create** your first document type: `event`.
```typescript:app/studio/schemaTypes/eventType.ts
import {defineField, defineType} from 'sanity'
export const eventType = defineType({
name: 'event',
title: 'Event',
type: 'document',
fields: [
defineField({
name: 'name',
type: 'string',
}),
],
})
```
> [!TIP]
> The `defineField` and `defineType` helper functions in the code above are not required, but they provide autocomplete suggestions and can catch errors in your configuration in code editors with TypeScript tooling.
Now you can import this document type into the `schemaTypes` array in the `index.ts` file in the same folder.
- [ ] **Update** the Studio schema to include the Event type
```typescript:apps/studio/schemaTypes/index.ts
import {eventType} from './eventType'
export const schemaTypes = [eventType]
```
When you save these two files, your Studio should automatically reload and show your first document type. You can and should create a new "event" document.

When you add content in the **Name** field, all your changes are automatically synced to your project's dataset in the Content Lake.
Now, let's add some more document types with fields in them. Same procedure as with the event type: add new files, copy-paste the code into them, and import and add them to the `schemaType` array in `index.ts`.
- [ ] **Create** new document types for **Artist **and **Venue**.
```typescript:apps/studio/schemaTypes/artistType.ts
import {defineField, defineType} from 'sanity'
export const artistType = defineType({
name: 'artist',
title: 'Artist',
type: 'document',
fields: [
defineField({
name: 'name',
type: 'string',
}),
defineField({
name: 'description',
type: 'text',
}),
defineField({
name: 'photo',
type: 'image',
}),
],
})
```
```typescript:apps/studio/schemaTypes/venueType.ts
import {defineField, defineType} from 'sanity'
export const venueType = defineType({
name: 'venue',
title: 'Venue',
type: 'document',
fields: [
defineField({
name: 'name',
type: 'string',
}),
defineField({
name: 'city',
type: 'string',
}),
defineField({
name: 'country',
type: 'string',
}),
],
})
```
Notice how all these document types use **singular** names and titles. This is because the singular form makes sense in most contexts where these values are used. Later in this course, you will learn how to customize document lists to use plural names.
- [ ] **Update** the array of schema types with the new document types
```typescript:apps/studio/schemaTypes/index.ts
import {eventType} from './eventType'
import {artistType} from './artistType'
import {venueType} from './venueType'
export const schemaTypes = [artistType, eventType, venueType]
```
Before we go further, confirm in your Sanity Studio that you can create new Artist, Event and Venue type documents.

## Adding familiar field types
Sanity Studio has the field types you'd expect for storing content in a JSON format. For example `string`, `number`, `boolean`, `array`, `object`, and more.
In a typical project, the document types you create and the fields you add within them should be informed by conversations you've had with designers and content creators.
> [!TIP]
> Using the Sanity schema docs as a guide, complete the fields we need for our project. See: [Schemas and Forms](https://www.sanity.io/learn/studio/schemas-and-forms).
Add the following fields to your `event` schema type. You will extend the configuration later to make their purpose clearer:
- [ ] `slug`: a `slug` type field
- [ ] `eventType`: a `string` type field
- [ ] `date`: a `datetime` type field
- [ ] `doorsOpen`: a `number` type field
- [ ] `venue`: a `reference` type field to the `venue` document type
- [ ] `headline`: a `reference` type field to the `artist` document type
- [ ] `image`: an `image` type field
- [ ] `details`: an `array` of `block` type fields
- [ ] `tickets`: a `url` field
Once complete, your `eventType` file should look like this:
```typescript:apps/studio/schemaTypes/eventType.ts
import {defineField, defineType} from 'sanity'
export const eventType = defineType({
name: 'event',
title: 'Event',
type: 'document',
fields: [
defineField({
name: 'name',
type: 'string',
}),
defineField({
name: 'slug',
type: 'slug',
}),
defineField({
name: 'eventType',
type: 'string',
}),
defineField({
name: 'date',
type: 'datetime',
}),
defineField({
name: 'doorsOpen',
type: 'number',
}),
defineField({
name: 'venue',
type: 'reference',
to: [{type: 'venue'}],
}),
defineField({
name: 'headline',
type: 'reference',
to: [{type: 'artist'}],
}),
defineField({
name: 'image',
type: 'image',
}),
defineField({
name: 'details',
type: 'array',
of: [{type: 'block'}],
}),
defineField({
name: 'tickets',
type: 'url',
}),
],
})
```
You can now compose and publish documents with multiple fields of varying data types, including a "reference" field that can relate one document with another.
You could deploy this to content creators in its current state. It’s a fully-functioning content management system!
### The `details` field as “block content”
You might notice that the `details` field appears as a block content (or "rich text") editor in the Studio. Any `array` type field that includes a `block` type will automatically change the UI for the field to this editor.
This is how Sanity Studio is designed for authoring and storing block content. Instead of saving block content and rich text in formats like Markdown or HTML as a string, Sanity Studio stores it in the open-source specification called [Portable Text](https://portabletext.org). This unlocks powerful querying and filtering capabilities in your projects and makes integrating across most platforms and frameworks easier.
## Import some content
In the following lessons you'll query and render content from this dataset. You could painstakingly hand-craft individual documents in Sanity Studio.
Or you can import this test dataset using Sanity CLI.
- [ ] Download the seed data dataset and place `production.tar.gz` at the root of your Studio directory
- [ ] Run the following to import the archive into your project's `production` dataset
```sh
# inside /apps/studio
pnpm dlx sanity@latest dataset import production.tar.gz --dataset production
```
Generate a token at [sanity.io/manage](https://www.sanity.io/manage) under API → Tokens, or set the `SANITY_IMPORT_TOKEN` environment variable to avoid passing it inline.
A successful import will give you a bunch of artists, venues, and events in the past and future between 2010–2030.
Reminder: All the documents have now been written to the Content Lake, and you are browsing them in your locally configured Sanity Studio.
Your multiplayer, real-time dashboard for authoring content is presently stuck on your computer. Time to share it with the world, and your authors, in the next lesson.
---
## Lesson 5: Deploying your Studio
https://www.sanity.io/learn/course/day-one-with-sanity-studio/deploying-your-studio
Get your content authoring dashboard into the hands of others with a single terminal command.
> [Video: Deploying your Studio](https://www.sanity.io/learn/course/day-one-with-sanity-studio/deploying-your-studio)
Your Sanity Studio is locally configured, though it writes to Sanity's hosted Content Lake. As you continue to build your Studio you'll want to put it into the hands of your content authors.
You don't have to deploy the Studio to Sanity's hosting, but it is increasingly beneficial to, so this is the recommended home for your Sanity Studio.
- [ ] **Run** the following command to deploy your Studio
```sh
# inside apps/studio/
pnpm run deploy
```
You will need to create a unique hostname for your Studio. Once the deployment is complete you can visit and share your `sanity.studio` URL.
The `sanity deploy` command will not only build and deploy your Studio to our hosting, but also deploys an up to date version of your schema types in a way that other parts of the Content Operating System will use. Features such as AI Agent Actions.
## Alternative hosting
As a React SPA, Sanity Studio can be hosted in a number of ways.
### Self-hosted
As an SPA you could deploy the Sanity Studio application to almost any hosting provider (such as Vercel or Netlify) and add a CORS origin to the project in Manage.
This can be beneficial for creating "preview builds" of Sanity Studio before deploying configuration changes.
### Embedded
As a React component, Sanity Studio can be imported from the `sanity` package and rendered at a route (such as `/studio`) in your full stack application (such as Next.js or Astro)
The drawback to embedded studios is a slower development environment and not being able to use the auto updating feature.
For both alternatives you will need to manually configure other deployment features such as hosted schemas—or need to run `sanity deploy` as part of your build process.
### Recommendation
With all this considered, `sanity deploy` is the preferred method to get the best experience with all of Sanity's features.
## Automation
In a production project you will likely want to automate the deployment process. For details on how to structure a Sanity project for maximum efficiency we have a separate course of lessons.
> [!TIP]
> See the [Architecture & DevOps](https://www.sanity.io/learn/course/architecture-and-devops) course for more
## Next steps
You have now initialized, lightly configured and deployed your Sanity Studio. But there is so much of the configuration you have not yet interacted with and even a small amount of additional effort will greatly improve the editorial experience.
If you have the time, it is recommended you move onto the [Studio excellence](https://www.sanity.io/learn/course/studio-excellence) course next, before returning to complete the rest of this course. The following lessons in this course will assume you have completed it.
> [!TIP]
> Begin the [Studio excellence](https://www.sanity.io/learn/course/studio-excellence) course
Otherwise if you're racing to the finish, let's move onto the next lesson and look at getting your content out of Sanity and into the world.
---
## Lesson 6: Studio excellence
https://www.sanity.io/learn/course/day-one-with-sanity-studio/studio-excellence
Go beyond the default configuration. Learn what separates an average Sanity Studio from a fully-configured, content creation powerhouse that authors will love.
---
## Lesson 7: Just enough GROQ
https://www.sanity.io/learn/course/day-one-with-sanity-studio/a-taste-of-groq
You can think of GROQ as "SQL for JSON," a simple but flexible way to query anything in your dataset and reshape the response.
> [Video: Just enough GROQ](https://www.sanity.io/learn/course/day-one-with-sanity-studio/a-taste-of-groq)
While Sanity also has a GraphQL API, most choose to query their Sanity content using GROQ.
While you can think of GraphQL as a replacement for RESTful APIs, GROQ is more like SQL for JSON. In other words, you can do way more with it.
GROQ is also used for configuring parts of the Studio configuration API and project-level features like Functions, and user access control.
> [!TIP]
> Learn more about [GROQ and GraphQL](https://www.sanity.io/learn/content-lake/what-about-graphql) in the documentation
## Vision: The GROQ playground
The Vision tool lets you run queries against your project's dataset(s) from Sanity Studio. It comes preinstalled with new studios. In the Studio's toolbar, next to Structure, select **Vision**.

### Querying with GROQ
To start with, you can view the most common type of GROQ expression in three parts:
```groq
*[_type == "event"]{ name }
```
- `*`: Represents **all documents** in a dataset as an array
- `[_type == "event"]` represents a **filter **where you narrow down those documents
- `{ name }` represents a **projection** where you define which **attribute** in those matching documents you want the query to return
```groq
* // "all documents"
[_type == "event"] // "filter"
{ name } // "projection"
```
> [!TIP]
> See [Query Language (GROQ)](https://www.sanity.io/learn/groq) in the documentation
- [ ] In Vision, write your first GROQ query for all documents:
```groq
*
```
The `*` indicates you want to return every document in the target dataset, which will be returned in an array.
You can add a set of `[]` square brackets with a logical expression in them – called a filter – to return only a subset of the documents within it.
- [ ] Filter the array to just our "event" documents:
```groq
*[_type == "event"]
```
You can stack filters for even more granular results and, to a small extent, faster responses.
Perhaps you only want to return event documents that are marked as in-person. Yes, you can filter on *any* key and value that your documents might have.
- [ ] Write a query just for in-person events
```groq
*[
_type == "event"
&& eventType == "in-person"
]
```
You could use the `now()` function here to only return upcoming in-person events
- [ ] Write a query just for upcoming in-person events
```groq
*[
_type == "event"
&& eventType == "in-person"
&& date > now()
]
```
> [!TIP]
> See the documentation about [GROQ Functions Reference](https://www.sanity.io/learn/specifications/groq-functions)
Currently, every field in every returned document is being returned. This is more data than we need! Over-fetching can lead to slower queries and makes it less clear to others which attributes your application depends on.
Add a **projection** `{}` after the array filter so that for every item in the array, only certain **attributes** are returned.
- [ ] Add a projection to return only the event name and the artist name
```groq
*[
_type == "event"
&& eventType == "in-person"
&& date > now()
]{
name,
headline->{
name
},
"isUpcoming": true
}
```
In this projection, you are doing the following:
- Returning the event's `name` as-is
- Using the `->` to join the referenced artist document for `headline` and return just the `name` of that artist (try removing the arrow and the projection after to see the difference in the returned data)
- Defining some arbitrary data for `isUpcoming` (which is implied by the filter), demonstrating the flexibility of GROQ by creating and returning new content in the context of a query.
This is just the beginning, but it's enough for us to query Sanity content and render it in an application.
> [!TIP]
> See [Query Cheat Sheet - GROQ](https://www.sanity.io/learn/content-lake/query-cheat-sheet) for more GROQ examples
## Next steps
You now know enough GROQ to get work done, but you could go much deeper. You might like to jump out of this course for now and complete [Between GROQ and a hard place](https://www.sanity.io/learn/course/between-groq-and-a-hard-place).
> [!TIP]
> Take the [Between GROQ and a hard place](https://www.sanity.io/learn/course/between-groq-and-a-hard-place) course
Otherwise if you're still racing to the finish, let's keep going onto the next lesson.
---
## Lesson 8: Between GROQ and a hard place
https://www.sanity.io/learn/course/day-one-with-sanity-studio/between-groq-and-a-hard-place
Go beyond writing data queries – filter, add functions, reshape and transform the responses. Get familiar with GROQ, the query language for Sanity data, webhooks and roles.
---
## Lesson 9: Prepare your monorepo
https://www.sanity.io/learn/course/day-one-with-sanity-studio/prepare-your-monorepo
Setup a PNPM workspace to more efficiently move through the rest of this course while developing multiple applications.
> [Video: Prepare your monorepo](https://www.sanity.io/learn/course/day-one-with-sanity-studio/prepare-your-monorepo)
Sanity is much more than a CMS, and Sanity Studio is just one part of the Content Operating System. Before creating more Sanity-driven applications, let's configure your project files in a way that will better suit the rest of the course material.
Putting multiple applications into a "monorepo" is a popular way of colocating separate-but-related applications.
Configuring a PNPM workspace is a popular standard for monorepos and allows you to install dependencies or start development servers across a number of applications with a single command.
> [!TIP]
> Read more about [PNPM workspaces in their documentation](https://pnpm.io/workspaces).
## Create config files
The following files are the minimum you need to create a PNPM workspace.
- [ ] **Create** a `package.json` file at the root of the project
```json:package.json
{
"name": "day-one-content-operations",
"private": true,
"version": "1.0.0",
"description": "Day One Content Operations",
"scripts": {
"dev": "pnpm run --parallel dev",
"build": "pnpm run --parallel build"
},
"engines": {
"node": ">=20.0.0",
"pnpm": ">=10.0.0"
}
}
```
- [ ] **Create** a `pnpm-workspace.yaml` file at the root of the project
```yaml:pnpm-workspace.yaml
packages:
- "apps/*"
```
- [ ] **Create** a `README.md` file at the root of the project
```markdown:README.md
# Day One Content Operations
Applications developed while following lessons on sanity.io/learn
```
- [ ] **Create** a `.gitignore` file at the root of the project
```:.gitignore
node_modules
```
You can now run the following command from the root (`day-one`) directory to install dependencies across multiple applications:
```sh
# in the root directory
pnpm install
```
Or run the following to concurrently run the development servers for all your applications:
```sh
# in the root directory
pnpm run dev
```
You only have one application now, but you will create a second one in the next lesson.
## Reset git
While this course will not teach you how to use git, it is expected that you would check this project into a repository and push changes as you work through stages.
> [!TIP]
> If you're entirely new to Git, Epic Web has a [free Git Fundamentals tutorial](https://www.epicweb.dev/tutorials/git-fundamentals), which will get you up to speed with the basics.
When the Sanity CLI created the `apps/studio` directory it had git already initialized. But you'll want to version control all files in this monorepo from the root.
Without the following steps the `apps/studio` directory would be a "git submodule" and this is a world of complexity and pain for which neither you or I have the appetite for.
- [ ] **Run** the following command to remove the `.git` directory from the `apps/studio` directory
```sh
# from the "day-one" directory
rm -rf apps/studio/.git
```
- [ ] **Run** the following command to initialize git at the root
```sh
git init
```
You should now link your local directory to a remote repository using the provider (GitHub, BitBucket, etc) of your choice.
In the following lessons this course assumes you'll also be a good developer citizen and work in branches, not just force-push all your work to main.
The foundation is set, let's add our second app to this monorepo in the following lesson.
---
## Lesson 10: Display content in Next.js
https://www.sanity.io/learn/course/day-one-with-sanity-studio/bringing-content-to-a-next-js-front-end
You've now crafted a content creation experience and learned how to query from the Content Lake. All that's left to do is distribute that content to the world.
> [Video: Display content in Next.js](https://www.sanity.io/learn/course/day-one-with-sanity-studio/bringing-content-to-a-next-js-front-end)
In this lesson, you'll create a new Next.js application and query for Sanity content. Next.js is a React framework for building full-stack web applications. You'll use it in this lesson because of how simply you can get started but the concepts here could work with any framework or front end library.
> [!TIP]
> Prefer alternatives to Next.js? [See "clean starter" templates](https://www.sanity.io/templates) available for Astro, React Router and more
## Install a new Next.js application
The command below installs a predefined bare bones template with some sensible defaults, and Tailwind CSS is installed.
- [ ] **Run** the following command at the root `day-one` directory to create a new Next.js application.
```sh
# in the root /day-one directory
pnpm dlx create-next-app@latest apps/web --tailwind --ts --app --src-dir --eslint --import-alias "@/*" --turbopack --use-pnpm
cd apps/web
```
The included flags set some opinionated defaults—such as Tailwind CSS, TypeScript, and eslint—so that you don't have to decide.
You should now have your Sanity Studio and Next.js app in two separate, adjacent folders:
```
day-one/
└── apps/
├── studio/ -> Sanity Studio
└── web/ -> Next.js app
```
### Sanity dependencies
- [ ] **Run** the following command to install Sanity dependencies inside the `apps/web` directory
```sh
# inside the apps/web directory
pnpm install next-sanity
```
- [`next-sanity`](https://github.com/sanity-io/next-sanity) is a collection of utilities specifically tuned for Next.js when integrating with Sanity
- [`@portabletext/react`](https://github.com/portabletext/react-portabletext#readme) (installed as part of `next-sanity`) is a React Component for rendering Portable Text with default components and the option to extend them for your own block content.
This lesson has a deliberately narrow focus to query and render Sanity content in a front-end.
For projects going into production, there are more factors to consider such as caching, revalidation, visual editing, SEO and more. As well as extra editing affordances such as "page building".
> [!TIP]
> Consider taking the [Work-ready Next.js](https://www.sanity.io/learn/track/work-ready-next-js) track of courses to explore in more detail.
> [!TIP]
> The [`next-sanity` documentation](https://github.com/sanity-io/next-sanity?tab=readme-ov-file#next-sanity) contains more details for preparing Sanity and Next.js for production.
- [ ] **Run** the following to start the development server for both your Studio and Next.js apps
```sh
pnpm run dev
```
- [ ] Open [http://localhost:3000](http://localhost:3000) in your browser
You should now see the default page for new Next.js applications, just like this:

## Fetching Sanity content
To fetch content from Sanity, you'll need a configured Sanity Client. In the code snippet below, you'll need to modify the `projectId` value to the one in your Studio's `sanity.config.ts`
- [ ] **Create** a new file for the Sanity Client with your `projectId`
```typescript:apps/web/src/sanity/client.ts
import { createClient } from "next-sanity";
export const client = createClient({
projectId: "REPLACE_WITH_YOUR_PROJECT_ID",
dataset: "production",
apiVersion: "2025-07-09",
useCdn: false,
});
```
> [!NOTE]
> In a production project, sharing values such as your Project ID across configuration files in a monorepo is better done with either a global environment variable or a `/packages` directory in your workspace.
Sanity Client is a convenient way to interact with almost all of Sanity's APIs, such as fetching for content. In many frameworks, Sanity Client is all you'd use. In Next.js it's simple to do much better than a simple fetch.
Instead of only making fetches as a page is requested, let's make the application ["Live by Default"](https://www.sanity.io/live) with a little extra configuration.
- [ ] **Create** a new file to create live fetching utilities
```typescript:apps/web/src/sanity/live.ts
import { defineLive } from "next-sanity/live";
import { client } from "@/sanity/client";
export const { sanityFetch, SanityLive } = defineLive({
client
});
```
> [!WARNING]
> Next.js uses a "path alias" to import files from the `/src` directory using `@/` as shorthand. So you're importing `client` from `src/sanity/client.ts` in the example above. Not to be confused with the package `@sanity/client`!
- [ ] **Update** the root layout to include the `SanityLive` component
```tsx:src/app/layout.tsx
import { SanityLive } from "@/sanity/live";
import "./globals.css";
export default function RootLayout({
children,
}: Readonly<{
children: React.ReactNode;
}>) {
return (
{children}
);
}
```
### Create the home page
Next.js uses React Server Components, typically used as routes, for loading and displaying data. This home page is the root index route with the filename `page.tsx`.
It's currently showing static content; let's replace that with content fetched from your Sanity project.
Notice the GROQ query looking for all event-type documents that have a slug.
> [!TIP]
> [Learn more about data fetching with Next.js and React Server Components](https://nextjs.org/learn/dashboard-app/fetching-data)
- [ ] **Update** the home page route file
```tsx:apps/web/src/app/page.tsx
import Link from "next/link";
import { defineQuery } from "next-sanity";
import { sanityFetch } from "@/sanity/live";
const EVENTS_QUERY = defineQuery(`*[
_type == "event"
&& defined(slug.current)
&& date > now()
]|order(date asc){_id, name, slug, date}`);
export default async function IndexPage() {
const { data: events } = await sanityFetch({ query: EVENTS_QUERY });
return (
Events
{events.map((event) => (
{event?.name}
{event?.date && (
{new Date(event.date).toLocaleDateString()}
)}
))}
);
}
```
Your home page should now look mostly the same but with published documents from your Studio.

### Create individual event pages
Create another route to display each individual event. The query on this page will look for any event with a matching slug from the one used to load the page.
- [ ] **Create** a route for individual event pages by adding a folder named `events` with another folder named `[slug]` within it
- [ ] Create a new file in the `[slug]` folder named `page.tsx`
```tsx:src/app/events/[slug]/page.tsx
import { defineQuery, PortableText } from "next-sanity";
import Link from "next/link";
import { notFound } from "next/navigation";
import { sanityFetch } from "@/sanity/live";
const EVENT_QUERY = defineQuery(`*[
_type == "event" &&
slug.current == $slug
][0]{
...,
"date": coalesce(date, now()),
"doorsOpen": coalesce(doorsOpen, 0),
headline->,
venue->
}`);
export default async function EventPage({
params,
}: {
params: Promise<{ slug: string }>;
}) {
const { data: event } = await sanityFetch({
query: EVENT_QUERY,
params: await params,
});
if (!event) {
notFound();
}
const {
name,
date,
headline,
details,
eventType,
doorsOpen,
venue,
tickets,
} = event;
const eventDate = new Date(date).toDateString();
const eventTime = new Date(date).toLocaleTimeString();
const doorsOpenTime = new Date(
new Date(date).getTime() - doorsOpen * 60000
).toLocaleTimeString();
const imageUrl = "https://placehold.co/550x310/png";
return (
);
}
```
A few things of note in the code example above:
- The brackets in the `[slug]` folder name tell Next.js that it should make this part of the URL (`localhost:3000/events/**the-event-slug**`) dynamic, that is, available inside of the `params` property for the page template function. We can then use this information to query the correct document from Sanity (`$slug`).
- Some deeply nested items use [optional chaining](https://developer.mozilla.org/en-US/docs/Web/JavaScript/Reference/Operators/Optional_chaining) (`?.`) to only render an attribute if its parent exists. This is especially important when working with live preview where draft documents cannot be guaranteed to have values – even those you have required validation rules on.
You should now be able to view the list of Events on the home page, click any one, and be shown its full details.

Your app queries and renders text content, but the Content Lake stores assets such as media and images and Sanity's CDN includes image transformation to serve them in a performant way.
Let's set this up in the next lesson.
---
## Lesson 11: Rendering assets
https://www.sanity.io/learn/course/day-one-with-sanity-studio/rendering-assets
Sanity's powerful image asset CDN allows you to deliver images at the appropriate size by setting a few query parameters on a URL.
> [Video: Rendering assets](https://www.sanity.io/learn/course/day-one-with-sanity-studio/rendering-assets)
> [!TIP]
> Read [Presenting images](https://www.sanity.io/learn/apis-and-sdks/presenting-images) in the documentation for more details
To simplify the creation of image URLs, we also ship a number of helpful functions and methods in the `@sanity/image-url` package.
- [ ] **Run** the following to install `@sanity/image-url`
```sh
# in apps/web
pnpm add @sanity/image-url
```
## Configure image domains
Next.js includes an `Image` component for the performant rendering of images. Before you can use images from Sanity's CDN URL they'll need to be added to the Next.js configuration.
> [!TIP]
> Read more about the `Image` component [in the Next.js documentation](https://nextjs.org/docs/app/api-reference/components/image).
- [ ] **Update** `next.config.ts` to include the URLs of Sanity's CDN and a placeholder service.
```javascript:apps/web/next.config.ts
import type { NextConfig } from "next";
const nextConfig: NextConfig = {
images: {
remotePatterns: [
{ protocol: "https", hostname: "cdn.sanity.io" },
{ protocol: "https", hostname: "placehold.co" },
],
},
};
export default nextConfig;
```
## Building image URLs
Create a helper function that is specific to your project ID and dataset which takes information about an image asset in Sanity (such as its ID) and return a complete URL with settings such as quality and size.
- [ ] **Create** a new file to export a `urlFor` helper function
```typescript:apps/web/src/sanity/image.ts
import { createImageUrlBuilder, type SanityImageSource } from "@sanity/image-url";
import { client } from "./client";
const builder = createImageUrlBuilder(client);
export function urlFor(source: SanityImageSource) {
return builder.image(source);
}
```
You can now update the individual page route to use Image component from Next.js as well as this `urlFor` function to turn a Sanity image asset ID into a complete URL.
```tsx:apps/web/src/app/events/[slug]/page.tsx
import { defineQuery, PortableText } from "next-sanity";
import Link from "next/link";
import { notFound } from "next/navigation";
import Image from "next/image";
import { sanityFetch } from "@/sanity/live";
import { urlFor } from "@/sanity/image";
const EVENT_QUERY = defineQuery(`*[
_type == "event" &&
slug.current == $slug
][0]{
...,
"date": coalesce(date, now()),
"doorsOpen": coalesce(doorsOpen, 0),
headline->,
venue->
}`);
export default async function EventPage({
params,
}: {
params: Promise<{ slug: string }>;
}) {
const { data: event } = await sanityFetch({
query: EVENT_QUERY,
params: await params,
});
if (!event) {
notFound();
}
const {
name,
date,
headline,
details,
eventType,
doorsOpen,
venue,
tickets,
} = event;
const eventDate = new Date(date).toDateString();
const eventTime = new Date(date).toLocaleTimeString();
const doorsOpenTime = new Date(
new Date(date).getTime() - doorsOpen * 60000
).toLocaleTimeString();
const imageUrl = headline?.photo
? urlFor(headline.photo)
.height(310)
.width(550)
.quality(80)
.auto("format")
.url()
: "https://placehold.co/550x310/png";
return (
);
}
```
You can now open any event with a `headline` artist with a `photo` field, and see the image rendered at the appropriate size.

> [!NOTE]
> Set `hotspot: true` on the `image` field schema to enable crop and hotspot. When this data is passed into the same URL builder function it is added to the image URL parameters.
```typescript:apps/studio/schemaTypes/artistType.ts
defineField({
name: 'photo',
type: 'image',
options: { hotspot: true },
}),
```
You're now querying and rendering text and image content from Sanity into your Next.js application—but your code has some annoying red squiggly lines because of TypeScript. Let's fix that next.
---
## Lesson 12: Generating types
https://www.sanity.io/learn/course/day-one-with-sanity-studio/generating-types
Generate TypeScript types from your Sanity Studio schema and GROQ queries. Ensure robust, maintainable, and error-resistant code, with type-safe data fetching.
> [Video: Generating types](https://www.sanity.io/learn/course/day-one-with-sanity-studio/generating-types)
Thanks to [Sanity TypeGen](https://www.sanity.io/learn/apis-and-sdks/sanity-typegen), the schema types in your Studio and the response shape of your GROQ queries can be fully typed.
There's a few steps involved to make this happen:
1. **Export** the Studio schema configuration to a JSON file
2. **Configure** Sanity TypeGen to look through your application to look for GROQ queries that use the `defineQuery` helper function
3. **Generate** Types from both the schema export and GROQ queries
- [ ] **Run **the following in your `apps/studio` directory to extract the Studio schema
```sh
# in apps/studio
npx sanity schema extract
```
You should now have a `schema.json` file in the root of your `apps/studio` directory.
- [ ] **Add** typegen configuration to your existing `sanity.cli.ts` in the `apps/studio` directory to configure TypeGen to use the extracted schema and search the Next.js project for queries
```typescript:apps/studio/sanity.cli.ts
import {defineCliConfig} from 'sanity/cli'
export default defineCliConfig({
// ...your existing project config
typegen: {
path: '../web/src/**/*.{ts,tsx,js,jsx}',
schema: './schema.json',
generates: '../web/src/sanity/types.ts',
},
})
```
- [ ] **Run **the following in your `apps/studio` directory to generate Types
```sh
# in apps/studio
npx sanity typegen generate
```
In the terminal you should see a message similar to the following:
```sh
✅ Generated TypeScript types for 14 schema types and 2 GROQ queries in 2 files into: ../web/src/sanity/types.ts
```
And you should also have a new file `apps/web/src/sanity/types.ts` file inside your Next.js project.
## Automatic type inference
While you could now manually use Types throughout the Next.js application, Sanity Client supports "automatic type inference." That is, the response of a query should be automatically typed.
If you open `apps/web/src/sanity/types.ts` and scroll to the bottom, you will see something like the following
```typescript:apps/web/src/sanity/types.ts
// ...all schema types
// Query TypeMap
import "@sanity/client";
declare module "@sanity/client" {
interface SanityQueries {
'*[\n _type == "event" &&\n slug.current == $slug\n ][0]{\n ...,\n "date": coalesce(date, now()),\n "doorsOpen": coalesce(doorsOpen, 0),\n headline->,\n venue->\n}': EVENT_QUERYResult;
'*[\n _type == "event"\n && defined(slug.current)\n && date > now()\n]|order(date asc){_id, name, slug, date}': EVENTS_QUERYResult;
}
}
```
As you add more queries to your application and re-run TypeGen, this automatic mapping between queries and responses will be updated.
You may notice there are red squiggly lines beneath `@sanity/client`. Because these types extend that dependency, automatic type inference will not work until it is installed as a dependency.
- [ ] **Run** the following to install `@sanity/client`
```sh
# in apps/web
pnpm add @sanity/client -D
```
All the "redlines" from TypeScript in your route files should now be gone.
You should also see that the response from `sanityFetch` in the home and individual page routes are typed.

## Keeping types updated
Previously, you had to re-run schema extraction and type generation manually every time you changed your schema or queries. With Sanity v5, you can automate this.
Adding `enabled: true` to your typegen config means types will regenerate automatically when you run `sanity dev` or `sanity build`. No more manual re-running.
- [ ] **Update** your `sanity.cli.ts` to enable automatic type generation
```typescript:apps/studio/sanity.cli.ts
import {defineCliConfig} from 'sanity/cli'
export default defineCliConfig({
// ...your existing config
typegen: {
enabled: true,
path: '../web/src/**/*.{ts,tsx,js,jsx}',
schema: './schema.json',
generates: '../web/src/sanity/types.ts',
},
})
```
> [!NOTE]
> If you prefer to regenerate types on demand, both `schema extract` and `typegen generate` support a --watch flag for continuous regeneration.
- [ ] **Alternatively, run** the watch command for continuous type regeneration
```sh
# Watch for changes and regenerate types continuously
npx sanity typegen generate --watch
```
This will watch for file changes and regenerate types automatically whenever you save.
With either approach, your types will stay in sync with your schema and GROQ queries as you develop.
## What next?
You've now laid the groundwork for a Sanity Studio for your content backend and a Next.js front end with Types. This is a great start for most use cases!
As projects mature, parts of your foundation will likely need to change. This is where the next course, [Handling schema changes confidently](https://www.sanity.io/learn/course/handling-schema-changes-confidently), can help you update schema types and configuration without downtime.
If you have the time, complete that course next, otherwise let's move onward to building content applications.
---
## Lesson 13: Handling schema changes confidently
https://www.sanity.io/learn/course/day-one-with-sanity-studio/handling-schema-changes-confidently
Expertly navigate schema changes, validate datasets, and execute content migrations using tools like the Sanity CLI and GROQ queries.
---
## Lesson 14: Build a content application
https://www.sanity.io/learn/course/day-one-with-sanity-studio/create-a-content-application
Go beyond the customization and configuration of Sanity Studio and build something specific to your unique content operations.
> [Video: Build a content application](https://www.sanity.io/learn/course/day-one-with-sanity-studio/create-a-content-application)
Many teams will find Sanity Studio sufficient for most of their content operations. However, when teams become fragmented with unique needs or need to perform operations more specifically in bulk or integrated with other systems, reaching outside Sanity Studio and building your application may be best.
Fortunately, Sanity App SDK provides almost all of Sanity Studio's CMS-like behavior as a set of headless React hooks for data fetching and mutation.
This means you can build custom applications that live alongside your Sanity Studio in the "Dashboard."
## Initialize
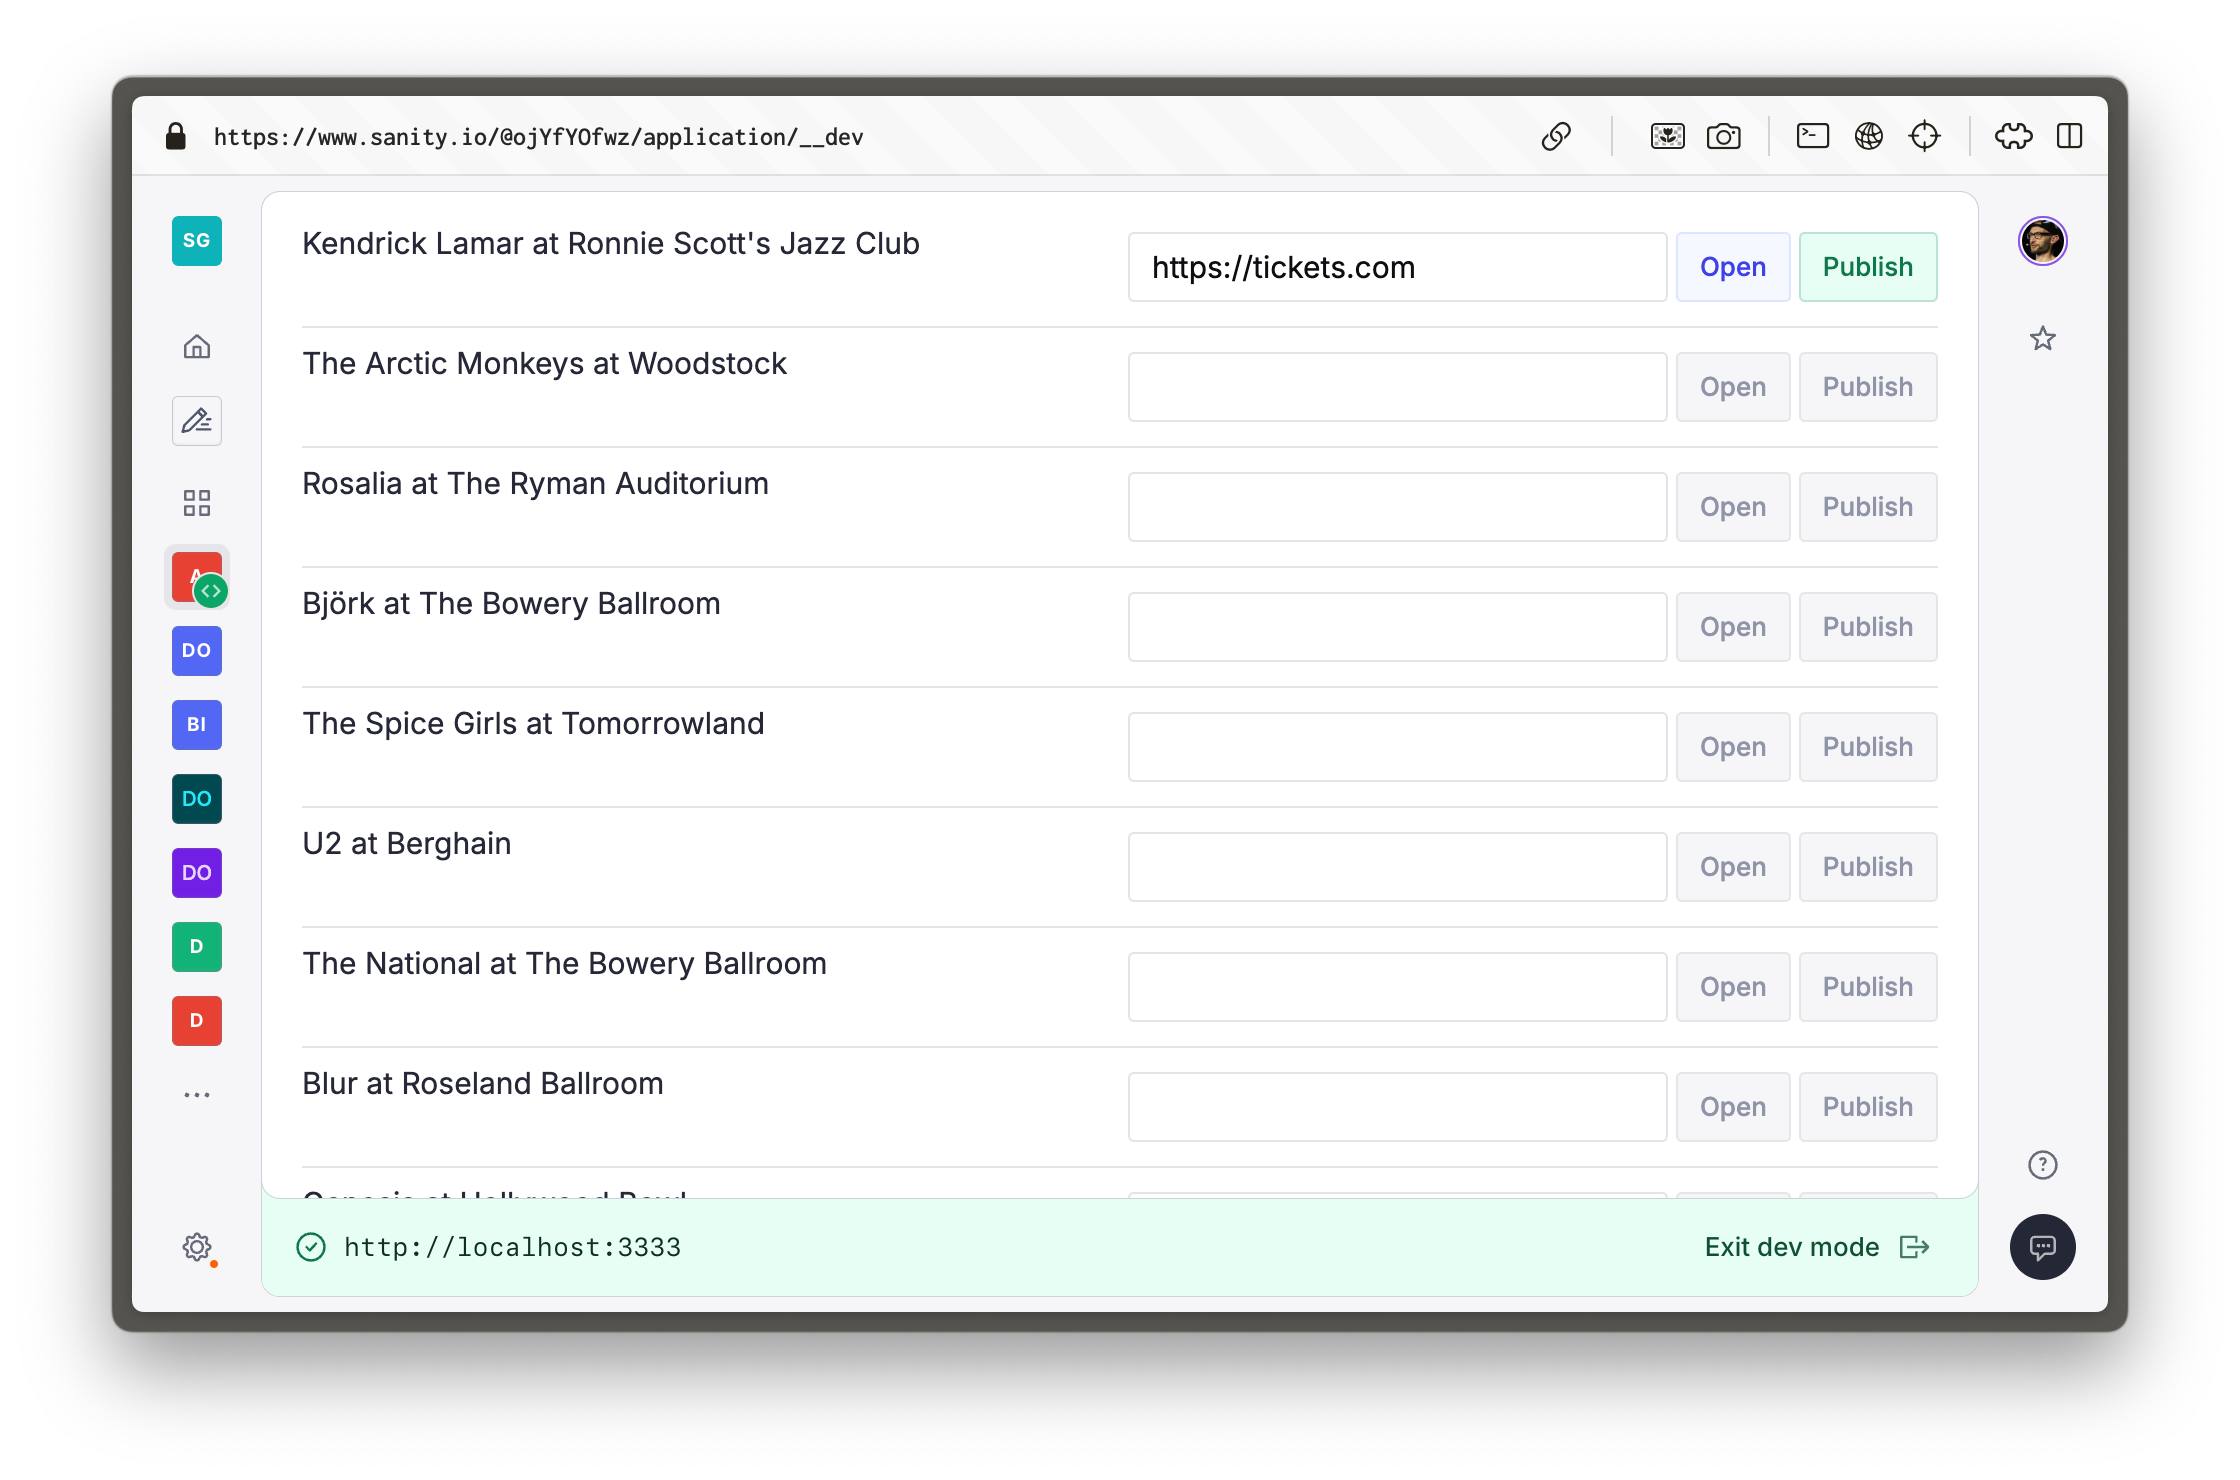
Let's build a (very simple) custom content application to list all events with a link to their ticket website—so authors can rapidly check, update and fix any incorrect URLs.
For this lesson you'll use the Sanity UI template, but as a headless data library you may use any front end library you prefer such as Tailwind, shadcn/ui, etc.
- [ ] **Run** the following command at the root `/day-one` directory to initialize a new App SDK app
```sh
# in /day-one
pnpm dlx sanity@latest init --template app-sanity-ui --typescript --output-path apps/tickets
```
You'll be prompted to select an Organization, choose the same one in which you created your Sanity project.
### Workspace arrangement
You should now have your Sanity Studio, Next.js app and App SDK app in three separate, adjacent folders.
```
day-one/
└── apps/
├── studio/ -> Sanity Studio
├── tickets/ -> Sanity App SDK app
└── web/ -> Next.js app
```
### Configuration
You'll notice in the terminal you're prompted to update the `App.tsx` file with the details of your Sanity project ID and dataset name.
- [ ] **Update **`App.tsx` by copying `projectId` and `dataset` from your `sanity.config.ts` file
```typescript:apps/tickets/src/App.tsx
const sanityConfigs: SanityConfig[] = [
{
projectId: 'REPLACE_WITH_YOUR_PROJECT_ID',
dataset: 'production',
},
];
```
## Running two apps
By default, SDK Apps use the same port number (`3333`) as the Studio. To run the Studio and your applications simultaneously, you can update `sanity.cli.ts` of either one.
Let's change the default port of the Studio.
- [ ] **Update** the Sanity CLI config of the Sanity Studio
```typescript:apps/studio/sanity.cli.ts
import {defineCliConfig} from 'sanity/cli'
export default defineCliConfig({
server: {
port: 3334,
},
// ...all other settings
})
```
Restart your Studio's development server, you'll get a new development URL.
Open the Studio in your browser and be asked to create a new CORS origin.
You can follow the instructions in the browser, or create a new origin using Sanity CLI with the following command run from inside your `studio` folder.
```sh:Terminal
# in apps/studio
pnpm dlx sanity@latest cors add http://localhost:3334 --allow
```
- [ ] **Run** the following inside the `apps/tickets` folder to start the app's development server.
```sh
# in apps/tickets
pnpm run dev
```
> [!WARNING]
> If you get an error about a mismatched Organization ID, you may have selected a different Organization to the one in which the project was created. Update `apps/tickets/sanity.cli.ts` to use the correct Organization ID.
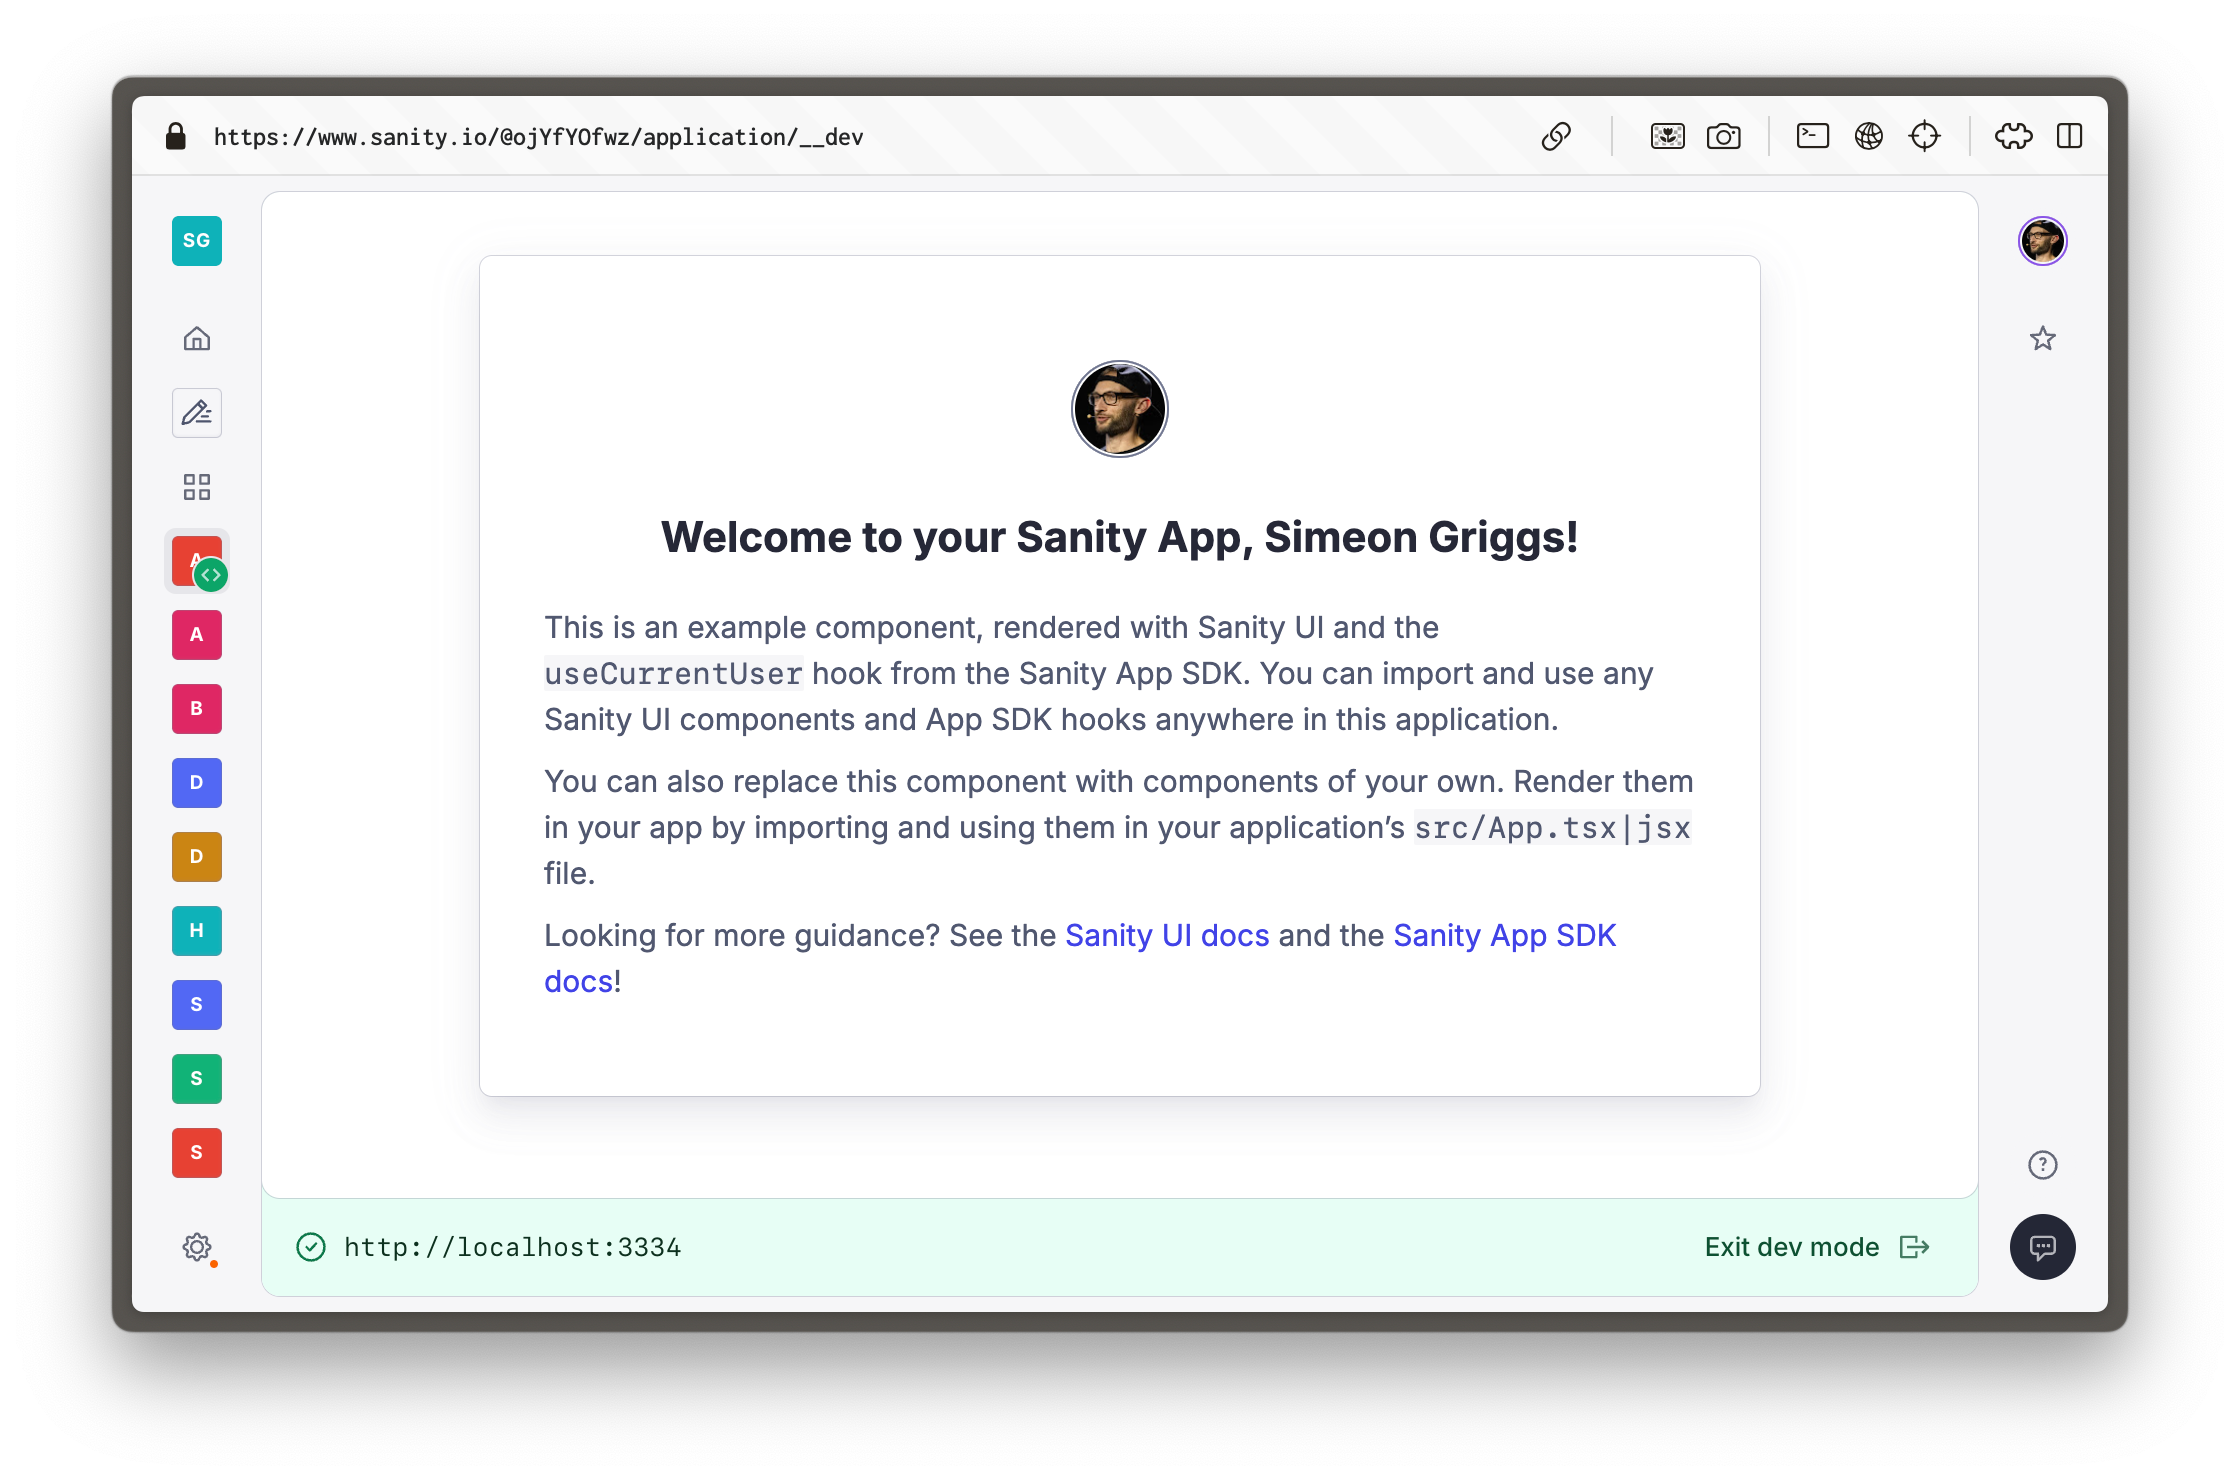
You'll see a URL in the terminal to open the App running from within the Sanity Dashboard.
Dashboard is the default "home screen" where authors can move between deployed Studios and other applications—such as the one you're building right now. The Dashboard also provides authentication to your app.
## Create components
Sanity App SDK for React is a collection of hooks which are implemented individually into components.
Create following component files to assemble the entire application.
> [!TIP]
> Sanity App SDK hooks use [Suspense](https://react.dev/reference/react/Suspense), if you are not familiar with this component you may like to read the React documentation.
- [ ] **Create** `Publish.tsx` to publish changes to documents when they are in a draft state.
```tsx:apps/tickets/src/Publish.tsx
import {
DocumentHandle,
publishDocument,
useApplyDocumentActions,
useDocument,
} from '@sanity/sdk-react'
import {Button} from '@sanity/ui'
export function Publish(props: DocumentHandle) {
const {data: _id} = useDocument({...props, path: '_id'})
const isDraft = _id?.startsWith('drafts.')
const apply = useApplyDocumentActions()
const publish = () => apply(publishDocument(props))
return (
)
}
```
Pay particular attention to `useApplyDocumentActions` in this component, this same hook can be used to duplicate, delete or revert changes to documents.
- [ ] **Create** `TicketURL.tsx` to update, validate and open the current ticket URL value in the document.
```tsx:apps/tickets/src/TicketURL.tsx
import {DocumentHandle} from '@sanity/sdk'
import {useDocument, useEditDocument} from '@sanity/sdk-react'
import {Box, Button, TextInput} from '@sanity/ui'
function isValidUrl(url: string) {
try {
new URL(url)
return true
} catch {
return false
}
}
export function TicketURL(props: DocumentHandle) {
const {data: value} = useDocument({
...props,
path: 'tickets',
})
const editTicketURL = useEditDocument({
...props,
path: 'tickets',
})
const isValid = isValidUrl(value || '')
return (
<>
editTicketURL(event.currentTarget.value)}
/>
)
}
```
This hook uses both `useDocument` and `useEditDocument` to optimistically track the value of a field as well as create a function to edit the value of the document at that path.
**Create** `Event.tsx` to query for the `name` of the value and render the previous components.
```tsx:apps/tickets/src/Event.tsx
import {Suspense} from 'react'
import {DocumentHandle} from '@sanity/sdk'
import {useDocumentProjection} from '@sanity/sdk-react'
import {Card, Flex, Grid, Text} from '@sanity/ui'
import {TicketURL} from './TicketURL'
import {Publish} from './Publish'
type EventProjection = {
name: string | null
tickets: string | null
}
export function Event(props: DocumentHandle) {
const {data: event} = useDocumentProjection({
...props,
projection: `{ name }`,
})
return (
{event?.name || 'Untitled'}
)
}
```
This component uses `useDocumentProjection` since the `name` field does not need optimistic updates in this App.
> [!WARNING]
> The configuration of `Suspense` in this app is sub-optimal (to keep code examples smaller) and will lead to layout shift. See [useNavigateToStudioDocument](https://www.sanity.io/learn/course/build-content-apps-with-sanity-app-sdk/use-navigate-to-studio-document) for ideas on how to achieve better implementation.
- [ ] **Create** `Events.tsx` to fetch for all `event` type documents and render an individual role for each one.
```tsx:apps/tickets/src/Events.tsx
import {useDocuments} from '@sanity/sdk-react'
import {Container, Stack, Text} from '@sanity/ui'
import {Suspense} from 'react'
import {Event} from './Event'
export function Events() {
const {data: events} = useDocuments({
documentType: 'event',
})
return (
{events?.map((event) => (
Loading...}>
))}
)
}
```
The `useDocuments` hook fetches documents of a particular type (which can be narrowed with an additional `filter` and returns an array of "document handles," which are passed down as props and used by many other Sanity App SDK for React hooks.
- [ ] **Update** `App.tsx` to include the `Events` component
```tsx:apps/tickets/src/App.tsx
// ...all other imports
import {Events} from './Events'
function App() {
// ...config, loading spinner
return (
}>
)
}
export default App
```
You should now see the complete application rendered in your Dashboard. Type a URL into any of the inputs, and once valid you will be able to publish the document or open the URL in a new window.
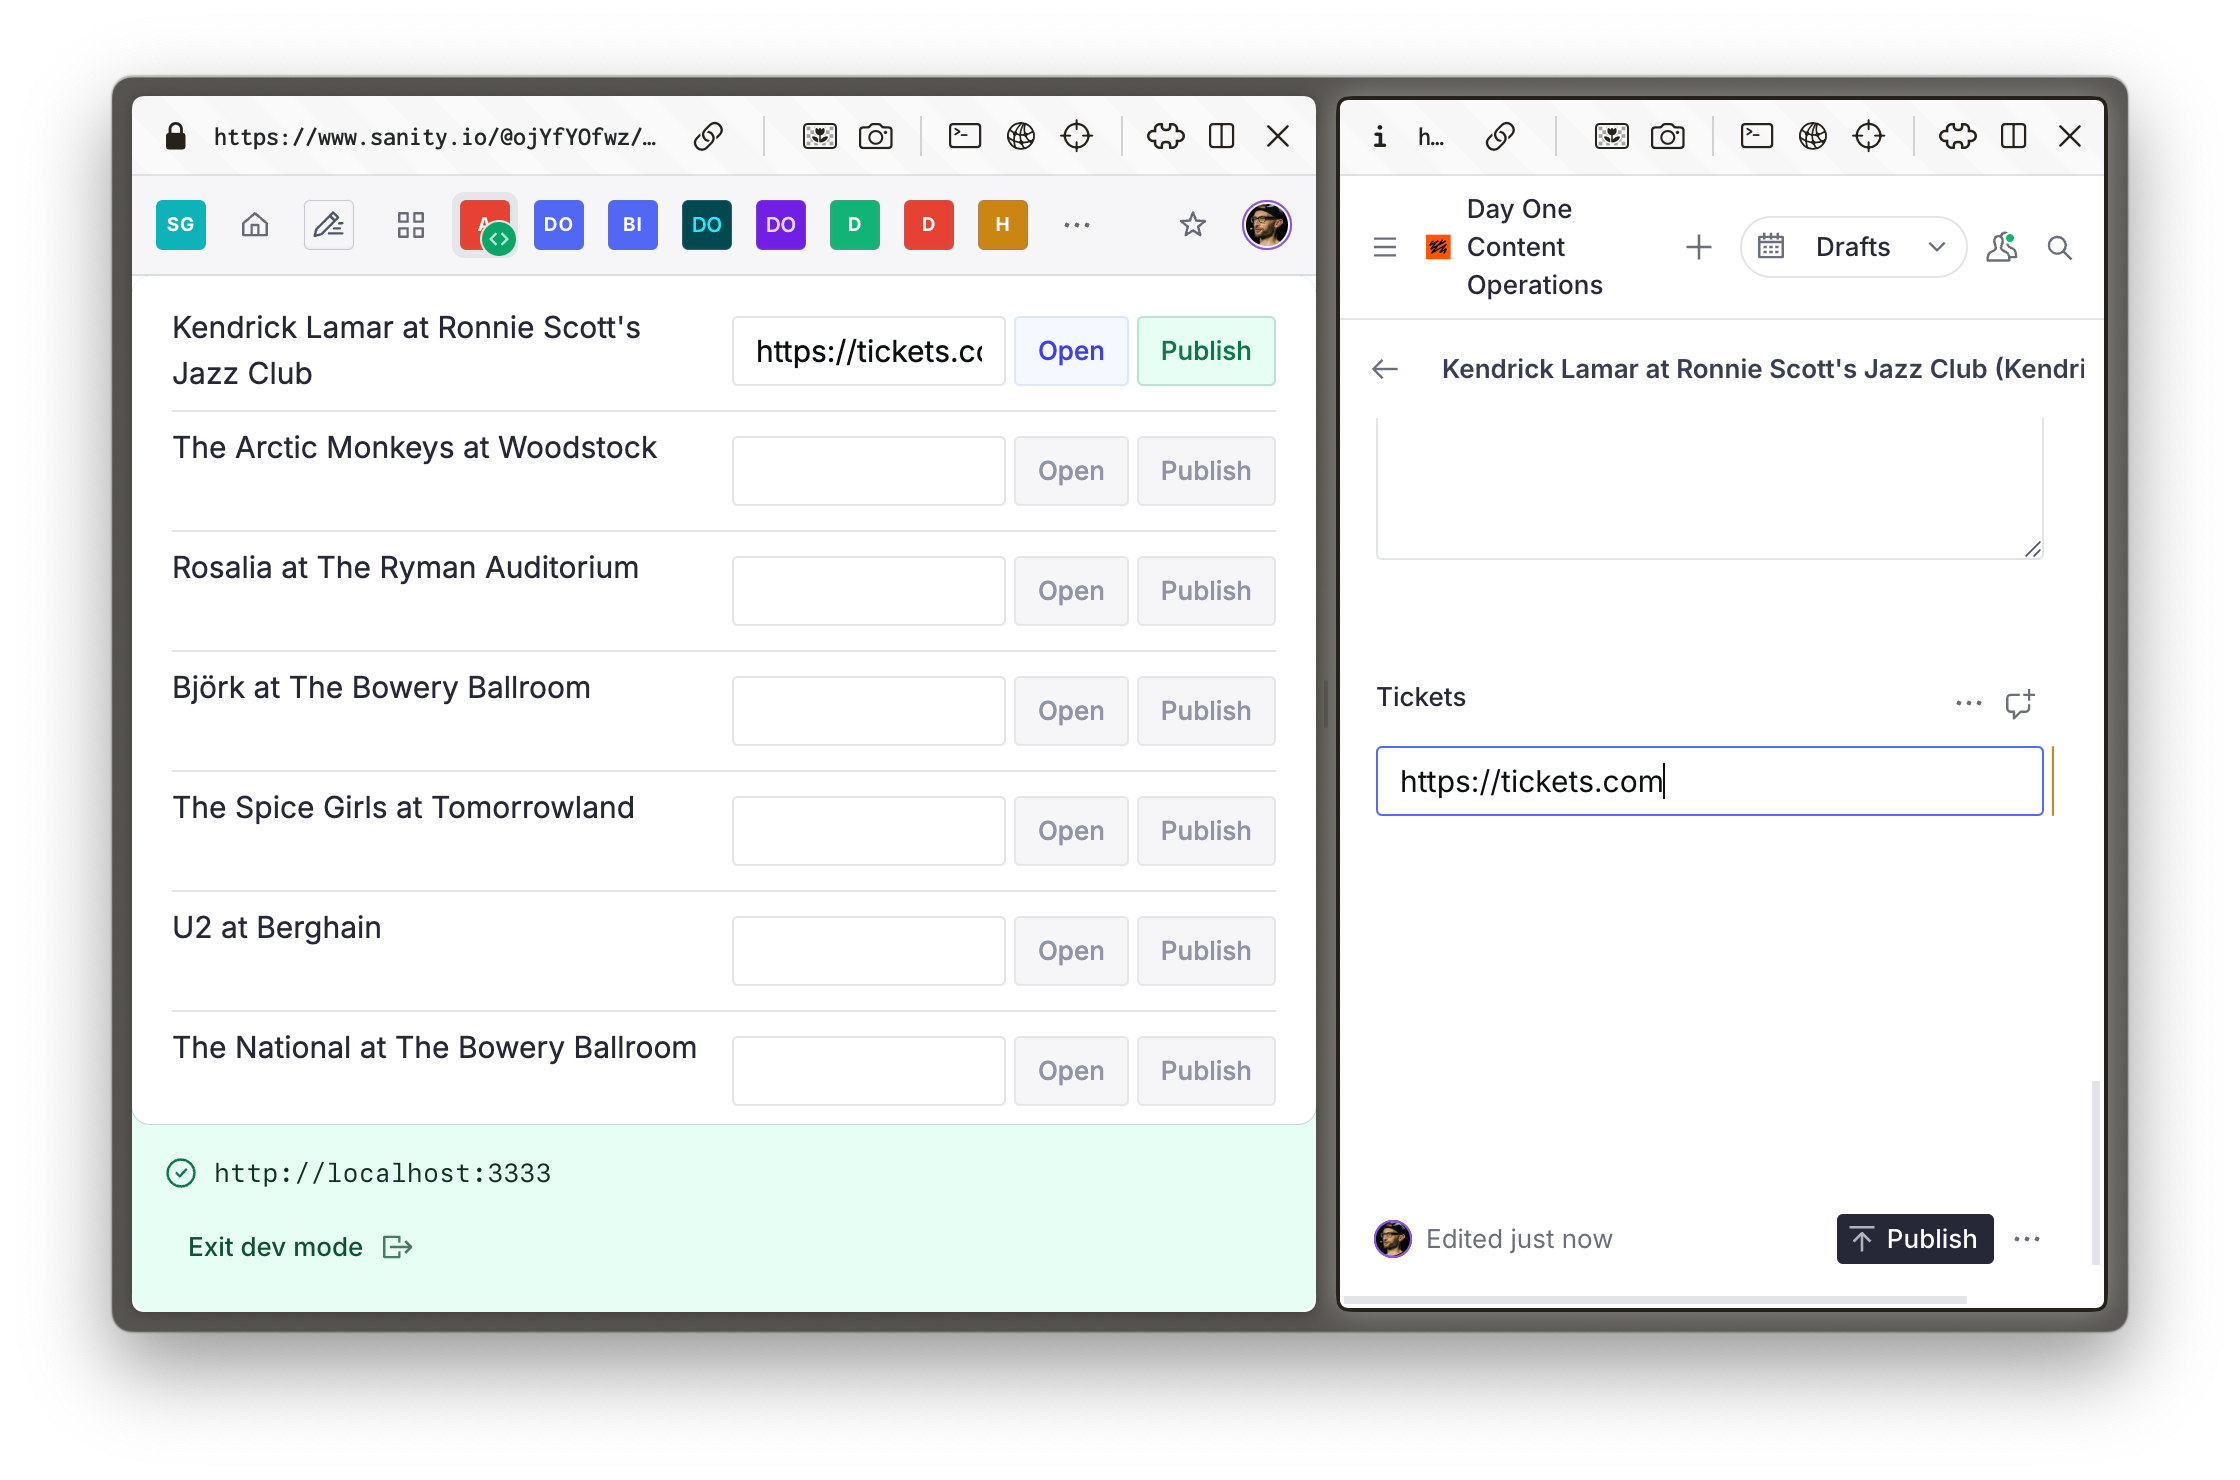
Notice how making edits to a published document immediately creates a new draft version. Or how if you have the app open in two tabs, both will update automatically. All this complexity is baked into the Sanity App SDK!
## Deploy
You can also deploy your app to the Dashboard the same way you'd deploy a Sanity Studio.
- [ ] **Run** the following to deploy your App
```sh
# in apps/tickets
pnpm dlx sanity deploy
```
Though basic, you've rapidly created a unique content editing experience. Imagine how far you could go with a little extra effort.
> [!NOTE]
> You may need to add an additional CORS origin for the remote URL of your SDK Application. You can do this in the Manage panel, open it by running `pnpm dlx sanity manage`
> [!TIP]
> Read [App SDK best practices](https://www.sanity.io/learn/app-sdk/sdk-best-practices) for more details on writing great Sanity App SDK apps.
> [!TIP]
> TypeGen support for App SDK is in beta, read the documentation for more: [App SDK and TypeGen](https://www.sanity.io/learn/app-sdk/sdk-typegen)
## Go deeper
A separate course is available to help you gain a deeper understanding of the Sanity App SDK. While it builds from a separate code-base, you will need to complete it in order to unlock the certification exam for this track.
> [!TIP]
> Take the [Build content apps with Sanity App SDK](https://www.sanity.io/learn/course/build-content-apps-with-sanity-app-sdk) course.
If you're staying on this course, so far we've been looking at in-browser experiences, but you can also make programmatic, reactive events automatic with Sanity Functions. Let's unpack that next.
---
## Lesson 15: Build content apps with Sanity App SDK
https://www.sanity.io/learn/course/day-one-with-sanity-studio/build-content-apps-with-sanity-app-sdk
Building fast, real-time content authoring applications has never been simpler. Create a feedback processing application with user assignment, AI analysis and more.
---
## Lesson 16: Automate anything with Functions
https://www.sanity.io/learn/course/day-one-with-sanity-studio/create-a-function
The content lifecycle goes beyond authoring in Sanity Studio or rendering on a web page. Automate everything that happens next with Sanity Functions.
> [Video: Automate anything with Functions](https://www.sanity.io/learn/course/day-one-with-sanity-studio/create-a-function)
> [!NOTE]
> Note: The video in this lesson shows functions and blueprints placed inside the apps/studio folder. The written instructions below follow the current official recommendation of placing them at the project root, one level above the studio. The outcome is the same — only the file paths differ.
There are many reasons that you may want some other action to take place after an author presses publish. For example, update a search index or invalidate a website cache.
Sanity has long had webhooks that have allowed you to automate a request to a serverless function to create "if this then that" functionality.
With the launch of Sanity Functions, we now provide our own compute layer, so you can define how your function works in code along with the rest of your Sanity project.
In this lesson you'll create a simple function to write the date and time a document was first published to a field on the document.
## Functions vs Document Actions
Sanity Studio contains the concept of "Document Actions," where you can configure alternative logic or buttons in the bottom right of the document viewer. To overwrite or augment the built-in Publish, Delete, Discard and other buttons.
Functions are triggered by mutations in the Dataset, therefore they will always run whenever a document is changed from any source. Document Actions in the Studio require an author to press a button in order to run logic.
Also consider that Document Actions run client-side where it is more difficult to perform long-running processes. And their logic must be bundled in the Studio code which makes secure logic that requires secrets more complicated.
> [!TIP]
> [Document actions](https://www.sanity.io/learn/studio/document-actions) can still be useful, you may read more about them in the documentation.
## Introducing Blueprints
Configuring and deploying Sanity Functions requires the creation of a Sanity Blueprint. A new configuration file which will eventually become the central source of truth for all your content operations.
For now it has the sole task of configuring Functions.
- [ ] **Run** the following command to create a new Blueprint file
```sh
# in day-one/
pnpm dlx sanity@latest blueprints init . --type ts --project-id
```
> [!NOTE]
> **The official recommendation** is to keep functions and blueprints a level above your Studio directory. In a monorepo like this one, that means placing them at the day-one/ root, not inside apps/studio/.
You should now have a `sanity.blueprint.ts` file at the root of your day-one/ project. An example function is commented out.
The previous command also added a new dependency `@sanity/blueprints` which needs to be installed. The function you'll write also requires `@sanity/client`.
- [ ] **Run** the following command to install required packages
```sh
# in day-one/
pnpm add @sanity/client @sanity/blueprints
```
> [!TIP]
> Read more about configuration options for [Functions](https://www.sanity.io/learn/functions/functions-introduction) in the documentation
## Create a function
Before updating the blueprint let's use the Sanity CLI to scaffold a new function.
- [ ] **Run** the following command to create a new Function
```sh
# in day-one/
pnpm dlx sanity@latest blueprints add function --name first-published --installer pnpm --fn-type document-publish
```
Double-check you have this folder and file structure for your project:
```
day-one/
├── apps/
│ ├── studio/ -> Sanity Studio
│ ├── tickets/ -> Sanity App SDK app
│ └── web/ -> Next.js app
├── functions/
│ └── first-published/ -> Sanity Function
│ └── index.ts
└── sanity.blueprint.ts -> Sanity Blueprint
```
### Update your blueprint
After the install completes you'll see instructions in the terminal to update your Blueprint file to include this function.
Without any further configuration, this function would be executed on every publish event for every document in every dataset—not ideal.
Let's add the function to the blueprint with an additional GROQ `filter` to limit executions to only `event` type documents which do not yet have a field named `firstPublished`.
- [ ] **Update** your `sanity.blueprint.ts` to include the function you just created, with a filter
```tsx:day-one/sanity.blueprint.ts
import {defineBlueprint, defineDocumentFunction} from '@sanity/blueprints'
export default defineBlueprint({
resources: [
defineDocumentFunction({
name: 'first-published',
event: {
includeAllVersions: true,
on: ['create', 'update'],
filter: '_type == "event" && !defined(firstPublished)',
},
}),
],
})
```
> [!WARNING]
> If your function writes changes to a document it is extremely important to configure your filter correctly. You don't want to deploy recursive functions!
> [!TIP]
> See [Create a Document Function](https://www.sanity.io/learn/functions/function-quickstart) for details on how to `destroy` functions
## Test a function
If you open the function that was scaffolded for you, you'll see all it does is log the current time to the console.
```typescript:day-one/functions/first-published/index.ts
import { documentEventHandler } from '@sanity/functions'
export const handler = documentEventHandler(async ({ context, event }) => {
const time = new Date().toLocaleTimeString()
console.log(`👋 Your Sanity Function was called at ${time}`)
})
```
- [ ] **Run** the following in your terminal to see the event handler
```sh
# in day-one/
pnpm dlx sanity@latest functions test first-published
```
Unsurprisingly, you should see a response something like this below:
```sh
Logs:
👋 Your Sanity Function was called at 1:49:48 PM
```
Excellent! If deployed, this function would write this log every time an `event` type document without a `firstPublished` field is published.
Not very useful. Let's make the function useful.
### Configuring Sanity Client
The `context` parameter in the event handler contains details on a project ID and dataset, and in production a token with permissions to write to documents.
The `event` parameter contains details about the document being published.
Combined you can use these details to create a Sanity Client instance and use it to update the document.
- [ ] **Update** the function to set a value on the document which called the function
```typescript:day-one/functions/first-published/index.ts
import {createClient} from '@sanity/client'
import {documentEventHandler} from '@sanity/functions'
export const handler = documentEventHandler(async ({context, event}) => {
try {
await createClient({
...context.clientOptions,
useCdn: false,
apiVersion: '2026-02-27',
})
.patch(event.data._id)
.setIfMissing({
firstPublished: new Date().toISOString(),
})
.commit({dryRun: context.local})
console.log(context.local ? 'Dry run:' : 'Updated:', `firstPublished set on ${event.data._id}`)
} catch (error) {
console.error(error)
}
})
```
> [!NOTE]
> This function can write to Content Lake, even if tested with a local document, because we're going to use a real document ID. For this reason we're protecting the `.commit()` method with the `dryRun` flag, so the mutation is only attempted locally, but will execute when deployed.
### Test with data
Your Sanity Function is invoked when a document is published and will receive that document as a parameter—`data`. This will be automatic in production, but needs to be manual in development.
> [!NOTE]
> Add a `projection` to your function configuration to limit or modify the data passed from a document to the function.
Fortunately you can feed a JSON file to a function locally. Even better, Sanity CLI makes it simple to download an existing document from your dataset.
If you used the seed data in [Local development](https://www.sanity.io/learn/course/day-one-with-sanity-studio/getting-started) the command below should work. Otherwise update the document ID to one in your dataset.
- [ ] **Run** the following command to download a document to a local JSON file
```sh
# in apps/studio
pnpm dlx sanity@latest documents get AUoLUkEDo6CVeRx5svBjGN > sample-document.json
```
- [ ] **Run** the following to test your function using the sample document
```sh
# in day-one/
pnpm dlx sanity@latest functions test first-published --file apps/studio/sample-document.json --with-user-token --dataset production
```
> [!WARNING]
> The `--with-user-token` argument is required to pass a `token` to the Sanity Client config to perform the mutation
You should receive confirmation that the document would have been modified, but only a "dry run" was performed.
```sh
Logs:
Dry run: firstPublished set on AUoLUkEDo6CVeRx5svBjGN
```
## Deploy a function
Now you've configured your function and tested it works, it's time to go live. Functions are deployed along with your blueprint.
- [ ] **Run** the following in your console to deploy your blueprint and its function
```sh
# in day-one/
pnpm dlx sanity@latest blueprints deploy
```
After a few moments you should receive confirmation that the blueprint has deployed.
```sh
Deployment completed!
```
### Inspecting logs
Open any `event` document in your Sanity Studio (whether in local development or the deployed Studio), make a small change and click publish.
You can now access the same logs you saw in local development in production.
- [ ] **Run** the following in the terminal to view logs for your `first-published` function
```sh
# in day-one/
pnpm dlx sanity@latest functions logs first-published
```
You should see something like this in your terminal, confirming the field was set.
```sh
7/2/2025 10:25:07 AM INFO Updated: firstPublished set on AUoLUkEDo6CVeRx5svBdUP
```
If you scroll to the bottom of that document in Sanity Studio you should also see this warning showing there's a value written to the document in Content Lake that is not yet present in your Sanity Studio schema.

A good reminder that your Sanity Studio is just a "versioned window" into the Content Lake!
### Update your schema
One last chore before you're finished, let's fix this warning by adding this field to `event` type documents.
- [ ] **Update** the `event` document schema to include a `firstPublished` field
```typescript:apps/studio/schemaTypes/eventType.ts
export const eventType = defineType({
// ...all other config
fields: [
// ...all other fields
defineField({
name: 'firstPublished',
description: 'Automatically set when first published',
type: 'datetime',
readOnly: true,
})
],
})
```
- [ ] **Run** the following from the terminal to redeploy your Sanity Studio
```sh
pnpm dlx sanity@latest deploy
```
## Functions inspiration
Sanity Exchange contains many ready-made Functions "Recipes" which you can add to your project.
> [!TIP]
> See [Functions Recipes](https://www.sanity.io/schemas) on Sanity Exchange
> [!TIP]
> Explore `/examples` in the [Sanity repo on GitHub](https://github.com/sanity-io/sanity/tree/main/examples)
Programmatic mutations are cool, but with access to built-in AI tooling we can perform truly dynamic actions. Let's look at AI Agent Actions next.
---
## Lesson 17: Agent Actions
https://www.sanity.io/learn/course/day-one-with-sanity-studio/ai-agent-actions
Explore batteries-included schema-aware AI with Agent Actions to create, modify and translate documents using natural language.
> [Video: Agent Actions](https://www.sanity.io/learn/course/day-one-with-sanity-studio/ai-agent-actions)
In the previous lesson you made programmatic changes to a document. In plain language it would be described as:
> *When published, write the current date and time to a field if it is not already set*
With AI tooling now omnipresent, your ambitions can be much grander. Agent Actions allows you to work with Sanity documents with built-in AI to either **Generate**, **Transform** or **Translate** content with instructions.
> [!TIP]
> Read more about [Agent Actions](https://www.sanity.io/learn/agent-actions) in the documentation
Agent Actions can be triggered via the API, or using Sanity Client perhaps in a Sanity Function or script.
## Creating a CLI script
Generate can create new, or update existing, documents by following an instruction (or "prompt").
In this lesson you'll create a script using this API to write new content to the `details` field in an event.
- [ ] **Create** a new file in the Studio directory to contain the transform script
```typescript:apps/studio/scripts/details.ts
import {getCliClient} from 'sanity/cli'
const client = getCliClient({apiVersion: 'vX'})
const EVENT_QUERY = `*[_type == "event" && !defined(details)][0]._id`
async function run() {
const eventId = await client.fetch(EVENT_QUERY)
console.log({eventId})
}
run()
```
This script:
- Imports a function to get the Sanity Client configured by the Sanity CLI
- Updates its configuration to use API Version `vX` (currently required for Agent Actions)
- Queries for the first event it can find where `details` has no value
- Logs that event ID to the console
- [ ] **Run** the following in your terminal to execute the script
```sh
# in apps/studio
pnpm dlx sanity@latest exec scripts/details.ts
```
In response you should see a warning about the API Version and the ID of the document it found
```sh
This is an experimental API version, which will change without warning and may have serious bugs.
{ eventId: '57c1561e-378c-4124-9aa2-88c0db96a037' }
```
## Invoke an action
In the previous script you only retrieved the document ID, which is required for an Agent Action to target a document.
In the updated script below, the GROQ query is more refined to only find an event document with a "headline" and "venue" so that the value of these fields can be used to create a rich `instruction` for the action.
Also note the `schemaId` which has been set to the default name for deployed schemas. This was done for you when you completed [Deploying your Studio](https://www.sanity.io/learn/course/day-one-with-sanity-studio/deploying-your-studio).
- [ ] **Update** the script file to include the Agent Action with updated GROQ query
```typescript
import {getCliClient} from 'sanity/cli'
const client = getCliClient({apiVersion: 'vX'})
const EVENT_QUERY = `*[
_type == "event"
&& defined(headline)
&& defined(venue)
&& !defined(details)][0]{
_id,
headline->{ name },
venue->{ name }
}`
type EventDocument = {
_id: string
headline: {name: string}
venue: {name: string}
}
async function run() {
const event = await client.fetch(EVENT_QUERY)
await client.agent.action
.generate({
schemaId: '_.schemas.default',
documentId: event._id,
instruction:
'Create a short description of what attendees can expect when they come to this event. The headline artist is "$headline" and the venue is "$venue".',
instructionParams: {
headline: event.headline.name,
venue: event.venue.name,
},
target: [{path: ['details']}],
})
.then((res) => {
console.log('Wrote description:', res.details[0].children[0].text)
})
.catch((err) => {
console.error(err)
})
}
run()
```
Because this script will now need permissions to modify documents, you will now need to run this script with the `--with-user-token` argument.
- [ ] **Run** the following in your terminal to execute the script which will update a single `event` document with a `details` field
```sh
# in apps/studio
pnpm dlx sanity@latest exec scripts/details.ts --with-user-token
```
You should receive confirmation in your terminal that a document was updated, something like:
```sh
Wrote description: Experience an unforgettable night at the Austin City Limits Music Festival with the electrifying sounds of ...
```
Double check the document in your Studio (it should've been moved to the top of the document list). You'll notice that if the action was run against a published document, this new value was written to a new draft document and will need to be published.
You've manually performed your first Agent Action, think of all the content operations you could now automate!
With that, you're done! Let's test everything you've learned in a final quiz.
---
## Lesson 18: Day one quiz
https://www.sanity.io/learn/course/day-one-with-sanity-studio/day-one-quiz
Let's test everything you've learned in this course by answering a few questions.
> [Video: Day one quiz](https://www.sanity.io/learn/course/day-one-with-sanity-studio/day-one-quiz)
## Structured Content
> **Question:** What's the best thing about Sanity being developer friendly?
>
> 1. Developers can work faster and get to go home earlier
> 2. Everyone is happier when developers are
> 3. Developers can create experiences tailored to content creators **[correct]**
> 4. Developers can make all the most important decisions on their own
> **Question:** What does each element in a content model describe?
>
> 1. What something looks like
> 2. What something is **[correct]**
> 3. How something works
> 4. Who created it
## Sanity Studio
> **Question:** Which of these is NOT a good reason to add validation rules?
>
> 1. They ensure consumers receive trustworthy content
> 2. They help guide the purpose of the content being created
> 3. It's good to force content creators to slow down **[correct]**
> 4. Guardrails are especially useful for new creators
> **Question:** What's a good reason for making changes in your Sanity Studio?
>
> 1. Experimentation
> 2. Feedback from content creators **[correct]**
> 3. Intuition
> 4. Change is as good as a holiday
> **Question:** When is a good time to create a custom form component?
>
> 1. As soon as possible
> 2. After exhausting built-in configuration options **[correct]**
> 3. Before reading the documentation
> 4. Just before bed time
## GROQ
> **Question:** What is [] called in GROQ?
>
> 1. A square bracket pair
> 2. A filter **[correct]**
> 3. An index
> 4. Square bois
> **Question:** What is {} called in GROQ?
>
> 1. A curly bracket pair
> 2. A projection **[correct]**
> 3. An index
> 4. Curly bois
> **Question:** Which of the following is true in GROQ queries?
>
> 1. Filters must always specify a _type
> 2. The * indicates a query across all datasets
> 3. Projections help reduce over-fetching **[correct]**
> 4. You can write GraphQL inside a GROQ query
## App SDK
> **Question:** Which front end library is Sanity App SDK designed for?
>
> 1. Tailwind CSS
> 2. Sanity UI
> 3. shadcn/ui
> 4. None (they're headless) **[correct]**
> **Question:** What can App SDK apps do that Studio can't?
>
> 1. Multiplayer editing
> 2. Cross-project editing **[correct]**
> 3. Optimistic editing
> 4. AI-powered editing
## Compute
> **Question:** Which one ISN'T a use case for Functions?
>
> 1. Triggering connected services
> 2. Preventing publishing **[correct]**
> 3. Invalidating caches
> 4. Updating search indexes
> **Question:** Functions are deployed as part of
>
> 1. Sanity Studio
> 2. Sanity Functions
> 3. Sanity Blueprints **[correct]**
> 4. GROQ-powered webhooks
---
## Related Resources
- [Track overview](https://www.sanity.io/learn/track/sanity-developer-essentials.md)
- [All courses and lessons](https://www.sanity.io/learn/sitemap.md)
- [Complete content for LLMs](https://www.sanity.io/learn/llms-full.txt)