# Visual Editing for interactive live previews
https://www.sanity.io/learn/course/sanity-and-shopify-with-hydrogen/visual-editing-for-interactive-live-previews.md
To dramatically improve the content creation experience for your authors, configure your Hydrogen front end and Sanity Studio for Visual Editing.
In short, Visual Editing works by dynamically setting the React Loader configured by `hydrogen-sanity` to query for draft documents using the `drafts` [perspective](https://www.sanity.io/docs/perspectives).
As well as include "[stega encoding](https://www.sanity.io/docs/loaders-and-overlays)" to return information about the origin of the content and create interactive overlays so that authors can use the front end as a means to navigate the content. Most commonly, this is all done [inside the Presentation tool](https://www.sanity.io/docs/presentation).
1. See the `hydrogen-sanity` [readme](https://github.com/sanity-io/hydrogen-sanity/) for all installation steps if you need further guidance.
2. See [Visual Editing with Sanity](https://www.sanity.io/learn/visual-editing/introduction-to-visual-editing) in the Sanity documentation.
## Update your Hydrogen front end
To support visual editing in the current environment, pass a `preview` configuration to the loader. In order to enable or disable visual editing for the current request, you'll need to provide a condition like checking whether or not the user's session has the project ID set.
If a `preview` option isn't provided, then the current environment won't have visual editing setup. In some cases, you may want to only enable visual editing in a preview deployment.
You can check for preview mode using the `sanity` context's `preview?.enabled` value.
### Server context
The token value here will be created later in this lesson. Previews won't work without it.
1. **Update** `createSanityContext` in your `context.ts` file to configure server-side data fetching when preview mode is activated.
```typescript:web/app/lib/context.ts
// ...all other imports
import {PreviewSession} from 'hydrogen-sanity/preview/session';
import {isPreviewEnabled} from 'hydrogen-sanity/preview';
export async function createHydrogenRouterContext(
request: Request,
env: Env,
executionContext: ExecutionContext,
) {
const [cache, session, previewSession] = await Promise.all([
caches.open('hydrogen'),
AppSession.init(request, [env.SESSION_SECRET]),
PreviewSession.init(request, [env.SESSION_SECRET]),
]);
const sanity = await createSanityContext({
request,
cache,
waitUntil,
client: {
projectId: env.SANITY_PROJECT_ID,
dataset: env.SANITY_DATASET,
apiVersion: env.SANITY_API_VERSION || '2025-08-27',
useCdn: true,
stega: {
enabled: isPreviewEnabled(env.SANITY_PROJECT_ID, previewSession),
studioUrl: 'http://localhost:3333',
}
},
preview: {
token: env.SANITY_API_TOKEN,
session: previewSession,
}
});
// ...rest of context
}
```
Use this to determine whether to render a preprepared `VisualEditing` component is rendered.
### Root route
1. This component listens to changes and reloads your server-side data, powering live previews with minimal latency.
1. **Update** your root file to include the VisualEditing component when preview mode is active:
```tsx:web/app/root.tsx
// ...other imports
import {usePreviewMode} from 'hydrogen-sanity/preview'
import {VisualEditing} from 'hydrogen-sanity/visual-editing'
export function Layout({children}: {children?: React.ReactNode}) {
// ...all other logic
const previewMode = usePreviewMode()
return (
// ...all other components
{previewMode ? : null}
);
}
```
### Preview route
The Presentation tool can be configured to visit a specific route to potentially enable preview mode. Within the `hydrogen-sanity` package is a prepared route which will use the Sanity Client you configured in `server.ts` to check for a secret that Presentation has prepared – and if matched – write the `projectId` to the current user's session.
1. This route, and the previous step's VisualEditing component are convenient, opinionated defaults. If necessary you can copy the source and modify these implementation details in your own production projects.
1. **Create** a new resource route to handle enabling preview mode
```typescript:web/app/routes/api.preview.ts
export {action, loader} from 'hydrogen-sanity/preview/route'
```
### Content security policy
Since Sanity Studio's Presentation tool displays the storefront inside an iframe, you will need to adjust the Content Security Policy (CSP) in `entry.server.tsx`.
The settings below work for the setup you're creating in this course, but [more options are available](https://github.com/sanity-io/hydrogen-sanity?tab=readme-ov-file#modify-storefronts-content-security-policy-csp).
1. **Update** `entry.server.tsx` with configuration to enable viewing within an iframe.
```tsx:web/entry.server.tsx
// ...all other imports
export default async function handleRequest(
request: Request,
responseStatusCode: number,
responseHeaders: Headers,
reactRouterContext: EntryContext,
context: HydrogenRouterContextProvider,
) {
const {env, sanity} = context;
const projectId = env.SANITY_PROJECT_ID;
const studioHostname = 'http://localhost:3333';
const isPreviewEnabled = sanity.preview?.enabled;
const {nonce, header, NonceProvider} = createContentSecurityPolicy({
// ...all other settings
frameAncestors: isPreviewEnabled ? [studioHostname] : [],
defaultSrc: ['https://cdn.sanity.io', 'https://lh3.googleusercontent.com'],
connectSrc: [
`https://${projectId}.api.sanity.io`,
`wss://${projectId}.api.sanity.io`,
],
});
// ...all other configuration
}
```
## Update your Sanity Studio
In this section you'll setup the Presentation tool – a unique plugin with a Studio tool where authors can browse the website as a way to navigate your Sanity content.
### Setup locations
You can associate documents with routes on the website so that content creators can more quickly jump from documents to any page on the front end. [These are called "locations" in Presentation](https://www.sanity.io/docs/configuring-the-presentation-tool#585b86f5d415).
1. **Create** a new document with the following location configuration
```typescript:studio/presentation/locations.ts
import { defineLocations } from "sanity/presentation";
export const locations = {
product: defineLocations({
select: {
title: 'store.title',
slug: 'store.slug.current',
},
resolve: (doc) => ({
locations: [
{
title: doc?.title || 'Untitled',
href: `/products/${doc?.slug}`,
},
{title: 'Products', href: `/products`},
],
}),
}),
}
```
### Setup Presentation tool
Back in your Sanity Studio project, update the plugins inside `sanity.config.ts` to include the Presentation tool – with one configuration setting to visit the resource route setup earlier in this exercise.
1. **Update** your `sanity.config.ts` file
```typescript:studio/sanity.config.ts
// Add these imports
import { presentationTool } from "sanity/presentation";
import { locations } from "./presentation/locations";
export default defineConfig({
// ...all other settings
plugins: [
// ..all other plugins
presentationTool({
resolve: {locations},
previewUrl: {
origin: "http://localhost:3000",
preview: "/",
previewMode: {
enable: "/api/preview",
},
},
}),
],
});
```
The origin is necessary if you are deploying your storefront and Studio on different domains. If you provide one, the other options are relative to that domain. Like the origin in your Content Security Policy, you might consider using an environment variable you can assign at runtime.
### Sanity Manage: Create a viewer token
A viewer token is required for server-side fetching of draft content as well as "stega encoding" for Visual Editing.
Open Manage from the Studio or run the following from the command line:
```sh
# In the /studio folder
pnpm dlx sanity manage
```
1. **Create** a new token with Viewer permissions in Sanity Manage
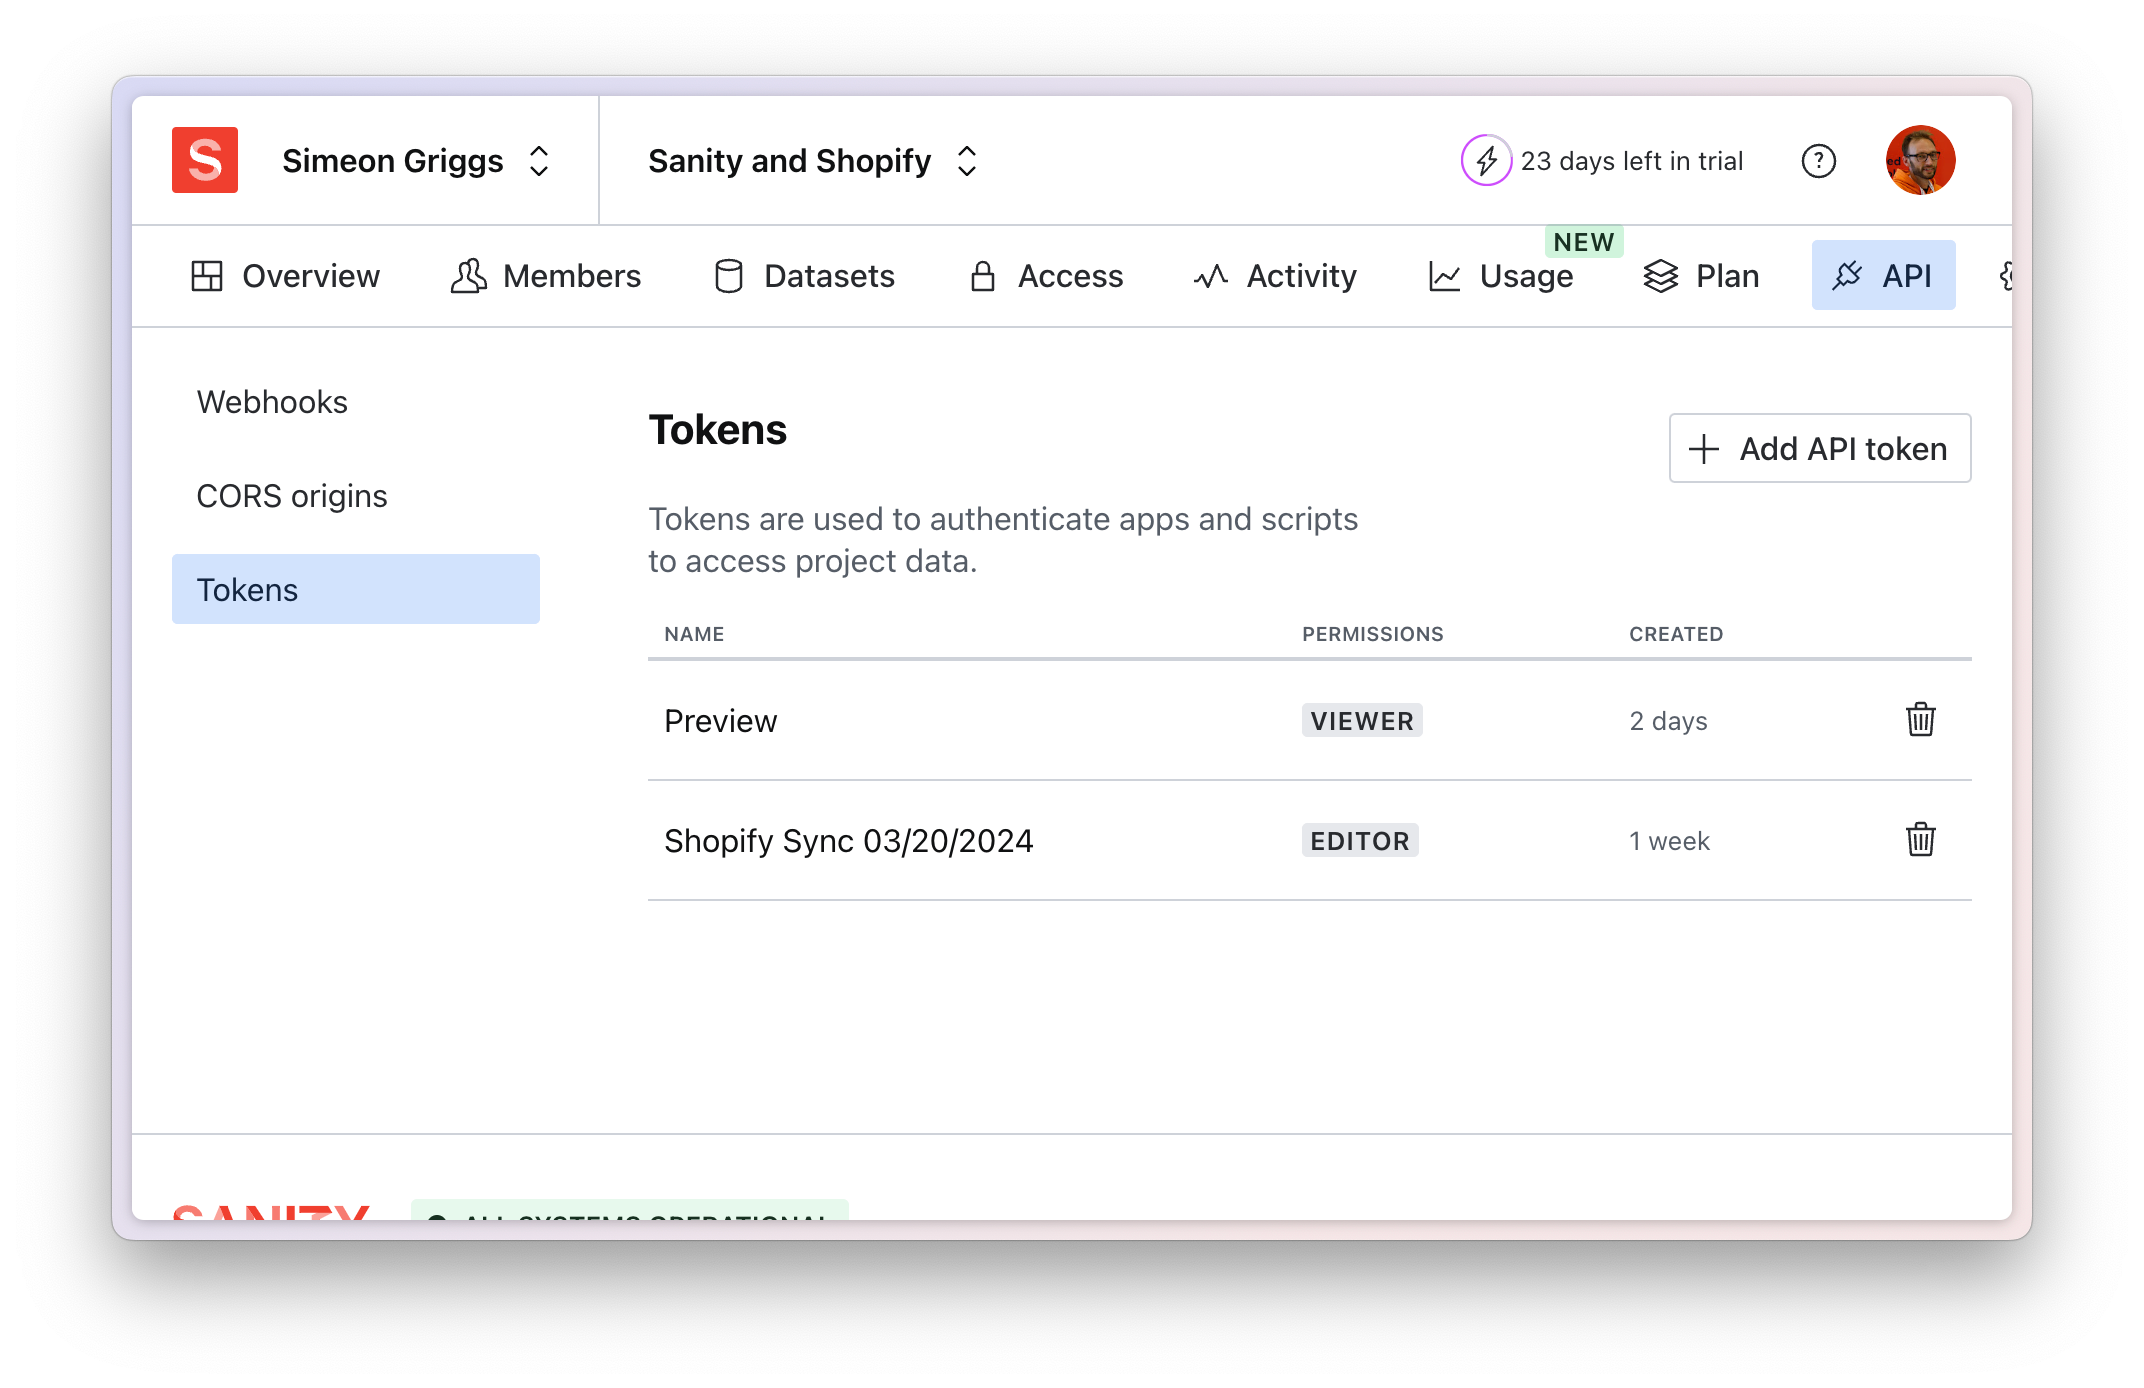
1. Add it to the `.env` file in your Hydrogen application.
```text:web/.env
SANITY_API_TOKEN="sk..."
```
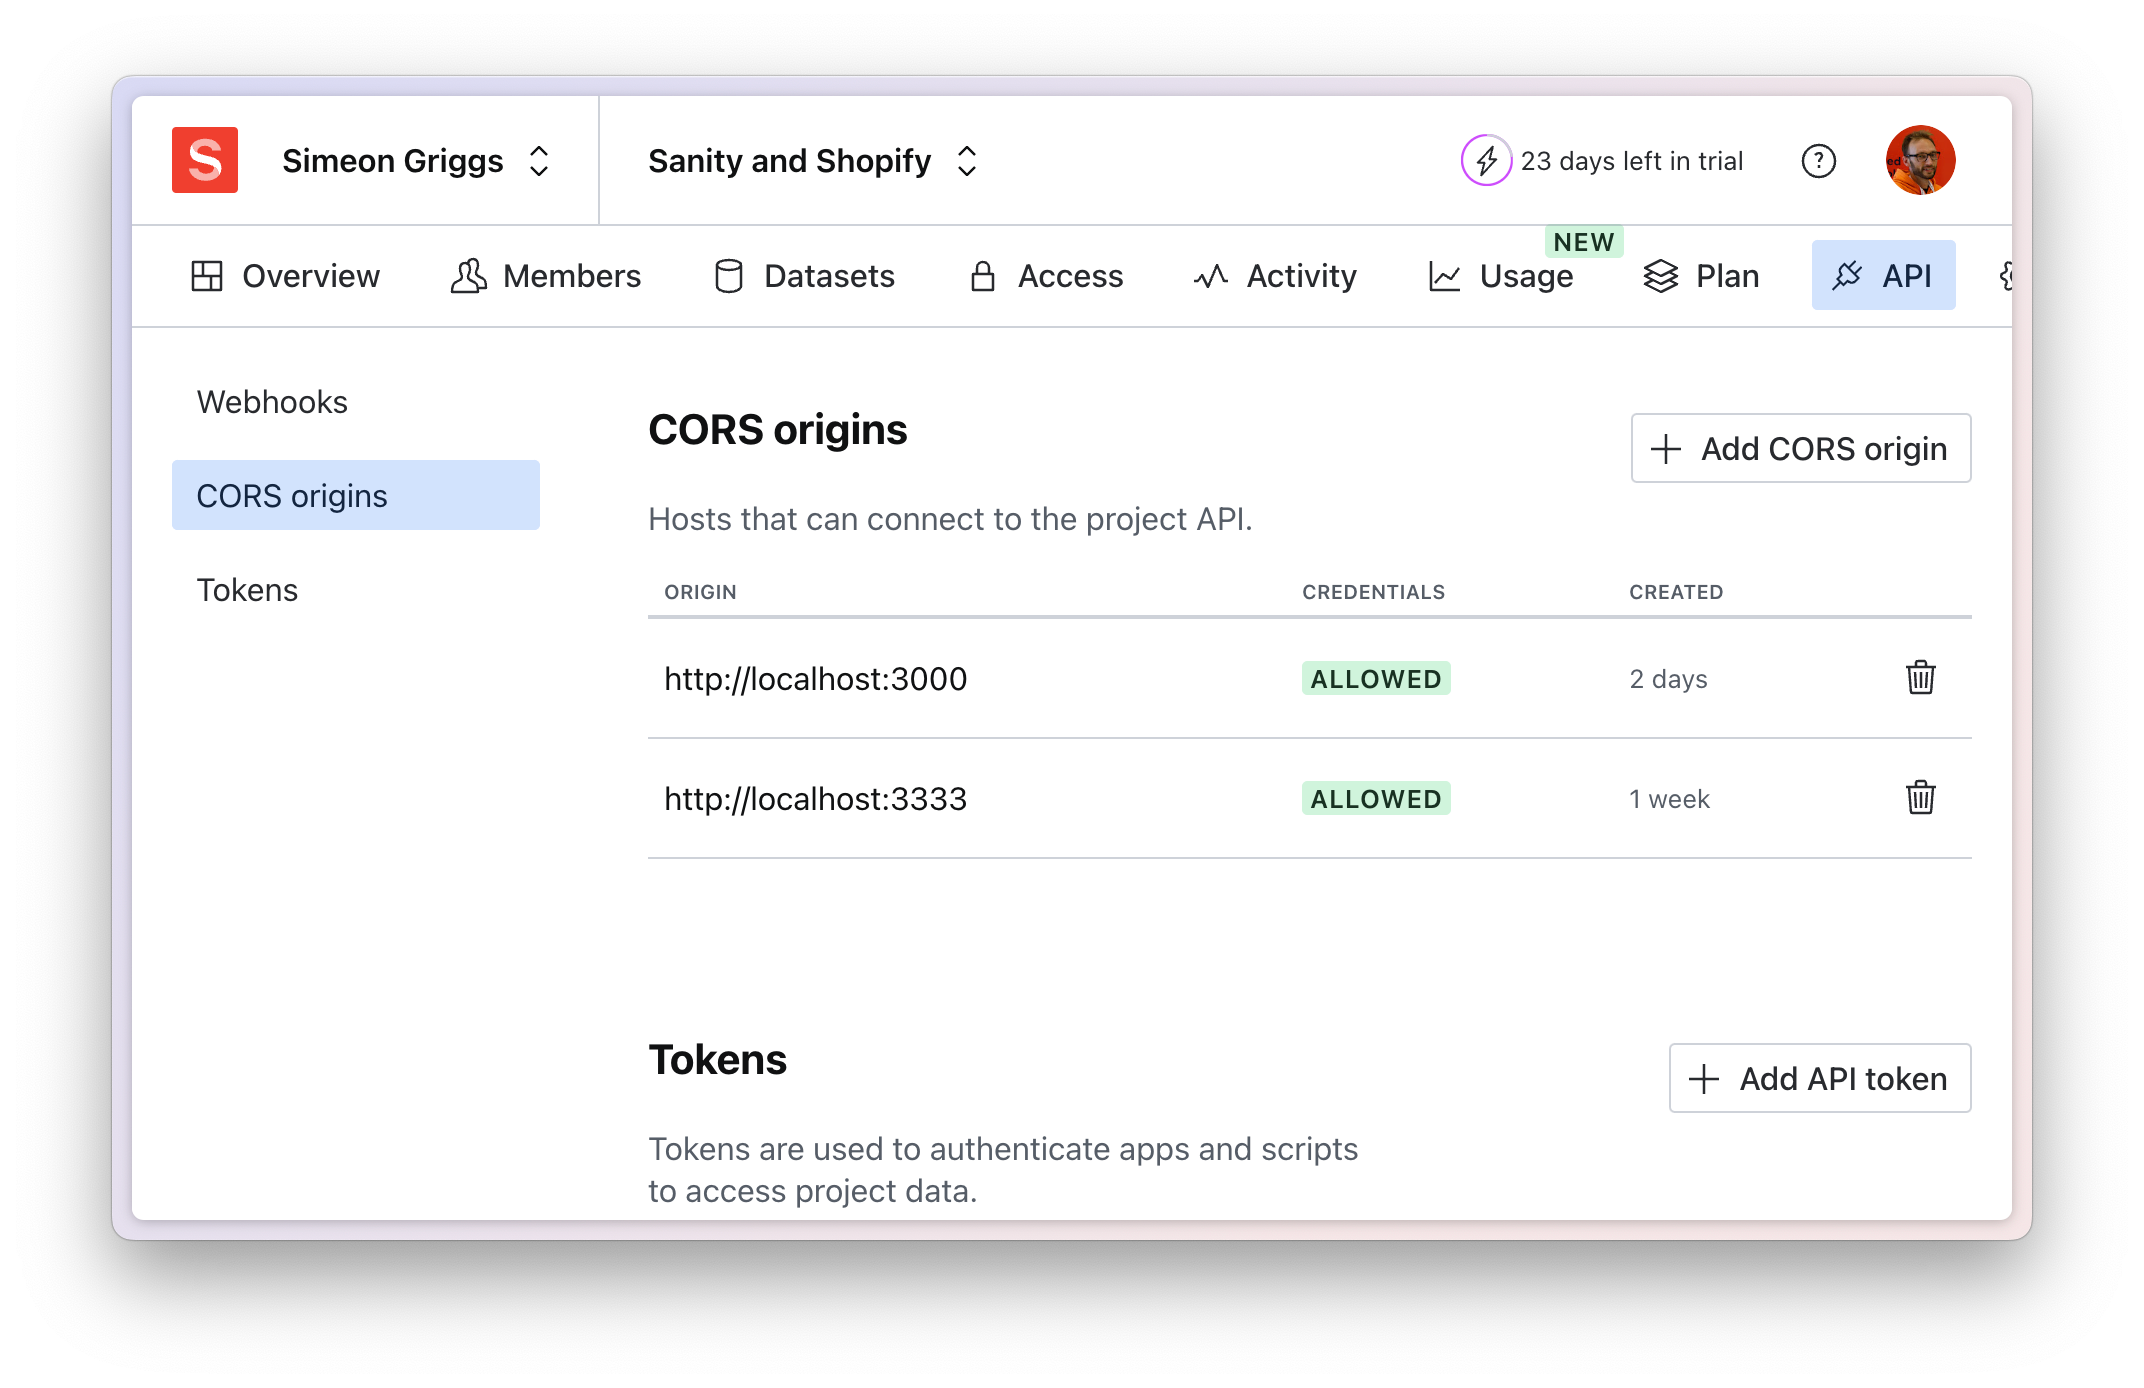
### Sanity Manage: Update CORS origins
You will also need to allow communication from your front end to the Content Lake by adding its domain as a CORS origin.
1. **Add** `http://localhost:3000` to the CORS origins in your Sanity project settings at [sanity.io/manage](https://sanity.io/manage).
### Start editing, visually!
Now visit the Presentation tool in your Studio. You should be redirected to the home page. Navigate to a product that contains some Sanity content and you should be able to click-to-edit and watch previews of draft content rendering in your front end in real time.
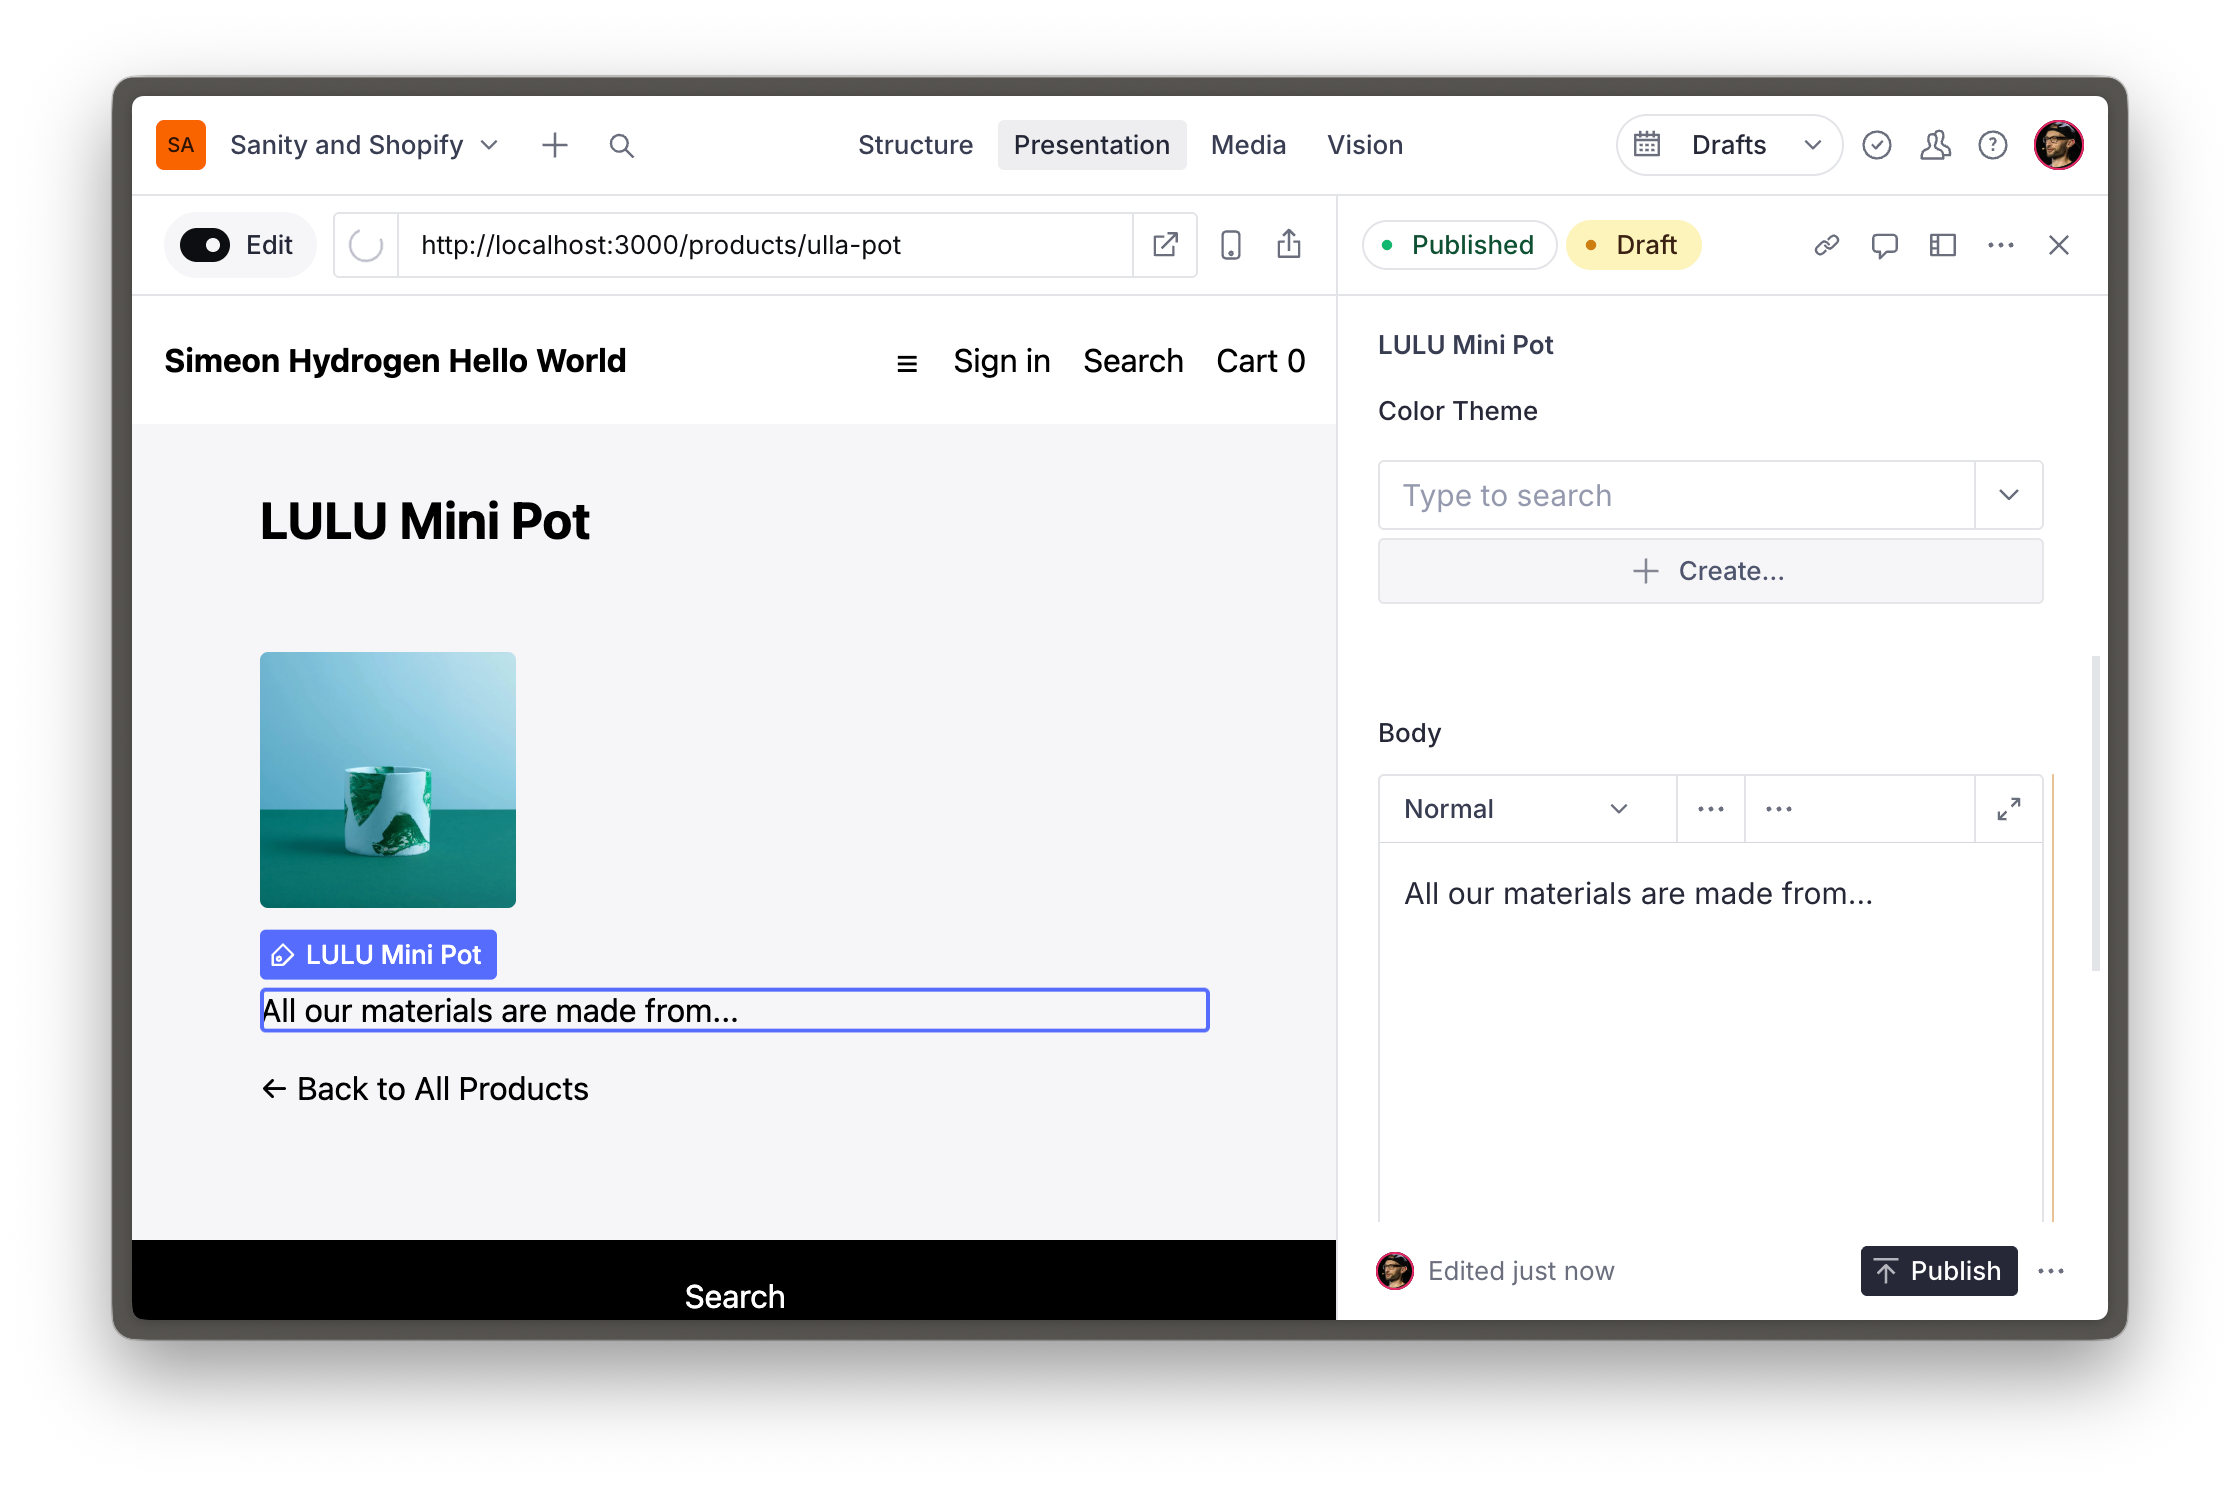
Note that because some of the content – such as product names – were rendered from Shopify, you won't be able to click and edit them.