# Course: SEO optimized content with Next.js
https://www.sanity.io/learn/course/seo-optimization
SEO doesn't have to be complicated. It's a matter of taking content you've already responsibly structured with Sanity and rendering it in the format and places that search engines expect. Complete this course to improve how robots and humans interact with your content with Sanity and Next.js
---
## Navigation
**Track:** [Work-ready Next.js](https://www.sanity.io/learn/track/work-ready-next-js) · [View as markdown](https://www.sanity.io/learn/track/work-ready-next-js.md)
## Contents
1. [An introduction to SEO and structured content](https://www.sanity.io/learn/course/seo-optimization/an-introduction-to-seo-and-structured-content) · [markdown](https://www.sanity.io/learn/course/seo-optimization/an-introduction-to-seo-and-structured-content.md)
2. [SEO schema types and metadata](https://www.sanity.io/learn/course/seo-optimization/seo-schema-types-and-metadata) · [markdown](https://www.sanity.io/learn/course/seo-optimization/seo-schema-types-and-metadata.md)
3. [Extending the SEO schema types](https://www.sanity.io/learn/course/seo-optimization/adding-seo-fields-to-your-project) · [markdown](https://www.sanity.io/learn/course/seo-optimization/adding-seo-fields-to-your-project.md)
4. [Implementing redirects](https://www.sanity.io/learn/course/seo-optimization/implementing-redirects) · [markdown](https://www.sanity.io/learn/course/seo-optimization/implementing-redirects.md)
5. [Creating dynamic Open Graph images](https://www.sanity.io/learn/course/seo-optimization/creating-dynamic-open-graph-images-with-vercel-og) · [markdown](https://www.sanity.io/learn/course/seo-optimization/creating-dynamic-open-graph-images-with-vercel-og.md)
6. [Generate social posts from your content](https://www.sanity.io/learn/course/seo-optimization/ai-generate-social-posts-from-your-content) · [markdown](https://www.sanity.io/learn/course/seo-optimization/ai-generate-social-posts-from-your-content.md)
7. [Build a dynamic sitemap](https://www.sanity.io/learn/course/seo-optimization/building-a-dynamic-sitemap) · [markdown](https://www.sanity.io/learn/course/seo-optimization/building-a-dynamic-sitemap.md)
8. [Generating JSON-LD dynamically](https://www.sanity.io/learn/course/seo-optimization/generating-json-ld-dynamically) · [markdown](https://www.sanity.io/learn/course/seo-optimization/generating-json-ld-dynamically.md)
9. [Sanity SEO quiz](https://www.sanity.io/learn/course/seo-optimization/sanity-seo-quiz) · [markdown](https://www.sanity.io/learn/course/seo-optimization/sanity-seo-quiz.md)
---
## Lesson 1: An introduction to SEO and structured content
https://www.sanity.io/learn/course/seo-optimization/an-introduction-to-seo-and-structured-content
A few core principles, applied consistently, can form a solid foundation that benefits both search engines and editorial workflows.
## About this course
This course will guide you on the best practices of building SEO-optimized content in Next.js with Sanity.
Rather than getting bogged down in complex SEO configurations, the focus is on creating simple but effective schema types and queries that give content editors flexibility while maintaining SEO best practices.
This approach emphasizes pragmatic solutions that address essential SEO needs without adding unnecessary complexity.
It focuses on structuring content for both search engines and editorial teams, offering smart defaults along with optional granular controls. The aim is to simplify SEO-friendly content creation while adhering to Next.js best practices.
## About the author
I'm Jono, the founder of [Roboto Studio](https://robotostudio.com/?utm-source=sanity-learn).
We specialize in building the best editorial experiences on the web with Sanity and Next.js
I'm excited to share our opinionated but battle-tested approach to SEO with you. This isn't just theory - these are the same patterns we use successfully with our clients every day.
Also a special thanks to Sne and Hrithik for their help structuring this course.
## Simplifying SEO with structured content
SEO is often presented as a complex endeavor, but it is more straightforward than commonly assumed. A few core principles, applied consistently, can form a solid foundation that benefits both search engines and editorial workflows.
A well-structured content model handles most of the heavy lifting, removing the need for overly complex schemas or endless metadata fields. This approach facilitates agnostic SEO practices. This means you can incrementally adopt SEO best practices without having to always enter content from scratch.
Next.js includes opinionated API's that streamline SEO optimization. Aligning Sanity schema types and queries with these conventions creates an effective framework for building SEO-ready websites.
In the following lessons we will take a closer look at how we can leverage structured content and Next.js to help search engines understand and rank your content.
---
## Lesson 2: SEO schema types and metadata
https://www.sanity.io/learn/course/seo-optimization/seo-schema-types-and-metadata
Prepare useful, optional and reusable schema types specifically for SEO content and render them into page metadata the Next.js way.
For the benefit of content authors, fields relevant to SEO should not always be required. Instead, they should be used to override some existing content, when provided.
## Create an SEO schema type
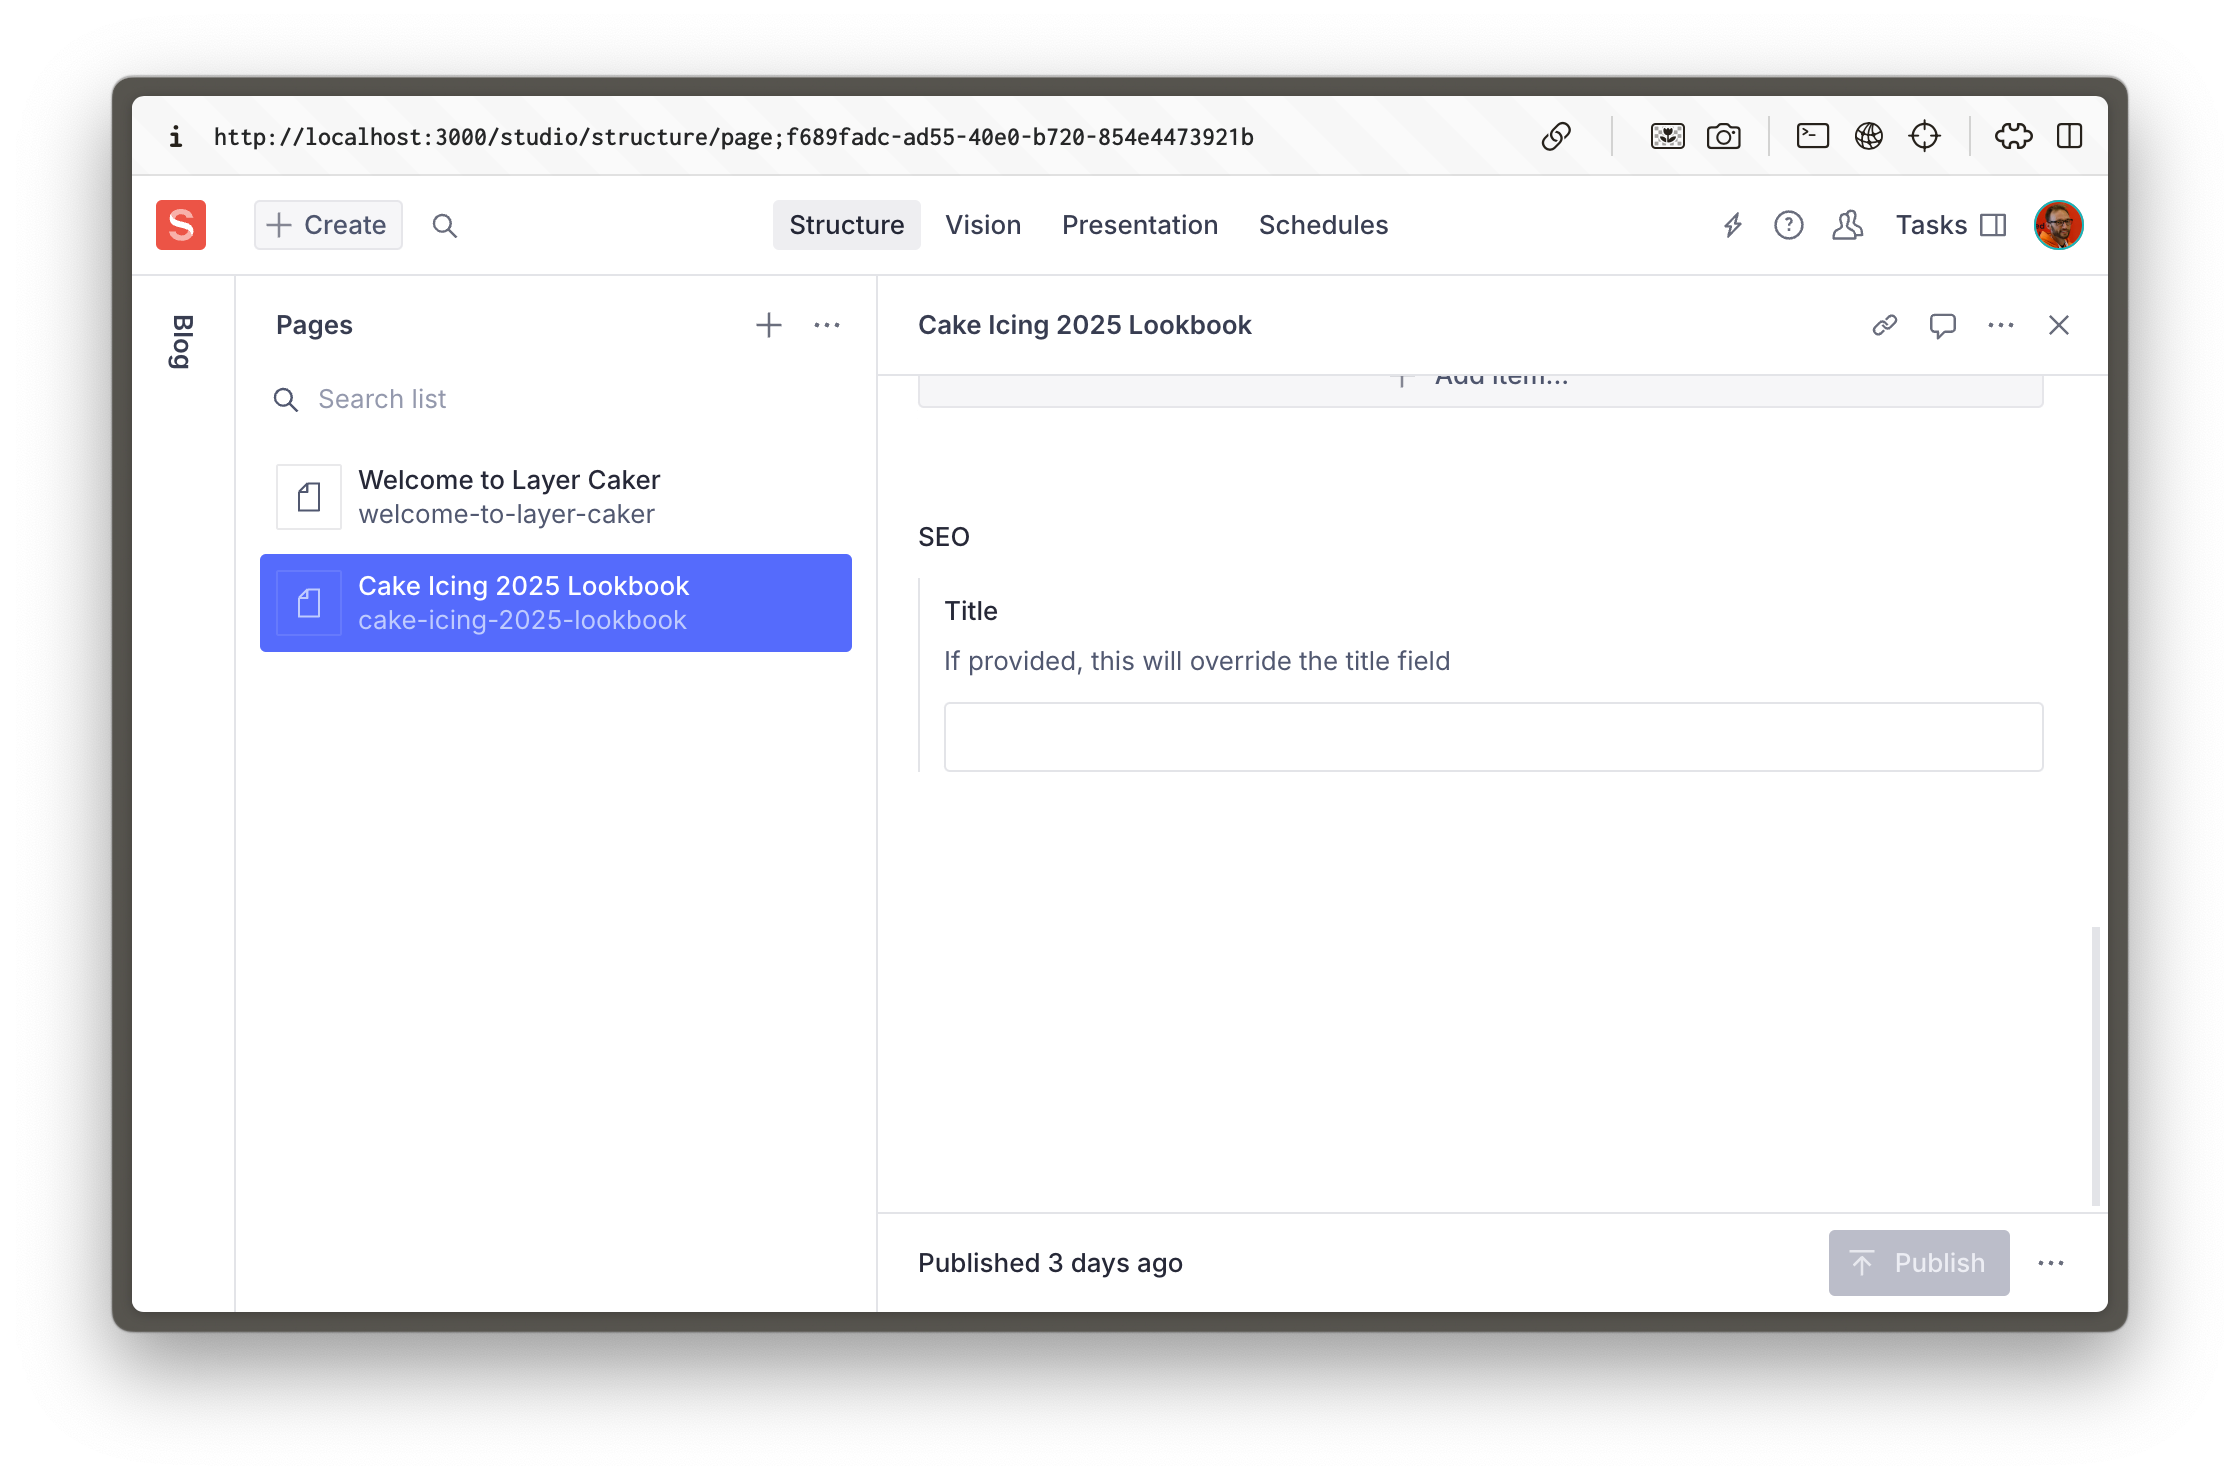
No matter what document type you're applying SEO content to, the same data will be required. For example a title, description, image and more. So to easily re-use these fields you'll register a custom schema type to the Studio
- [ ] **Create** a new schema type for SEO fields
```typescript:src/sanity/schemaTypes/seoType.ts
import { defineField, defineType } from "sanity";
export const seoType = defineType({
name: "seo",
title: "SEO",
type: "object",
fields: [
defineField({
name: "title",
description: "If provided, this will override the title field",
type: "string",
}),
],
});
```
- [ ] **Update** your registered schema types to include `seoType`
```typescript:src/sanity/schemaTypes/index.ts
// ...all your other imports
import { seoType } from "./seoType";
export const schema: { types: SchemaTypeDefinition[] } = {
types: [
// ...all your other types
seoType,
],
};
```
- [ ] **Update** your `page` and `post` document types to include the SEO fields
```typescript:src/sanity/schemaTypes/pageType.ts
export const pageType = defineType({
// ...all other configuration
fields: [
// ...all other fields
defineField({
name: "seo",
type: "seo",
}),
],
});
```
> [!WARNING]
> Throughout the rest of this course you'll be expected to keep both the `page` and `post` document schema types, GROQ queries and Next.js routes updated—but code examples may only be shown for the `page` type.
You should now see the SEO object field at the bottom of `page` and `post` document types in the Studio.
## Queries with fallbacks
In the description field of the SEO title, we've informed the author that the title is not required, but that it will override the title field if provided.
The title field is likely to be sufficient for SEO the majority of the time, but if for some reason it needs to be different, the author now has an avenue to override it.
For the front-end to respect this, there are a few ways to do it. You *could* choose which field to render with logic like this:
```tsx:Example only
{seo?.title ?? title}
```
But then we'd need to duplicate that logic *everywhere* we optionally render the correct value. It's also annoying because the `seo` attribute may or may not exist.
Because we have GROQ, we can move all this logic into our query instead.
- [ ] **Update** the `PAGE_QUERY` to include an `seo` attribute with values and fallbacks
```typescript:src/sanity/lib/queries.ts
export const PAGE_QUERY =
defineQuery(`*[_type == "page" && slug.current == $slug][0]{
...,
"seo": {
"title": coalesce(seo.title, title, ""),
},
content[]{
...,
_type == "faqs" => {
...,
faqs[]->
}
}
}`);
```
Don't forget to update your POST_QUERY to include the same projection.
> [!NOTE]
> `coalesce()` is a GROQ [GROQ Functions Reference](https://www.sanity.io/learn/specifications/groq-functions) that returns the first value that is not null
Now `seo.title` will never be `null`, and contain either the optionally provided SEO title, or the page title, or an empty string.
- [ ] **Run** the following command to update your Types now that you've made schema and query changes
```sh
npm run typegen
```
> [!NOTE]
> This command was setup in the [Generate TypeScript Types](https://www.sanity.io/learn/course/content-driven-web-application-foundations/generate-typescript-types) lesson of the [Content-driven web application foundations](https://www.sanity.io/learn/course/content-driven-web-application-foundations) course.
Just to prove this works, update the dynamic route that renders your pages to include a `` tag. It is a [feature of React 19](https://react.dev/blog/2024/12/05/react-19#support-for-metadata-tags) to move meta tags into the `<head>` tag. (But it's not how Next.js 15 recommends, you'll do that later).
- [ ] **Update** the dynamic page route to include the `<title>` tag
```tsx:src/app/(frontend)/[slug]/page.tsx
import { PageBuilder } from "@/components/PageBuilder";
import { sanityFetch } from "@/sanity/lib/live";
import { PAGE_QUERY } from "@/sanity/lib/queries";
export default async function Page({
params,
}: {
params: Promise<{ slug: string }>;
}) {
const { data: page } = await sanityFetch({
query: PAGE_QUERY,
params: await params,
});
return (
<>
<title>{page.seo.title}
{page?.content ? (
) : null}
);
}
```
Your front end should now have rendered either the page title, or the SEO title field value into a `` tag inside the `<head>`.
## Metadata, the Next.js way
The problem with relying on the previous method is deduplication. React will render multiple `<title>` tags when it finds them, and your Next.js application may eventually use nested layouts where this is a possibility.
Instead, Next.js has an API to export a uniquely named function from a route to take the same dynamic data that is rendered into the page to generate those meta tags as required.
In the example below we have extracted the `sanityFetch` to its own function, because now it will be re-used multiple times. (Which Next.js should cache and only run once). Inside the `generateMetadata` function, the same `seo.title` value is used to generate a `<title>` tag in the final markup.
- [ ] **Update** your `page` route to generate metadata and the rendered on-page content in separate functions.
```tsx:src/app/(frontend)/[slug]/page.tsx
import type { Metadata } from "next";
import { PageBuilder } from "@/components/PageBuilder";
import { sanityFetch } from "@/sanity/lib/live";
import { PAGE_QUERY } from "@/sanity/lib/queries";
type RouteProps = {
params: Promise<{ slug: string }>;
};
const getPage = async (params: RouteProps["params"]) =>
sanityFetch({
query: PAGE_QUERY,
params: await params,
});
export async function generateMetadata({
params,
}: RouteProps): Promise<Metadata> {
const { data: page } = await getPage(params);
return {
title: page.seo.title,
};
}
export default async function Page({ params }: RouteProps) {
const { data: page } = await getPage(params);
return page?.content ? (
<PageBuilder
documentId={page._id}
documentType={page._type}
content={page.content}
/>
) : null;
}
```
Following the same pattern, you can add SEO overrides for other important metadata tags. Such as a `<meta name="description" />` tag. This is what Google uses to display a description of your page in the search results.
Again, you can also add an override for the `seoImage` field, which will be used to populate the `<meta property="og:image" />` tag.
The most important takeaway from this, is that you always want to have an override, and a fallback. It keeps consistency in your content, and standardizes the way you query your SEO fields.
Don't forget to update your individual post route to use the same conventions.
> [!TIP]
> Take a look at the Next.js [metadata documentation](https://nextjs.org/docs/app/building-your-application/optimizing/metadata) for more information.
## Just getting started
At this point, you can see how the pattern works, and how this is easy to extend to other SEO fields.
In the next lesson, you will enhance your SEO functionality by adding more fields, including those for Open Graph data, and one to control search engine indexing
---
## Lesson 3: Extending the SEO schema types
https://www.sanity.io/learn/course/seo-optimization/adding-seo-fields-to-your-project
Now you're setup for success, extend the fields made available to your authors.
In the first lesson, you learned how to add some basic SEO fields to your schema. Now you're going to kick it up a notch with Open Graph fields and more granular controls over displaying documents in lists.
## Add more SEO fields
- [ ] **Update** your `seoType` schema type to include `description`, `image` and a `noIndex` field
```typescript
import { defineField, defineType } from "sanity";
export const seoType = defineType({
name: "seo",
title: "SEO",
type: "object",
fields: [
defineField({
name: "title",
description: "If provided, this will override the title field",
type: "string",
}),
defineField({
name: "description",
type: "text",
}),
defineField({
name: "image",
type: "image",
options: {hotspot: true}
}),
defineField({
name: "noIndex",
type: "boolean",
}),
],
});
```
You may wish to have separate title and description fields for Open Graph properties. But in this course you'll re-use these values.
- [ ] **Update** `PAGE_QUERY` and `POST_QUERY` to include these new attributes, along with default values
```typescript:src/sanity/lib/queries.ts
export const PAGE_QUERY =
defineQuery(`*[_type == "page" && slug.current == $slug][0]{
...,
"seo": {
"title": coalesce(seo.title, title, ""),
"description": coalesce(seo.description, ""),
"image": seo.image,
"noIndex": seo.noIndex == true
},
content[]{
...,
_type == "faqs" => {
...,
faqs[]->
}
}
}`);
```
- [ ] **Run** the following to regenerate Types now that you've made schema and query changes
```sh
npm run typegen
```
## Render more metadata
With these fields now present in your schema types and queries, you can now render even more metadata in your route.
Note in the code below how the Open Graph image reuses the `urlFor` helper function to generate an image the correct width and height–and will also respect crop and hotspot data.
The value for `noindex` we only include in the metadata if it is set to true.
```typescript:src/app/(frontend)/[slug]/page.tsx
// ...the rest of your route
export async function generateMetadata({
params,
}: RouteProps): Promise<Metadata> {
const { data: page } = await getPage(params);
if (!page) {
return {}
}
const metadata: Metadata = {
title: page.seo.title,
description: page.seo.description,
};
if (page.seo.image) {
metadata.openGraph = {
images: {
url: urlFor(page.seo.image).width(1200).height(630).url(),
width: 1200,
height: 630,
},
};
}
if (page.seo.noIndex) {
metadata.robots = "noindex";
}
return metadata;
}
```
Don't forget to update your individual post route as well.
### A note on `noIndex`
Having a page set to `noIndex` typically means that you want the published document to exist as a route in your application—but you don't want it included in search results. Either on search engine results or within your website.
Nothing needs to change now with your page type documents, but if you were to include these fields in your post type documents, you'd likely want to update any query that looks up and renders many posts to exclude results where `noIndex` is true. For example:
```groq:Example only
*[_type == "post" && seo.noIndex != true]
```
You'll see an example of this later in the lesson [Build a dynamic sitemap](https://www.sanity.io/learn/course/seo-optimization/building-a-dynamic-sitemap).
Now your Sanity Studio and application are capable of authoring, querying and rendering complex metadata for the most common SEO needs. You can continue to extend these fields for any other metadata requirements.
In the following lesson you'll take on another major SEO concern: redirects.
---
## Lesson 4: Implementing redirects
https://www.sanity.io/learn/course/seo-optimization/implementing-redirects
Redirects are a critical component of SEO and site maintenance. While they may appear straightforward at first, improper implementation can lead to complex redirect chains and degraded site performance.
Let's go through best practices for implementing redirects with Next.js and Sanity.
## Learning objectives
You will create a redirect system that:
- Is configured with documents in Sanity Studio
- Can be managed by your content team
- Won't create a maintenance headache later
## Creating the schema
Let's start with your redirect schema type first. You want to make this as editor friendly as possible. The goal is to build a non-technical solution that can be managed by your content team, and output to your Next.js configuration.
> [!TIP]
> See the Next.js [documentation about creating redirects](https://nextjs.org/docs/app/building-your-application/routing/redirecting#redirects-in-nextconfigjs)
Below is a simplified document schema, which you'll make much smarter with validation rules later in the lesson.
- [ ] **Create** a new document schema type for redirects
```typescript:src/sanity/schemaTypes/redirectType.ts
import { defineField, defineType } from "sanity";
import { LinkIcon } from "@sanity/icons";
export const redirectType = defineType({
name: "redirect",
title: "Redirect",
type: "document",
icon: LinkIcon,
fields: [
defineField({
name: "source",
type: "string",
}),
defineField({
name: "destination",
type: "string",
}),
defineField({
name: "permanent",
type: "boolean",
initialValue: true,
}),
defineField({
name: "isEnabled",
description: "Toggle this redirect on or off",
type: "boolean",
initialValue: true,
}),
],
});
```
Don't forget to register it to your Studio schema types
```typescript:src/sanity/schemaTypes/index.ts
// ...all other imports
import { redirectType } from "./redirectType";
export const schema: { types: SchemaTypeDefinition[] } = {
types: [
// ...all other schema types
redirectType,
],
};
```
- [ ] **Update** your structure builder configuration to add the redirect document type:
```typescript:src/sanity/structure.ts
// add this line
S.documentTypeListItem('redirect').title('Redirects')
```
## Fetching the redirects
The redirect documents created in Sanity Studio will need to be queried into our Next.js config file.
- [ ] **Update** `queries.ts` to include a GROQ query for redirect documents
```typescript:src/sanity/lib/queries.ts
// ...all other queries
export const REDIRECTS_QUERY = defineQuery(`
*[_type == "redirect" && isEnabled == true] {
source,
destination,
permanent
}
`);
```
- [ ] **Create** a new utility to fetch all redirect documents
```typescript:src/sanity/lib/fetchRedirects.ts
import { client } from "./client";
import { REDIRECTS_QUERY } from "./queries";
export async function fetchRedirects() {
return client.fetch(REDIRECTS_QUERY);
}
```
Since you've added schema types and a new query to the application, don't forget to generate Types.
```sh:Terminal
pnpm run typegen
```
### Things to note
- Vercel has a limit of 1,024 redirects in Next.js config.
- For large numbers of redirects (1000+), use a custom middleware solution instead. See Vercel's documentation on [managing redirects at scale](https://nextjs.org/docs/app/building-your-application/routing/redirecting#managing-redirects-at-scale-advanced) for more details.
## Add redirects in your Next.js config
Now we can use Next.js's built-in redirects configuration in `next.config.ts`. This allows us to define redirects that will be applied at build time. Note that redirects defined in `next.config.ts` run **before** any middleware, should you use it in the future.
- [ ] **Update** your `next.config.ts` file to include redirects
```typescript:next.config.ts
// ...other imports
import { fetchRedirects } from "@/sanity/lib/fetchRedirects";
const nextConfig: NextConfig = {
// ...other config
async redirects() {
return await fetchRedirects();
},
};
export default nextConfig;
```
## Validation rules
Validation is critical as invalid redirects can break future builds. Without validation, authors could publish a redirect that prevents your application from deploying—or create a deployment with circular redirects.
- Source paths must start with `/`
- Never create circular redirects like `A` -> `B` -> `A`
Here's the validation logic, yes it's a bit complex but it's worth it to avoid hours of debugging, when your build breaks because of a missing slash.
- [ ] **Update** the `source` field in the `redirectType` schema
```typescript:src/sanity/schemaTypes/redirectType.ts
import { defineField, defineType, SanityDocumentLike } from "sanity";
import { LinkIcon } from "@sanity/icons";
function isValidInternalPath(value: string | undefined) {
if (!value) {
return "Value is required";
} else if (!value.startsWith("/")) {
return "Internal paths must start with /";
} else if (/[^a-zA-Z0-9\-_/:]/.test(value)) {
return "Source path contains invalid characters";
} else if (/:[^/]+:/.test(value)) {
return "Parameters can only contain one : directly after /";
} else if (
value.split("/").some((part) => part.includes(":") && !part.startsWith(":"))
) {
return "The : character can only appear directly after /";
}
return true;
}
function isValidUrl(value: string | undefined) {
try {
new URL(value || "");
return true;
} catch {
return "Invalid URL";
}
}
export const redirectType = defineType({
name: "redirect",
title: "Redirect",
type: "document",
icon: LinkIcon,
validation: (Rule) =>
Rule.custom((doc: SanityDocumentLike | undefined) => {
if (doc && doc.source === doc.destination) {
return ["source", "destination"].map((field) => ({
message: "Source and destination cannot be the same",
path: [field],
}));
}
return true;
}),
fields: [
defineField({
name: "source",
type: "string",
validation: (Rule) => Rule.required().custom(isValidInternalPath),
}),
defineField({
name: "destination",
type: "string",
validation: (Rule) =>
Rule.required().custom((value: string | undefined) => {
const urlValidation = isValidUrl(value);
const pathValidation = isValidInternalPath(value);
if (urlValidation === true || pathValidation === true) {
return true;
}
return typeof urlValidation === "boolean"
? urlValidation
: pathValidation;
}),
}),
defineField({
name: "permanent",
description: "Should the redirect be permanent (301) or temporary (302)",
type: "boolean",
initialValue: true,
}),
defineField({
name: "isEnabled",
description: "Toggle this redirect on or off",
type: "boolean",
initialValue: true,
}),
],
});
```
The additional validation logic now thoroughly checks:
- If the `source` is a valid internal path
- If the `destination` is a valid URL, or valid internal path
- If the `source` and `destination` values are different
## Pro tips from experience
- Keep an eye on redirect chains, they can cause "too many redirects" errors
- Clean up old redirects periodically
- Consider logging redirects if you need to track usage
- Adjust the cache duration based on how often you update redirects
- You may need to redeploy your site as new redirects are added or existing redirects are modified
Next up, you'll learn how to generate Open Graph images using Tailwind CSS and Vercel edge functions.
---
## Lesson 5: Creating dynamic Open Graph images
https://www.sanity.io/learn/course/seo-optimization/creating-dynamic-open-graph-images-with-vercel-og
Generate dynamic Open Graph images that pull your data directly from Sanity, saving you hours of design work and ensuring your social previews are always up to date with your content.
Open Graph images (or social cards) are the preview images that appear when your content is shared on social media platforms. It is proven that having these images included with your social shares increases click through rates.
Dependent on which platform you're sharing to, you may want to create a range of different aspect ratios. For this tutorial, you'll create the most common size, `1200x630` pixels.
As always, you'll set this up in such a way that if you do upload a bespoke image to the `seo.image` field, it will override the automatically generated one.
## Learning objectives
By the end of this lesson, you'll be able to:
- Generate dynamic Open Graph images using Next.js Edge Runtime
- Extract and use dominant colors from featured images
- Create professional, branded social previews
### Setting up the edge route
Let's create a new API route using Next.js Edge Runtime. This route will:
- Accept a parameter to dynamically fetch data
- Return an image response using Next.js `ImageResponse`
Make sure before you proceed any further, you have read the [limitations](https://vercel.com/docs/functions/og-image-generation#limitations) of Open Graph image generation on Vercel.
- [ ] **Create** a new route in your Next.js application
```tsx:src/app/api/og/route.tsx
import { ImageResponse } from "next/og";
export const runtime = "edge";
const dimensions = {
width: 1200,
height: 630,
};
export async function GET(request: Request) {
const { searchParams } = new URL(request.url);
const title = searchParams.get("title");
return new ImageResponse(
(
<div tw="flex w-full h-full bg-blue-500 text-white p-10">
<h1 tw="text-6xl font-bold">{title || "Missing title parameter"}</h1>
</div>
),
dimensions
);
}
```
Visit [http://localhost:3000/api/og?title=hello](http://localhost:3000/api/og?title=hello) and you should see an image rendered of a blue rectangle with the word "hello" in the top right.
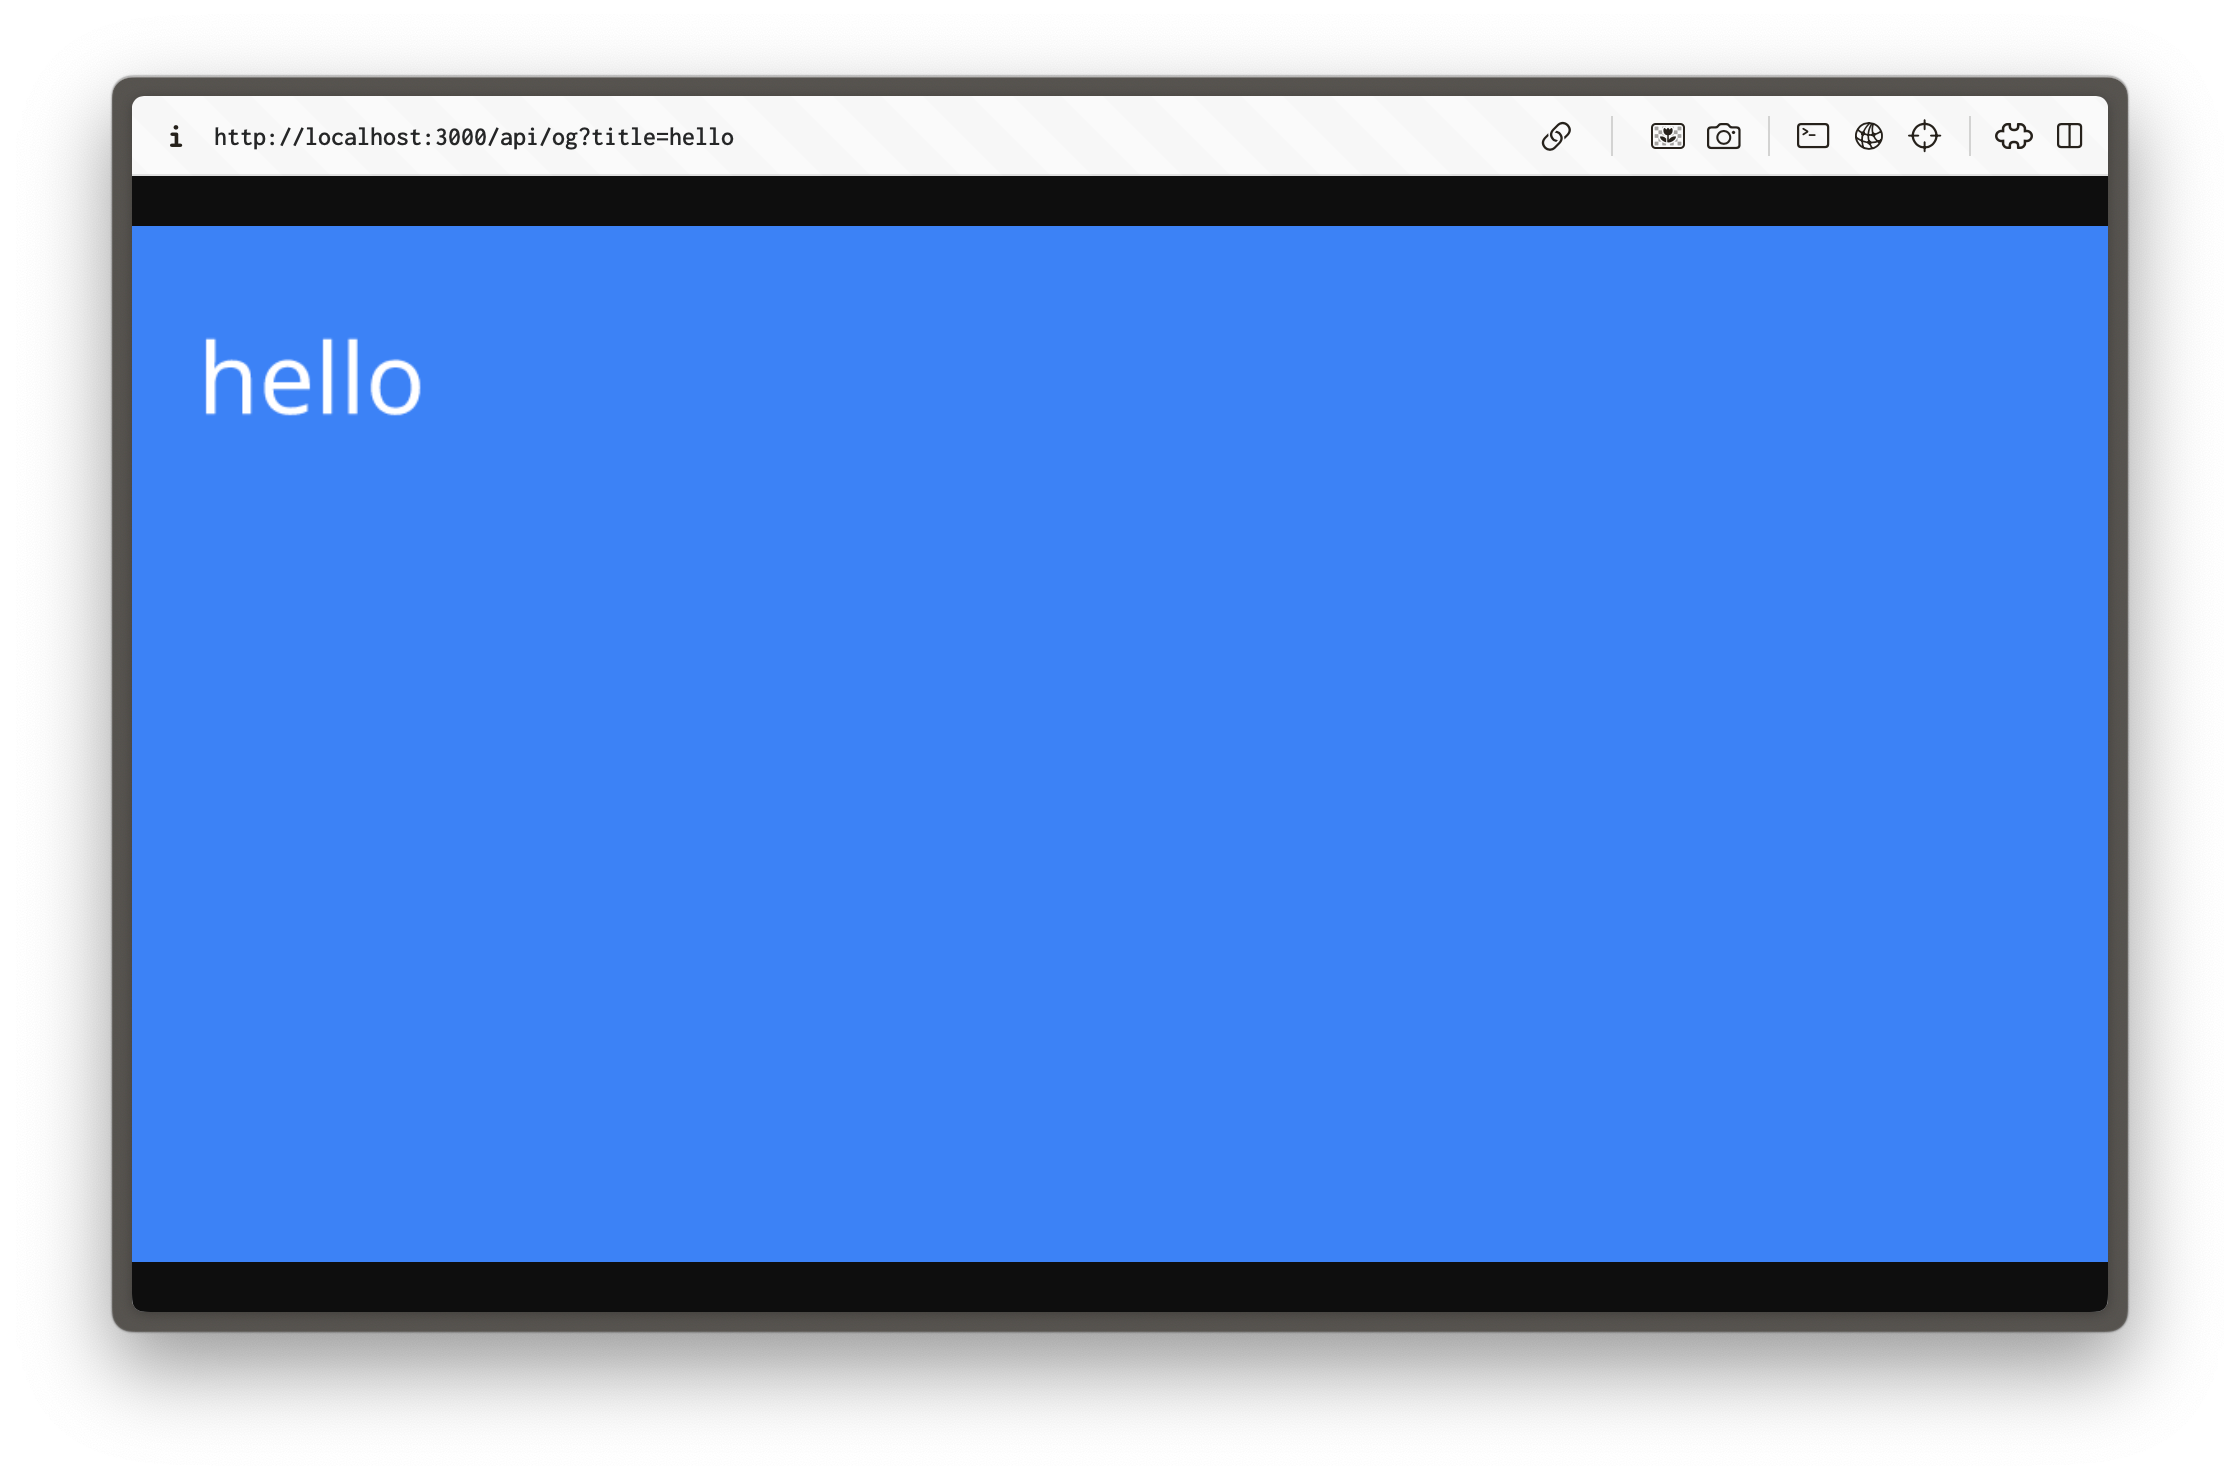
This creates a route that generates an image which will render whatever was passed into the title parameter.
We're using Tailwind CSS utility classes in a `tw` prop for styling. If you use `className` you will get an error. This is all part of how the `ImageResponse` function works.
This works, but isn't much to look at. And at present any user could enter *any* value for the `title` parameter and have it render a custom image. Not safe! If we're going to render content, it's better to do so from a single source of truth. Your Content Lake.
### Creating the Sanity query
We'll need to fetch specific data for our OG images:
- Page title
- Featured image URL
- Color palette information
[There's lots of neat metadata you can pull from Sanity images](https://www.sanity.io/docs/image-metadata), such as the dominant colors within an image. We'll use these as part of the design.
- [ ] **Update** queries with a GROQ query for the data needed to generate an image
```typescript:src/sanity/lib/queries.ts
// ...all other queries
export const OG_IMAGE_QUERY = defineQuery(`
*[_id == $id][0]{
title,
"image": mainImage.asset->{
url,
metadata {
palette
}
}
}
`);
```
- [ ] **Update** the route that generates the OG image to fetch data based on the search parameter `id`
```tsx:src/app/api/og/route.tsx
import { client } from "@/sanity/lib/client";
import { urlFor } from "@/sanity/lib/image";
import { OG_IMAGE_QUERY } from "@/sanity/lib/queries";
import { notFound } from "next/navigation";
import { ImageResponse } from "next/og";
export const runtime = "edge";
async function loadGoogleFont(font: string, text: string) {
const url = `https://fonts.googleapis.com/css2?family=${font}&text=${encodeURIComponent(text)}`;
const css = await (await fetch(url)).text();
const resource = css.match(
/src: url\((.+)\) format\('(opentype|truetype)'\)/
);
if (resource) {
const response = await fetch(resource[1]);
if (response.status == 200) {
return await response.arrayBuffer();
}
}
throw new Error("failed to load font data");
}
export async function GET(request: Request) {
const { searchParams } = new URL(request.url);
const id = searchParams.get("id");
if (!id) {
notFound();
}
const data = await client.fetch(OG_IMAGE_QUERY, { id });
if (!data) {
notFound();
}
const vibrantBackground =
data?.image?.asset?.metadata?.palette?.vibrant?.background ?? "#3B82F6";
const darkVibrantBackground =
data?.image?.asset?.metadata?.palette?.darkVibrant?.background ?? "#3B82F6";
const text = data.title || "";
return new ImageResponse(
(
<div
tw="flex w-full h-full relative"
style={{
background: `linear-gradient(135deg, ${vibrantBackground} 0%, ${darkVibrantBackground} 100%)`,
}}
>
{/* Content container */}
<div tw="flex flex-row w-full h-full relative">
{/* Text content */}
<div tw="flex-1 flex items-center px-10">
<h1 tw="text-7xl tracking-tight leading-none text-white leading-tight">
{text}
</h1>
</div>
{/* Image container */}
{data.image && (
<div tw="flex w-[500px] h-[630px] overflow-hidden">
{/* eslint-disable-next-line @next/next/no-img-element */}
<img
src={urlFor(data.image).width(500).height(630).url()}
alt=""
tw="w-full h-full object-cover"
/>
</div>
)}
</div>
</div>
),
{
width: 1200,
height: 630,
fonts: [
{
name: "Inter",
data: await loadGoogleFont("Inter", text),
weight: 400,
style: "normal",
},
],
}
);
}
```
This query fetches the page title, image, and its color palette information—all based on the value of an ID passed to the route. It uses this data to create a dynamic background color based on the image.
The route now also uses the font Inter, [fetched from Google Fonts](https://fonts.google.com/specimen/Inter).
You can test this route by visiting `/api/og?id=your-document-id` in your browser, replacing `your-document-id` with an actual Sanity document ID.
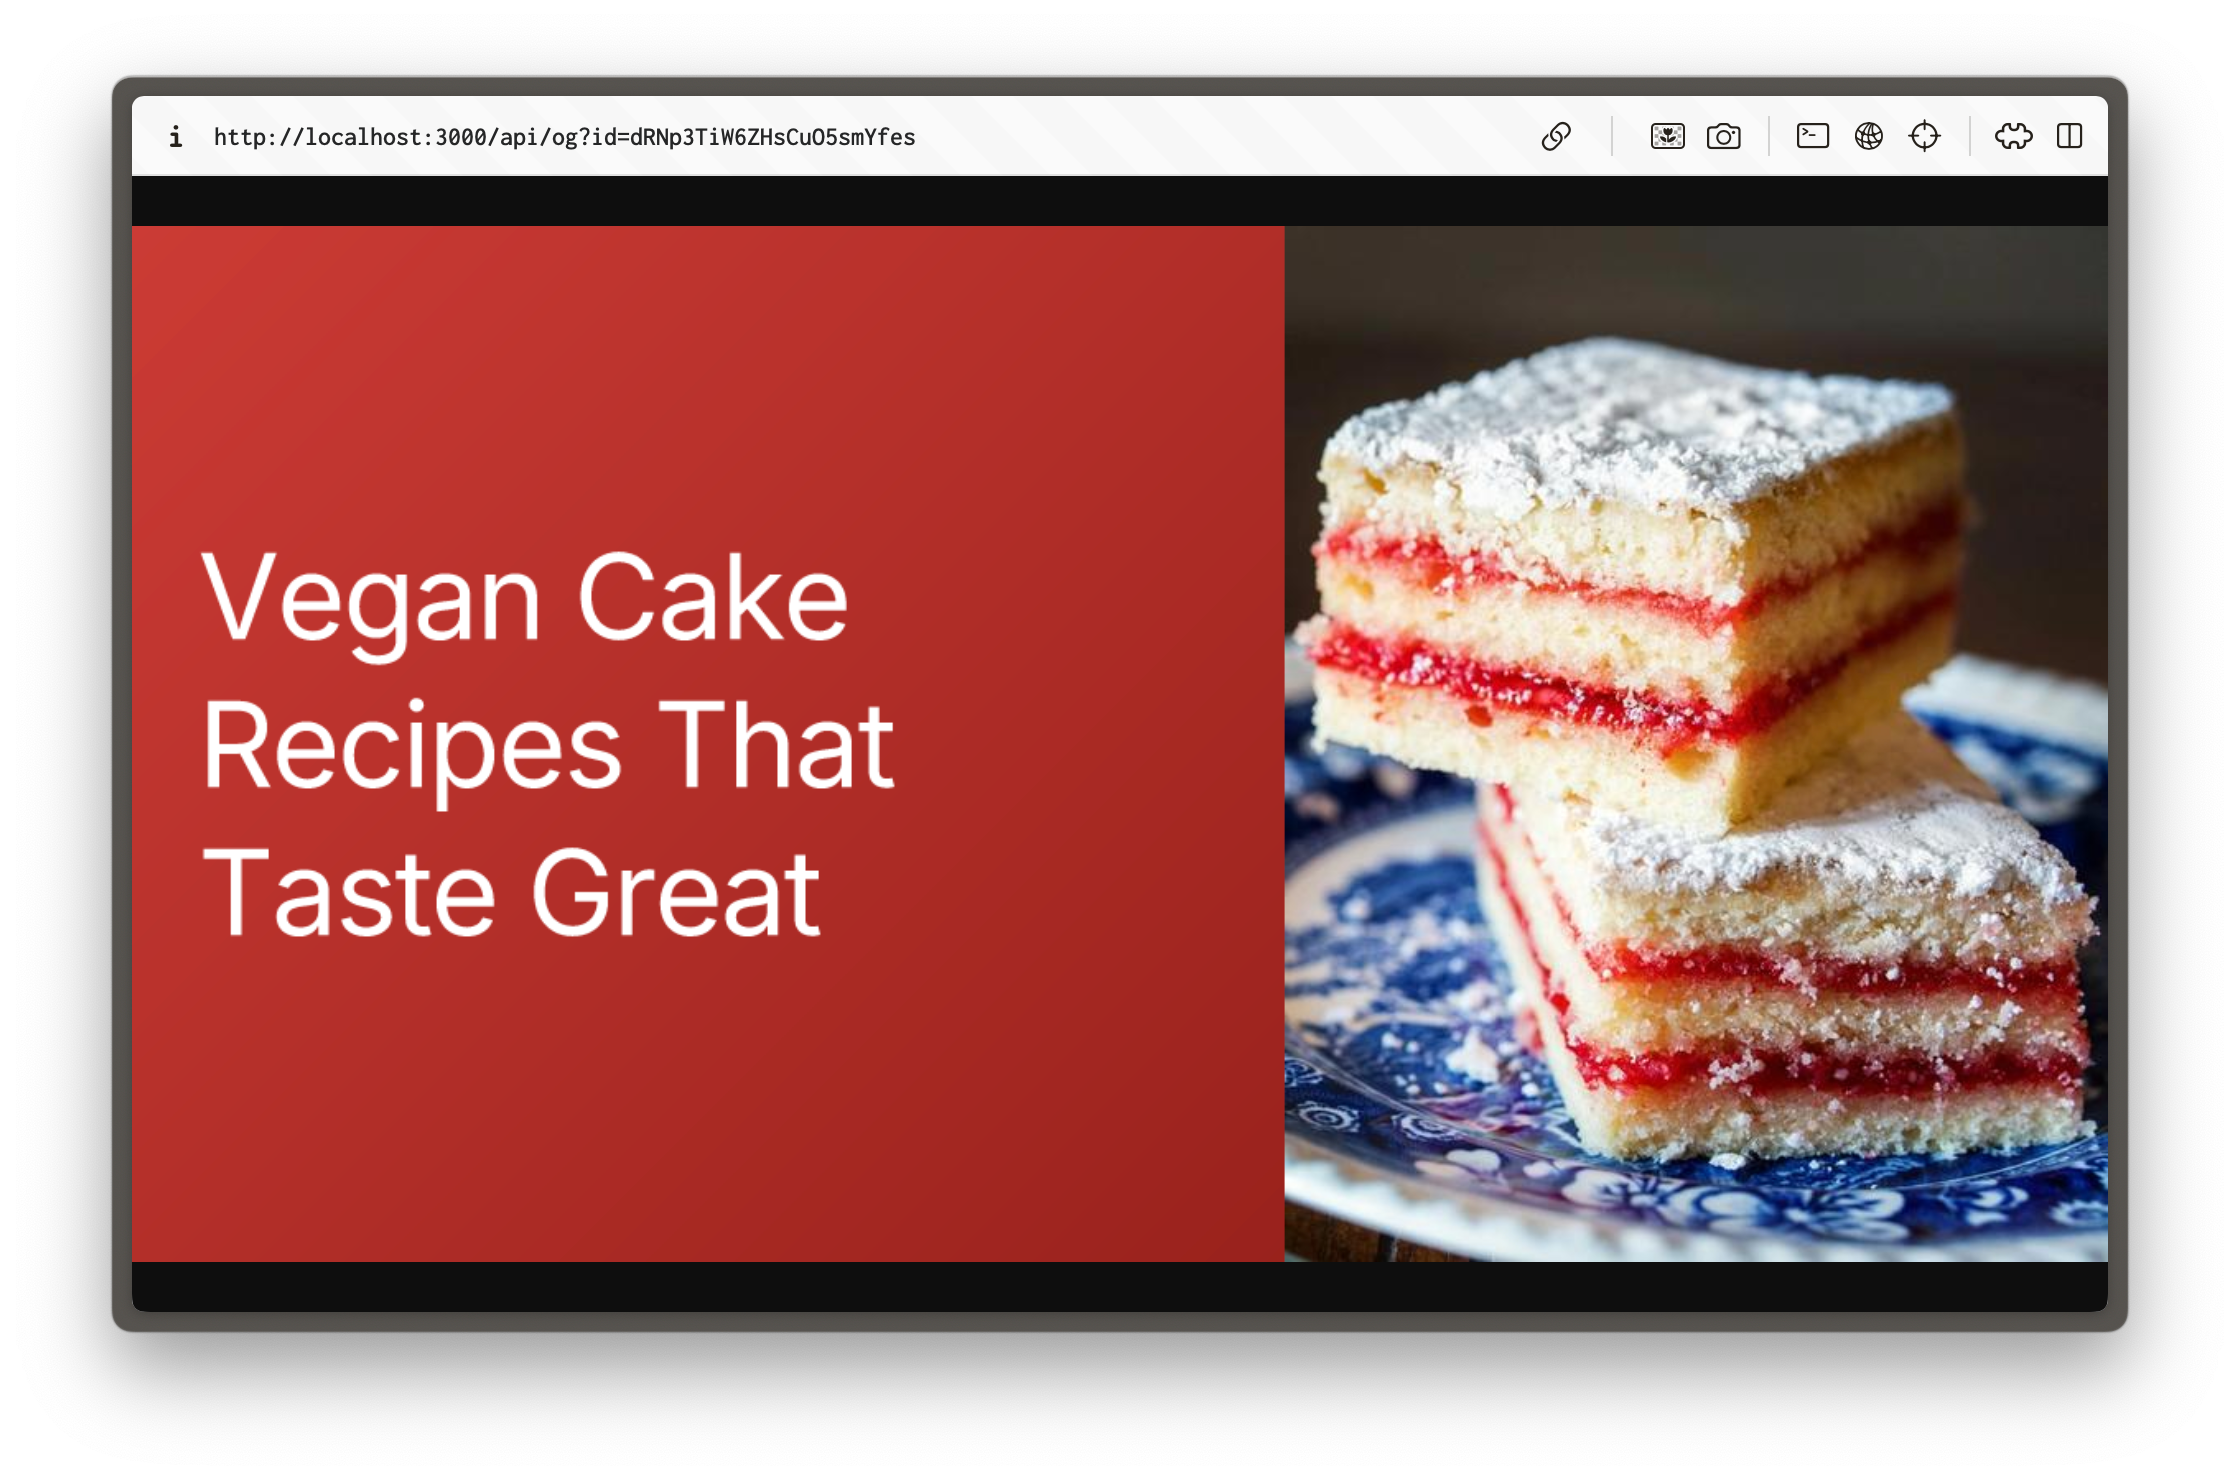
The image template includes:
- A dynamic background color based on the featured image
- The page title
- The featured image, respecting its crop and hotspot settings
What we have now is a basic—but working—prototype for the future. You could extend this design or even explore creating different layouts depending on the value of the document's `_type`.
### Implementing metadata
Now that you have your Open Graph image generation set up, it will need to be added to each route's metadata so that it renders when that URL is shared.
- [ ] **Update** the `generateMetadata` function in your `page` and `post` routes to use the dynamically generated Open Graph image, if an image is not specified in the document
```typescript:src/app/(frontend)/[slug]/page.tsx
// ...all your imports
export async function generateMetadata({
params,
}: RouteProps): Promise<Metadata> {
const { data: page } = await getPage(params);
if (!page) {
return {};
}
const metadata: Metadata = {
metadataBase: new URL('https://acme.com'),
title: page.seo.title,
description: page.seo.description,
};
metadata.openGraph = {
images: {
url: page.seo.image
? urlFor(page.seo.image).width(1200).height(630).url()
: `/api/og?id=${page._id}`,
width: 1200,
height: 630,
},
};
if (page.seo.noIndex) {
metadata.robots = "noindex";
}
return metadata;
}
```
Be sure to copy this logic over to your individual post route as well.
This setup generates metadata dynamically for each page, uses the page's Sanity ID to generate the correct Open Graph image, and maintains consistent dimensions across platforms.
## Testing your implementation
There are a few ways to test your implementation.
If you have a service like [ngrok](https://ngrok.com/) setup locally you can pipe your local development environment to an external URL, and then run that URL through an Open Graph previewing service.
> [!TIP]
> [opengraph.ing](https://opengraph.ing/) is a simple service for validating your social previews in multiple applications and services
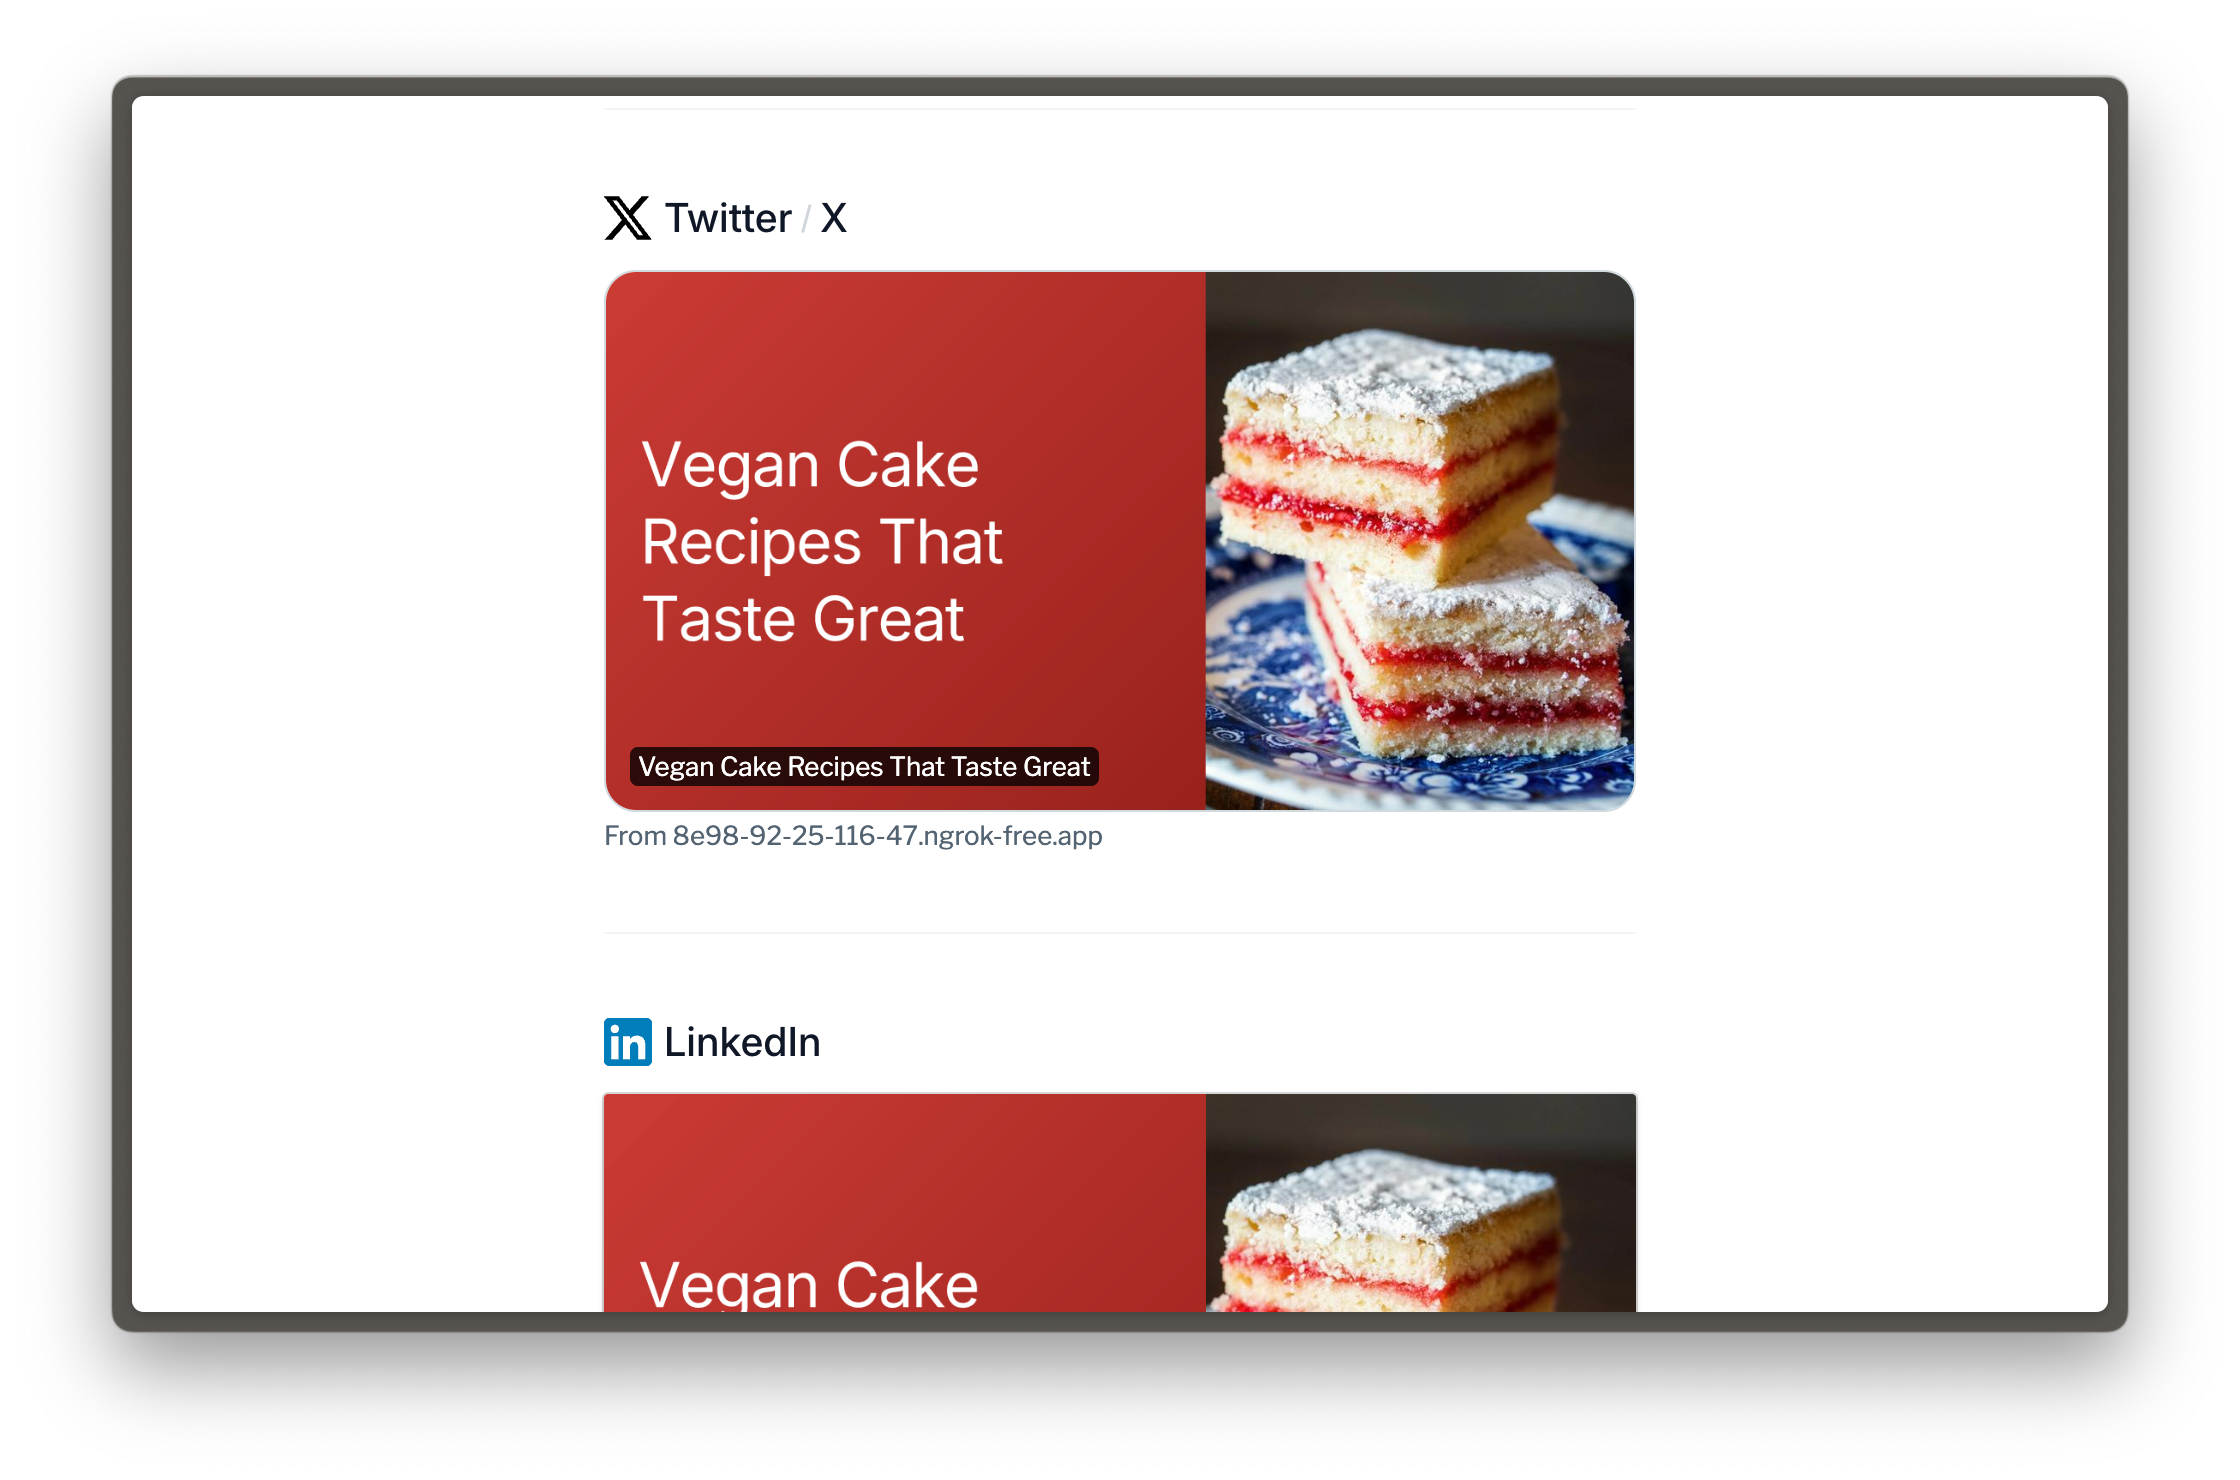
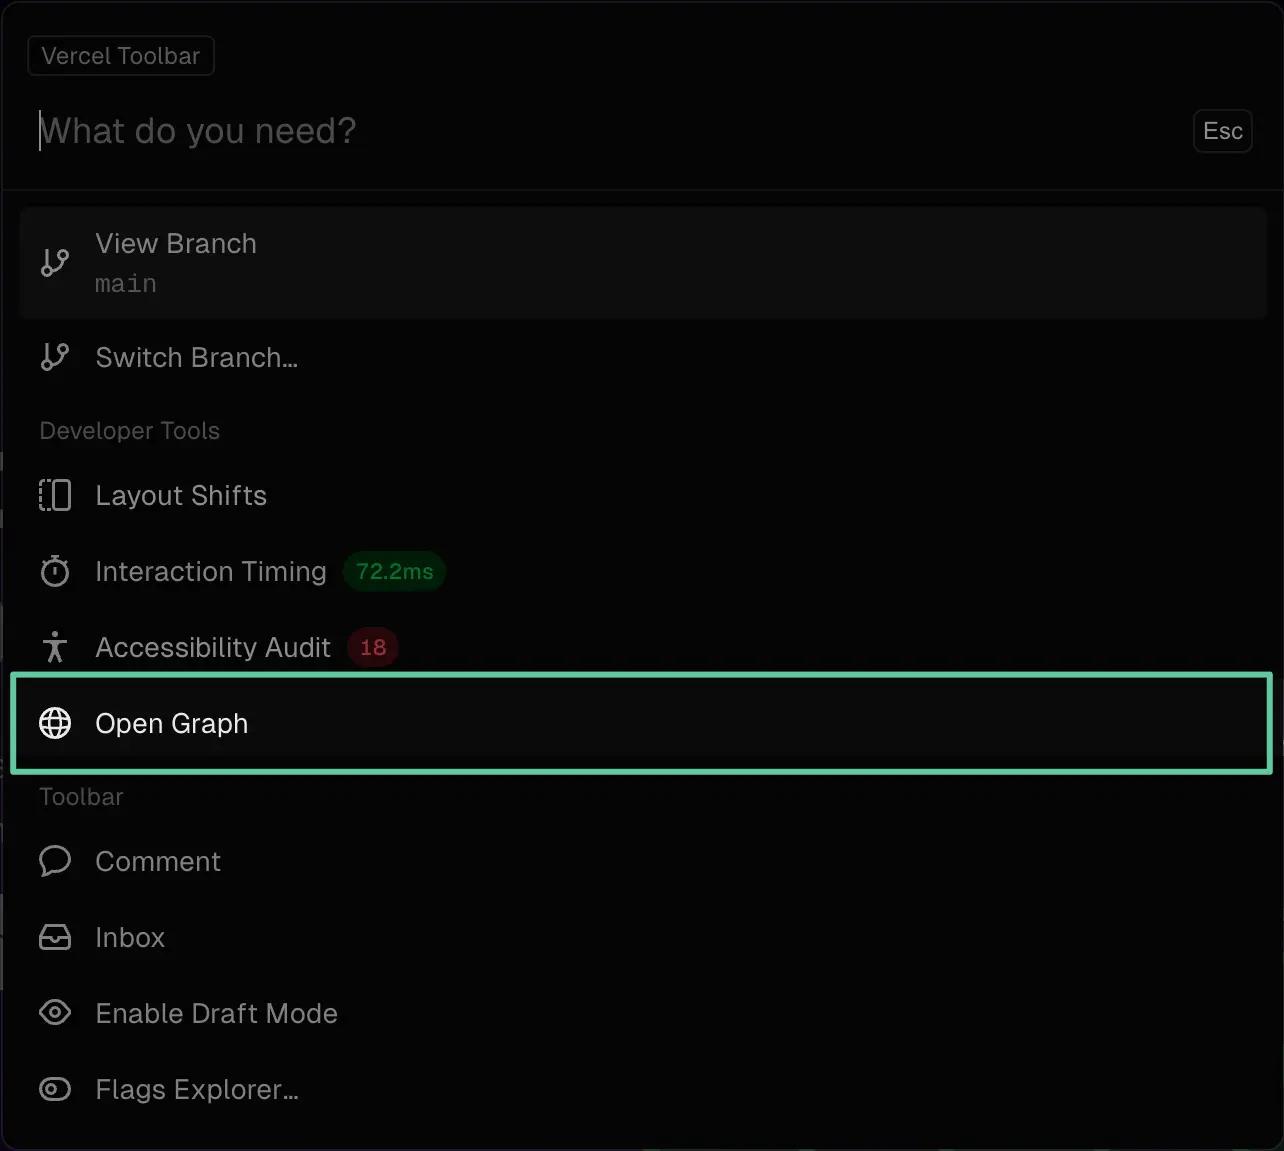
Once you're ready to deploy, you can check the implementation from your preview environment. Once deployed you can use the Vercel toolbar to preview your site and see the Open Graph image.
Other alternatives include using platform-specific debugging tools:
- [Facebook Sharing Debugger](https://developers.facebook.com/tools/debug/)
- [Twitter Card Validator](https://cards-dev.twitter.com/validator)
- [LinkedIn Post Inspector](https://www.linkedin.com/post-inspector/)
These tools allow you to test your Open Graph image on the platform you are sharing to, and see the preview image. There is an added benefit of these tools, that some of them force the cache to be invalidated, which means you can see the latest version of your Open Graph image across that social platform.
The next lesson will cover remixing content for social platforms using the Sanity AI Assistant.
---
## Lesson 6: Generate social posts from your content
https://www.sanity.io/learn/course/seo-optimization/ai-generate-social-posts-from-your-content
Speed up ideation of social media posts. And as a result, boost your SEO from sharing your content to a wider audience across different social platforms.
> [!NOTE]
> This lesson uses features only available in paid plans. If you started a new project for this course, you can test these features during the free trial period. You can also start a new free project at any time.
Summarizing existing content and making it more useful in different forms is one of the best features of AI tooling. Sanity AI Assist makes it possible for authors to automatically generate new content, using existing fields along with prompts that they can save and share.
In this lesson you'll use Sanity AI Assist to generate text to post on social networks while sharing a link to the content.
> [!TIP]
> Read more about [Sanity AI Assist](https://www.sanity.io/docs/install-and-configure-sanity-ai-assist) in the documentation
## Create new schema types
First you'll need new fields to write content to. Just like you made a new custom object schema type for SEO fields, create another for social networks.
In the example below we've chosen only LinkedIn and X (formerly known as Twitter) for now, feel free to include any of the countless others.
- [ ] **Create** a new `social` object schema type
```typescript:src/sanity/schemaTypes/socialType.ts
import { defineField, defineType } from "sanity";
export const socialType = defineType({
name: "social",
title: "Social",
type: "object",
fields: [
defineField({
name: "linkedIn",
title: "LinkedIn",
type: "text",
rows: 3,
}),
defineField({
name: "x",
description: "Formerly known as Twitter",
type: "text",
rows: 2,
}),
],
});
```
Don't forget to register this type to your Sanity Studio schema types
```typescript:src/sanity/schemaTypes/index.ts
// ...all other imports
import { socialType } from "./socialType";
export const schema: { types: SchemaTypeDefinition[] } = {
types: [
// ...all other types
socialType,
],
};
```
- [ ] **Update** your `page` and `post` schema types to include the `social` field.
```typescript:src/sanity/schemaTypes/pageType.ts
export const pageType = defineType({
// ...all other settings
fields: [
// ...all other fields
defineField({
name: "social",
type: "social",
}),
],
});
```
## Install Sanity AI Assist
To automatically generate content for these fields, you'll now install and configure the Sanity AI assistant.
- [ ] **Run** the following in your terminal
```sh:Terminal
npm install @sanity/assist
```
- [ ] **Update** your Sanity Studio config file to include the `assist` plugin
```typescript:sanity.config.ts
// ...all other imports
import { assist } from "@sanity/assist";
export default defineConfig({
// ...all other config
plugins: [
// ...all other plugins
assist(),
],
});
```
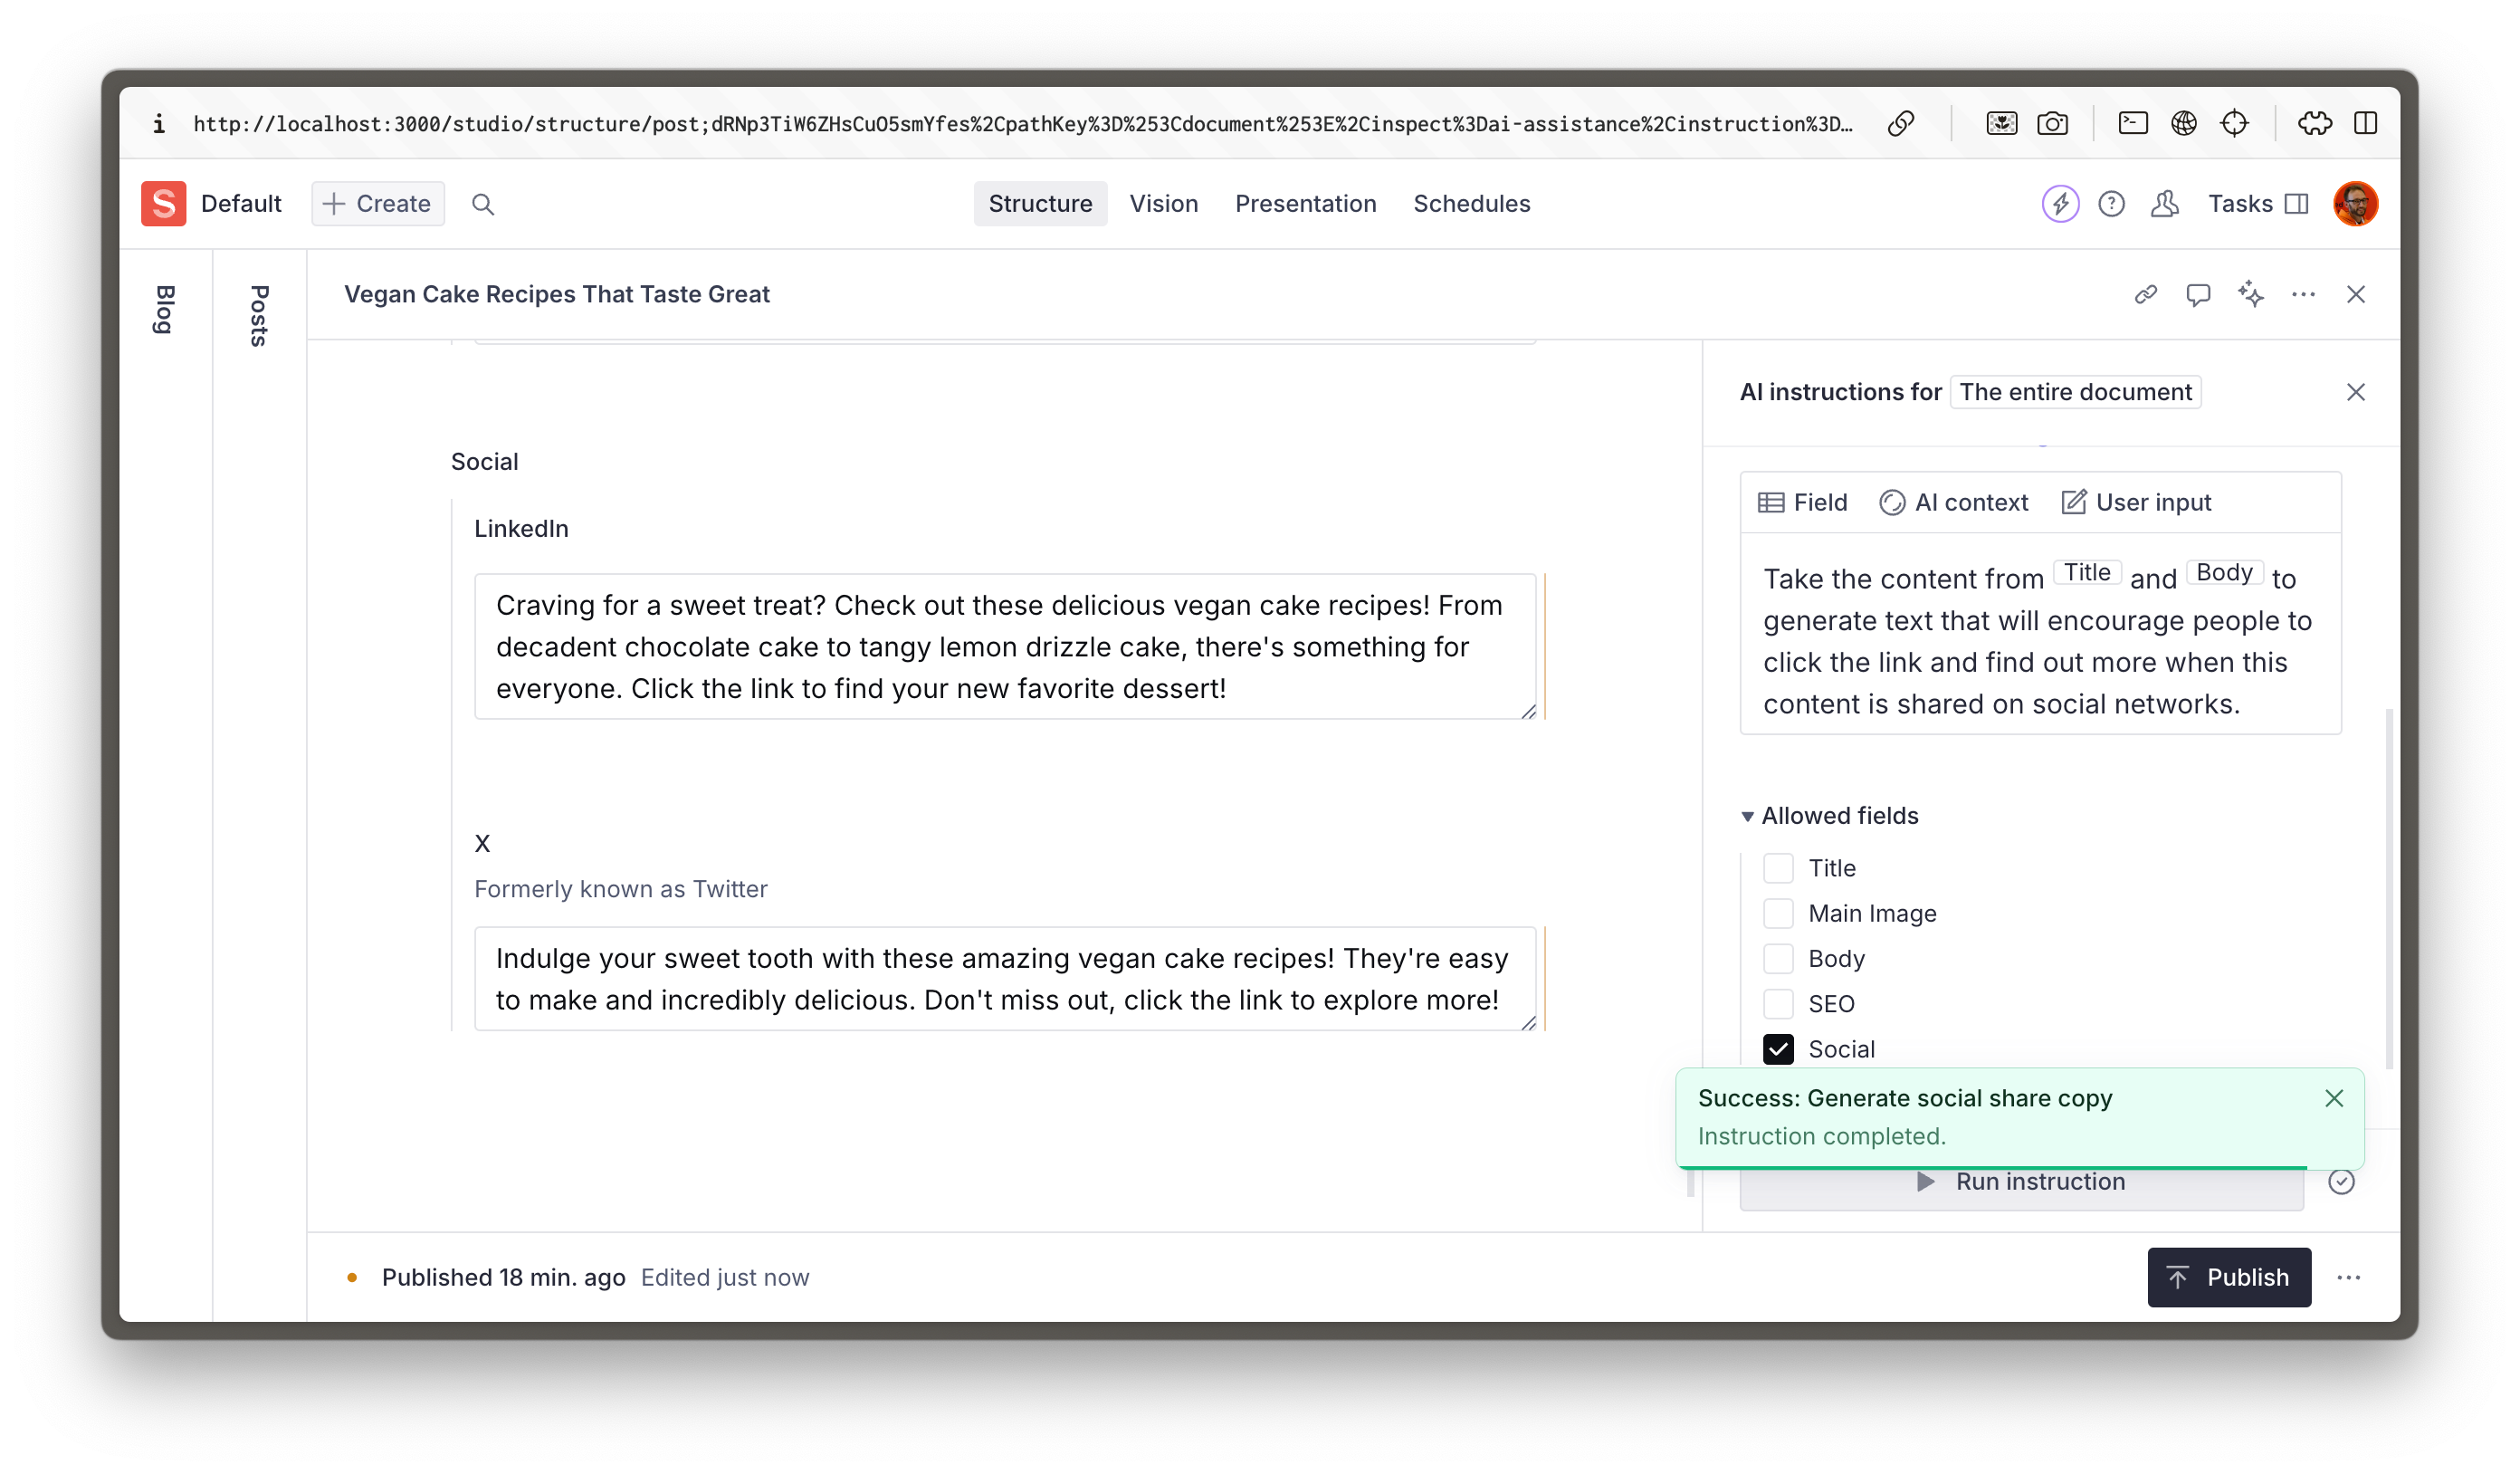
With this installed you can create a prompt to help Sanity AI Assist generate content from your existing fields.
Sanity AI Assist works at both field level and document level, however, for this example, you will be using the document level. Look at the top right of the Studio with any document open and you should see a sparkly new icon.
The first time you click this button you may be asked to Enable AI Assist
- [ ] Click **Enable AI Assist**
You can see there are currently no instructions.
- [ ] Click **Add item** to create your first instruction.
What we want AI Assist to do is to summarize the main body of the document
You're going to create a new prompt, use the example below for guidance.
Where you see the boxes like `[Title]`, replace these with references to the fields in your document.
Make sure the **Allowed fields** is set to only write to the **Social** field object.
- [ ] **Create** your new Instruction and run it
```
Take the content from [title] and [body] to generate text that will encourage people to click the link and find out more when this content is shared on social networks.
```
> [!TIP]
> Writing prompts for AI is a bit of an art form! Take a look at the [instructions cheat sheet](https://www.sanity.io/docs/ai-assist-cheat-sheet) in the documentation for inspiration.
### Posting to social networks
In this lesson you're only using Sanity to **generate** text for posting to social networks. So for now your authors would need to copy and paste them from Sanity. There are a variety of third-party tools available to automate this process.
Please use the feedback form below to let us know if you have preferred ways to automate posting to social networks.
### Adapt to your tone of voice
By default, AI-generated copy can be generic. Consider adding some **AI context** documents (now visible in your Studio structure) to inform your preferred writing style and tone of voice. You can then add this context to your instruction, so that copy generated in future will be consistently informed.
In the following lesson, you'll create a dynamic sitemap that automatically updates when content changes. Helping search engines discover and index your content more effectively.
---
## Lesson 7: Build a dynamic sitemap
https://www.sanity.io/learn/course/seo-optimization/building-a-dynamic-sitemap
A sitemap helps search engines understand and index your website more effectively. Generate a dynamic sitemap to guide search crawlers through your content, showing them what pages exist and how often they change.
A well-structured sitemap gives search engines clear guidance about your content hierarchy and update frequency.
## Why this approach?
Search engines like Google use sitemaps as a primary method to discover and understand your content. While they can crawl your site naturally through links, a sitemap:
1. Ensures all your content is discoverable, even pages that might be deep in your site structure
2. Helps search engines understand when content was last updated
3. Allows you to indicate content priority
4. Speeds up the indexing process for new content
This is especially important for dynamic content managed through Sanity, where pages might be added or updated frequently.
## Learning objectives
By the end of this lesson, you will:
- Create a dynamic sitemap from Sanity content
- Implement graceful validation error handling
### Understanding sitemaps
Before diving into the code, let's understand what makes a good sitemap from a technical perspective:
- **XML Format**: Search engines expect a specific XML format
- **Last Modified Dates**: Helps search engines know when content was updated
- **Change Frequency**: Indicates how often content changes
- **Priority**: Suggests the importance of pages
### Building the sitemap
Let's start with a GROQ query to fetch all `page` and `post` type documents.
- [ ] **Update** `queries.ts` to include `SITEMAP_QUERY`
```typescript:src/sanity/lib/queries.ts
// ...all other queries
export const SITEMAP_QUERY = defineQuery(`
*[_type in ["page", "post"] && defined(slug.current)] {
"href": select(
_type == "page" => "/" + slug.current,
_type == "post" => "/posts/" + slug.current,
slug.current
),
_updatedAt
}
`)
```
This query:
- Gets all documents of type `page` and `post`
- Dynamically creates a complete path depending on the value of `_type`
- Returns that path as `href`, and the last updated date of the document
You've created a new query, so you'll need to create new types.
```sh:Terminal
pnpm run typegen
```
The Next.js app router has a special, reserved route for generating an XML sitemap response from an array of objects in JavaScript.
> [!TIP]
> See the Next.js documentation for more details on the [sitemap route](https://nextjs.org/docs/app/api-reference/file-conventions/metadata/sitemap)
The route below fetches content from Sanity using the query above, and generates the shape of content response that Next.js requires.
- [ ] **Create** a new route to generate the sitemap
```typescript:src/app/sitemap.ts
import { MetadataRoute } from "next";
import { client } from "@/sanity/lib/client";
import { SITEMAP_QUERY } from "@/sanity/lib/queries";
export default async function sitemap(): Promise<MetadataRoute.Sitemap> {
try {
const paths = await client.fetch(SITEMAP_QUERY);
if (!paths) return [];
const baseUrl = process.env.VERCEL
? `https://${process.env.VERCEL_URL}`
: "http://localhost:3000";
return paths.map((path) => ({
url: new URL(path.href!, baseUrl).toString(),
lastModified: new Date(path._updatedAt),
changeFrequency: "weekly",
priority: 1,
}));
} catch (error) {
console.error("Failed to generate sitemap:", error);
return [];
}
}
```
### Testing your sitemap
After deploying your changes, you can test your sitemap by visiting [http://localhost:3000/sitemap.xml](http://localhost:3000/sitemap.xml) on your site.
You should see something like this:
```xml
<urlset xmlns="http://www.sitemaps.org/schemas/sitemap/0.9">
<url>
<loc>http://localhost:3000/welcome-to-layer-caker</loc>
<lastmod>2025-01-10T14:13:34.000Z</lastmod>
<changefreq>weekly</changefreq>
<priority>1</priority>
</url>
<!-- // all other URLs... -->
</urlset>
```
Even if your sitemap looks correct, checking with a sitemap validator tool is recommended. Especially as your website grows. It's very easy to miss validation errors. A solid option is [XML Sitemaps](https://www.xml-sitemaps.com/validate-xml-sitemap.html) for a free and quick check.
### Best practices
To ensure your sitemap is doing what it's meant to, keep these points in mind:
- **Regular Updates**: Your sitemap should update when content changes
- **Size Limits**: Keep under 50,000 URLs **per sitemap file**
- **Valid URLs**: Ensure all URLs are properly formatted
At this stage, your sitemap will now automatically update whenever you publish new content in Sanity, helping search engines discover and index your content.
As you continue to enhance your sitemap implementation and expand out through other document types, you may want to consider adding different priorities for different page types to help search engines understand the relative importance of your content.
Next, you'll explore structured data and JSON-LD, a clever way of reusing your documents for set-and-forget SEO benefits.
---
## Lesson 8: Generating JSON-LD dynamically
https://www.sanity.io/learn/course/seo-optimization/generating-json-ld-dynamically
JSON-LD is a powerful way to provide structured data to search engines—fortunately structured data is what Sanity does best.
JSON-LD data follows structured conventions for many different types of content. All you'll need to do is take content already authored in your documents, and render it into the DOM in the expected format. We already have FAQs as a document type, so it makes sense to start there.
When it comes to FAQs, proper JSON-LD implementation can help your content appear in rich snippets and potentially even surface you near the top of search results just by providing useful information.
## Learning objectives
By the end of this lesson, you will:
- Generate JSON-LD for FAQs programmatically
- Implement type-safe JSON-LD using Google's `schema-dts` package
- Improve your FAQ block from the page builder course
### Understanding JSON-LD generation
JSON-LD generation can be challenging to get right as it follows a strict structure. Fortunately, [Google provides a TypeScript package](https://github.com/google/schema-dts) called `schema-dts` that gives you type safety for your structured content.
Let's start by creating a function that transforms your FAQ data into a JSON-LD friendly structure. Back in [Create page builder schema types](https://www.sanity.io/learn/course/page-building/create-page-builder-schema-types) you created a document type schema for FAQs.
- [ ] **Run** the following to install the `schema-dts` package
```sh:Terminal
pnpm add schema-dts
```
Currently in the GROQ query for pages the FAQ block is returning the full document for every reference.
Let's update this to only extract specific fields from the document, as well as the Portable Text in the `body` field as a string using the GROQ function `pt::text()`
- [ ] **Update** your GROQ query for pages, to return the answer in plain text
```groq:src/sanity/lib/queries.ts
// replace this
faqs[]->
// with this
faqs[]->{
_id,
title,
body,
"text": pt::text(body)
}
```
You've updated your queries, so update your types
```sh:Terminal
pnpm run typegen
```
### Implementing FAQ JSON-LD in components
The JSON-LD markup can be rendered anywhere in the page—it doesn't need to be stored inside the `<head>`. So you can add it directly into components where you already have access to the correct data.
In this instance, you're rendering the FAQ content into an accordion in this block, so you can also have it process that same content into the JSON-LD format and add it to the component output.
- [ ] **Update** your `FAQs` block to render JSON-LD content in a script tag
```tsx:src/components/blocks/faqs.tsx
// ...all your imports and types
import { FAQPage, WithContext } from "schema-dts";
const generateFaqData = (faqs: FAQsProps["faqs"]): WithContext<FAQPage> => ({
"@context": "https://schema.org",
"@type": "FAQPage",
mainEntity: faqs?.map((faq) => ({
"@type": "Question",
name: faq.title!,
acceptedAnswer: {
"@type": "Answer",
text: faq.text!,
},
})),
});
export function FAQs({ _key, title, faqs }: FAQsProps) {
const faqData = generateFaqData(faqs);
return (
<section className="container mx-auto flex flex-col gap-8 py-16">
<script
type="application/ld+json"
dangerouslySetInnerHTML={{ __html: JSON.stringify(faqData) }}
/>
{/* ...the rest of the component */}
</section>
);
}
```
Notice the most important part of this block, the `<script>` tag. This is where you're adding the JSON-LD to the page. This should get you thinking about how you can reuse this pattern across your site.
The FAQ schema covered here is just the tip of the JSON-LD iceberg. The beauty of structured data is that once implemented, it works silently in the background to enhance your search presence.
Some other examples you may want to implement:
- [Product information](https://schema.org/Product)
- [Event information](https://schema.org/Event)
- [Blog post information](https://schema.org/BlogPosting)
## Conclusion
The more you lean into structured data, the more benefits you'll experience.
If there's one thing to take away from this whole course, it's that SEO doesn't need to be a complex process. It's about taking your existing data and repurposing it to make it more digestible for your audience and, by extension, for search crawlers.
The future of the web won't be about configuring hundreds of different fields to get the perfect SEO score. Instead, it will focus on finding ways to accelerate content creation and automating the tasks you don't want to do.
It's time to revise everything you've learned in the final lesson!
---
## Lesson 9: Sanity SEO quiz
https://www.sanity.io/learn/course/seo-optimization/sanity-seo-quiz
Let's test what you've learned in the prior lessons!
> **Question:** What is the benefit of using dynamic metadata in Next.js?
>
> 1. It reduces the website's loading time
> 2. It improves the server's performance
> 3. It automatically creates backlinks
> 4. It allows for page-specific SEO optimization based on content **[correct]**
> **Question:** When would you use a Sanity AI Assist context?
>
> 1. When you need to provide more information about your business within the prompt
> 2. When you need to add your specific writing style
> 3. When you need to reference important information that is regularly reused
> 4. All of the above **[correct]**
> **Question:** What is the purpose of the coalesce query in GROQ?
>
> 1. To override the value if another value has been provided **[correct]**
> 2. To combine the two values together
> 3. To type check the value inside of a Sanity field
> 4. To assess which is the bigger of two fields
> **Question:** Why might we specify an image, title and description, as well as an SEO title, SEO description, SEO image?
>
> 1. To create more work for the content editors
> 2. Because you cannot reuse fields in multiple locations
> 3. To be more granular when entering SEO information **[correct]**
> 4. To provide different content for different social media platforms
> **Question:** What is the recommended way to structure SEO fields in your Sanity schema?
>
> 1. Create unique schema types for each document type's SEO fields
> 2. Add SEO fields directly to the document type without any structure
> 3. Create a reusable SEO object type that can be referenced across different document types **[correct]**
> 4. Store all SEO fields in a single global configuration document
> **Question:** Why is there such a significant amount of validation within Next.js redirects?
>
> 1. To make the development process more complex
> 2. To slow down the build process
> 3. Because Next.js is overly cautious
> 4. Because providing incorrect redirect data can break your deployment pipeline **[correct]**
> **Question:** What is the key advantage of implementing a dynamic sitemap in a Sanity + Next.js project?
>
> 1. It makes the website load faster
> 2. It automatically updates when content changes **[correct]**
> 3. It improves the website's visual design
> 4. It automatically generates meta descriptions
> **Question:** When implementing schema markup with Next.js and Sanity, what is the recommended data format?
>
> 1. XML
> 2. JSON-LD **[correct]**
> 3. JavaScript
> 4. HTML microdata
> **Question:** What is considered best practice when implementing SEO features in a Sanity + Next.js project?
>
> 1. Hardcoding all SEO values in the Next.js files
> 2. Creating reusable schemas and components that can be managed by content creators **[correct]**
> 3. Managing everything through external SEO tools
> 4. Letting search engines handle everything automatically
> **Question:** What is the main purpose of implementing on-page schema in your website?
>
> 1. To make your website look better on social media
> 2. To increase your chance of search engines displaying rich results **[correct]**
> 3. To improve website loading speed
> 4. To create better URLs
---
## Related Resources
- [Track overview](https://www.sanity.io/learn/track/work-ready-next-js.md)
- [All courses and lessons](https://www.sanity.io/learn/sitemap.md)
- [Complete content for LLMs](https://www.sanity.io/learn/llms-full.txt)