
Learn how to customize how document lists and document views are organized in the Structure tool.
By default, the Structure tool will list all the unique document schema types registered to your Studio workspace. When you select a document type in the first pane, it will open a list of documents; when you select a document, it will open its form.
This is a good start, but you may want to filter, reorder, and decorate these lists. To do this, you can use the Structure Builder API, a powerful – but at times complex – set of functions and methods that lets you describe how the interface should work.
You start by giving the structureTool() plugin inside sanity.config.ts some additional configuration. It takes two parameters:
structure: defines which document lists are displayed.defaultDocumentNode: defines document views for document types, unless overwritten in structure.
Both of these parameters take functions that include the StructureBuilder object, commonly shortened to S. This object contains all the methods required to create customized lists of documents. It has both primitive methods that are fairly low-level, and convenience methods that have higher abstractions that do more out of the box.
You will start by making the titles for the document types pluralized. Notice how the convenience method documentTypeListItem(type) takes a document type name. Based on this one parameter, it defines what will appear in the next document pane when it’s selected, as well as configuration for document pane menus, and so on.
structureimport type {StructureResolver} from 'sanity/structure'import {CalendarIcon, UsersIcon, PinIcon} from '@sanity/icons'
export const structure: StructureResolver = (S) => S.list() .id('root') .title('Content') .items([ S.documentTypeListItem('event').title('Events').icon(CalendarIcon), S.documentTypeListItem('artist').title('Artists').icon(UsersIcon), S.documentTypeListItem('venue').title('Venues').icon(PinIcon), ])structure into the structureTool() plugin// Add to your importsimport {structure} from './structure'
// Update your plugins arrayconst config = defineConfig({ // ...all other settings plugins: [ structureTool({structure}), // ...all other plugins ],});The first column in your Structure tool should now show the same three document types as before but with pluralized titles and icons.
The first pane, or root pane, could be even more editor-friendly with dividers and filtered lists of documents.
structure to the code example below for filtered lists of eventsimport type {StructureResolver} from 'sanity/structure'import {CalendarIcon, UsersIcon, PinIcon} from '@sanity/icons'
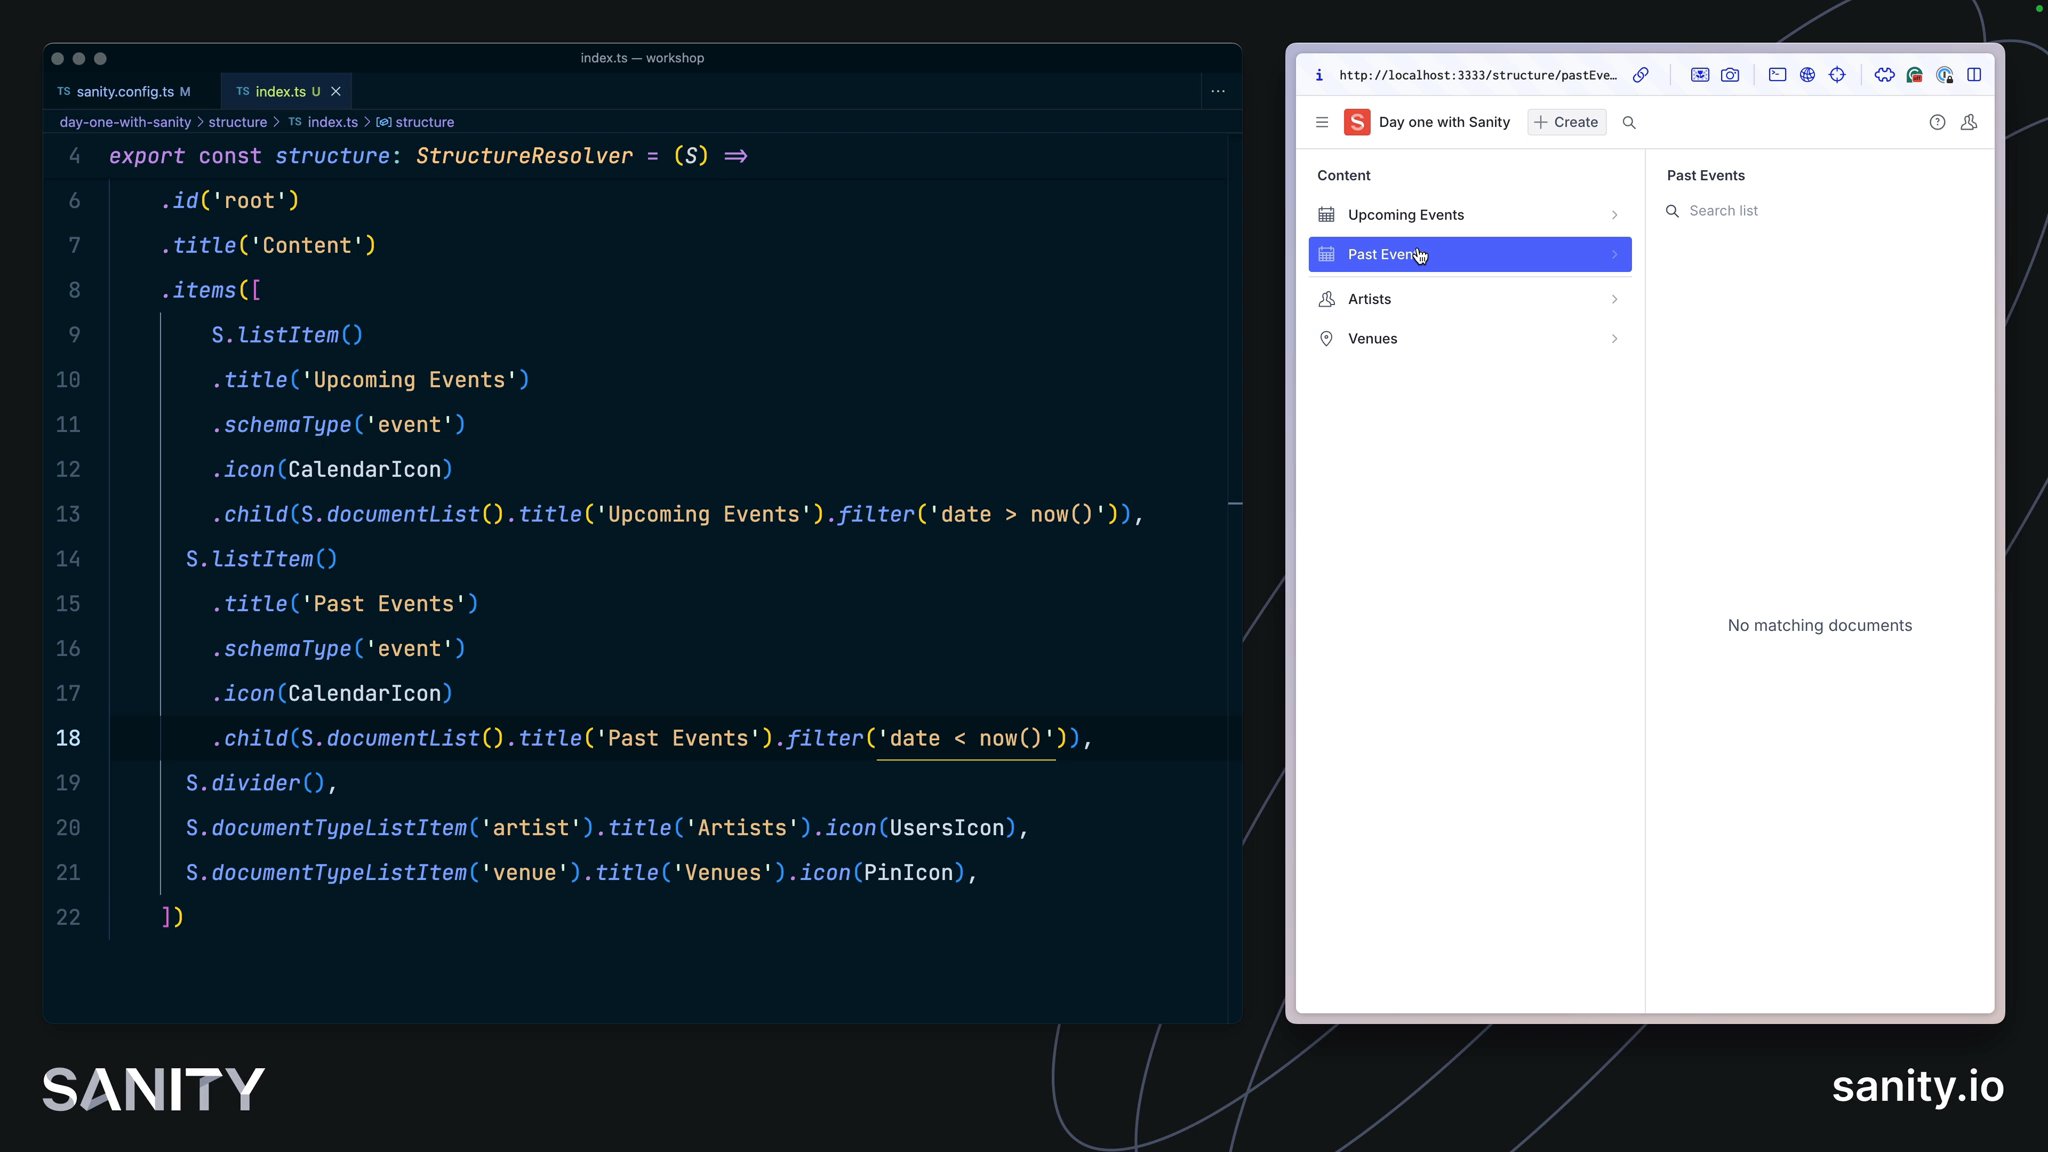
export const structure: StructureResolver = (S) => S.list() .id('root') .title('Content') .items([ S.listItem() .title('Upcoming Events') .schemaType('event') .icon(CalendarIcon) .child(S.documentList().title('Upcoming Events').filter('date > now()')), S.listItem() .title('Past Events') .schemaType('event') .icon(CalendarIcon) .child(S.documentList().title('Past Events').filter('date < now()')), S.divider(), S.documentTypeListItem('artist').title('Artists').icon(UsersIcon), S.documentTypeListItem('venue').title('Venues').icon(PinIcon), ])Your first column should now look like this, with events helpfully filtered into separate lists.
This is an example of using structured content to power useful and data-driven groupings of documents. You didn't have to make new content types for "upcoming" and "past" events, or compromise your content model in other ways.
The Structure tool can be configured to change document view options in the document editor. Each document type can have a default set of views. The document form is the default view.
Document views help give additional context to the editing experience. You might load in a web preview, text analysis, or analytics alongside the editor so your content creators don't lose context as they create.
Any React component can be loaded into a View Pane. For simplicity today, you'll set up the Documents Pane plugin to display a list of events an artist is referenced in.
npm install sanity-plugin-documents-panedefaultDocumentNode file in your Studio. import type {DefaultDocumentNodeResolver} from 'sanity/structure'import DocumentsPane from 'sanity-plugin-documents-pane'
export const defaultDocumentNode: DefaultDocumentNodeResolver = (S, {schemaType}) => { switch (schemaType) { case `artist`: return S.document().views([ S.view.form(), S.view .component(DocumentsPane) .options({ query: `*[_type == "event" && references($id)]`, params: {id: `_id`}, options: {perspective: 'previewDrafts'} }) .title('Events'), ]) default: return S.document().views([S.view.form()]) }}defaultDocumentNode into the structureTool() plugin// Update your importsimport {structure} from './structure'import {defaultDocumentNode} from './structure/defaultDocumentNode'
// Update your plugins arrayconst config = defineConfig({ // ...all other settings plugins: [ structureTool({ structure, defaultDocumentNode }), // ...all other plugins ],});When you open any Artist document, you should now see a list of any Events in which they are referenced.
Your Studio now has customized lists and document view panes.
We have only scratched the surface of what you can do with the Structure Builder API: You can load different structures for different users, update sorting options, and more.
In your structure filters, you may have noticed some GROQ to filter results – it’s time to learn how GROQ works!