Presenting images
Presenting images through the Sanity image pipeline
Sanity provides a powerful image pipeline that gives you access to a globally-distributed asset CDN. This allows you to request images in various sizes, crops, and formats on demand, with assets automatically cached close to your users for optimal performance.
This guide explains how to effectively present and transform images from your Sanity Content Lake in your front-end applications. For information about how assets are stored or uploaded, see the Assets documentation.
Prerequisites:
- A Sanity project with images uploaded to the Content Lake.
- Understanding of your front-end framework of choice.
- Familiarity with your schema.
Understanding image representation in Sanity
Before implementing images in your front-end, it's important to understand how Sanity handles images. In Sanity:
- The
imagetype represents an image used as a field in a document or embedded in block text. - Images may contain additional fields like caption, credits, and specific crop and hotspot information.
- Each
imagereferences anassetwhich contains the actual image data. - One
assetcan be shared by multipleimageinstances, allowing editors to reuse assets with different crops, captions, etc.
Media Library
You may have images in your dataset, images in your organization's Media Library, or a mix of the two. In all scenarios, you should request the assets from your project's dataset. They'll still pull the latest updates from Media Library, but will ensure you're using the correct asset pipeline.
Get the image URL
The simplest way to display images from Sanity is to get the base URL of the image from the asset, then transform it. Here's how to query for an image URL:
*[_type == 'person']{
  name,
  "imageUrl": image.asset->url
}
{
"name": "Sean Gunn",
"imageUrl": "https://cdn.sanity.io/images/zp7mbokg/production/G3i4emG6B8JnTmGoN0UjgAp8-300x450.jpg"
}Gotcha
Be aware, that requesting un-optimised images directly via the image URL, as detailed here, can lead to overages in your usage.
With the base URL, you can now append options in order to constrain size, crop the image, blur it or perform other operations on it. Here are some examples:
// Use the browser headers to supply the most optimized format.
// ?auto=format
https://cdn.sanity.io/images/zp7mbokg/production/G3i4emG6B8JnTmGoN0UjgAp8-300x450.jpg?auto=format
// Resized to have a height of 200
// ?h=200
https://cdn.sanity.io/images/zp7mbokg/production/G3i4emG6B8JnTmGoN0UjgAp8-300x450.jpg?h=200
// Set width to 800px, but never make a sub-800px wide image scale up.
// ?w=800&fit=max
https://cdn.sanity.io/images/zp7mbokg/production/G3i4emG6B8JnTmGoN0UjgAp8-300x450.jpg?w=800&fit=max
// Crop to a rectangle from the image (x, y, width, height)
// ?rect=70,20,120,150
https://cdn.sanity.io/images/zp7mbokg/production/G3i4emG6B8JnTmGoN0UjgAp8-300x450.jpg?rect=70,20,120,150
// Crop to a rectangle from the image (x, y, width, height) and constrain height to 64
// ?rect=70,20,120,150&h=64
https://cdn.sanity.io/images/zp7mbokg/production/G3i4emG6B8JnTmGoN0UjgAp8-300x450.jpg?rect=70,20,120,150&h=64
// Blur the image
?blur=50
https://cdn.sanity.io/images/zp7mbokg/production/G3i4emG6B8JnTmGoN0UjgAp8-300x450.jpg?blur=50
Gotcha
Small images get scaled up to the width or height you specify. To avoid this use &fit=max.
See the image url reference documentation for the full list of parameters.
Use the image URL builder
For JavaScript projects, Sanity provides the @sanity/image-url package that generates image URLs while respecting crop and hotspot settings.
image-url returns a URL
@sanity/image-url offers helpers to build URLs, but in the end it returns a normal URL. This lets you use it for any component that expects a URL, even framework-specific Image components.
It uses a method-chaining style syntax that lets you define image transformations.
Install the package
npm install @sanity/image-urlpnpm add @sanity/image-urlOlder versions of @sanity/image-url used a different import format and export naming scheme. Update to the latest version if you notice errors when importing the library.
Configure the builder
Next, configure the builder by passing a configured @sanity/client to the imageUrlBuilder. This example exports a reusable urlFor function. Check the ImageComponent.tsx example to see how to use it.
// sanityImageUrl.ts
import { createImageUrlBuilder, type SanityImageSource } from '@sanity/image-url'

import { client } from './client' // see example client config

// Create an image URL builder using the client
const builder = createImageUrlBuilder(client)

// Export a function that can be used to get image URLs
export function urlFor(source: SanityImageSource) {
  return builder.image(source)
}
import { urlFor } from './sanityImageUrl'
import type { SanityImageObject } from '@sanity/image-url'
// Use the urlFor function to build URLs
function ImageComponent({image}: {image: SanityImageObject}) {
return (
<img
src={urlFor(image)
.width(300)
.height(200)
.url()}
// Depending on your schema, you may need to adjust the alt text location
// and update types to match your schema.
alt={(image.alt) || 'Image'}
/>
)
}
export default ImageComponentimport { createClient } from "@sanity/client"
// Configure the client
export const client = createClient({
projectId: 'YOUR_PROJECT_ID',
dataset: 'YOUR_DATASET',
apiVersion: '2023-05-03',
useCdn: true
})The builder accepts an image source, an asset source, or a string containing the asset's ID. If you supply the image or asset source, the builder will automatically default to respecting any crop and hot-spot settings.
Learn more about the @sanity/image-url in the library documentation.
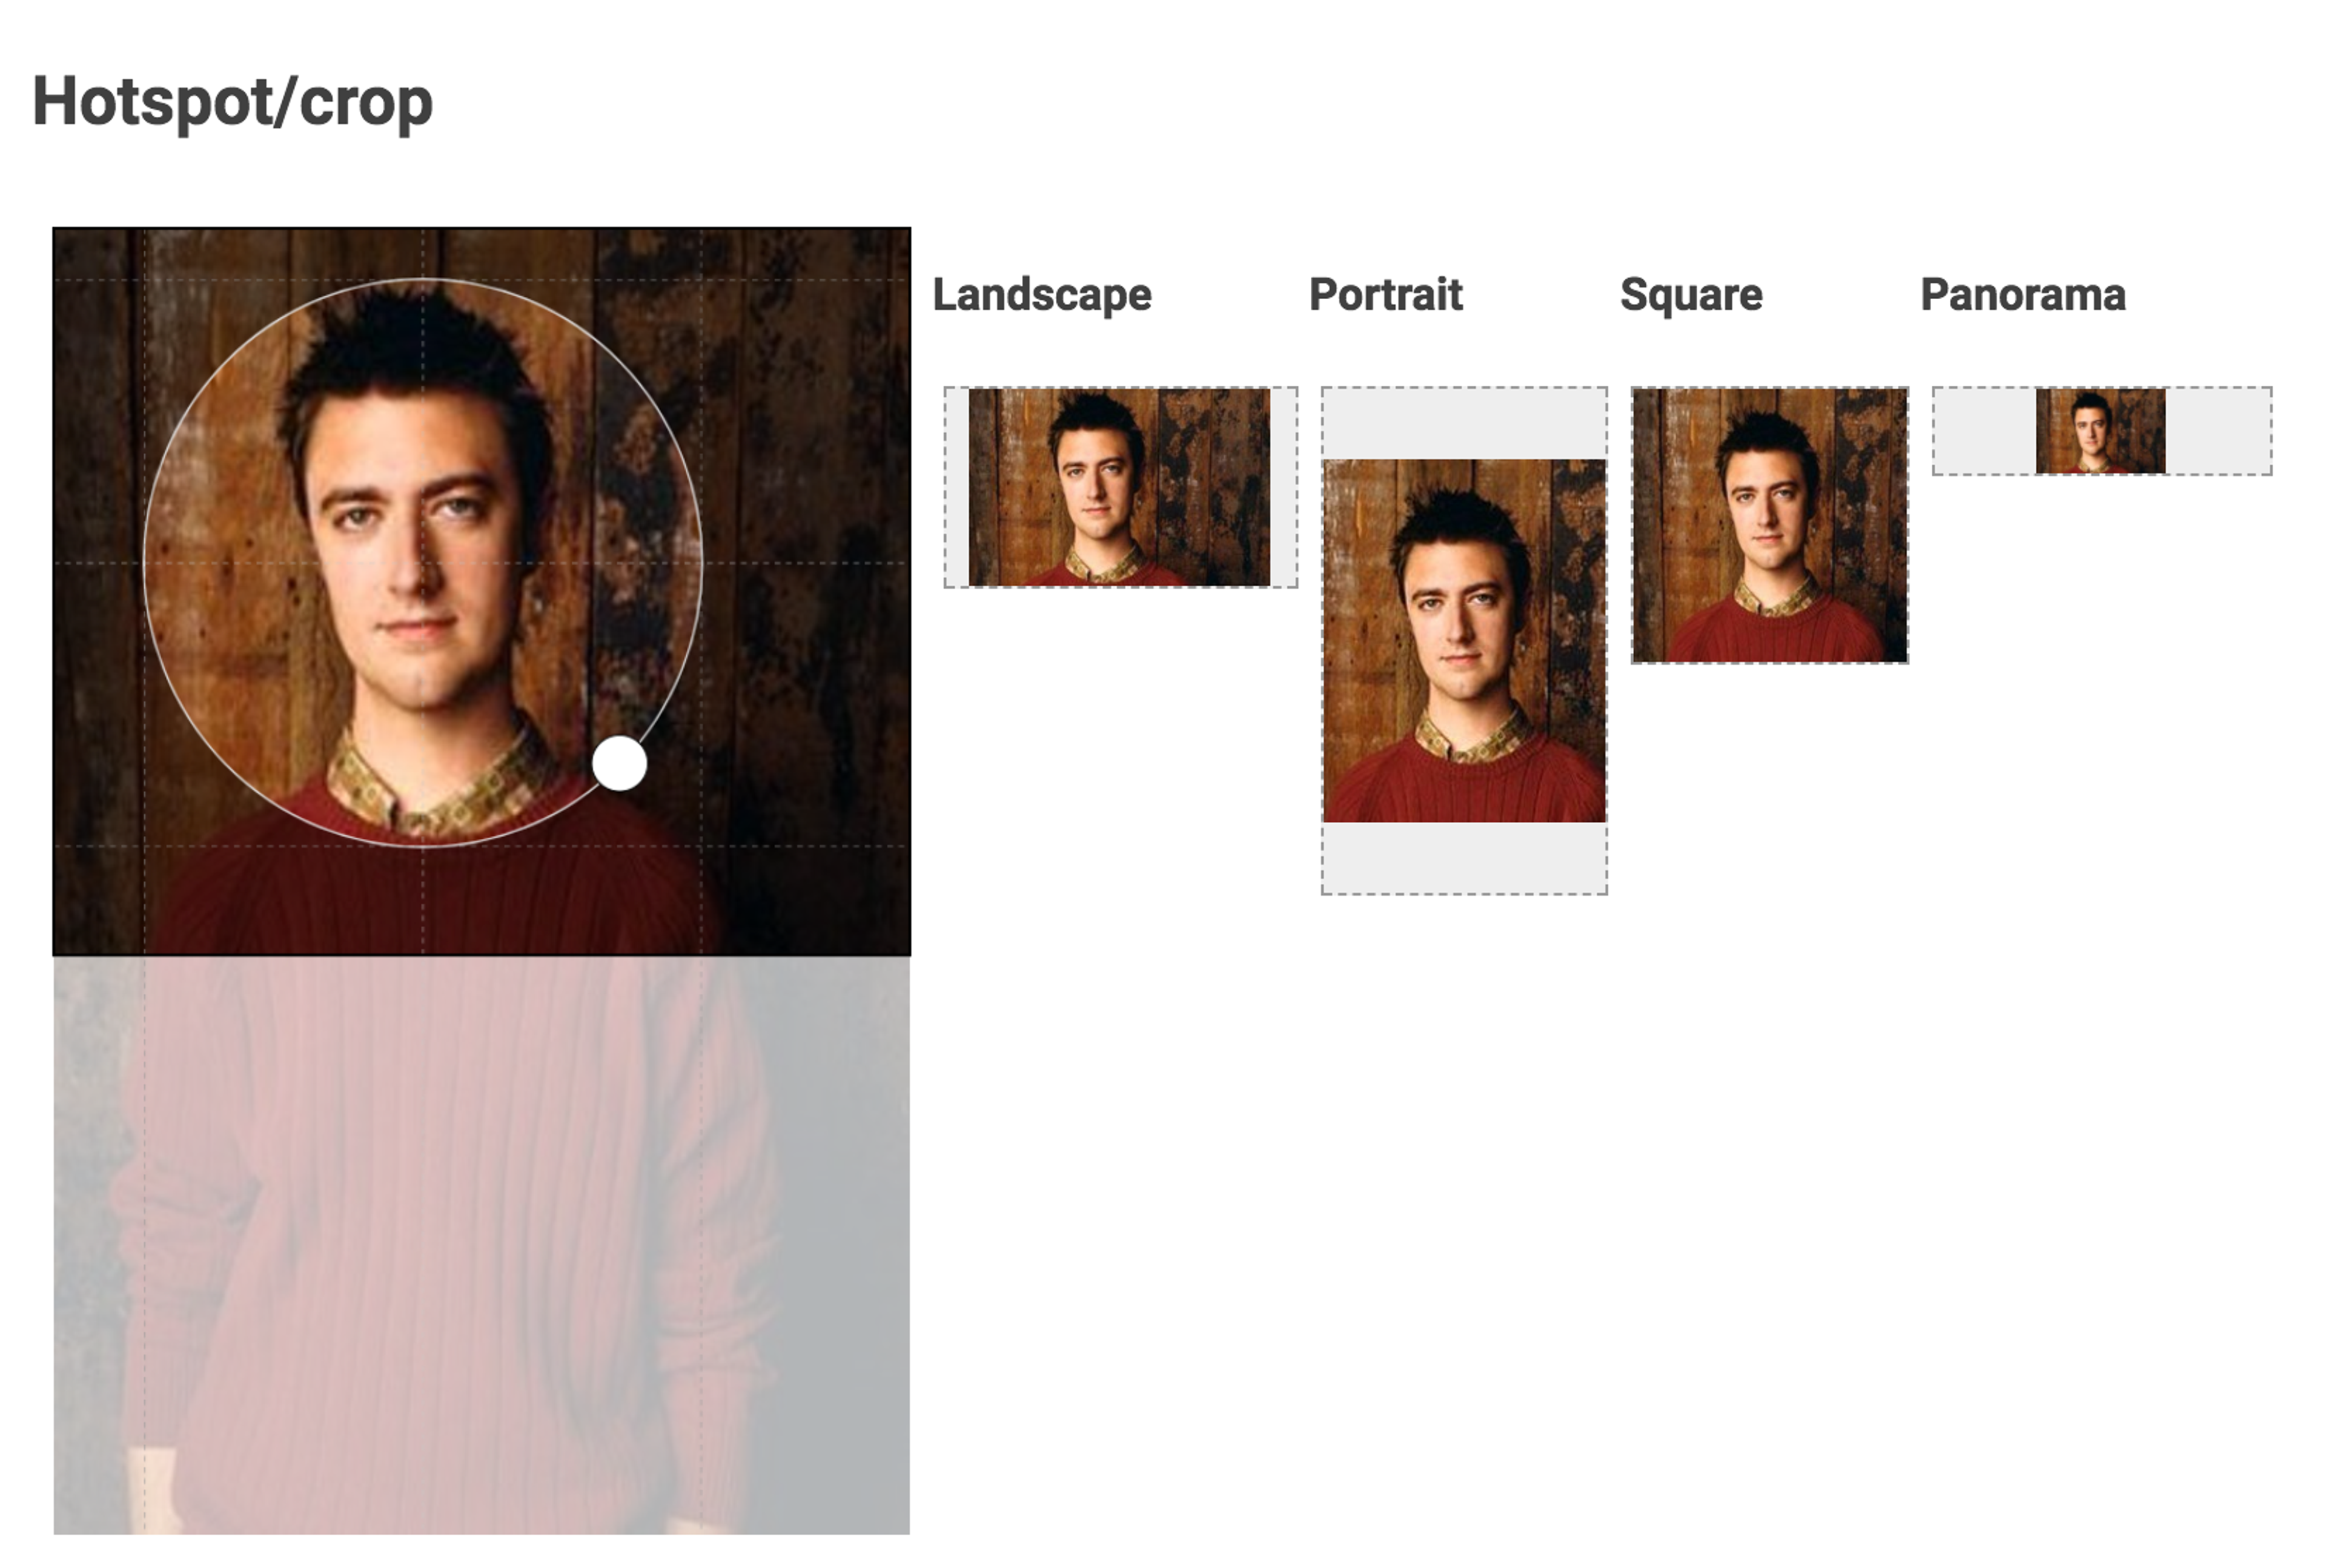
The crop and hot-spot
Sanity Studio allows editors, if enabled in the schema, to define crop regions and hotspots for images. The crop describes which part of the image the editor wants to allow to be used, while the hot-spot specifies what area to preserve when the image needs to be cropped additionally in a front end.
When an editor sets these, the image record might look like this:
{
  image: {
    _type: "image",
    asset: {
      _ref: "image-G3i4emG6B8JnTmGoN0UjgAp8-300x450-jpg",
      _type: "reference"
    },
    // The crop is specified in fractions of the image dimensions
    // and measured from the edge of the image. This image is cropped
    // from the bottom at 44% of the image height. The other dimensions
    // are left un-touched.
    crop: {
      bottom: 0.44,
      left: 0,
      right: 0,
      top: 0
    },
    // The hot-spot position x, y is in fractions of the image dimensions.
    // This hot-spot is centered at 43% of the image width from the left,
    // 26% of the image height from the top. The width and height is
    // in the same unit system. This hot spot is 44% of the image width wide,
    // 65% of the image height tall, this rectangle is centered on the x,y
    // coordinate given.
    hotspot: {
      height: 0.44,
      width: 0.65,
      x: 0.43,
      y: 0.26
    }
  }
}
*[_type == "person"][0]{
image{
_type,
asset,
crop,
hotspot
}
}The editor expects your front end to respect these settings. You can manually build the URL using the crop and hotspot data along with the pipeline's transformation options, but the @sanity/image-url library handles this automatically for you.
For example, using the urlFor helper from the earlier code example, you can render an image in two sizes. Note that urlFor expects the image field (person.image in the example), not just the asset, as it needs the crop and hotspot data.
import {urlFor} from './sanityImageUrl'

function ProfileImage({person}) {
  // The image builder automatically applies crop and hotspot settings
  return (
    <img
      src={urlFor(person.image)
        .width(800)
        .height(600)
        .url()}
      alt={person.image.alt || `Portrait of ${person.name}`}
    />
  )
}

// For square thumbnails
function AvatarImage({person}) {
  return (
    <img
      src={urlFor(person.image)
        .width(200)
        .height(200)
        .url()}
      alt={person.image.alt || `Avatar of ${person.name}`}
      className="avatar"
    />
  )
}
The URL builder applies the editor's crop settings, then uses the hotspot to determine a focal point if additional cropping is needed based on the requested dimensions.
Creating downloadable image links
Sometimes you want to change the headers on the URL so that when clicked, the file will download instead of displaying in the browser. You can do this with both the urlFor helper from the previous examples and with URL parameters.
// Using the URL builder
const downloadUrl = urlFor(image)
  .width(1200)
  .url() + '&dl=filename.jpg'

// Raw URL equivalent
const baseUrl = 'https://cdn.sanity.io/images/zp7mbokg/production/G3i4emG6B8JnTmGoN0UjgAp8-300x450.jpg'
const downloadUrlRaw = `${baseUrl}?w=1200&dl=filename.jpg`;

// Use the default filename by omitting a filename
const defaultFilename = `${baseUrl}?dl=`
Using dl= without a filename will use the original filename from time of upload, assuming storeOriginalFilename wasn't disabled in the schema. Otherwise, it will use the asset ID.
Vanity filenames
Sometimes you want to display an image normally, but adjust the pre-set filename that users see when they download or copy an image. You can append /your-new-filename.jpg with the text and extension of your choice to update the name. For example:
https://cdn.sanity.io/images/y856rro4/production/6005c6a1da9e27b033589ef439f8bb8f38420933-5152x7728.jpg/vanity-filename.jpgPerformance considerations
To maximize performance, reuse image transformations across your front end. This ensures that cached assets are reused effectively.
Pair image transformations with responsive images. For example:
function ResponsiveImage({image}) {
  return (
    <img
      src={urlFor(image).width(800).url()}
      srcSet={[
        `${urlFor(image).width(400).url()} 400w`,
        `${urlFor(image).width(800).url()} 800w`,
        `${urlFor(image).width(1200).url()} 1200w`,
      ].join(', ')}
      sizes="(max-width: 600px) 400px, (max-width: 1200px) 800px, 1200px"
      alt={image.alt || ''}
    />
  )
}
Additional resources
Image transformations
Reference documentation for image transformations.
Assets in Content Lake
Learn more about how Sanity stores your assets in Content Lake.
@sanity/image-url
Sanity's helper library for working with image URLs.
International Image Interoperability Framework (IIIF) API reference
The International Image Interoperability Framework (IIIF) provides a standardized way of delivering and describing images shared on the web. This is the reference documentation for how you can interact with the asset pipeline using IIIF.