Migrating your schema and content
How to migrate schema and content within a Sanity project
Most projects will require changes to the schema, that is, your content model. At the start of a project, these changes are often additive and only involve building out the schema with new document and field types. There will be no actual content that needs to be changed.
However, sometimes, you must change the existing schema and content in your Sanity Studio and Content Lake dataset (and maybe for your GraphQL API). Maybe you want to rename a field, add a new validation rule, check how existing documents will be affected, or move fields into an array or object type. There are many valid and necessary reasons to change and evolve your schema and the content that goes with it.
While changing a Sanity Studio schema is most often straightforward, if you have content in documents that assumes a certain structure, you will want to migrate these to match your updated schema. This is where our tools for schema change management come in.
Introduction to Schema Change Management
This course introduces you to schema and content migrations in a step-by-step manner.
Content migration cheat sheet
Copy-paste common content migration code snippets
Important considerations for schema change management
How to approach schema changes for projects in and out of production
CLI tooling for validations
Reference docs for checking document validation status across a dataset
CLI tooling for content migrations
Reference docs for working with migrations in the CLI
What is schema change management?
The process of changing your schema and existing content is called “schema change management.” This is comparable to what other content management systems call “content migrations,” but it goes beyond that. Schema change management is about what you must think about when changing the structure of your content or the validation rules of your field and document types.
In some contexts, “content migrations” might refer to cases where you go from one content management system to another. While the following can be useful as part of that process, this article and the features we address focus on migrations within a dataset in a Sanity project.
Common examples of schema change management:
- You need to change a schema for a Sanity Studio workspace and wish to update existing content to validate against the new schema update
- You have imported content from another content management system (CMS) and wish to change and improve its structure
- You have added new validation rules and wish to introspect and list documents that need to be updated by a content team or a content migration script
- You are crafting an NDJSON import file and want to validate the documents before importing them into your dataset
- You just want insight into the validation status across your whole dataset (as opposed to per document in the Studio) to troubleshoot implementation bugs
Gotcha
It’s important to note that changing the schema for a Sanity Studio workspace will not automatically change or delete existing content in your dataset.
We consider this a feature that helps prevent unintended breakage for applications that rely on your content model having a certain shape. As with databases, you want changes to the content model (or data model) to be intentional, preferably reproducible, and part of your development workflow.
Sanity offers tooling to bring existing content up to date so you have flexibility in adding, removing, and changing the shape of your content.
Tooling for schema and content migrations in a dataset
Sanity offers tooling and capabilities that support schema migrations:
- The
deprecatedproperty lets you mark document and field types that shouldn’t be used anymore with a definedreason. This configuration will appear visually in the Sanity Studio and as part of the GraphQL API schema for those using this feature. - Command Line Interface (CLI) commands:
sanity documents validatelets you check the validation status of documents in a dataset or export filesanity schemas validatelets you identify potential errors in your schema configuration (is also run bysanity documents validate)sanity migrations [command]lets you create, list, and run content migrations (defined in code) with helper functions for defining how documents should changesanity datasets import|export(or using Advanced Dataset Management) lets you export/import datasets to test and validate a migration in a non-production environment
- If you have needs beyond what the current tooling gives you, you can also use the Sanity Content Lake APIs for directly querying and mutating content.
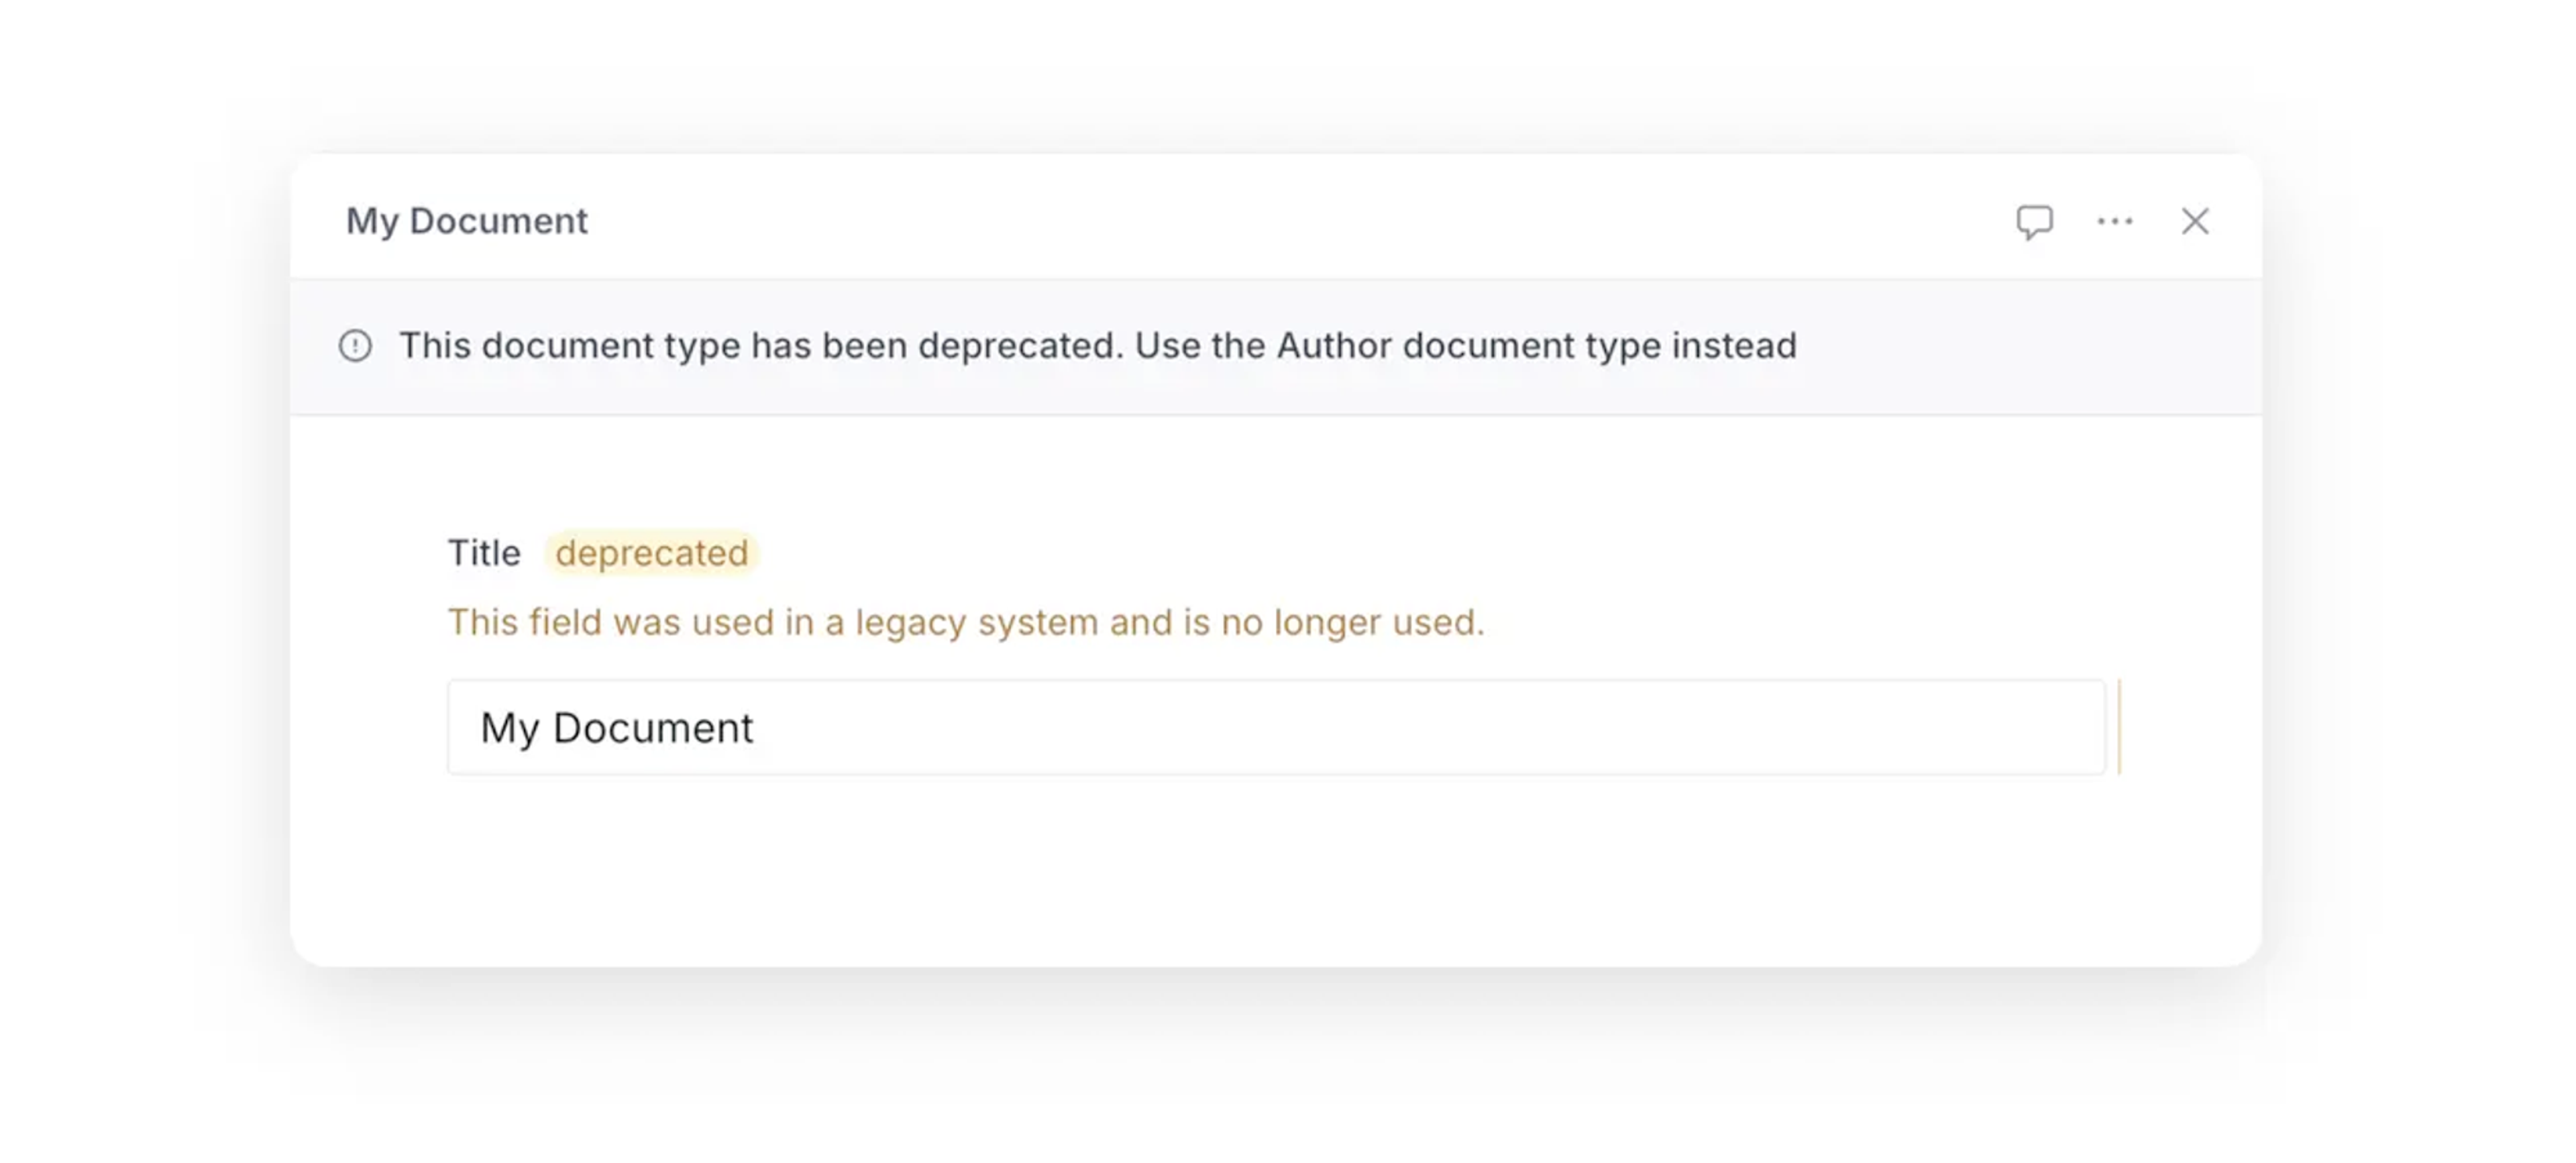
Deprecating document and field types
While you can add, change, and remove schema types freely without cascading changes to existing content, chances are you want to be more considered, especially for projects running in production. Often, you want content teams to be able to see and (sometimes) edit a deprecated field and explain why and how a schema type has been changed.
All user-configurable schema types support explicit deprecation through a configuration property called deprecated where the value is an object with a defined reason as a string (required):
export const person = defineType({
  name: 'person',
  type: 'document',
  deprecated: {
    reason: 'Use the Author document type instead.'
  },
  fields: [],
  readOnly: true // to prevent further edits
})
You can use the readOnly: true configuration to prevent deprecated fields and documents from being edited.
export const name = defineField({
  name: 'firstName',
  type: 'string',
  description: `The person's first name`,
  deprecated: {
    reason: 'Use the name field instead.'
  },
  readOnly: true, // to prevent further edits
})
This configuration will show up visually in the Studio:
Our GraphQL API also supports the deprecation property, which translates the property and reason into the directives for deprecations in the GraphQL specification.
Checking validation status across all documents in a dataset
Validation rules for document and field types are primarily shown within a document form for users of Sanity Studio. However, when working with schema and content migration, it is useful to review the validation status for all documents in a dataset, especially for quickly getting insight into the state of your datasets and helping you decide what migration jobs to create.
The Sanity CLI offers this functionality with sanity documents validate. This command runs all validation rules in your current schema configuration on documents in a virtual browser environment from where the command is run. In addition, it can also report on document types, that is, documents with a _type that is not covered in your schema configuration.
Without any extra flags, sanity documents validate will output a pretty formatted list of validation errors and warnings from the project and dataset defined in sanity.cli.ts. It will also give you actionable Studio links, provided you have configured a Studio URL in the project settings on sanity.io/manage.
You can use flags to specify a specific Studio workspace (if your project has more than one), dataset name, validation level (error, warning, info), and output formats (pretty, json, ndjson).
You can also use the --file [file path] flag to run validations against a dataset import/export file (supports both filename.ndjson or filename.tar.gz).
The anatomy of the validation output
When exporting to a JSON format, the output of the CLI gives you actionable data such as the document ID (the same as _id) and type (the same as _type), the revision ID, the URL to find the document in a deployed Studio, as well as an array with all validation notices that it can have. The level property on the root of this object will always reflect the most severe level in the markers array, from “error,” “warning,” to “info.”
{
    "documentId": "person_robin-sachs",
    "documentType": "person",
    "revision": "GspWPjs815p7KTxv2q3x76",
    "intentUrl": "https://schema-change-management-demo.sanity.studio/intent/edit/id=person_robin-sachs;type=person",
    "markers": [
      {
        "path": ["fullName"],
        "level": "warning",
        "message": "Field 'fullName' does not exist on type 'person'"
      }
    ],
    "level": "warning"
  }
A lot of validation errors? Pipe the output to a file!
If you have a sizeable dataset and/or a bunch of validation errors, the output will likely overflow your terminal’s buffer. In these cases, piping the output to a file in the terminal can be useful. For most shell environments, it will look something like this:
npx sanity documents validate -y --format ndjson > documentValidations.ndjson
pnpm dlx sanity documents validate -y --format ndjson > documentValidations.ndjson
yarn dlx sanity documents validate -y --format ndjson > documentValidations.ndjson
bunx sanity documents validate -y --format ndjson > documentValidations.ndjson
A pro tip is that you can then use GROQ CLI to parse this file. Let’s say you wanted to have a list of Studio URLs of all documents that have a validation error (and not just a warning):
# npm install --global groq-cli
cat documentValidations.ndjson|groq -n "*[level == 'error'].intentUrl"
Working with content migrations in the CLI
The Sanity CLI has tooling for creating and running content migrations against a dataset. Content migrations are described in JavaScript (or TypeScript) as files inside a migrations folder in your Sanity Studio project. You can also automate and run content migrations as part of a CI/CD pipeline.
Creating new content migrations
You can use the CLI command sanity migrations create to create a new content migration file. The CLI will prompt you for a human-friendly title, which document types you want to filter on, and a content migration template to start from. You can also go to the content migration cheat sheet to find starting points for common migration patterns.
File and folder structure
The sanity migrations CLI command will create and look for migration files in a migrations folder, when run from the Studio project root. You can write migration files in JavaScript (.js, .mjs, .cjs) and TypeScript (.ts).
You can store migration scripts in two patterns, which can also be combined:
studioFolder/migrations/my-content-migration.tsstudioFolder/migrations/my-content-migration/index.ts
The latter is useful when you have a complex migration and want to split up the code in more files.
The anatomy of a content migration file
A migration file should export a defineMigration (using default export) with the following configuration:
title: A reader-friendly description of what the content migration does.documentTypes: An array of document types to run the content migration on. If you don’t define this, the migration type will target all document types.filter: A simple GROQ-filter (doesn’t support joins) for documents you want to run the content migration on.migrate: An object of named helper functions corresponding to the primary schema type of the content you want to migrate. You can also run these functions as async and return the migration instructions as promises if you need to fetch data from elsewhere.
// migrations/example-migration/index.ts
import {defineMigration} from 'sanity/migrate'

export default defineMigration({
  title: 'A human-friendly description of what this content migration does',
  documentTypes: ['aDocumentType'],
  migrate: {
    document(doc, context) {
      // this will be called for every document of the matching type
    },
    node(node, path, context) {
      // this will be called for every node in every document of the matching type
    },
    object(node, path, context) {
      // this will be called for every object node in every document of the matching type
    },
    array(node, path, context) {
      // this will be called for every array node in every document of the matching type
    },
    string(node, path, context) {
      // this will be called for every string node in every document of the matching type
    },
    number(node, path, context) {
      // this will be called for every number node in every document of the matching type
    },
    boolean(node, path, context) {
      // this will be called for every boolean node in every document of the matching type
    },
    null(node, path, context) {
      // this will be called for every null node in every document of the matching type
    },
  },
})Understanding node in the context of content migrations
We refer to “node” in the code example above and that there is a mutation creator function for node(node, path, context). Here, a “node” refers to any value in a document, including nested ones.
The object, array, string, number, boolean, and null functions are subsets of the node function to make it easier to access content by its JSON data type.
The node as the first argument in these functions will be the value for any given node.
The path will tell you where the node value comes from in the document. This is where you will find any node's key/property/field name and the _key value in array data.
Protip
The migration tooling will run mutations with autoGenerateArrayKeys enabled. This means that you don't have to manually set a _key value when you work with objects in array data.
Let’s say you log out the values for node and path (console.log(node, path)). The output from a document with a title field would then be:
My title [ 'title' ]In the same document, for a slug field:
my-title [ 'slug', 'current' ]And for the first paragraph of a description field that is a Portable Text field:
This is some text.
[
  'description',
  { _key: '77b13c0924cb9fa06505215e8d0c8ee6' },
  'children',
  { _key: 'o9Bcm59c' },
  'text'
]
As you will see in the next section, you can change the data without authoring complex patches using these arguments even with more complex data structures.
Getting the right changes in the right places
The content migration tooling has helper functions for defining the changes you want to make. Under the hood, they translate the content migrations you define into transactions of mutations and patches submitted to the Sanity Content Lake.
For example, if you want to change all occurrences of the single string “acme” to uppercase regardless of where it is in your dataset, then the content migration script could look like this:
// migrations/uppercase-acme/index.ts
import {defineMigration, at, set} from 'sanity/migrate'

export default defineMigration({
  title: 'Make sure all strings with “acme” is uppercased to “ACME”',
  migrate: {
    string(node, path, context) {
      if (node === "acme") {
        return set(node.toUpperCase())
      }
    },
  },
})
When you use the document function or are in a nested field, the at function can be useful; you can pass the path and the operation to at to get the change in the right place. Below is an example of how to change the _type in an object field:
// migrations/movie-to-film/index.ts
import {defineMigration, at, setIfMissing, unset} from 'sanity/migrate'

export default defineMigration({
  title: 'Change the movie object field to film',
  documentTypes: ['screening'],
  migrate: {
    document(doc, context) {
      return [
        at('film', setIfMissing(doc.movie)),
        at('movie', unset())
      ]
    }
  }
})
As the example shows, you can return multiple patches as well. When changing a field name, you typically want to remove the value from the old field and add it to the new one.
Do note how the setIfMissing patch will only apply to documents without an existing film field. Usually, it’s good to be defensive when writing these scripts to avoid making unintended changes to existing data. Of course, you could also use the set operation to (over)write data to film regardless of whether it existed in a document.
A note on immutable properties and migrating _type and _id
Before you go on trying to at('_type', set('myNewDocumentType')), we must address that some fields (or properties) for documents in the Content Lake are immutable. In other words, you can’t change the value when it’s set. These immutable built-in properties all begin with an underscore, including:
_type_id_createdAt_updatedAt(automatically updated on changes to the document)_rev(automatically updated on changes to the document)
We realize that there are cases where you want to change the value of these. The best strategy for now is to do this by exporting and unpacking your dataset. Make the changes in the NDJSON file that holds all the documents, delete the documents you want to change the _type of, and then import it again.
How to run and execute content migrations
Once you have defined your content migrations as code and made sure they are nicely organized in a migrations folder in your Studio project, that is, alongside your sanity.cli.ts configuration, then you’re all set up for a test run.
To quickly list out what migrations the tool can access, run sanity migrations list.
Now you can copy-paste the content migration ID and run sanity migrations run <migration-id>.
The command will always run in dry-run mode unless you add the --no-dry-run flag. When running in dry-run mode, the CLI will output a list of patches and document IDs from your content migration script. You can review this list to catch obvious mistakes.
Before executing a content migration, ensure you have backed up your dataset (sanity datasets export or sanity datasets copy).
(Note: Exports are billed against the API quota, though documents are streamed to minimize usage.)
When you feel confident that you want to make the changes, you can run the following command:
npx sanity migrations run your-content-migration --no-dry-run
pnpm dlx sanity migrations run your-content-migration --no-dry-run
yarn dlx sanity migrations run your-content-migration --no-dry-run
bunx sanity migrations run your-content-migration --no-dry-run
It will output its progress and detail how many documents were processed, mutations were generated, and transactions were committed.
Rate limits
Migrations adhere to the same rate limits as other API interactions with the Sanity Content Lake. If your migrations involve numerous patches, consider regulating the volume of simultaneous mutation requests to manage your API call rate with the --concurrency flag. You can run between 1 and 10 transactions in parallel. The default is 6, but you can lower it to avoid rate limits.