Understanding the latest version of Sanity
Explore the features and improvements in the latest version of Sanity.
Keeping up with frequent releases and making sure your editorial teams get access to all the latest improvements and bug fixes is more convenient than ever before.
With auto updates enabled, the core Sanity Studio app will automatically be kept up to date whenever a patch and minor release drops, while your custom code remains untouched and continues to work seamlessly. We also update to new major versions when there are no runtime effects, like Node.js version changes. Instead of building and re-deploying your studio for each new version, the core Sanity Studio application is served on-demand to your browser, which means you'll always get access to the latest updates as they are released.
No breaking changes. Just the good stuff.
Prerequisites
- Using auto-updating studios requires a browser that supports import maps. This feature has been considered a baseline feature in modern browsers since March 2023, and is supported in all the latest versions of common browsers.
- Auto-updates is only supported for studios compiled with Sanity build tooling. I.e., running
sanity deployorsanity buildin your command line. Third-party build tools and embedded studios are not currently in scope for this feature.
Build or deploy?
For the auto-update feature to work, you must compile your studio using the build tooling provided in the core Sanity Studio package. Somewhat confusingly we refer to both the sanity deploy and sanity build commands in this article, but what's the difference?
In short, the autoUpdates config parameter is used by both commands. If your studio is hosted on a free *.sanity.studio-domain you probably use sanity deploy to build and deploy your studio in one fell swoop, while if you are hosting the studio elsewhere chances are that you compile the studio with sanity build, and then deal with deployment with a custom workflow.
Enable automatic updates
As of Sanity Studio version 3.57.3, all new projects are initialized with automatic updates enabled. You can check by viewing the sanity.cli.ts file in your Studio project directory.
import {defineCliConfig} from 'sanity/cli'

export default defineCliConfig({
  api: {
    projectId: 'YOUR_PROJECT_ID',
    dataset: '<your-project-dataset>'
  },
  deployment: {
    /**
    * Get the appId for a previously deployed Studio under the "Studio" tab for your project in sanity.io/manage
    * Note: this is required for fine-grained version selection
    */
    appId: '<your-studio-app-id>'
    /**
     * Enable auto-updates.
     * Learn more at https://www.sanity.io/docs/studio/latest-version-of-sanity
     */
    autoUpdates: true,
  }
})
import {defineCliConfig} from 'sanity/cli'
export default defineCliConfig({
api: {
projectId: 'YOUR_PROJECT_ID',
dataset: '<your-project-dataset>'
},
/**
* Enable auto-updates for studios.
* Learn more at https://www.sanity.io/docs/cli#auto-updates
*/
autoUpdates: true,
})If you don't see the deployment.autoUpdates option set to true, add it to enable automatic updates. Make sure you've confirmed that your deployment and development environments meet the prerequisites above, and take note of the caveats at the end of this article.
Fine grained version selection
When auto-updating is enabled, your studio will by default be kept up-to-date with what is currently published as the latest version on npm. You can also select the update schedule that best suits your needs.
Version selection requires sanity CLI v4.9.0 and appId
Fine grained version selection requires appId to be added to the deployment section in sanity.cli.ts. Support for appId was introduced in version 4.9.0 of @sanity/cli. Check the current CLI version by running npx sanity versions.
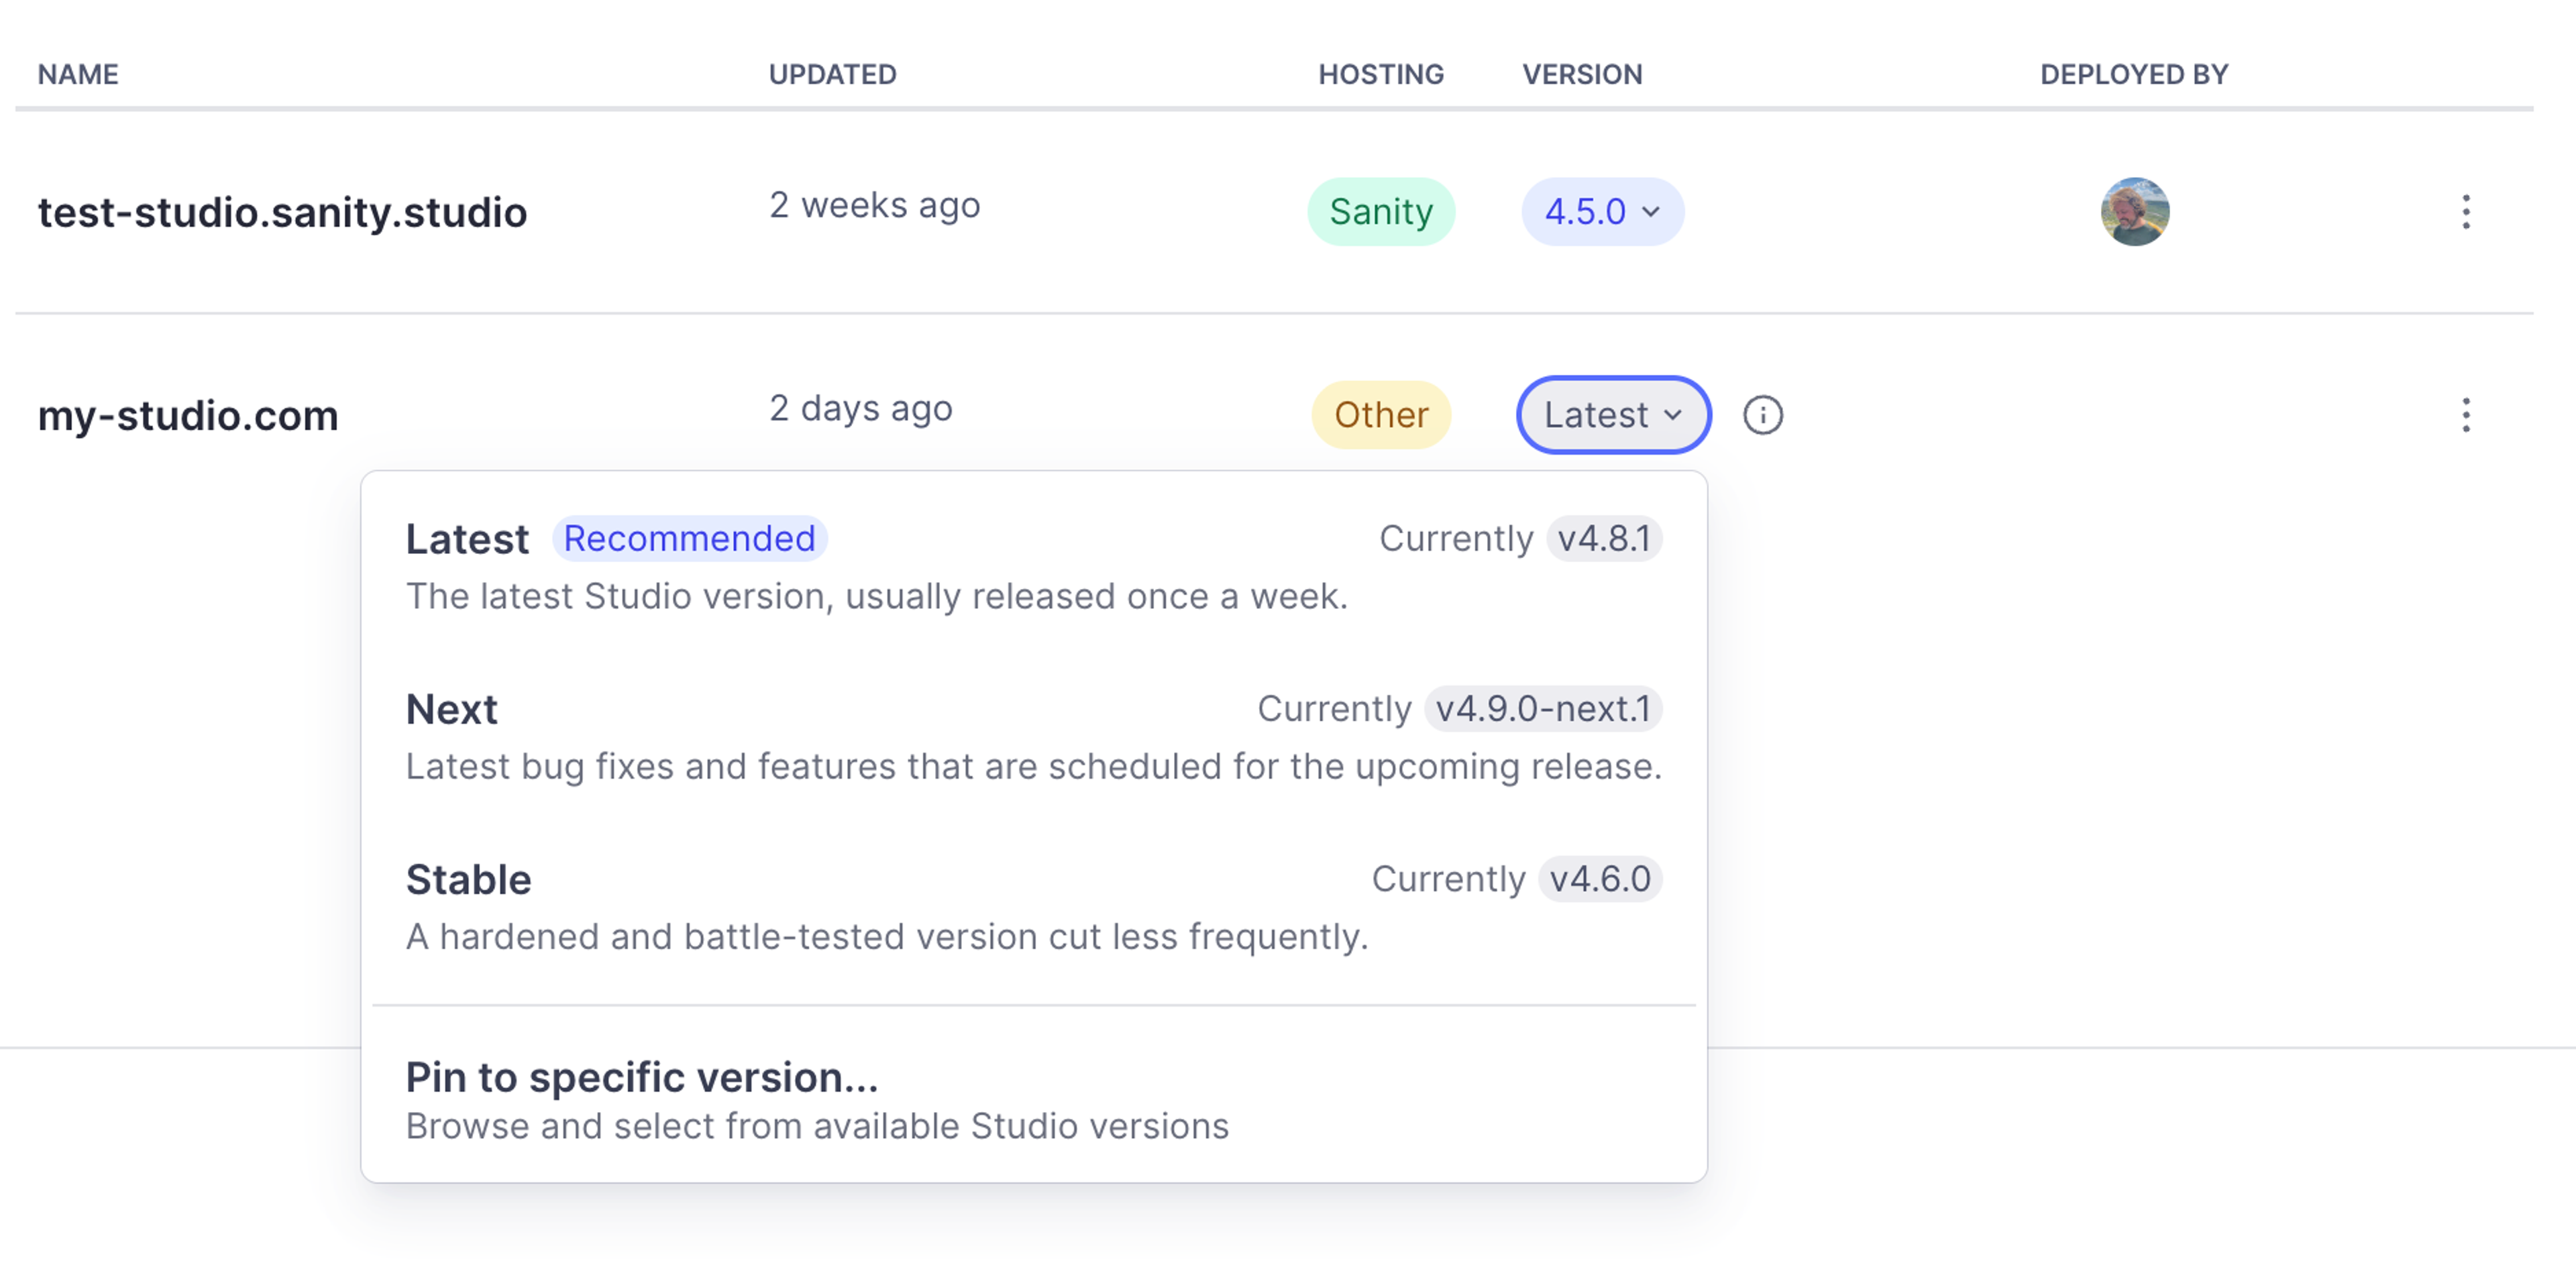
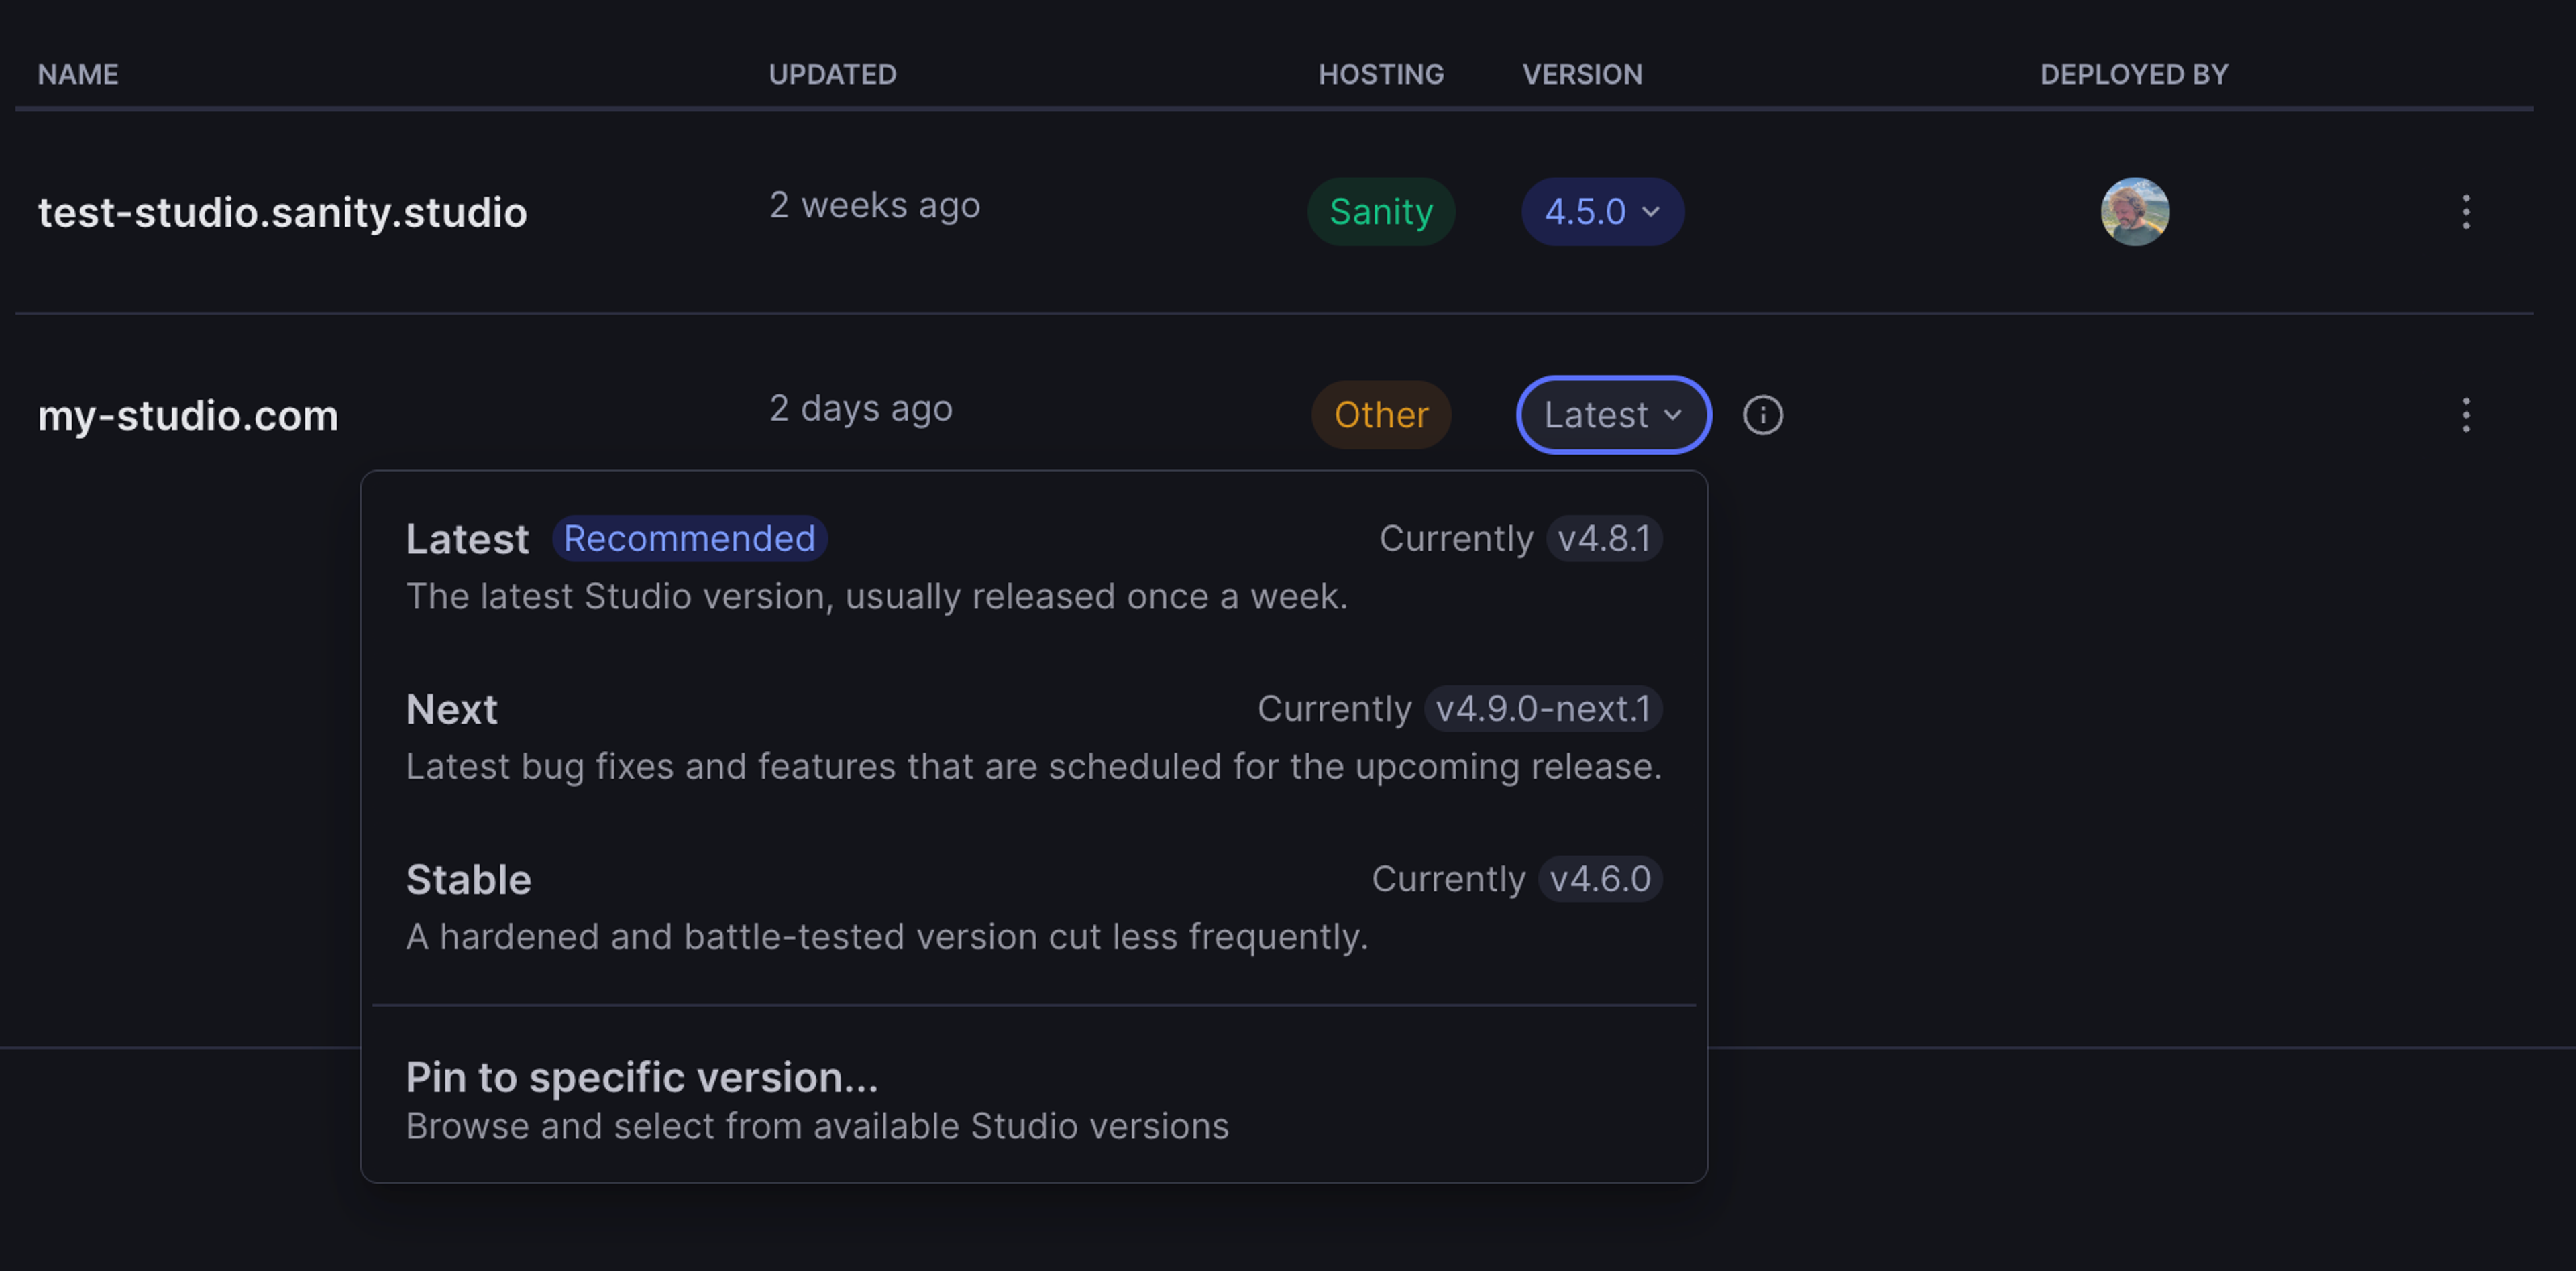
The available options are:
- Latest (Default): The latest official Studio version, usually released once a week.
- Next: Early bird updates with bug fixes and changes as they're merged into the Studio project and scheduled for the upcoming release. Select this if you want to stay on the absolute latest changes.
- Stable: Select if you want to stay current with more hardened, battle-tested versions. Stable versions will typically be released when a version has been in the latest channel for about a week without any reported issues.
- Pin a specific version: Allows you to set a fixed version. Note that this will effectively opt you out of receiving future updates, so we recommend using this option with caution, and make sure to update the pinned version on a regular schedule.
We'll only do safe downgrades
A deployed studio will never run with a version that predates the version it had at the time of deploy. This means that you will not be able to downgrade further than to the Sanity version you had when deploying your Studio.
For example, if you develop against sanity@4.5.0 locally, and then deploy your auto-updating studio, your deployed studio will not be able to run with a version that predates v4.5.0.
So even if you downgrade to v4.4.0 in sanity.io/manage, your Studio will still run with v4.5.0.
This also means that if you deploy with a more recent version than the version you have pinned, the pinned version will be ignored entirely, and your studio will be served the version of sanity it had installed during local development.
To select a tag or version, navigate to the Studios tab for your project in sanity.io/manage.
Each available update channel is kept in sync with their corresponding dist tag on npm, so running npm install sanity@latest will install the exact same version your auto-updated studio are currently running when latest is selected. Similarly, the next and stable channel are also available on npm with npm install sanity@next, and npm install sanity@stable. This is kept in sync with the stable tag on npm.
Auto-updating self-hosted studios
Self hosted studios with auto-updates enabled will make every attempt to update to the version displayed in the channel selection interface, but in some cases where additional dependencies are required, they will remain on their past version until updated manually. One example of this is from v4 to v5, where you'll need to update and redeploy to get back on the auto-update channel.
Developing auto-updating studios
Your local development process remains unchanged. You will still install the latest version of the Sanity Studio package locally and run your dev server on localhost, quite possibly at port 3333. When you are ready to commit, make sure deployment.autoUpdates is enabled and build and deploy your studio.
If you have auto-updating enabled and are developing locally against a version that is not up-to-date you will receive a warning in your build step to ensure you are aware of any potential discrepancies.
Working with Turbo
For auto-updating studios, the sanity dev script will check which dependencies you have installed and may occasionally prompt you to keep your Sanity Studio dependencies up to date. If you use a tool like Turbo to run the sanity dev script, please make sure it's able to show interactions.
Opting Out
If you need to support older browsers without support for import maps, if you have customized your studio using internal APIs or simply need full control over the studio dependencies, you can opt out of auto-updates. If you decide to opt out of auto-updates, set deployment.autoUpdates: false in your sanity.cli.ts configuration file, and then build and deploy again.
// sanity.cli.ts
import { defineCliConfig } from 'sanity/cli'

export default defineCliConfig({
  api: {
    projectId: 'YOUR_PROJECT_ID',
    dataset: '<YOUR_DATASET>',
  },
  deployment: {
    autoUpdates: false,
  }
})
// sanity.cli.ts
import { defineCliConfig } from 'sanity/cli'
export default defineCliConfig({
api: {
projectId: 'YOUR_PROJECT_ID',
dataset: '<YOUR_DATASET>',
},
autoUpdates: false,
})Caveats and key takeaways
- Auto-updating is currently only supported for studios built with the
sanity buildcommand, or deployed usingsanity deploy. Other build processes that do not use the build or deploy commands are not supported. - Auto-updates requires a browser that supports import maps, which has been considered a baseline feature in modern browsers since March 2023, and is supported in all the latest versions of common browsers.
- When developing with auto-updates enabled, you may receive warnings in your build step if your local version is out of sync with the auto-updated deployed version. Keep an eye out for these to ensure you're aware of any discrepancies between your development and production environments.
- Auto-updating keeps your studio current with patch releases and minor updates. We also update to new major versions when there are no runtime effects, like Node.js version changes. Rest assured that breaking changes will be announced clearly and in a timely fashion, as always.
- To opt out of auto-updating, rebuild and redeploy your studio using the feature flag or the
deployment.autoUpdatesconfiguration property set tofalse. Changes will take effect for your editorial teams once the new build has been successfully deployed. - Auto-updating keeps your studio up-to-date, but you're still responsible for updating and maintaining any custom code, plugins, or configurations layered on top of the base Sanity Studio.
The latest version of Sanity offers a range of new features and improvements to enhance your content management experience.