[NOW AVAILABLE] 👋 Hey Content Agent, tell me what you do that other AI tools can’t →
Skip to content
Sanity
  • Content operations

    • Sanity Studio
    • Media Library
    • Canvas
    • Content AgentNew
    • Content Releases
    • Insights
    • App SDK

    Content backend

    • Content Lake
    • Live CDN
    • Compute
    • Agent Actions
    • MCP ServerNew
    a white background with orange and black dots on it

    The only platform powering content operations

    Start building for free
    Start building for free
  • Use Cases

    • Headless CMS
    • E-commerce
    • Marketing
    • Media and publishing
    • PIM
    • LMS
    • Build your own

    Users

    • Developers
    • Content Editors
    • Product Owners
    • Business Leaders
    a man sits on a fence next to a horse

    Tecovas strengthens their customer connections

    Read the story
    Read the story
  • Build and Share

    • Sanity 101
    • Sanity Learn
    • Frameworks
    • Templates
    • Tools and plugins
    • Schemas and snippets
    • Join our community

    Insight

    • Blog
    • Events
    • Customer stories
    • Guides
    A dark-themed collage showcasing branded merchandise including t-shirts, a cap, mug, tote bag, and socks, alongside various digital design elements and logos, prominently featuring "Sanity" branding.

    Grab your gear: The official Sanity swag store

    Read Grab your gear: The official Sanity swag store
  • Docs
  • Enterprise
  • Pricing
Sanity

  • Content operations

    • Sanity StudioHeadless CMS
    • Media LibraryCentralized asset management
    • CanvasAI-assisted, free-form writing
    • Content AgentNewAI for content operations
    • Content ReleasesStack and stage content updates
    • InsightsUnderstand content performance
    • App SDKRapidly build content apps

    Content backend

    • Content LakeThe content optimized database
    • Live CDNSimple, scalable, real-time
    • ComputeEvent handlers for content changes
    • Agent ActionsBuilt-in, content aware AI
    • MCP ServerNew
  • Use Cases

    • Headless CMS
    • E-commerce
    • Marketing
    • Media and publishing
    • PIM
    • LMS
    • Build your own

    Users

    • Developers
    • Content Editors
    • Product Owners
    • Business Leaders
  • Build and Share

    • Sanity 101A quick series covering key areas of Sanity to get you up to speed.
    • Sanity Learn
    • Frameworks
    • Templates
    • Tools and plugins
    • Schemas and snippets
    • Join our community

    Insight

    • Blog
    • Events
    • Customer stories
    • Guides
  • Docs
  • Enterprise
  • Pricing
Join our community on Discord
Subscribe to our newsletter

Products

  • Sanity Studio
  • Media Library
  • Canvas
  • Content Agent
  • MCP Server
  • Content Releases
  • Insights
  • App SDK
  • Content Lake
  • Live CDN
  • Compute
  • Agent Actions
  • AI Assist
  • Use cases

Resources

  • Docs
  • Sanity 101
  • Sanity Learn
  • Tools and plugins
  • Frameworks
  • Templates
  • Schemas and snippets
  • Guides
  • Headless CMS explained
  • Resource library
  • Explainers
  • Enterprise CMS guides
  • Headless CMS Guides
  • Enhancing your CMS with AI
  • Compare Sanity
  • Glossary
  • Pricing

Company

  • Contact
  • Blog
  • Shop
  • Events
  • Careers
  • Changelog
  • Customer Stories
  • Agency Partners
  • Technology Partners

Trust and compliance

  • Privacy policy
  • Terms of service
  • Accessibility statement
  • Transparency statement
  • Security and compliance
  • Open Source Pledge

Keep in touch

© SANITY 2026

OSL, NOR (CET)

SFO, USA (PST)

Loading system status...
Change Site Theme
How-to guide

Content is more
than a string

This guide walks you through setting up a Sanity project, using Portable Text to separate content from presentation, and querying deeply nested content with GROQ. Flexible, scalable, and presentation-agnostic—without the headaches of MDX or HTML comments.

Follow guideEmail me the guide

Sanity features in this guide

Portable Text

Separate content and presentation by authoring rich text and block content as an array of objects. Unlock fine-grained queries for deeply nested content and render elements however you like.

Presenting Portable Text

Sanity Studio

The customizable, React-based content editing dashboard configured with JavaScript. Run locally in a Vite development environment and deploy to your hosting—or ours.

Learn more

Content Lake

All your Sanity content is stored in a Dataset in what we call the Content Lake. Schemaless cloud storage for all your content and assets.

What is the Content Lake?

On your phone?

This guide requires a terminal. Email yourself this command + get an extended 60-day trial of Sanity's paid features to start building when you're back at your desk.

By submitting this form, you confirm that you have read and understood Sanity's Privacy Policy. This site is protected by reCAPTCHA and the Google Privacy Policy and Terms of Service apply.

Rich text rendering without dangerouslySetInnerHTML

If you have an existing Sanity project, you may prefer to read the documentation on Portable Text for details on how to set it up in your application.

What's covered in this guide

You'll create a new free Sanity project using the Next.js template, publish new documents with Sanity Studio and explore the benefits of Portable Text.

Create a new project

You can get started with the template by clicking here, or use the command below to create a new free Sanity project using the Next.js template from the command line.

If you don't already have an account with Sanity, you'll be prompted to create one.

Building later? This guide requires a terminal. Email yourself this command + get an extended 60-day trial of Sanity's paid features to start building when you're back at your desk.

npm create sanity@latest -- --template sanity-io/sanity-template-nextjs-clean --coupon=text-guide

Now inside this directory, start the development server.

npm run dev

You should now have two apps running:

  • http://localhost:3000 – Your Next.js app
  • http://localhost:3333 – Your Sanity Studio

These apps are separately configured in the following directories:

├─ /nextjs-app
└─ /studio

The Sanity Studio is configured with code, edits you make to the configuration will render immediately in the development environment.

Content in Sanity Studio is written to a schemaless, cloud-hosted Dataset in what we call the Content Lake.

The Next.js app fetches content using Sanity Client with the GROQ query language.

Enter the Studio

Open http://localhost:3333 and log in to your Sanity Studio. The first tab that will open is the Presentation tool.

The Presentation tool is used to view your Next.js front end (http://localhost:3000) within an Iframe so that you can interact with your content.

💡 To see how Presentation can be used for interactive live preview of draft content, see the guide in this series on Visual Editing.

Publish a new post

Click "+ Create" from the top menu and select "Post."

The post document type currently has a few required fields. You will need to give this new document a

  • Title
  • Slug
  • Cover Image
    • and alternative text for the image

Once the Publish button is enabled, publish the post.

Open the post in Presentation

At the top of the document, you will see a box saying "Used on 2 pages" which you can open to show the locations of the current document in the front end.

Click the first location and you'll see the front end open side-by-side with the document editor. Make a change to the document and press Publish. You'll see the document update again, without a reload!

Sanity Studio in a browser window

Authoring Portable Text

Scroll to the Content field in the document editor and start entering some text. There's formatting controls like you would expect from an WYSIWYG editor—but you're not authoring HTML or Markdown, it's Portable Text.

Sanity Studio showing the "Inspect" button

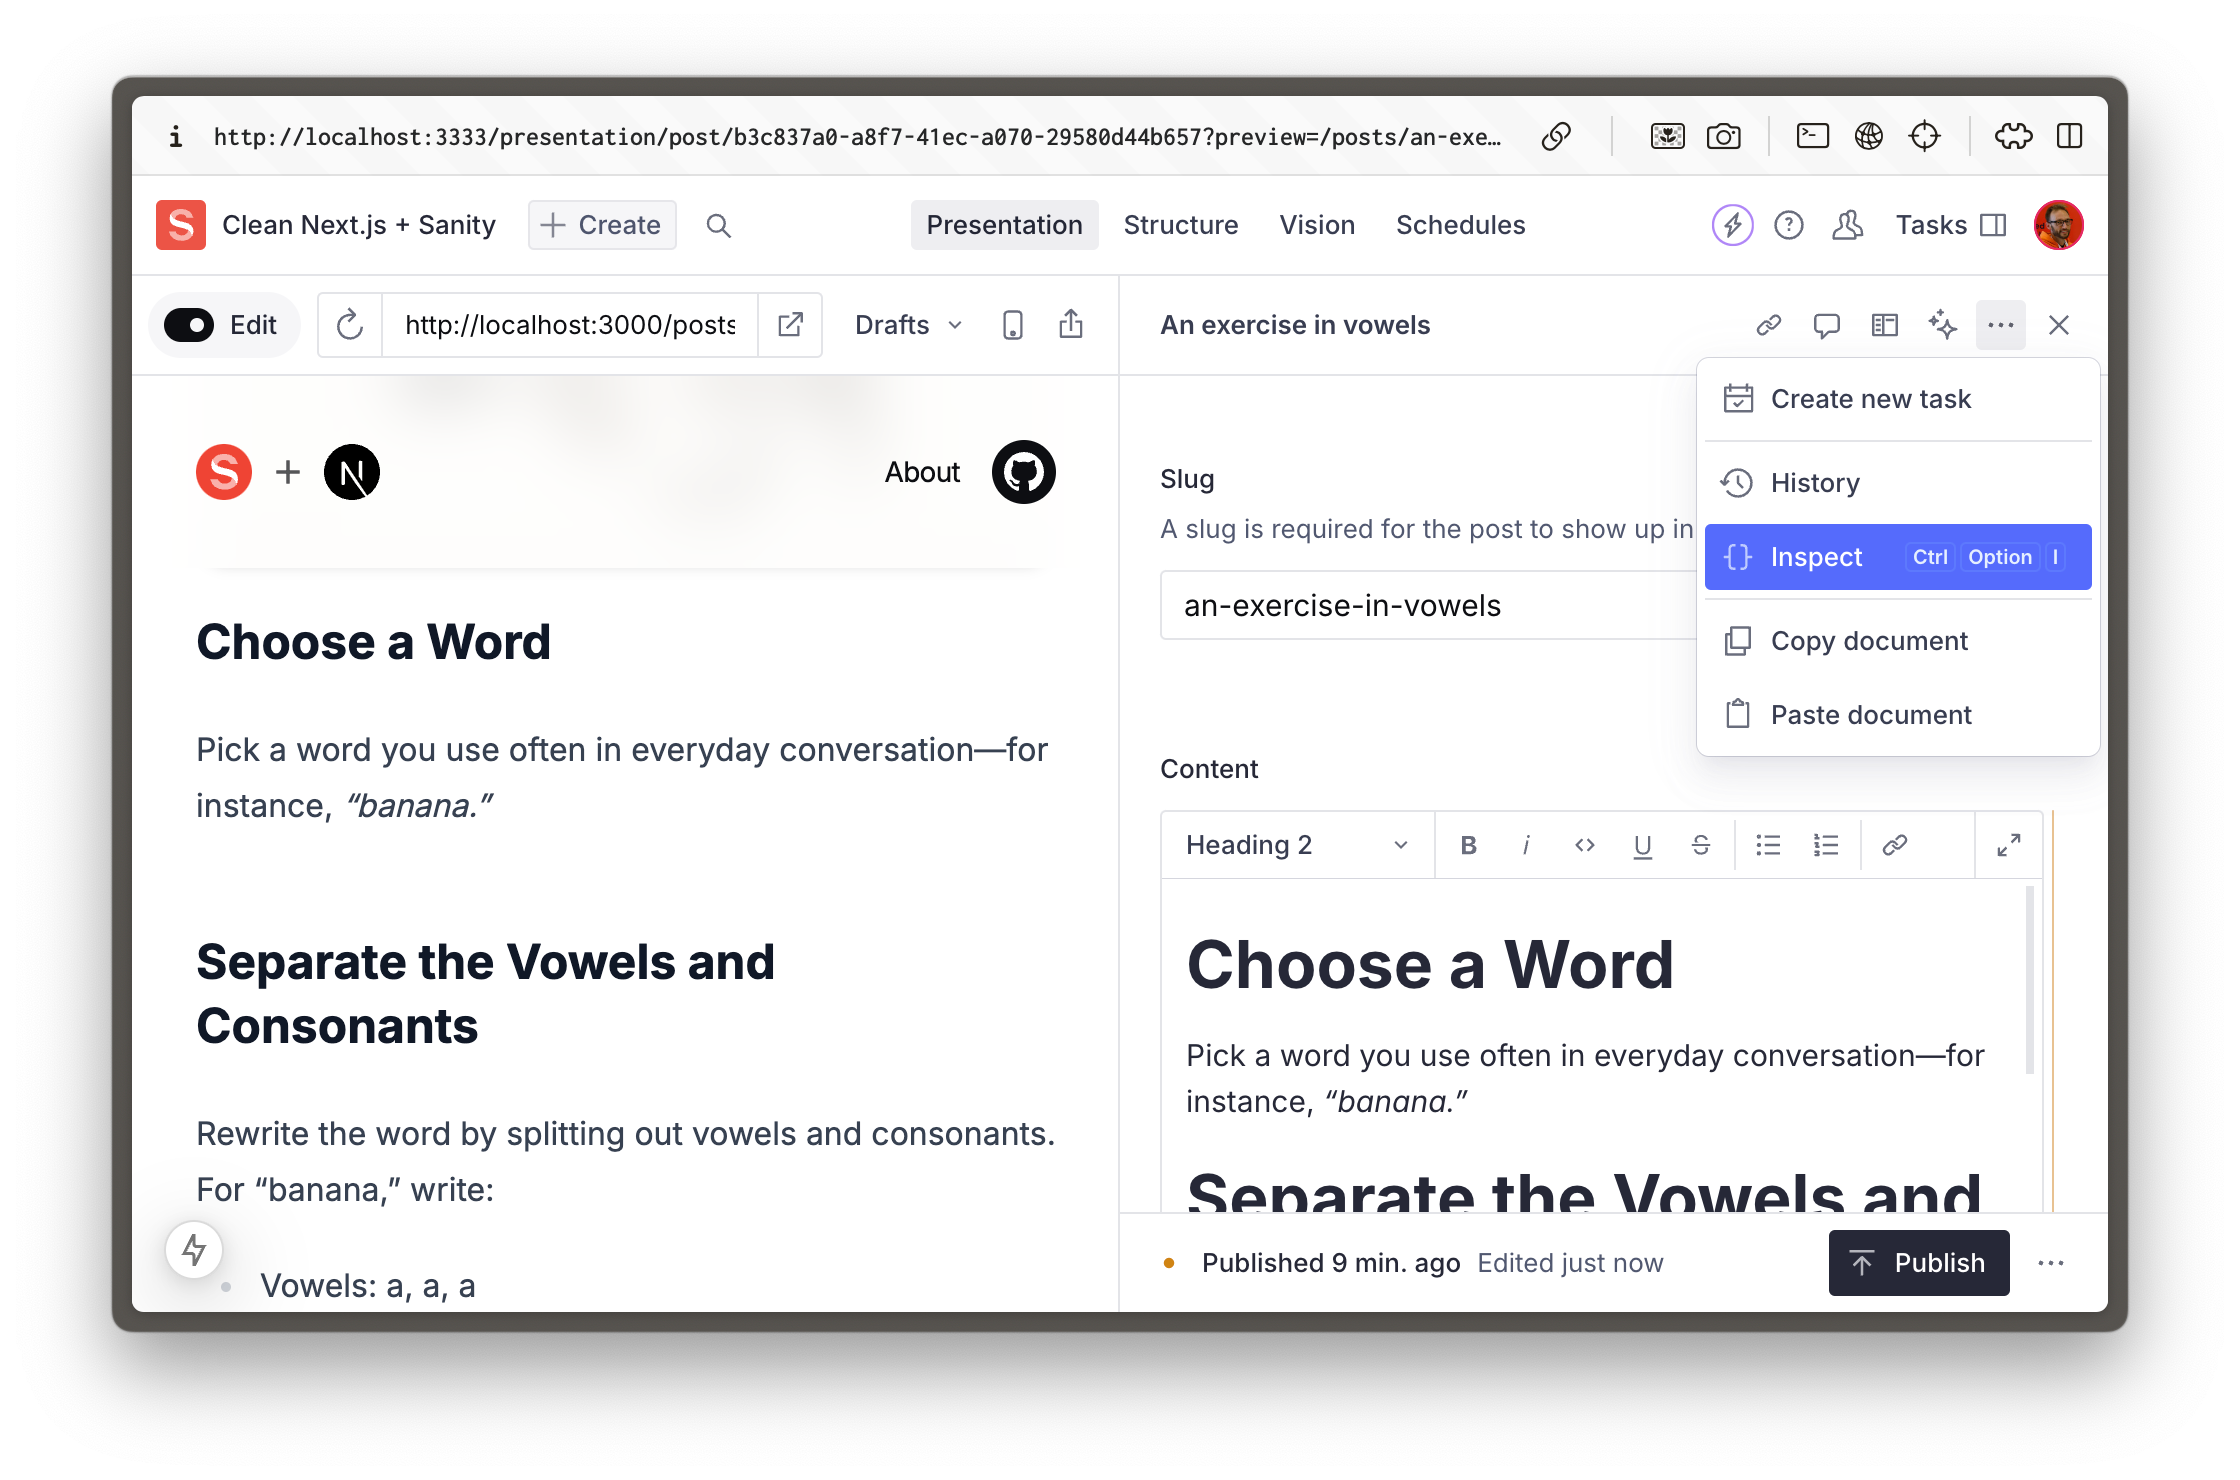
In the top right hand corner of the document editor, click the Inspect menu item. This will show you the JSON value of the current document, which the editor is writing.

In the content field you'll see an array of objects written in the standard of Portable Text. It's not intended to be human readable—it's a way of storing rich text and block content in a way that is serializable.

Rendering Portable Text

In the preview window to the left, you'll see content appear as you type. It does not have a direct 1:1 relationship with the presentation of content being authored in the Studio—it's not supposed to! Applications that consume Portable Text get to choose how and if each block is rendered.

As an example, your application may just render the body content. But it also may extract just blocks where the style equals heading in order to render a table of contents.

Querying Portable Text

Add a "link" to some text in the content field

Imagine you're tasked to get the URL from every link in every blog post.

Sanity Studio showing the Vision tool performing a GROQ query

With content stored as data, you can perform powerful queries for deeply nested content. From the top toolbar, open the Vision tool in the Studio and run the following GROQ query:

*[
  _type == "post" 
  && defined(content)
]
  .content[count(markDefs) > 0]
  .markDefs[_type == "link"].href

This query will look up:

  • Every document in the dataset (represented by *)
  • Filtered to only those of the "post" type where the content field has a value
  • Return the content field, filtered to only those with mark definitions
  • Return the mark definitions, filtered to only those of the "link" type
  • Filter those results to only return the "href" attribute

This should give you some idea of just how powerful it is to store your block content in a format that can be queried with such granularity! You might not perform this sort of query often, but when you do, it's a life saver.

Compare this to Markdown or HTML—hope you like Regex.

If you're new to GROQ, consider the Between GROQ and a Hard Place course on Sanity Learn.

How this works

Portable Text for React

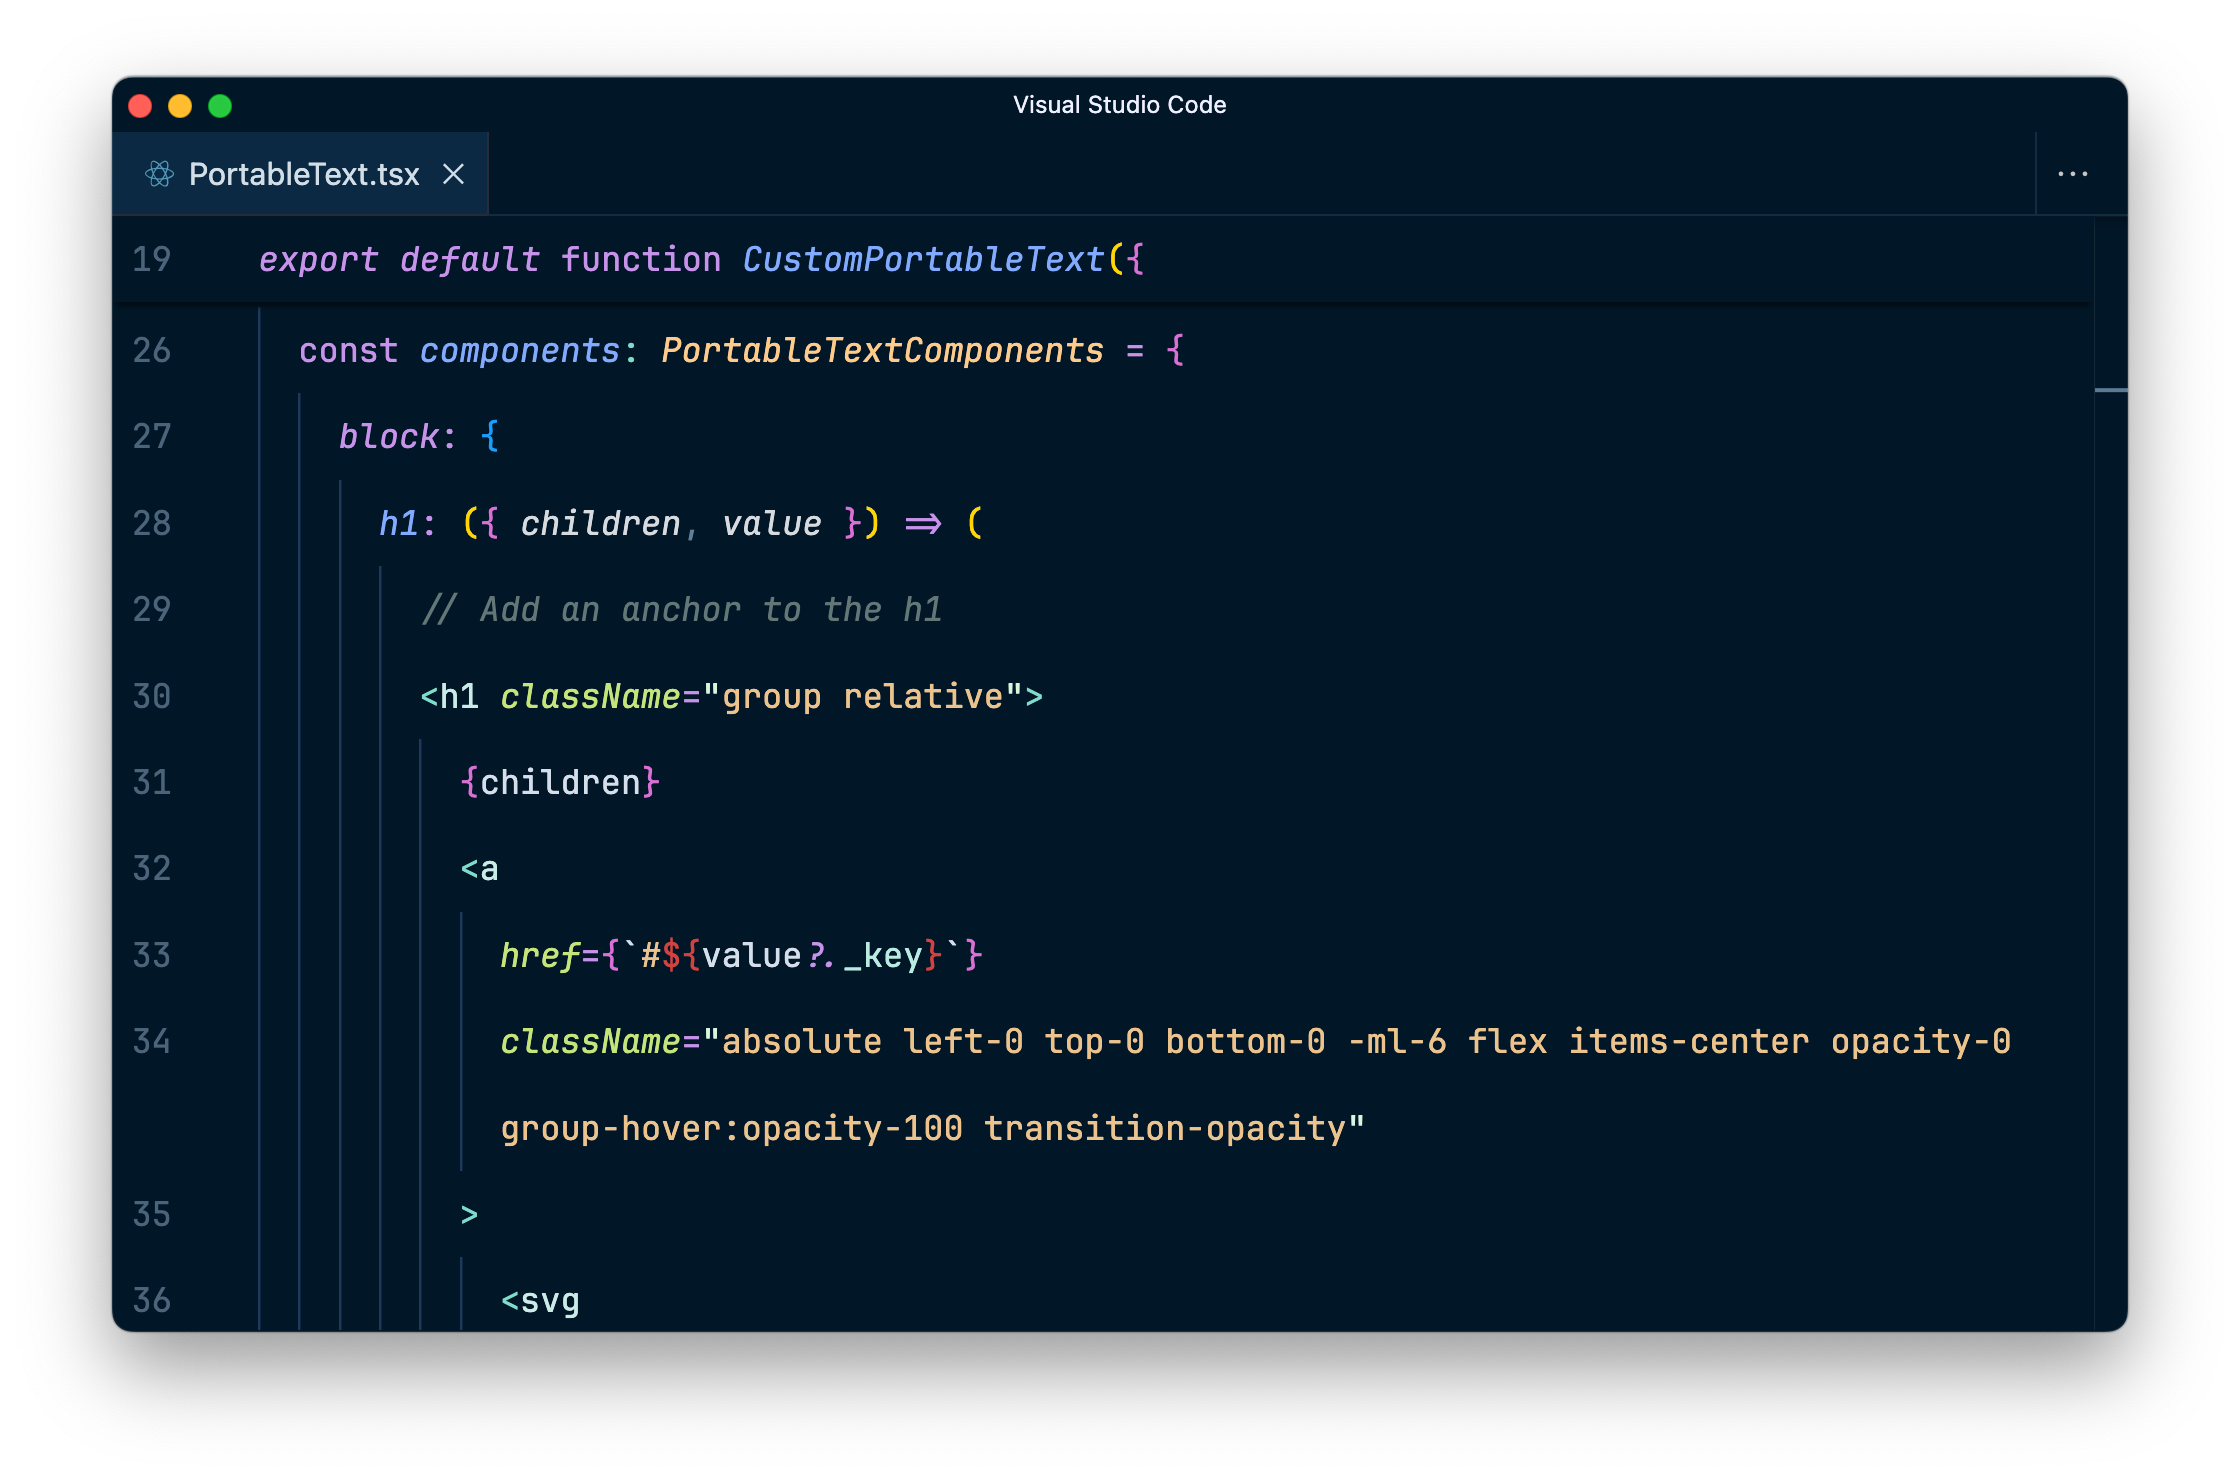
Open nextjs-app/app/components/PortableText.tsx

Code showing configuration of Portable Text

When Portable Text content is queried into your application, you need a way to map over that data and render components.

The @portabletext/react library contains a component PortableText which will handle a few default block types like headings and list, serializing them into the sorts of DOM elements you'd expect (<h1>, <h2>, <ul>, etc.)

The CustomPortableText component in this file contains that default component, along with a list of components to add custom serialization to include functionality like clickable links on headings. As well as class names on each individual block.

Next steps

Some ideas of what you might do next.

  • Commit this repository to your Git provider and deploy to Vercel to share these live previews with content creators
  • Add or edit Sanity Studio schema types. The template comes with a few already created, try adding a new field to post.ts in the /studio directory and see how the Studio updates imediately.
  • Explore GROQ, queries.ts in the /nextjs-app directory contains all the queries that the Next.js app currently makes. You can test queries in the Studio using the Vision tool.
  • Take the Day One with Sanity Studio Course to get a from-the-ground-up understanding of how to create new Sanity projects.

Jump to section

  • What's covered in this guide
  • Create a new project
  • Enter the Studio
  • Publish a new post
  • Open the post in Presentation
  • Authoring Portable Text
  • Rendering Portable Text
  • Querying Portable Text
  • How this works
  • Portable Text for React
  • Next steps
Go deeper

More resources

Course • Sanity Learn

Integrated Visual Editing with Next.js

The ultimate upgrade for content authors is to have absolute confidence in the impact of their work before they press publish – as well as the tools to rapidly find and update even the most minor pieces of content.

View course

Visual Editing with Sanity

Introduction to Sanity's Visual Editing features, architecture, and where to go to learn more.

Enabling drag and drop for Visual Editing

Core concepts for enabling drag and drop functionality within the Presentation tool

Visual Editing: give content teams a GPS for your CMS

product

Visual Editing streamlines everyday content management with an intuitive, one-click path from website preview content to Studio.

Molly Friederich
Simeon Griggs

Molly Friederich and 1 other

Explore more guides

Sanity TypeGen

Learn how Sanity Studio's flexible content modeling and GROQ queries can be made type-safe.

Flexible schemas, Type-safe queries

Visual Editing

Separate content from code and let authors publish their own changes, while you focus on what you'd rather do.

Fix a typo without a PR

Live Content API

Make all your content real-time content. Build live-by-default applications without touching the refresh button or busting the cache.

Really easy real-time

What's next?

Visual Editing, the Presentation tool and Sanity Studio and are just a few parts of the Sanity Content Operating System. Get a fresh start on a new project or take a guided course for more.

Get startedSanity Learn
npm create sanity@latest -- --template sanity-io/sanity-template-nextjs-clean --coupon=text-guide
├─ /nextjs-app
└─ /studio
*[
  _type == "post" 
  && defined(content)
]
  .content[count(markDefs) > 0]
  .markDefs[_type == "link"].href