Published January 13, 2022
How to Create a Single Page Application with Angular

Handling page interactivity with ease, retrieving data from the server without a necessary page reload, and updating a website via asynchronous requests are some of the selling points and promises of Single Page Applications.
A web application that is composed of one web page and handles the request for other pages through AJAX and automatically replaces the view with the new page response. As a result of this, the single-page applications are very responsive with improved speed.
To further explore some of the benefits of a single-page application, in this tutorial, I will show you how to easily build a SPA using Angular.
What is Angular
Angular is a JavaScript framework written entirely in TypeScript. Open sourced and maintained by Google, it provides a standard and opinionated structure for building a web application irrespective of the size and complexity.
Its primary purpose is to develop single-page applications and with benefits such as custom components, data binding, and dependency injection, it has helped developers across the globe boost efficiency and performance when building web applications.
What we’ll build
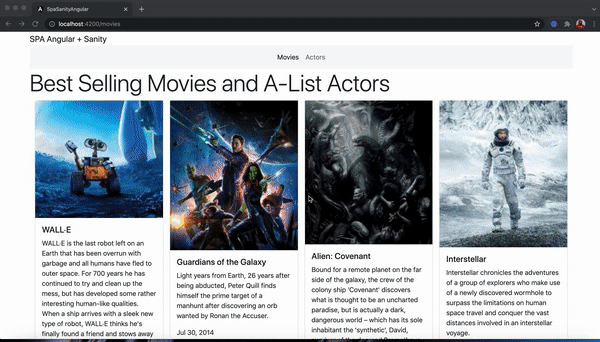
In this guide, we will build a movie application to show some best-selling movies and A-list actors in Hollywood. To manage the contents from the backend we will use Sanity.io and leverage Angular to build the user interface of the application. Once we are done, the application will look similar to the image shown below:
Prerequisites
For this project, you need:
- Familiarity with TypeScript
- Basic knowledge of building applications with Angular
- A free Sanity.io account
Additionally, you will need to have the following installed locally:
Scaffolding a new Angular application
We will begin by using the Angular CLI to create a new Angular application. Issue the following command from the terminal to do that:
ng new spa-sanity-angular
First, the preceding command will require you to answer a couple of questions as shown here:
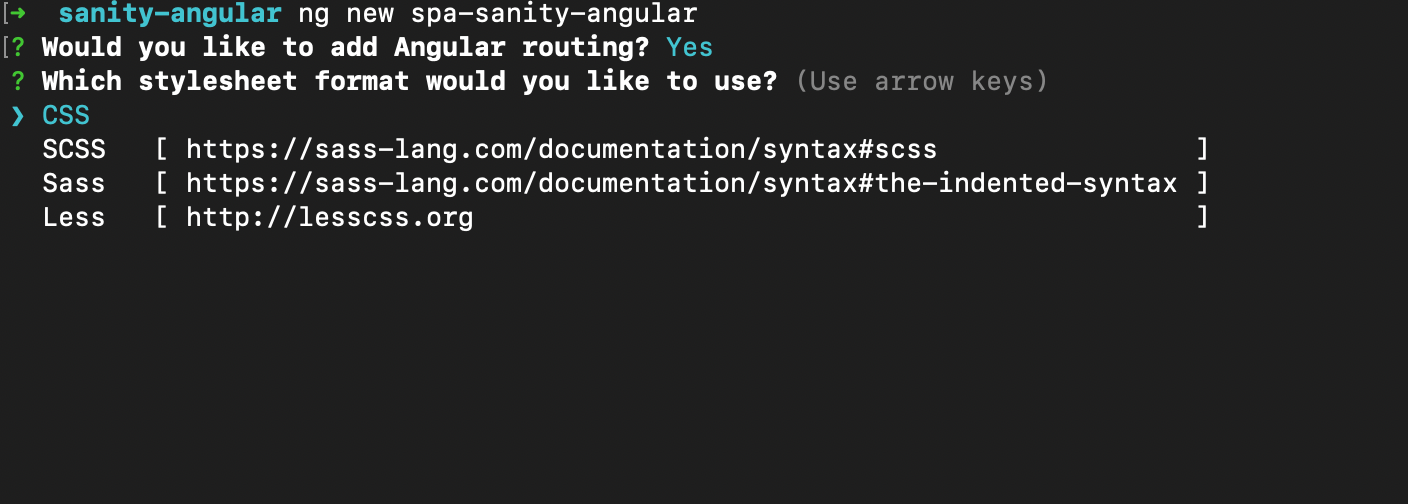
Add Angular routing and select CSS as the preferred stylesheet. Once you are done, Angular CLI will create a new basic Angular project in a folder named spa-sanity-angular within your development directory.
Next, navigate into the new project and run the application using the following commands:
//move into the project
cd spa-sanity-angular

// Run the application
ng serve
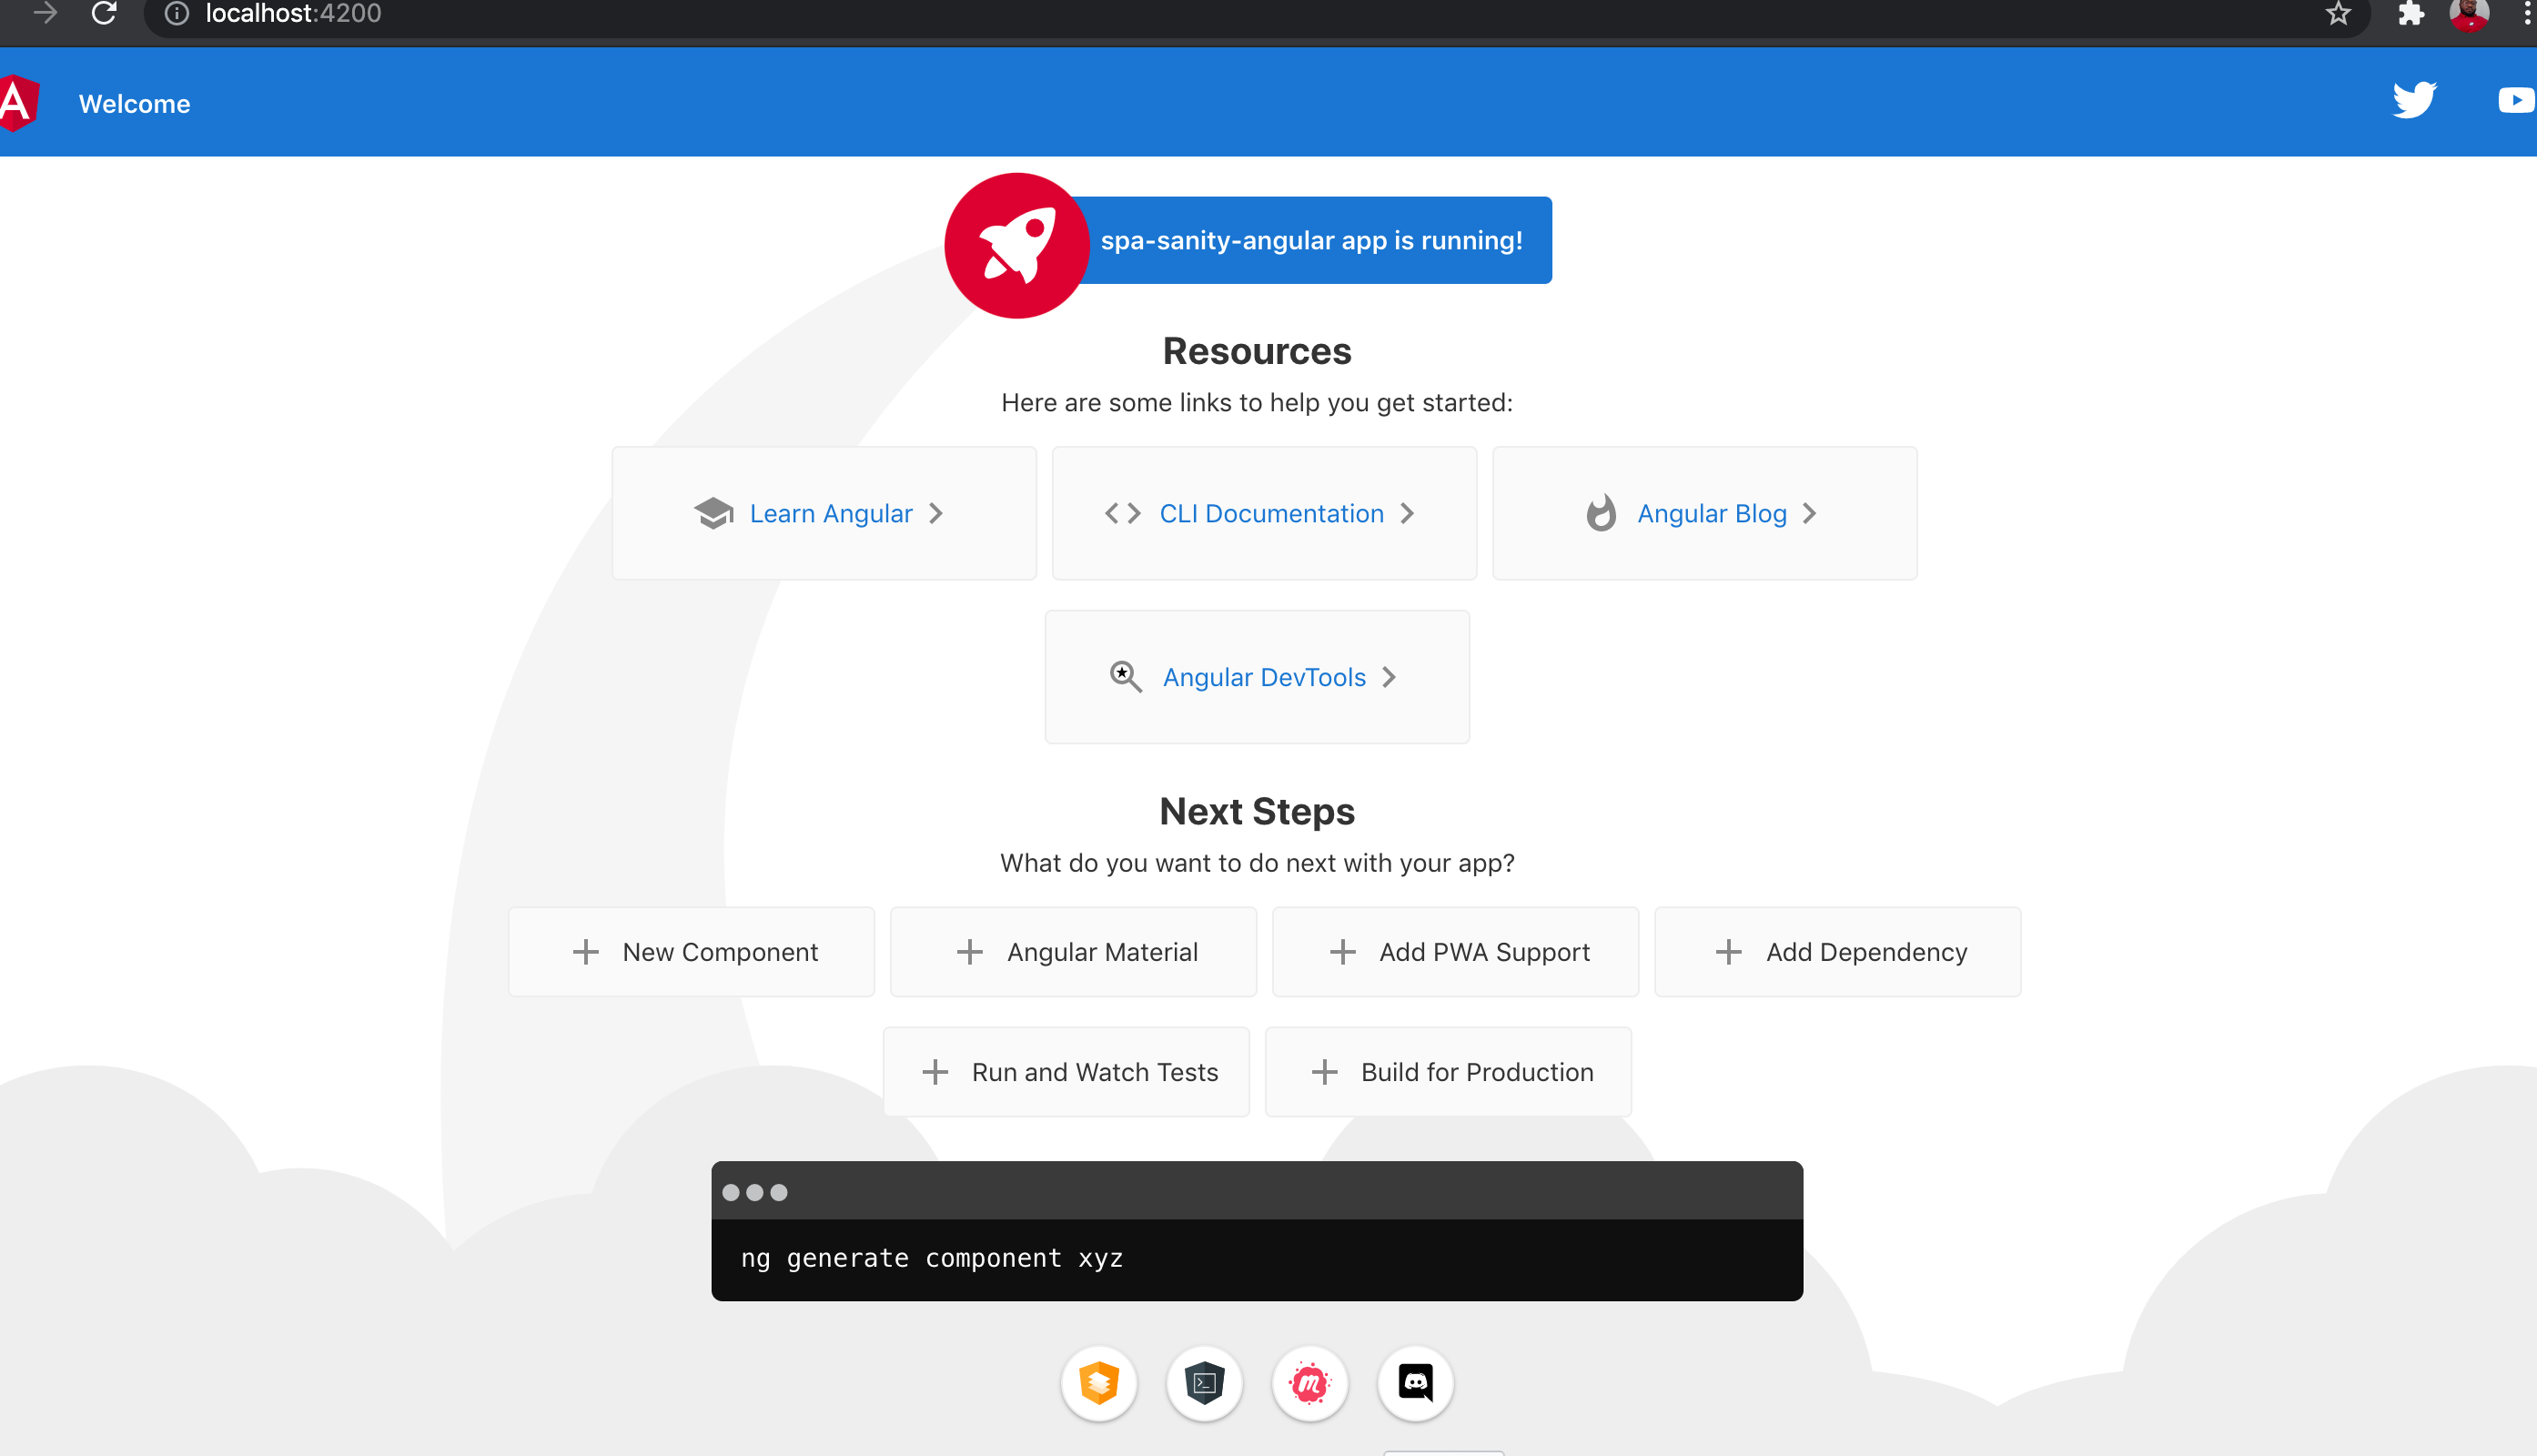
You can view the default homepage of a new Angular project on http://localhost:4200.
Now that we have created a new Angular application, stop the project from running using CTRL + C and hit enter to proceed. In the next section, we will set up the backend for the project using Sanity studio.
Creating the Sanity backend
To start a new Sanity project, ensure that you have installed the Sanity CLI and run the following command from the spa-sanity-angular folder:
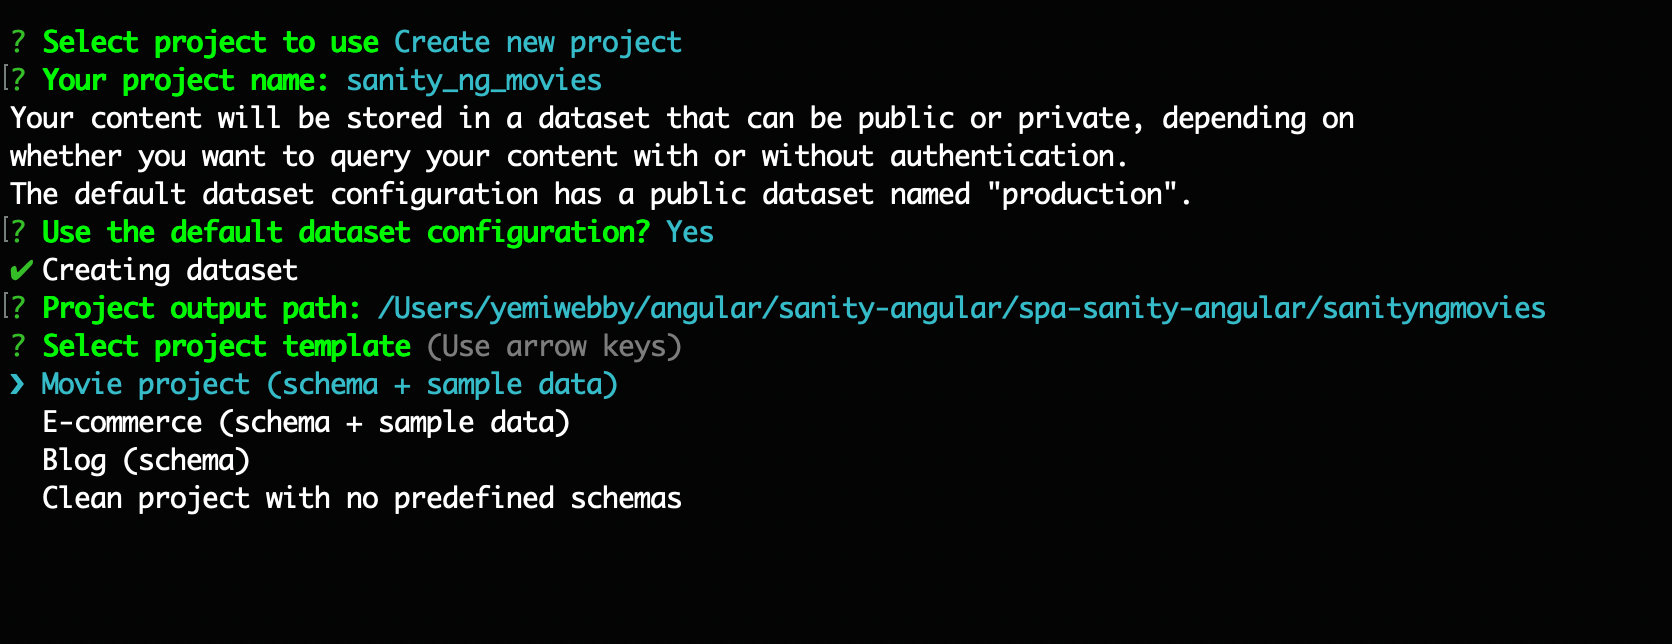
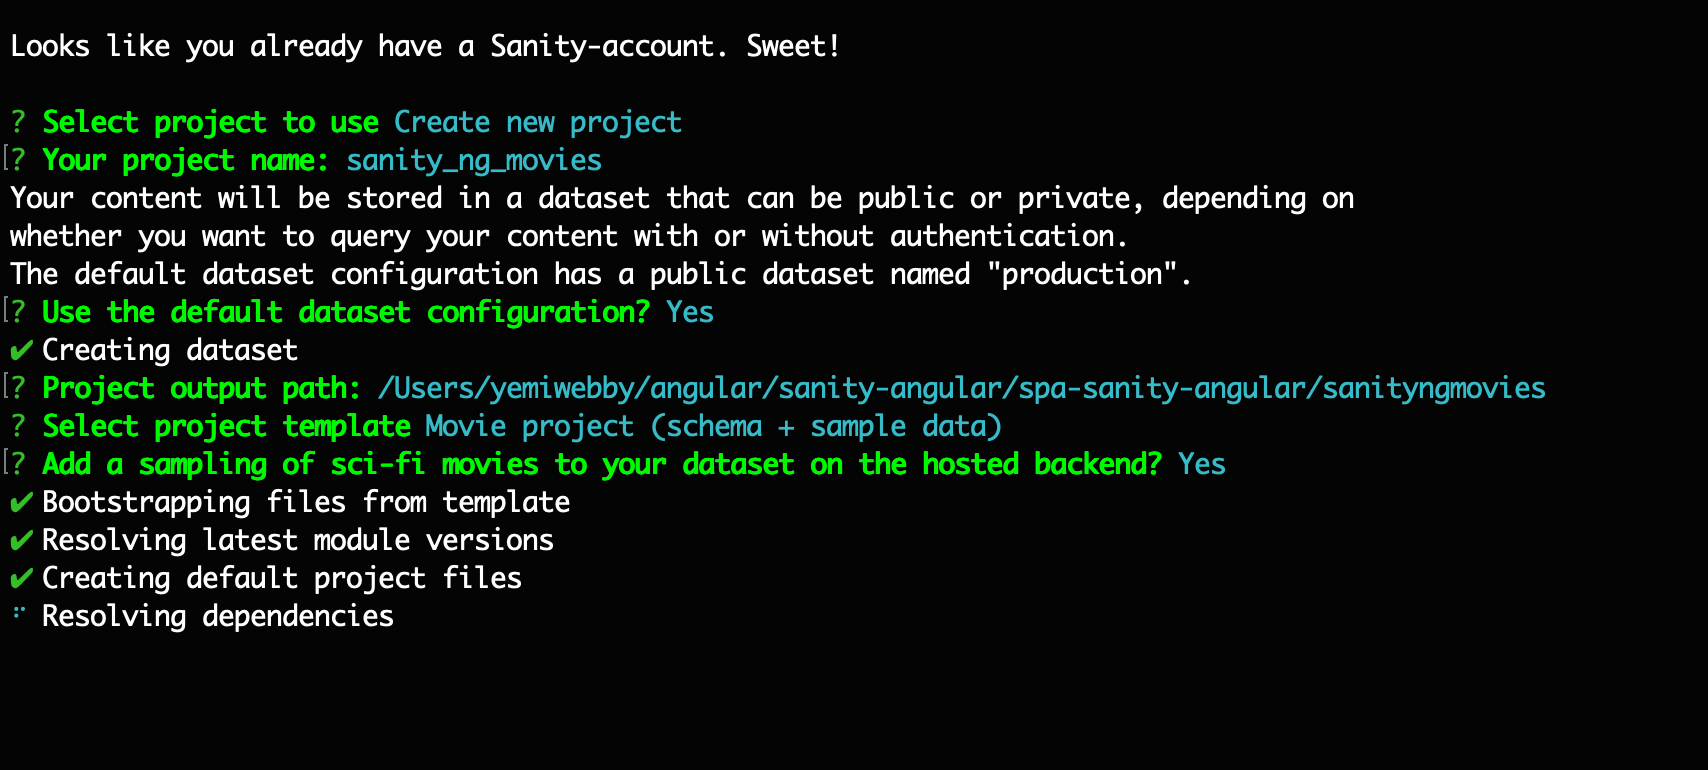
sanity initWhen prompted to provide some information. Proceed as follows:
- Select the Create new project option
- Name the project
sanity_ng_movies - Use the default dataset configuration (press
Y) - Select the project output path as
sanityngmovies - Select the movie project (schema + sample data) option. Using the arrow keys, navigate to that option and press enter when it turns blue.
- Upload a sampling of sci-fi movies to your dataset on the hosted
sanityngmovies(press Y)
The Sanity CLI will bootstrap a project from the movie template, link the needed dependencies and populate your new sanity studio with some science fiction movies data.
Once the process is completed, you can run your studio. To do that, open a new terminal, move into the sanityngmovies folder and start the studio using the commands below:
cd sanityngmovies

sanity start
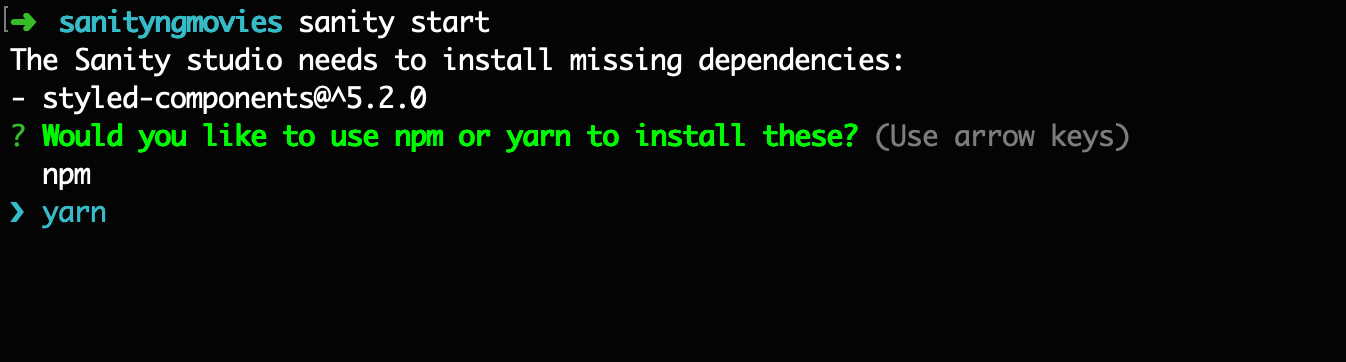
By default, the studio runs at http://localhost:3333.
Enabling CORS on Sanity
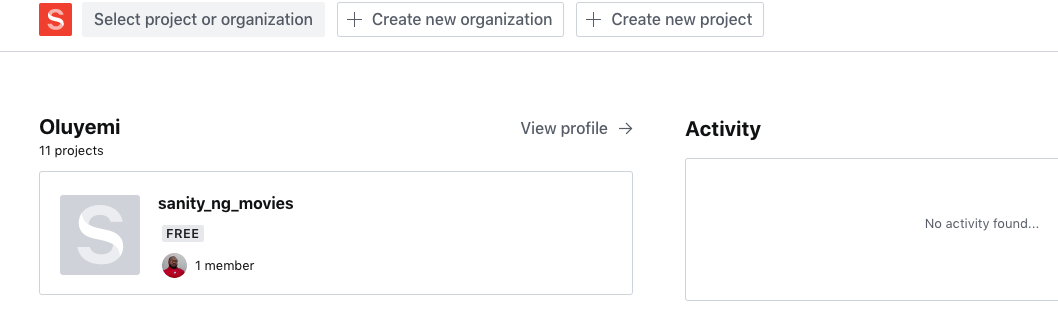
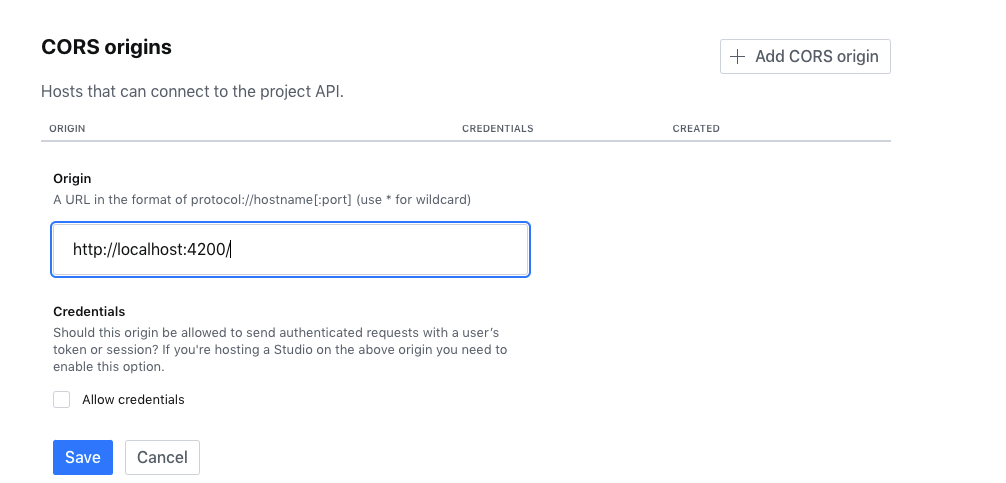
By default, a development server such as the Angular app will not be allowed to connect or communicate with the project API in the sanity studio (http://localhost:3333). To change that, we need to add the URL where our Angular application will be served to the permitted origins. Visit https://www.sanity.io/manage and click on the Sanity project that we are working on (sanity_ng_movies)
Next, click on the Settings → API and add http://localhost:4200/ to the CORS origins field. Click on the Save button to proceed. Leave the checkbox marked ‘Allow credentials’ unchecked.
Sourcing Sanity’s Data From Angular
In this section, we will set up the structure that will allow the Angular frontend query and fetch data from Sanity studio created earlier.
To begin, we will need to install the required Sanity Client package for proper interaction in our Angular project. Issue the following command from the terminal within the root of the project:
npm install @sanity/client @sanity/image-url
Creating an Angular service to retrieve Sanity data
The existing structure of Angular allows separation and abstraction of business logic to a different object regularly referred to as Angular Service. This helps reduce the need to write complex logic within any component and encourages the separation of concerns.
To proceed, we will create an Angular service to retrieve the list of Movies and Actors using the following command:
ng generate service service/sanity
This will create a new folder named service and two new files within it. Open the sanity.service.ts file and replace its content with the following:
// src/app/service/sanity.service.ts

import { Injectable } from '@angular/core';
import sanityClient from '@sanity/client';
import imageUrlBuilder from "@sanity/image-url";
import { Actor } from '../actor';
import { Movie } from '../movie';

@Injectable({
  providedIn: 'root'
})
export class SanityService {
  constructor() { }

  sanityClientCredentials = {
    option: sanityClient({
      projectId: "YOUR_PROJECT_ID",
      dataset: "production"
    })
  }

  urlFor = (source: any) =>
  imageUrlBuilder(this.sanityClientCredentials.option).image(source);

  async getMovies(): Promise<Movie[]> {
    return await this.sanityClientCredentials.option.fetch(
      `*[_type == "movie"]{
        _id,
    title,
    overview,
    releaseDate,
    poster
  }`
    );
  }

  async getActors(): Promise<Actor[]> {
    return await this.sanityClientCredentials.option.fetch(
      `*[_type == "person"]{
        _id,
    name,
    image
  }`
    );
  }
}
First, we created a property sanityClientCredentials which uses the Sanity client package to specify the projectId for the backend created in Sanity studio. Kindly replace the YOUR_PROJECT_ID placeholder with your Project ID, which you can get by navigating to sanityngmovies/sanity.json file or visit https://www.sanity.io/manage and click on the project to view its full details including the Project ID.
Next, we created two asynchronous methods:
getMovies(): Here, we make a GROQ request to the Sanity API to retrieve the lists of movies, showing only the title, released date, poster and overview.getActors(): Similar to the first method, this also made a GROQ request to retrieve the lists of actors from the Sanity API.
Lastly in this section, to be able to reference the installed sanity module with ECMAScript imports/exports, we need to turn on the allowSyntheticDefaultImports flag within tsconfig.json file. This is a known issue and can easily be fixed. To proceed, open tsconfig.json file and update the “compilerOptions” object by including:
// tsconfig.json

"compilerOptions": {
    "allowSyntheticDefaultImports":true,
    ...
  },
Defining Angular interfaces
Within the SanityService created in the preceding section, we referenced two files named actor.ts and movie.ts. These are interfaces that help to identify the datatypes of each of the properties expected to be returned by the methods defined in Sanity Service.
To set up these files, create actor.ts and movie.ts within the app folder and populate each one as shown below:
// src/app/actor.ts

export interface Actor {
    _id: String,
    name: String,
    image: String
}
// src/app/movie.ts
export interface Movie {
_id: String,
title: String,
overview: [],
releaseDate: Date,
poster: {},
}Creating Angular Component
Here, we will create Angular components to display the list of Movies and Actors created in Sanity Studio.
Creating the Movies component
To begin, use the Angular CLI to generate a Movies component. Run the following command:
ng generate component movies
Be default, this command will create the following:
- A folder named after the component (
movies) - A component file, (
movies.component.ts) - A template file (
movies.component.html) - A CSS file, (
movies.component.css) - A testing specification file,
movies.component.spec.ts
Open app/movies/movies.component.ts and use the following content for it:
// src/app/movies/movies.component.ts

import { Component, OnInit } from '@angular/core';
import { Movie } from '../movie';
import { SanityService } from '../service/sanity.service';

@Component({
  selector: 'app-movies',
  templateUrl: './movies.component.html',
  styleUrls: ['./movies.component.css']
})

export class MoviesComponent implements OnInit {
  constructor(private sanityService: SanityService ) { }

  movies: Movie[] = [];

  imageUrl(source: any) {
    return this.sanityService.urlFor(source);
  }

  ngOnInit(): void {
    this.getMovies();
  }

  async getMovies(): Promise<Movie[]>  {
    this.movies = await this.sanityService.getMovies();
    return this.movies;
  }
}
From the code snippet above, we injected the SanityService via the constructor and defined a sanityService property to identify it. Next, we created a getMovies() method to retrieve the movies from the service.
Next, open the app/movies/movies.component.html and replace its content with:
<!-- src/app/movies/movies.component.html -->

<div class="container content-wrapper">
  <div *ngFor="let movie of movies" class="card">
    <img
      src="{{ imageUrl(movie.poster).width(200).url() }}"
      alt="{{ movie.title }}"
    />
    <div class="card-body">
      <h5 class="card-title">
        {{ movie.title }}
      </h5>
      <p class="card-text" *ngFor="let view of movie.overview">
        {{ view["children"][0]["text"] }}
      </p>
      <div>{{ movie.releaseDate | date }}</div>
    </div>
  </div>
</div>
We iterate over the list of movies and render the list in HTML.
Creating the Actors component
To create the Actors component, issue the following command from the terminal:
ng generate component actors
This command will create an actors folder with the following files in it:
- A component file, (
actors.component.ts) - A template file (
actors.component.html) - A CSS file, (
actors.component.css) - A testing specification file,
actors.component.spec.ts
Open app/actors/actors.component.ts and use the following content for it:
// src/app/actors/actors.component.ts

import { Component, OnInit } from '@angular/core';
import { Actor } from '../actor';
import { SanityService } from '../service/sanity.service';

@Component({
  selector: 'app-actors',
  templateUrl: './actors.component.html',
  styleUrls: ['./actors.component.css']
})

export class ActorsComponent implements OnInit {

  constructor(private sanityService: SanityService) { }

  actors: Actor[] = [];

  defaultImageURL =
  "https://images.vexels.com/media/users/3/140384/isolated/preview/fa2513b856a0c96691ae3c5c39629f31-girl-profile-avatar-1-by-vexels.png";

  imageUrl(source: any) {
    return source ? this.sanityService.urlFor(source) : this.defaultImageURL;
  }

  ngOnInit(): void {
    this.getActors();
  }

  async getActors(): Promise<Actor[]> {
    this.actors = await this.sanityService.getActors();
    return this.actors;
  }
}
In this component, we injected the sanity service and created a getActors() to retrieve the list of Actors from the Sanity API.
With that in place, we can now access the actors property from the template file. To do that, open the app/actors/actors.component.html and replace its content with:
<!-- src/app/actors/actors.component.html -->

<div class="container content-wrapper">
  <div *ngFor="let actor of actors" class="card">
    <img src="{{ imageUrl(actor.image) }}" alt="{{ actor.name }}" />
    <div class="card-body">
      <h5 class="card-title">
        {{ actor.name }}
      </h5>
    </div>
  </div>
</div>
This snippet renders the list of A-list actors as retrieved from the API listing the names and images of each Actor.
Setting up Routing
Earlier when we created the Angular application, we selected an option to automatically add the Angular routing module. This was created by the Angular CLI and all that is required is to reference the components created and define respective paths.
Open app/app-routing.module.ts and paste the following content in it:
// src/app/app-routing.module.ts

import { NgModule } from '@angular/core';
import { RouterModule, Routes } from '@angular/router';
import { ActorsComponent } from './actors/actors.component';
import { MoviesComponent } from './movies/movies.component';

const routes: Routes = [
  { path: '', redirectTo: '/movies', pathMatch: 'full'},
  { path: 'movies', component: MoviesComponent},
  { path: 'actors', component: ActorsComponent}
];
@NgModule({
  imports: [RouterModule.forRoot(routes)],
  exports: [RouterModule]
})

export class AppRoutingModule { }
Here, we imported the MoviesComponent and ActorsComponent and created the paths in which each will be rendered.
Adding style
To style this application, run the following command to install Bootstrap via NPM:
npm install bootstrap
Once the installation is complete, open the angular.json file and include the bootstrap.css file:
// angular.json

"styles": [
    "./node_modules/bootstrap/dist/css/bootstrap.css",
    "src/styles.css"
 ],
Include extra custom style by opening style.css and use the following content for it:
/* style.css */

.content-wrapper {
  display: grid;
  grid-template-columns: repeat(auto-fill, minmax(305px, 1fr));
  grid-gap: 15px;
}
.content-wrapper > .card img {
  max-width: 100%;
}
Updating the App Component
Finally, open the app/app.component.html file and replace its content with the following:
<!-- src/app/app.component.html -->

<div class="container">
  <div>
    <span class="navbar-brand" href="#">SPA Angular + Sanity </span>
  </div>
  <nav class="navbar navbar-expand-lg navbar-light bg-light">
    <div class="collapse navbar-collapse" id="navbarNav">
      <ul class="navbar-nav mx-auto">
        <li class="nav-item">
          <a routerLink="/movies" class="nav-link active">Movies</a>
        </li>
        <li class="nav-item">
          <a routerLink="/actors" class="nav-link">Actors</a>
        </li>
      </ul>
    </div>
  </nav>
  <div class="jumbotron">
    <h4 class="display-4">Best Selling Movies and A-List Actors</h4>
  </div>
  <router-outlet></router-outlet>
</div>
Here, we defined the layout and include the navigation bar with respective links.
Testing the application
Now you can run the application again with:
ng serveIf you encounter the following errors:
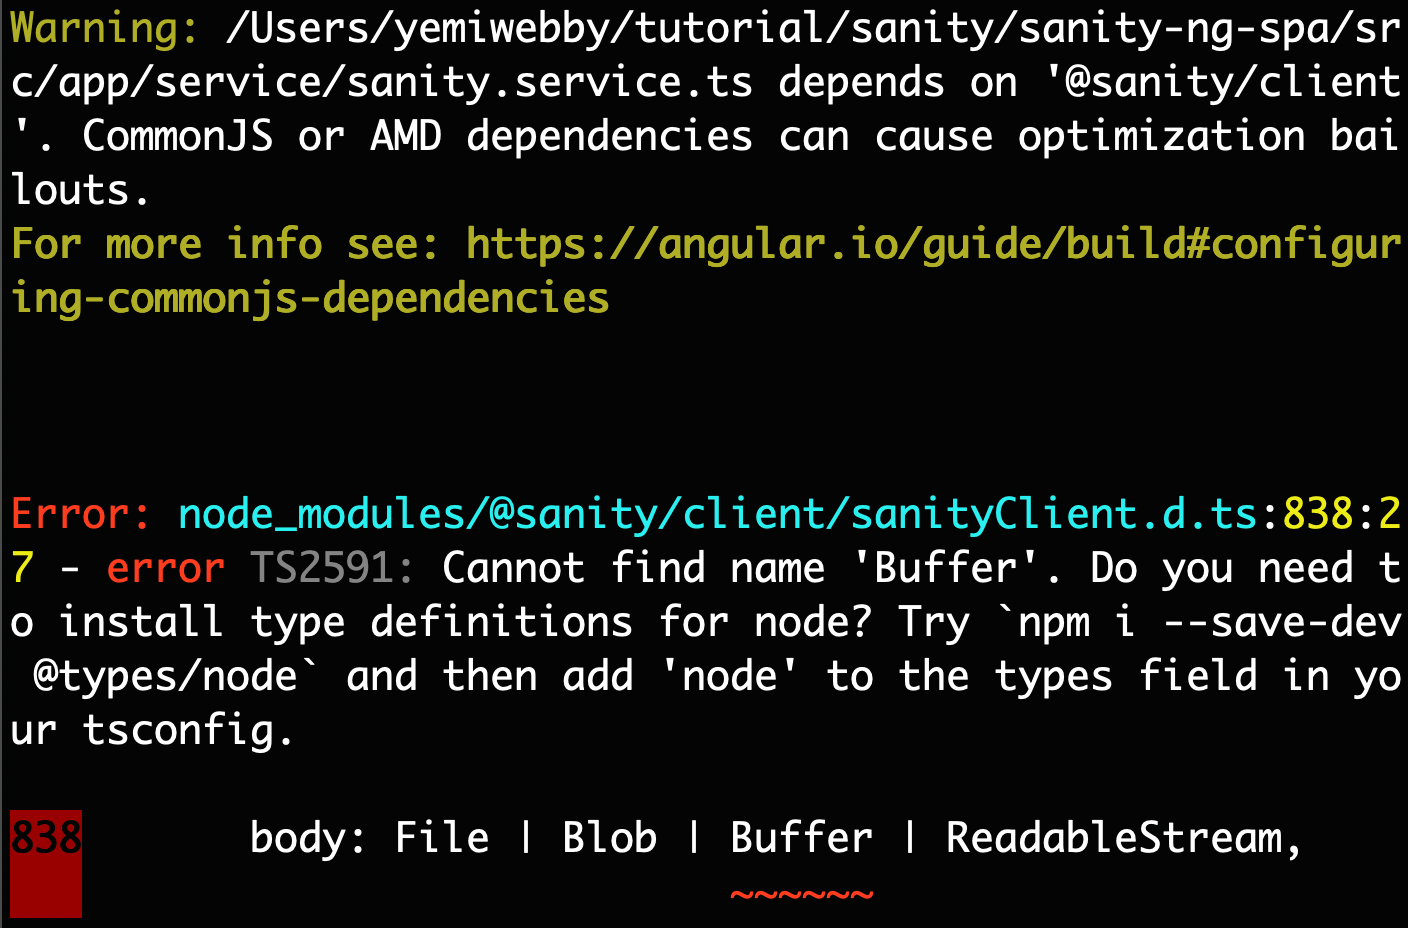
This error occurred because TypeScript doesn’t know classes from Node.js by default, you will need to install the type definitions for Node.js. To begin, First, you need to install types/node:
npm install --save @types/node
Once the installation is completed, open tsconfig.app.json file and update the “compilerOptions” object as shown here:
// tsconfig.json

"compilerOptions": {
    ...
    "types": ["node"],
    "typeRoots": ["node_modules/@types"]
  },
Lastly to handle the warning from the terminal about @sanity/client. Open angular.json file and update the options object defined within the build as shown below:
// angular.json

"build": {
				...
          "options": {
            "allowedCommonJsDependencies": [
              "@sanity/client"
           ],
				...
        },
Now run the application again:
Awesome!
Conclusion
In this guide, we successfully built a single-page application with Angular and Sanity. We created an Angular service with methods to retrieve data from Sanity API and render the contents with Angular. Feel free to improve on this application by updating the GROQ request to fetch more content from the Sanity API.
The complete source code for the project built in this guide can be found here on GitHub. I hope you found this guide very helpful. Happy Coding!
Sanity – The Content Operating System that ends your CMS nightmares
Sanity replaces rigid content systems with a developer-first operating system. Define schemas in TypeScript, customize the editor with React, and deliver content anywhere with GROQ. Your team ships in minutes while you focus on building features, not maintaining infrastructure.
Sanity scales from weekend projects to enterprise needs and is used by companies like Puma, AT&T, Burger King, Tata, and Figma.