Published August 26, 2020
Build your first blog using React
By Kapehe

Starting from scratch, build your first blog using ReactJS. We'll learn about the basic setup for a React SPA, query for our data, and have all of our blog content be managed by Sanity. To finish off, we'll style our blog with Tailwind CSS.
TL;DR: Starting from scratch, we will build a blog using React and Sanity. We will create our React and Sanity projects, walk through the Sanity Studio, connect the React app to Sanity, and use React Routing to navigate through our app.
This guide will start from scratch, but if you would like to test out Sanity a little quicker, there are starters that you can find at sanity.io/create.
By starting from nothing, let's go over what we are going to cover in detail:
- Set up a basic React SPA using
create-react-app - Set up our own content management system using Sanity
- Learn about navigating our app using React Router
- Learn how to query for remote data
- Get started with styling using Tailwind CSS
let’s see how you can fetch (structured) content from Sanity and use it in your own React application. This method will work for an existing React app or one that is at the create-react-app stage.
To find the completed project, head on over to this GitHub repo!
Powered by Sanity
Sanity is how we can manage our structured content. Whether our application is a blog, a portfolio, or the next spaceship data cloud, we need all of our content to be handled in an organized and simple way. With Sanity, we can manage our content’s title, image, body text, etc. Anything content, Sanity can help manage.
Sanity can manage the content for many different use cases. For example, an e-commerce site has products, prices for each product, and a description of the product. Sanity can hold all that information in one main location. In the case of Sanity, we would use the Sanity Studio.
Sanity Studio
Not only do we get the power of Sanity but we also get Sanity Studio. Sanity Studio is an interface where we can view our content. The studio allows for image editing, the editing of fields, and can be used by developers and non-developers! All of this can be viewed in a nicely laid out UI/UX. In this tutorial, we will use Sanity Studio.
To learn more about the Sanity Studio, we can find the docs here.
GROQ
Sanity offers two different ways to query for your content:
We are going to also be using GROQ today. GROQ stands for Graph-Relational Object Queries. This is designed to query collections of schema-less JSON documents. GROQ can do many things, for example, join several documents, expressive filtering, and create the response into something the application can use.
To learn more about GROQ visit the docs here.
Let’s get building!
Our project's structure
Before we begin let's talk about how our project is going to be organized. Once we create our React app using create-react-app, we will have our base React app. Once inside that application, we will create our Sanity Studio. Our folder structure will look like the following:
sanity-react (main project)

   |--- mysanityblog (Sanity project)

   |--- src (React application)
Our goal today is to:
- Create a new React blog
- Have Sanity manage our content
- Using React Routing, be able to navigate our app
Setting up a new React SPA
Let's first set up a new React SPA (single-page application) in our local developer environment.
Note: If you already have an application, feel free to skip this setup part!
Run the following command in your shell, which you can find in Terminal.app if you are on Mac or CMD if you're on Windows:
npx create-react-app sanity-react
Once that is built out, run this command to go into the new project directory that the command made:
cd sanity-reactOpen our newly created project in your code editor of choice. Once open, we should see our new React app! To double-check that everything is running smoothly, run the following command to view the React app in the browser:
npm startWe should be able to see our application running at localhost:3000!
Setting up Sanity
Now that we have our application ready for us, let's get Sanity up and running! We may need to install the Sanity CLI globally on our local developer environment. To do that, run the command:
npm i -g @sanity/cli
The Sanity CLI can do many things! Some of those include initiating a new project, interacting with a current project, or upgrading the studio. We will be using the CLI today to initiate a new project.
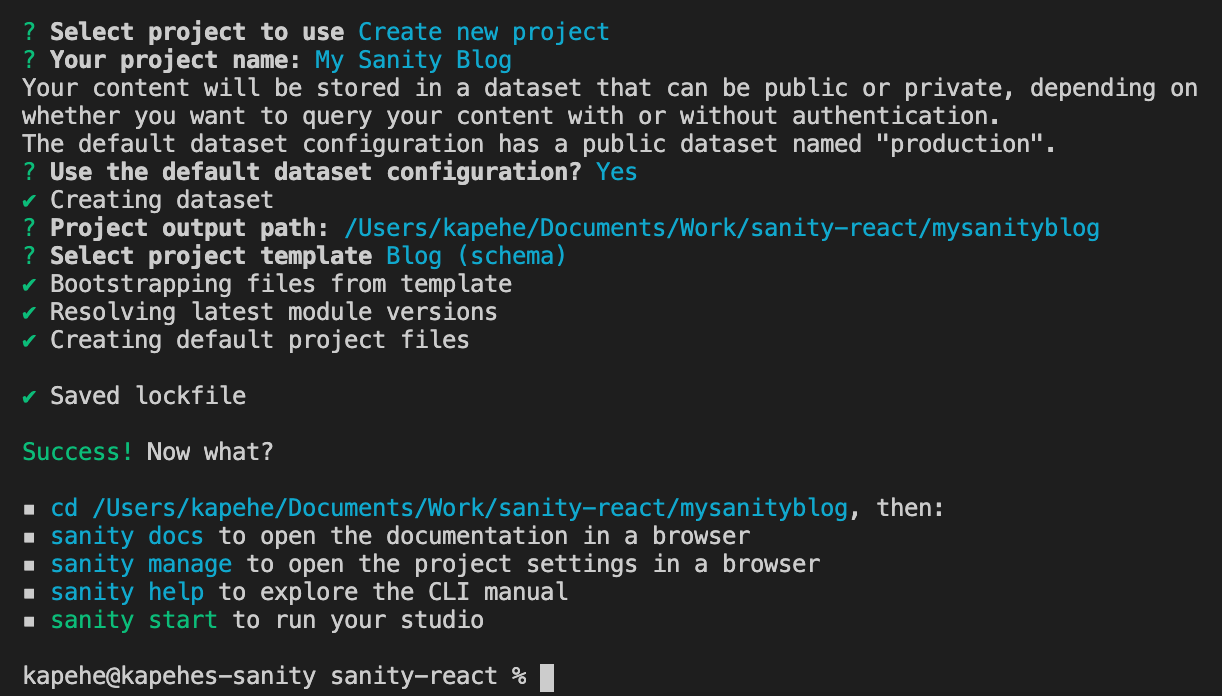
Our next command will be activating Sanity to this particular project. We will be asked a bunch of questions, these are there to get our Sanity set up just right. To start, run the following command within our home folder (sanity-react) to set up the Studio application:
sanity initNote: You may need to log into your Sanity account or create a new Sanity account in the browser first. There will be prompts.
We are going to see a list of questions for us to answer in the next steps. Let's walk through those!
- Create new project — Hit Enter.
- Your project name: — We can name it whatever we would like. Let's “My Sanity Blog” for this project.
- Use the default dataset configuration? — The default dataset configuration has a public dataset named “
production”, let's stick with that. So type in “Y” and hit Enter. - Project output path: — This will show us the path where our sanity project will live. The path should show the path that leads to this:
/sanity-react/mysanityblog. Hit Enter. - Select project template: — Here we are going to choose “Blog (schema)”. Using the arrow keys, navigate to that so it’s showing blue. Hit Enter once there. Success!
Once finished, we should see this:
To get the Sanity Studio running in our browser, we'll run the following commands to get into the new studio directory and start the development server:
cd mysanityblog
sanity start
Once it has compiled, we can go visit our new Sanity Studio at localhost:3333!
If we were to click on “Posts”, it would say, “No documents of this type found”. In the next section, we’ll walk through adding one in.
Adding content to Sanity Studio
If we were to click on the edit icon next to our Studio name, we will be able to create a new Post, Author, or Category.
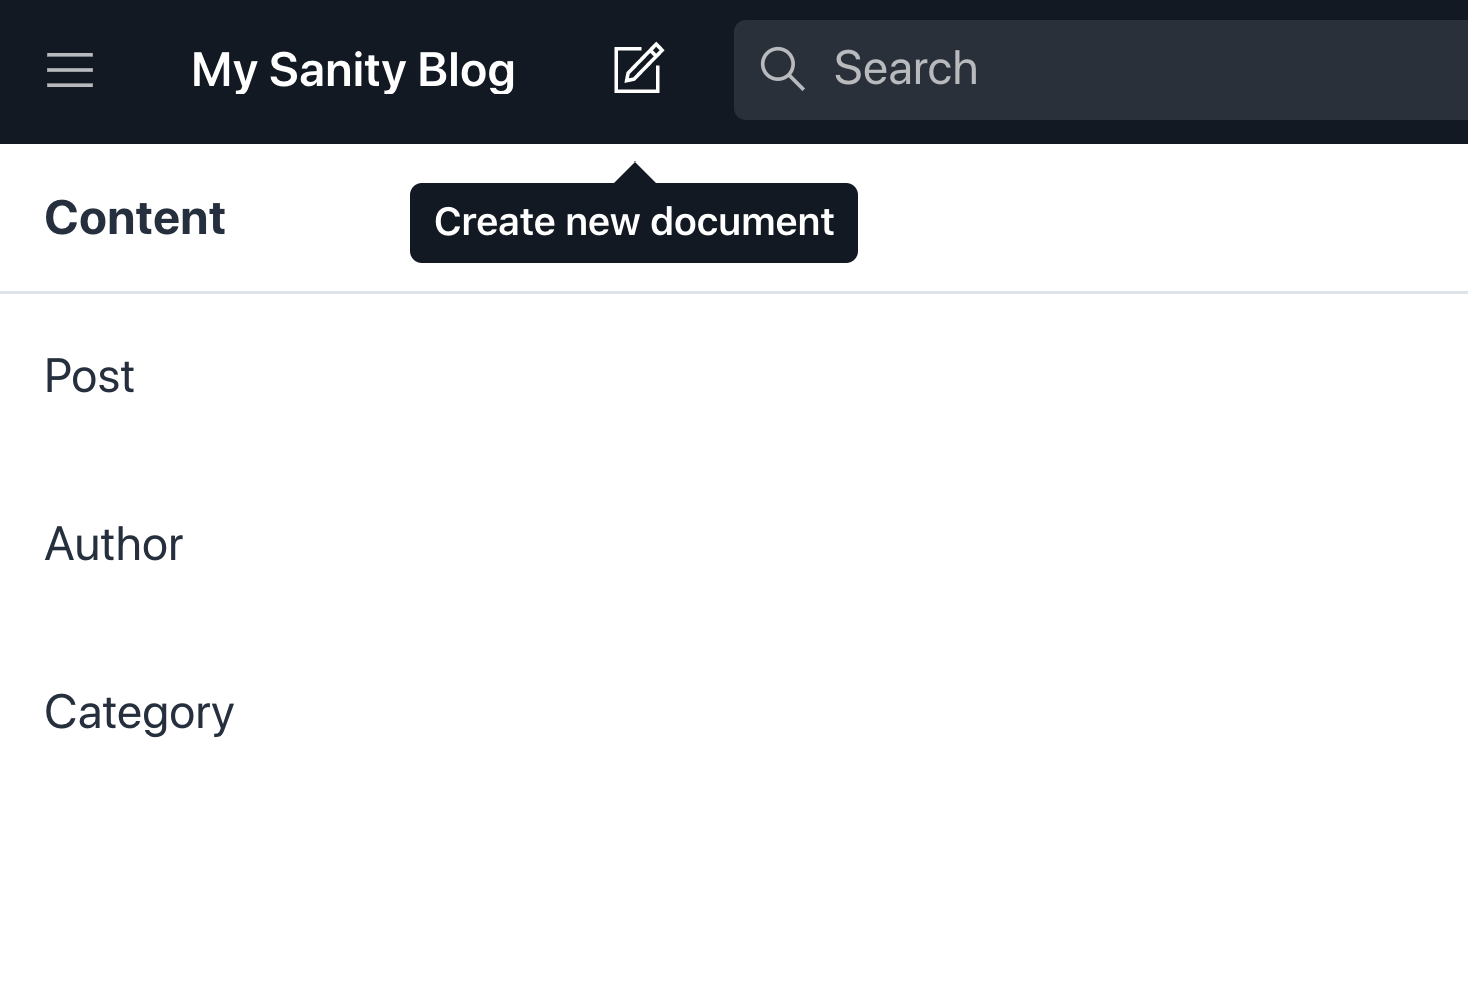
Choose “Post” and an “Untitled” page will appear with a bunch of empty text boxes! Filling these in helps us create our first blog post stored in the Studio. You may notice the “syncing” indicator in the bottom right. That means that all your changes are synced to Sanity’s content store in real-time and will be instantly available once you publish.
Go ahead and fill in the fields with any content you would like. It should look something like this:
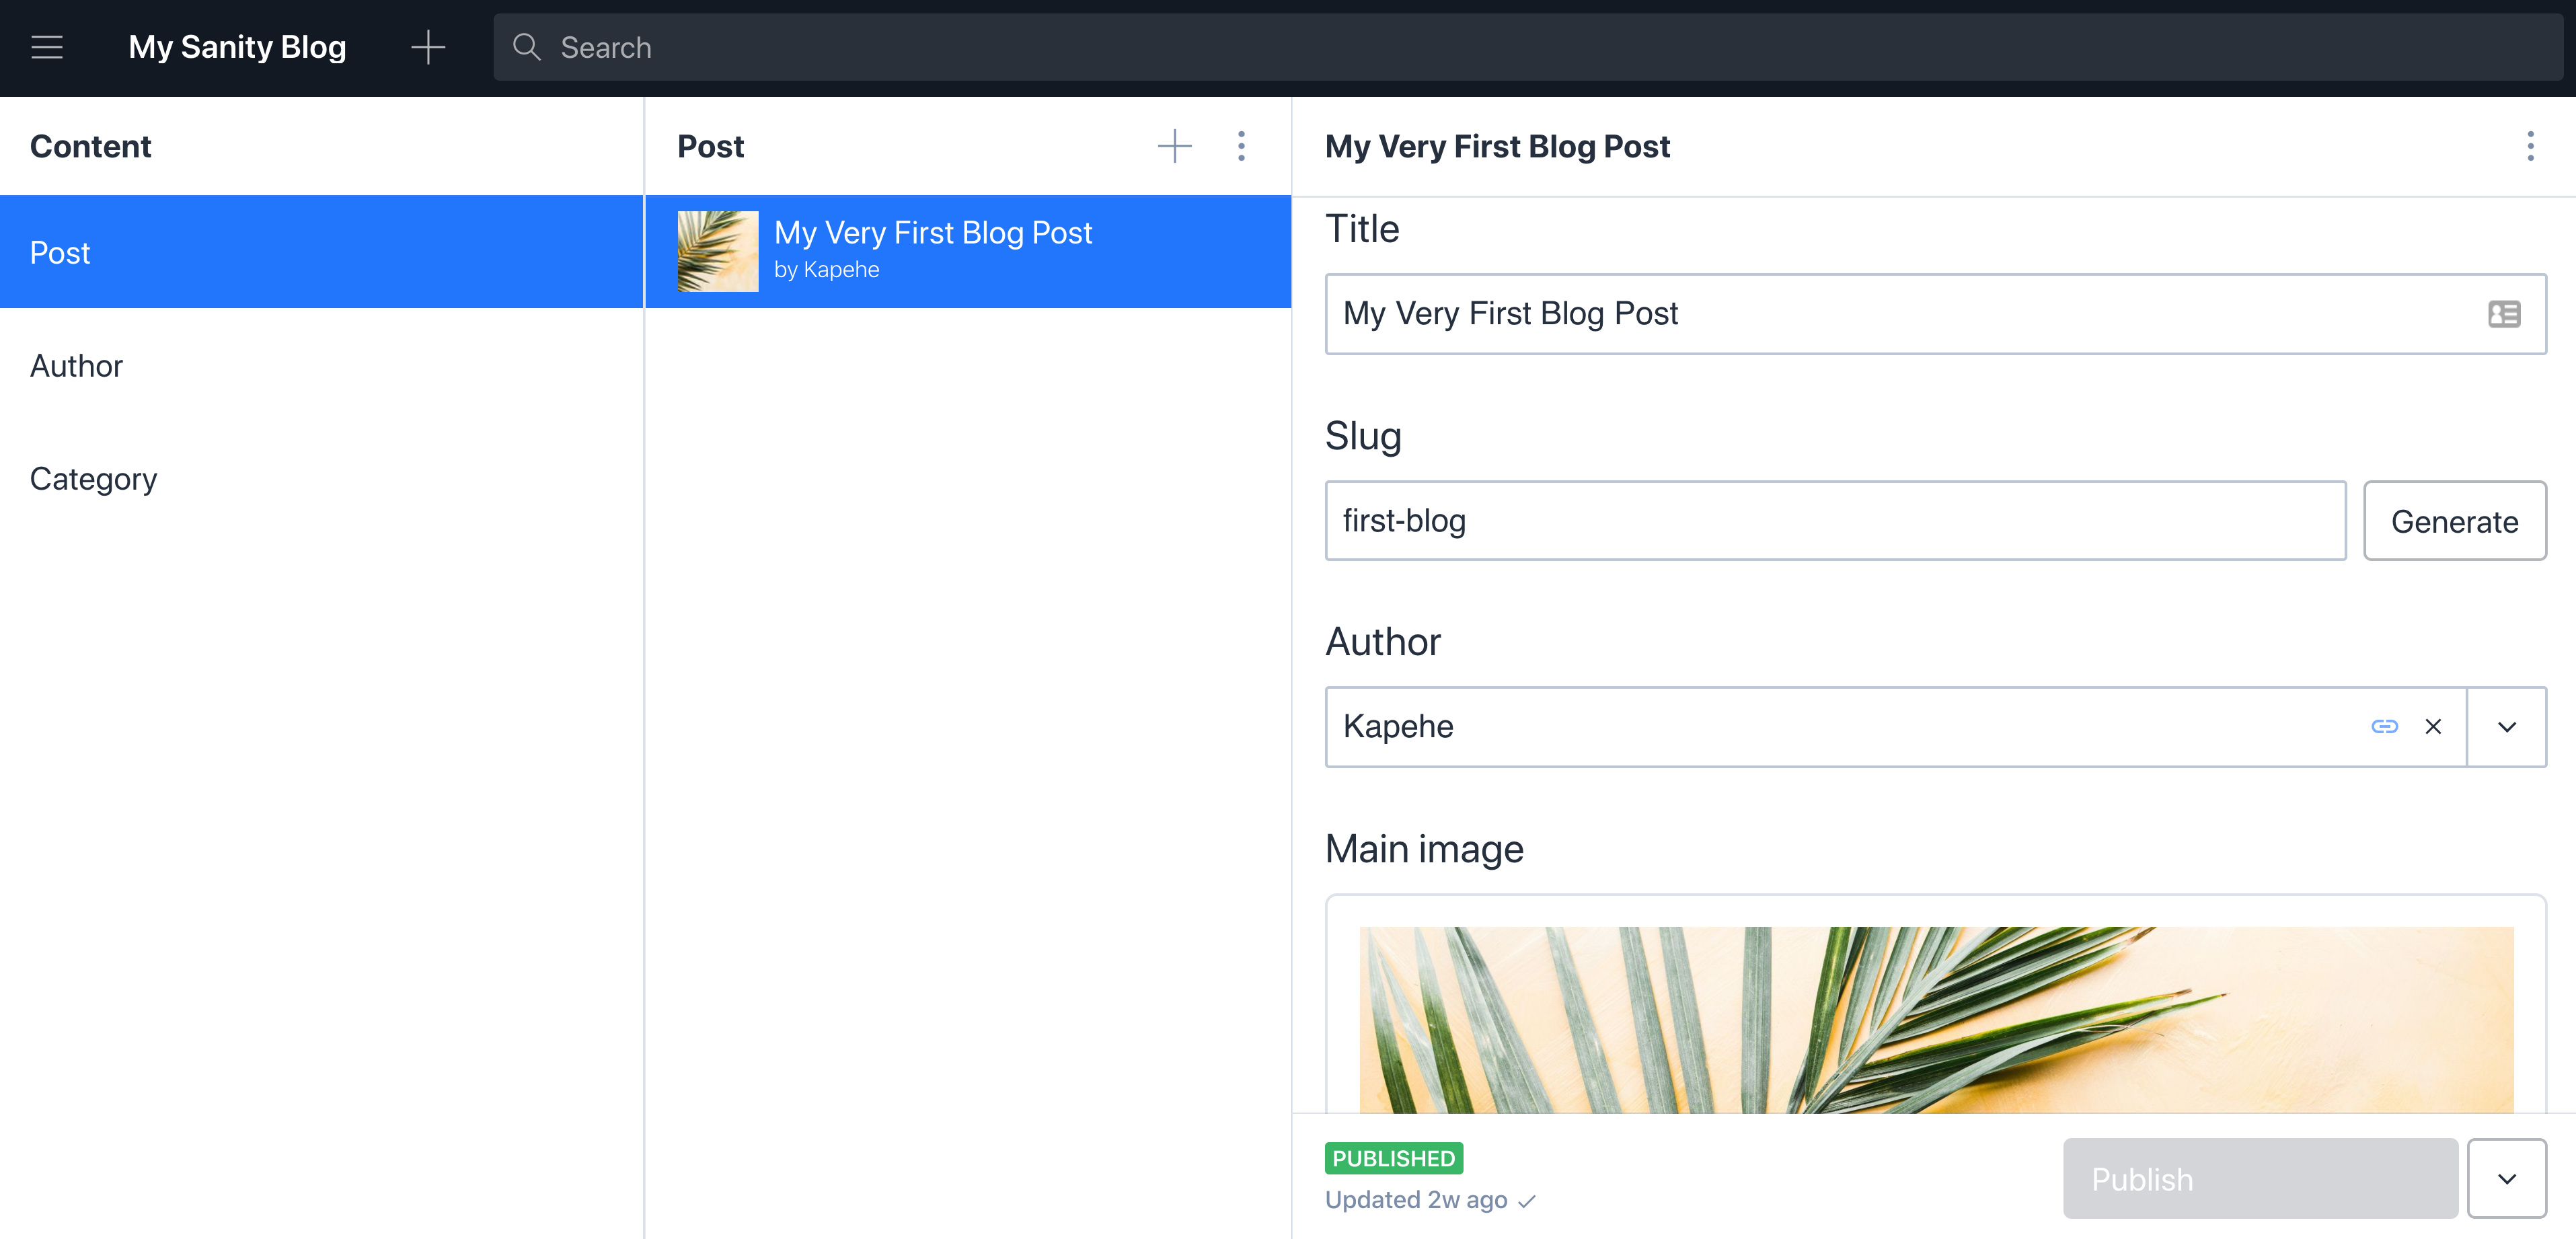
When finished, be sure to hit the blue “Publish” button in the bottom right-hand corner.
Feel free to add as many blog posts as desired! The awesome thing is Sanity will be handling the management of this content, we’ll make a GROQ call for these posts, and display it in our React app.
Once we have finished adding in all the blog posts we could ever imagine, let’s head on over to our code and get these blog posts live in React!
Connecting Sanity to our React app
Now that we are back in our React app, let’s start creating our blog! We are going to see multiple folders, the two we’re going to navigate between are:
sanity-react/mysanityblog-- where our Sanity project livessanity-react/src-- where our React app lives
We need to connect our React app to our Sanity project. We are going to want to bring in the Sanity Client. To do that run this command in the project:
npm install @sanity/client
Once done, we’ll first want to create a file in the React application that will import that package. Open src and create a new file: src/client.js and open it up. Inside that file let’s add the following code:
import sanityClient from "@sanity/client";

export default sanityClient({
  projectId: "Your Project ID Here", // find this at manage.sanity.io or in your sanity.json
  dataset: "production", // this is from those question during 'sanity init'
  useCdn: true,
});
We’ll see a couple of comments here, the one we'll focus on right now is the projectId.
There are two ways to find the projectId.
- In our
sanity.jsonfile - On our personal Sanity Manage page
For the first way, navigate to mysanityblog/sanity.json, under the api section we should see the following code:
"api": {
  "projectId": "Your Project ID Here",
  "dataset": "production"
},
For the second method, we'll need to go to our Sanity Manage page. Find the tile that says “My Sanity Blog” (what we named it earlier) and click into it. We should then be taken to our dashboard for our project.
We'll see at the top, under the name of the project, “PROJECT ID”. Copy that and paste it into the src/client.js file where it says projectId: “Your Project ID Here”.
In that same dashboard view, we are going to want to add “localhost:3000” to our API settings so it knows that link can be trusted! In the “My Sanity Blog” dashboard, click on “Settings”. Once there, click on “API” on the left and we’ll see “CORS Origins”. Click on “ADD NEW ORIGIN” and add “http://localhost:3000”.
Now our React app and Sanity Project are connected!
Building our React components
In this tutorial, we are going to have two pages for templates:
- All blog posts in a tile format
- One blog post and all the content for it
Let’s create those files. In the src/ folder, create the following folder: src/components. Within that newly created folder, let’s create two files:
src/components/AllPosts.jssrc/components/OnePost.js
We are going to be using React Router to navigate around our app. What this will do is in our App.js file, we will declare “routes” for our components. For example, if we wanted to route to an About page, we could use the URL route /about. By declaring our URL route and matching it up with a component, we are able to navigate to the proper page.
To set this up, let’s navigate to the src/App.js file.
Setting up React Router
To get React Router going, we are going to need to install our dependency. In the project, run the following command:
npm install --save react-router-dom
Within the App.js file, change the code to include the router components:
// src/App.js

import React from "react";
import { BrowserRouter, Route } from "react-router-dom";
import AllPosts from "./components/AllPosts.js";
import OnePost from "./components/OnePost.js";

function App() {
  return (
    <BrowserRouter>
      <div>
        <Route component={AllPosts} path="/" exact />
        <Route component={OnePost} path="/:slug" />
      </div>
    </BrowserRouter>
  );
}
export default App;
Let’s break this down.
By adding in the path=“/” we are stating that when we are at the base URL for our website, display the AllPosts component. Adding in the exact makes it so there’s no confusion for other routes that have additional info after the “/”; “/additional-info”. In our case, we have /:slug which will show the OnePost component, but more specifically, which blog post to display from the corresponding blog post.
Within our two components, add the following code:
// src/components/AllPosts.js

import React from "react";

export default function AllPosts() {
  return <h2>AllPosts Page</h2>;
}
// src/components/OnePost.js
import React from "react";
export default function OnePost() {
return <h2>OnePost Page</h2>;
}Once we have all that code, restart the server (ctrl + c, npm start) and navigate to “localhost:3000”. At “localhost:3000/” we should see the text “AllPosts Page” and if we navigate to “localhost:3000/:slug” (replacing :slug with a slug) we should see the text “OnePost Page”.
Awesome! Our routing is set up!
Building the page for all the blog posts
Let's go ahead and display all of our posts’ titles and their main image on the “All Posts” page. Head on over to src/components/AllPosts.js and paste the following code in there (we’ll go through it step-by-step after):
// src/components/AllPosts.js

import React, { useEffect, useState } from "react";
import { Link } from "react-router-dom";
import sanityClient from "../client.js";

export default function AllPosts() {
  const [allPostsData, setAllPosts] = useState(null);

  useEffect(() => {
    sanityClient
      .fetch(
        `*[_type == "post"]{
        title,
        slug,
        mainImage{
          asset->{
          _id,
          url
        }
      }
    }`
      )
      .then((data) => setAllPosts(data))
      .catch(console.error);
  }, []);

  return (
    <div>
      <h2>Blog Posts</h2>
      <h3>Welcome to my blog posts page!</h3>
      <div>
        {allPostsData &&
          allPostsData.map((post, index) => (
            <Link to={"/" + post.slug.current} key={post.slug.current}>
              <span key={index}>
                <img src={post.mainImage.asset.url} alt="" />
                <span>
                  <h2>{post.title}</h2>
                </span>
              </span>
            </Link>
          ))}
      </div>
    </div>
  );
}
Let’s walk through this section by section!
Top of the file
- We are going to be using hooks that are built into React for state management, so we have imported
useEffectanduseState. - Imported
Linkfor linking to single blog posts. - Imported the
sanityClientso we can fetch our data
AllPosts()
- Setting our state
- Using
useEffectandsanityClientto fetch our data
The return
- Setting a couple of headers
mappingover our blog posts and displaying themainImageandtitleof each- Making those clickable and setting
post.slug.currentso that it sends us to the correct blog post - If we hit save and navigate to “localhost:3000”, we should now see all of our data!
Our images might be very large, we’ll style those soon and make it look nice!
There is a Sanity plugin for handling images that we will use in components/OnePost.js, but in this component, we wanted to show how to GROQ for an image URL and display it without the plugin.
Building the page for an individual blog post
Now that we have our main blog page set up, let’s make those Link's navigate to an actual blog post and display all the information!
Before we write any code, we are going to want to install a couple of dependencies. Run the following command within the project:
npm install @sanity/block-content-to-react @sanity/image-url
Let's talk about these two:
@sanity/block-content-to-react— This will render an array of block text from Sanity with React. To learn more about this, we can find the docs here. There are libraries for React, Vue, HTML, and HyperText.@sanity/image-url— This library will help us with the image URL. Remember, inAllPosts.jswe did not use this, but rather saw how to without. We are going to use this plugin forOnePost.js. To learn more about this, please visit the docs here.
Now that we have our dependencies installed, let’s go ahead and build out our component! Head on over to src/components/OnePost.js and input the following code:
// src/components/OnePost.js

import React, { useEffect, useState } from "react";
import { useParams } from "react-router-dom";
import sanityClient from "../client.js";
import BlockContent from "@sanity/block-content-to-react";
import imageUrlBuilder from "@sanity/image-url";

const builder = imageUrlBuilder(sanityClient);
function urlFor(source) {
  return builder.image(source);
}

export default function OnePost() {
  const [postData, setPostData] = useState(null);
  const { slug } = useParams();

  useEffect(() => {
    sanityClient
      .fetch(
        `*[slug.current == $slug]{
          title,
          slug,
          mainImage{
            asset->{
              _id,
              url
             }
           },
         body,
        "name": author->name,
        "authorImage": author->image
       }`,
        { slug }
      )
      .then((data) => setPostData(data[0]))
      .catch(console.error);
  }, [slug]);

  if (!postData) return <div>Loading...</div>;

  return (
    <div>
      <div>
        <h2>{postData.title}</h2>
        <div>
          <img
            src={urlFor(postData.authorImage).width(100).url()}
            alt="Author is Kap"
          />
          <h4>{postData.name}</h4>
        </div>
      </div>
      <img src={urlFor(postData.mainImage).width(200).url()} alt="" />
      <div>
        <BlockContent
          blocks={postData.body}
          projectId={sanityClient.clientConfig.projectId}
          dataset={sanityClient.clientConfig.dataset}
        />
      </div>
    </div>
  );
}
Let’s walk through this code!
Top of the file
- We have imported the dependencies that we installed earlier
- Imported our Sanity Client
- Imported all the things we need from React
- Wrote out a function for
urlForso that we can use it below. Here is where we pulled inimageUrlBuilderfrom@sanity/image-urland used that withinurlFor. We'll use that lower in the file.
OnePost()
- Set our state
- We are using
useParams()for our slug. This is a React Hook that thereact-router-dompackage gives to pull URL parameters. - In the
useEffect()we are again fetching our data fromsanityClient - This GROQ query is a little different than our previous call. This one is pulling a particular post by its slug. Remember, this slug was set in our Sanity Studio. We are going to be pulling out the title, slug, mainImage, body, and then the name and image of the author!
- We then set all the data and catch any errors!
- If no post shows up, we'll show “Loading…” text.
The return
- Display the title of the post
- Show the author’s image and then name. We are using our
urlForhere. Notice we chained multiple things here. First, the image, we then set width, and then addedurl()to create that URL. To learn all about presenting images, visit this page. - We then display the main image of the blog post. Again, we are using
urlFor()here. - Lastly, we have used
BlockContentfor the body of the blog. This will take all the text and images that are in our Sanity Studio and display it nicely!
Putting it all together
Now that we have our components set up, we can head on over to “localhost:3000” and see a list of our blog posts. If we click on any of those, it will redirect us to that particular blog post and display our information! That URL should look something like this: http://localhost:3000/sanity-react
And we now have a functioning blog with blog posts! All of our content is living in our Sanity Studio and if we want to add more, remove one, or edit the content in an existing one, we can head there to do so! Remember, our Sanity Studio is living at “localhost:3333” and we must run sanity start in our folder sanity-react/mysanityblog.
Styling our application
Let’s add some styling!
Feel free to skip this section if you would like to do your own styling!
We are going to be using Tailwind CSS! Tailwind is a CSS framework that can be highly-customizable! But also provides amazing building blocks right out of the box.
Let's go ahead and add that in. To do so, head to our src/index.css file, clear out the existing code, and input the following code:
/* src/index.css */

@import url("https://unpkg.com/@tailwindcss/typography@0.2.x/dist/typography.min.css");
@import url("https://unpkg.com/tailwindcss@^1.0/dist/tailwind.min.css");
@import url("https://fonts.googleapis.com/css2?family=Amatic+SC:wght@700&display=swap");

.cursive {
  font-family: "Amatic SC", cursive;
  font-weight: 700;
}

.prose img {
  margin-left: auto;
  margin-right: auto;
  border-radius: 5px;
}
We are importing the necessary Tailwind packages. Also, a Google font that we’ll use.
The prose comes from that first import (typography). This will help our body in our “OnePost” render correctly. Tailwind needs this when pulling from Sanity Studio.
Styling AllPosts() with Tailwind
Here is the AllPosts() component with Tailwind:
// src/components/AllPosts.js

import React, { useEffect, useState } from "react";
import { Link } from "react-router-dom";
import sanityClient from "../client.js";

export default function AllPosts() {
  const [allPostsData, setAllPosts] = useState(null);

  useEffect(() => {
    sanityClient
      .fetch(
        `*[_type == "post"]{
        title,
        slug,
        mainImage{
        asset->{
          _id,
          url
        }
      }
    }`
      )
      .then((data) => setAllPosts(data))
      .catch(console.error);
  }, []);

  return (
    <div className="bg-green-100 min-h-screen p-12">
      <div className="container mx-auto">
        <h2 className="text-5xl flex justify-center cursive">Blog Posts</h2>
        <h3 className="text-lg text-gray-600 flex justify-center mb-12">
          Welcome to my blog posts page!
        </h3>
        <div className="grid md:grid-cols-2 lg:grid-cols-3 gap-8">
          {allPostsData &&
            allPostsData.map((post, index) => (
              <Link to={"/" + post.slug.current} key={post.slug.current}>
                <span
                  className="block h-64 relative rounded shadow leading-snug bg-white
                      border-l-8 border-green-400"
                  key={index}
                >
                  <img
                    className="w-full h-full rounded-r object-cover absolute"
                    src={post.mainImage.asset.url}
                    alt=""
                  />
                  <span
                    className="block relative h-full flex justify-end items-end pr
                      -4 pb-4"
                  >
                    <h2
                      className="text-gray-800 text-lg font-bold px-3 py-4 bg-red-700
                        text-red-100 bg-opacity-75 rounded"
                    >
                      {post.title}
                    </h2>
                  </span>
                </span>
              </Link>
            ))}
        </div>
      </div>
    </div>
  );
}
Once that is all in, we should see something like this at “localhost:3000”:
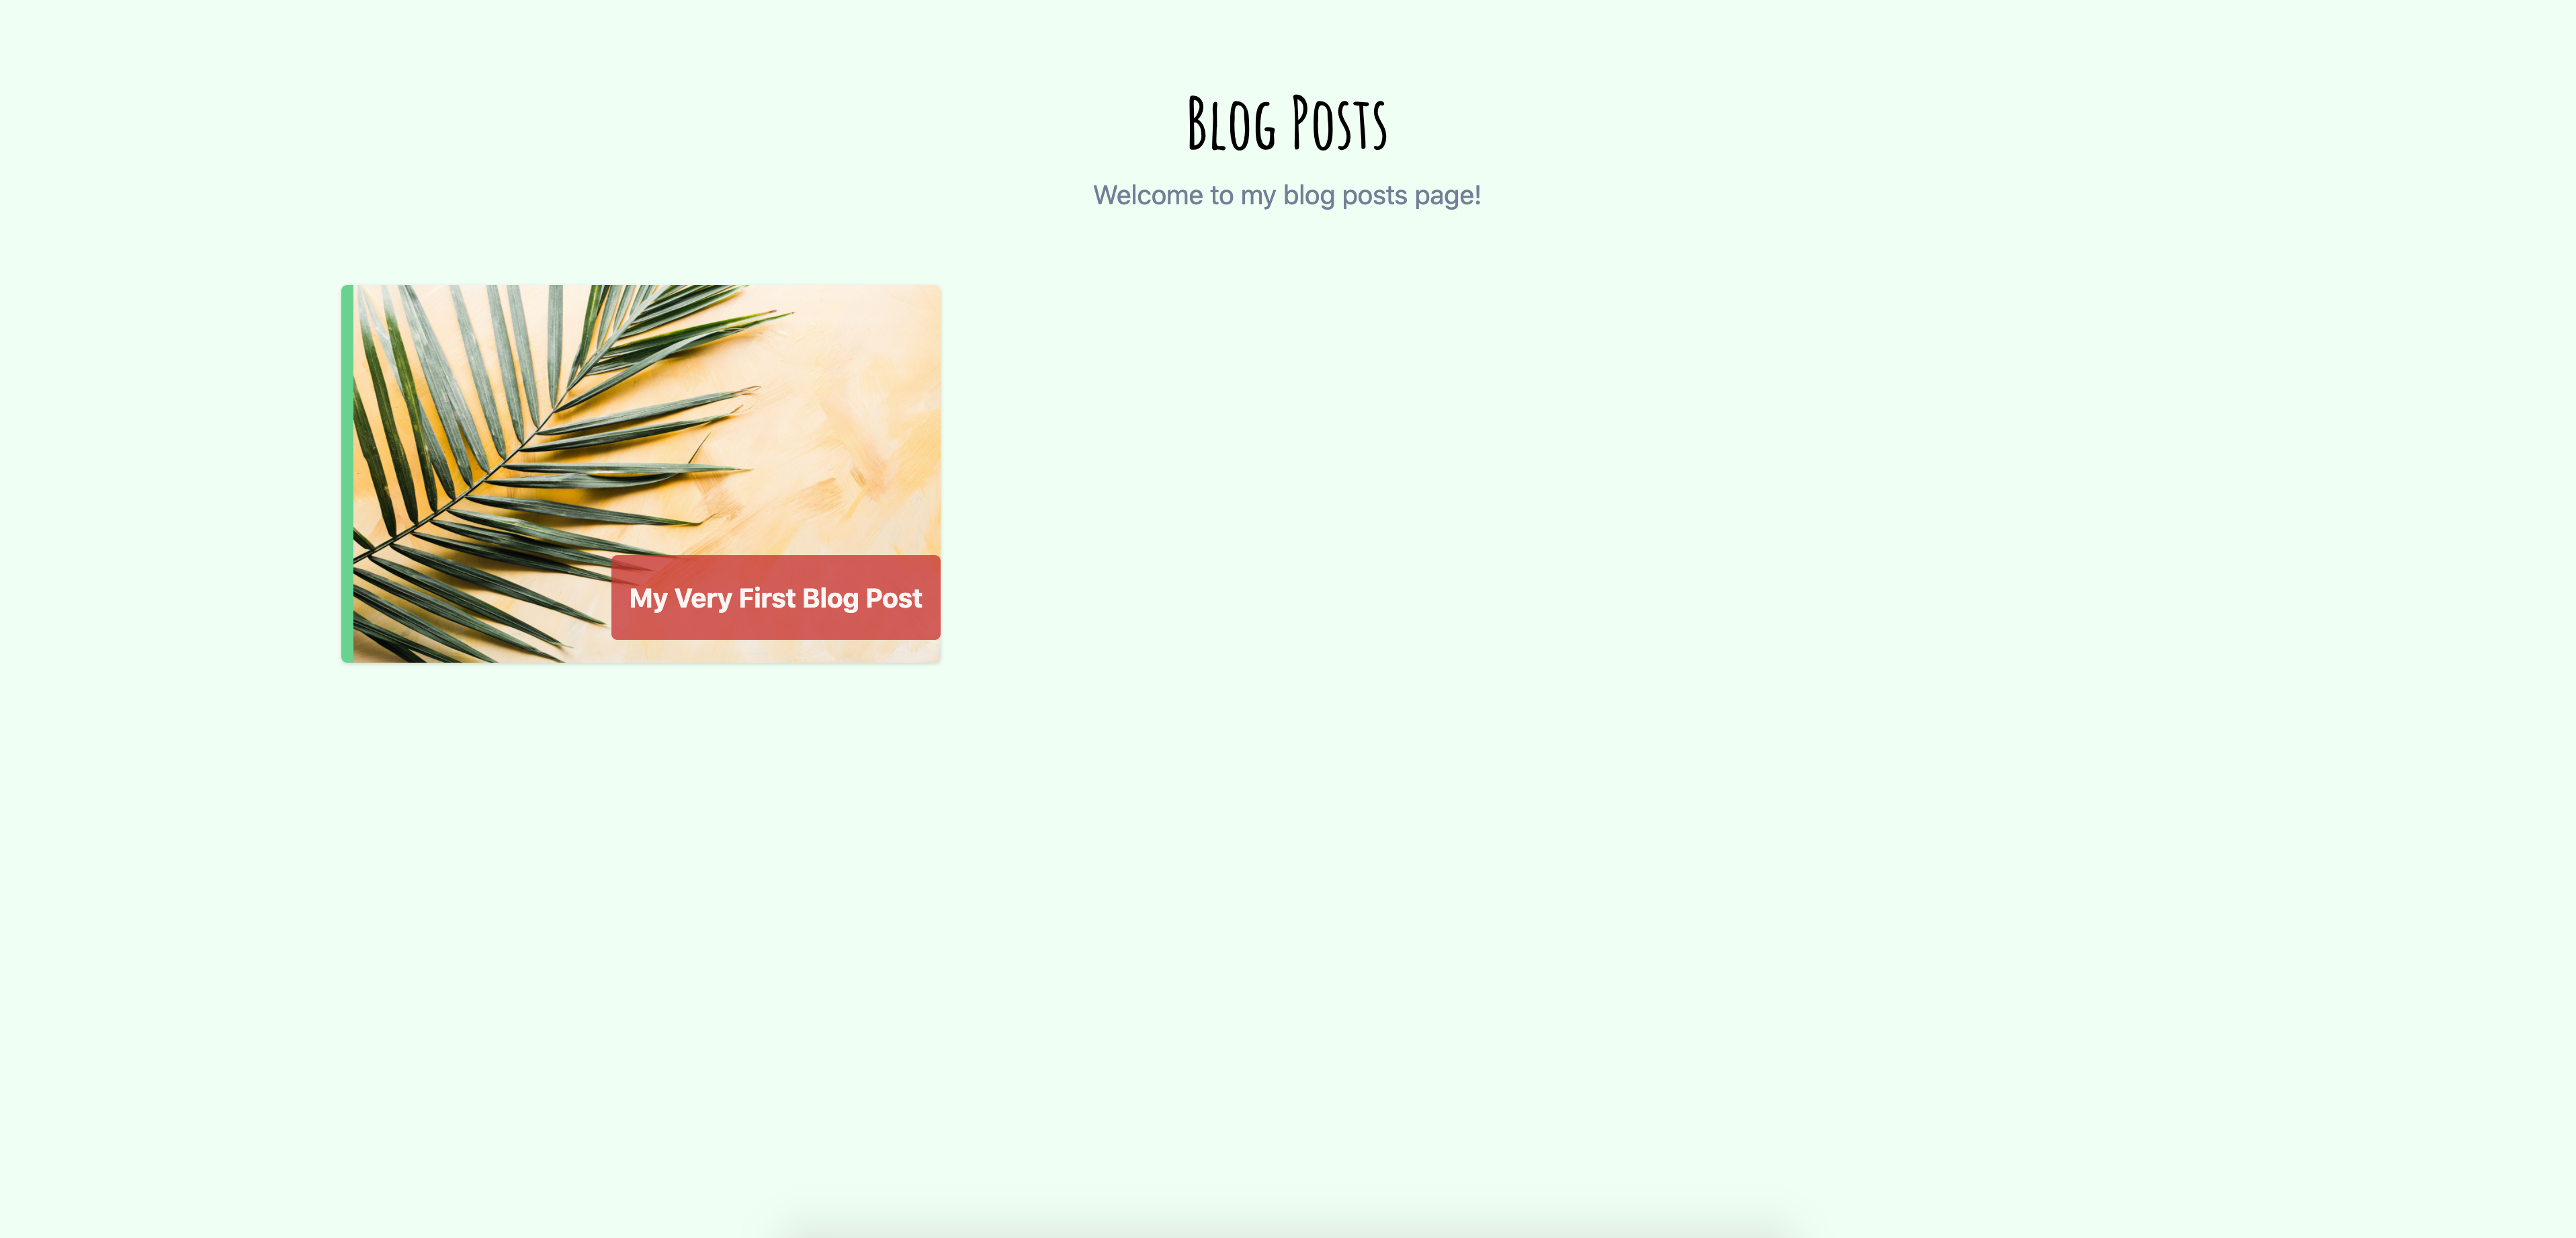
Looks great!
Styling OnePost() with Tailwind
Here is the OnePost() component with Tailwind:
// src/component/OnePost.js

import React, { useEffect, useState } from "react";
import { useParams } from "react-router-dom";
import sanityClient from "../client.js";
import BlockContent from "@sanity/block-content-to-react";
import imageUrlBuilder from "@sanity/image-url";

const builder = imageUrlBuilder(sanityClient);
function urlFor(source) {
  return builder.image(source);
}

export default function OnePost() {
  const [postData, setPostData] = useState(null);
  const { slug } = useParams();

  useEffect(() => {
    sanityClient
      .fetch(
        `*[slug.current == "${slug}"]{
           title,
           slug,
           mainImage{
           asset->{
              _id,
              url
            }
          },
          body,
          "name": author->name,
          "authorImage": author->image
       }`
      )
      .then((data) => setPostData(data[0]))
      .catch(console.error);
  }, [slug]);

  if (!postData) return <div>Loading...</div>;

  return (
    <div className="bg-gray-200 min-h-screen p-12">
      <div className="container shadow-lg mx-auto bg-green-100 rounded-lg">
        <div className="relative">
          <div className="absolute h-full w-full flex items-center justify-center p-8">
            {/* Title Section */}
            <div className="bg-white bg-opacity-75 rounded p-12">
              <h2 className="cursive text-3xl lg:text-6xl mb-4">
                {postData.title}
              </h2>
              <div className="flex justify-center text-gray-800">
                <img
                  src={urlFor(postData.authorImage).url()}
                  className="w-10 h-10 rounded-full"
                  alt="Author is Kap"
                />
                <h4 className="cursive flex items-center pl-2 text-2xl">
                  {postData.name}
                </h4>
              </div>
            </div>
          </div>
          <img
            className="w-full object-cover rounded-t"
            src={urlFor(postData.mainImage).url()}
            alt=""
            style={{ height: "400px" }}
          />
        </div>
        <div className="px-16 lg:px-48 py-12 lg:py-20 prose lg:prose-xl max-w-full">
          <BlockContent
            blocks={postData.body}
            projectId={sanityClient.clientConfig.projectId}
            dataset={sanityClient.clientConfig.dataset}
          />
        </div>
      </div>
    </div>
  );
}
Notice we are using the prose for our BlockContent!
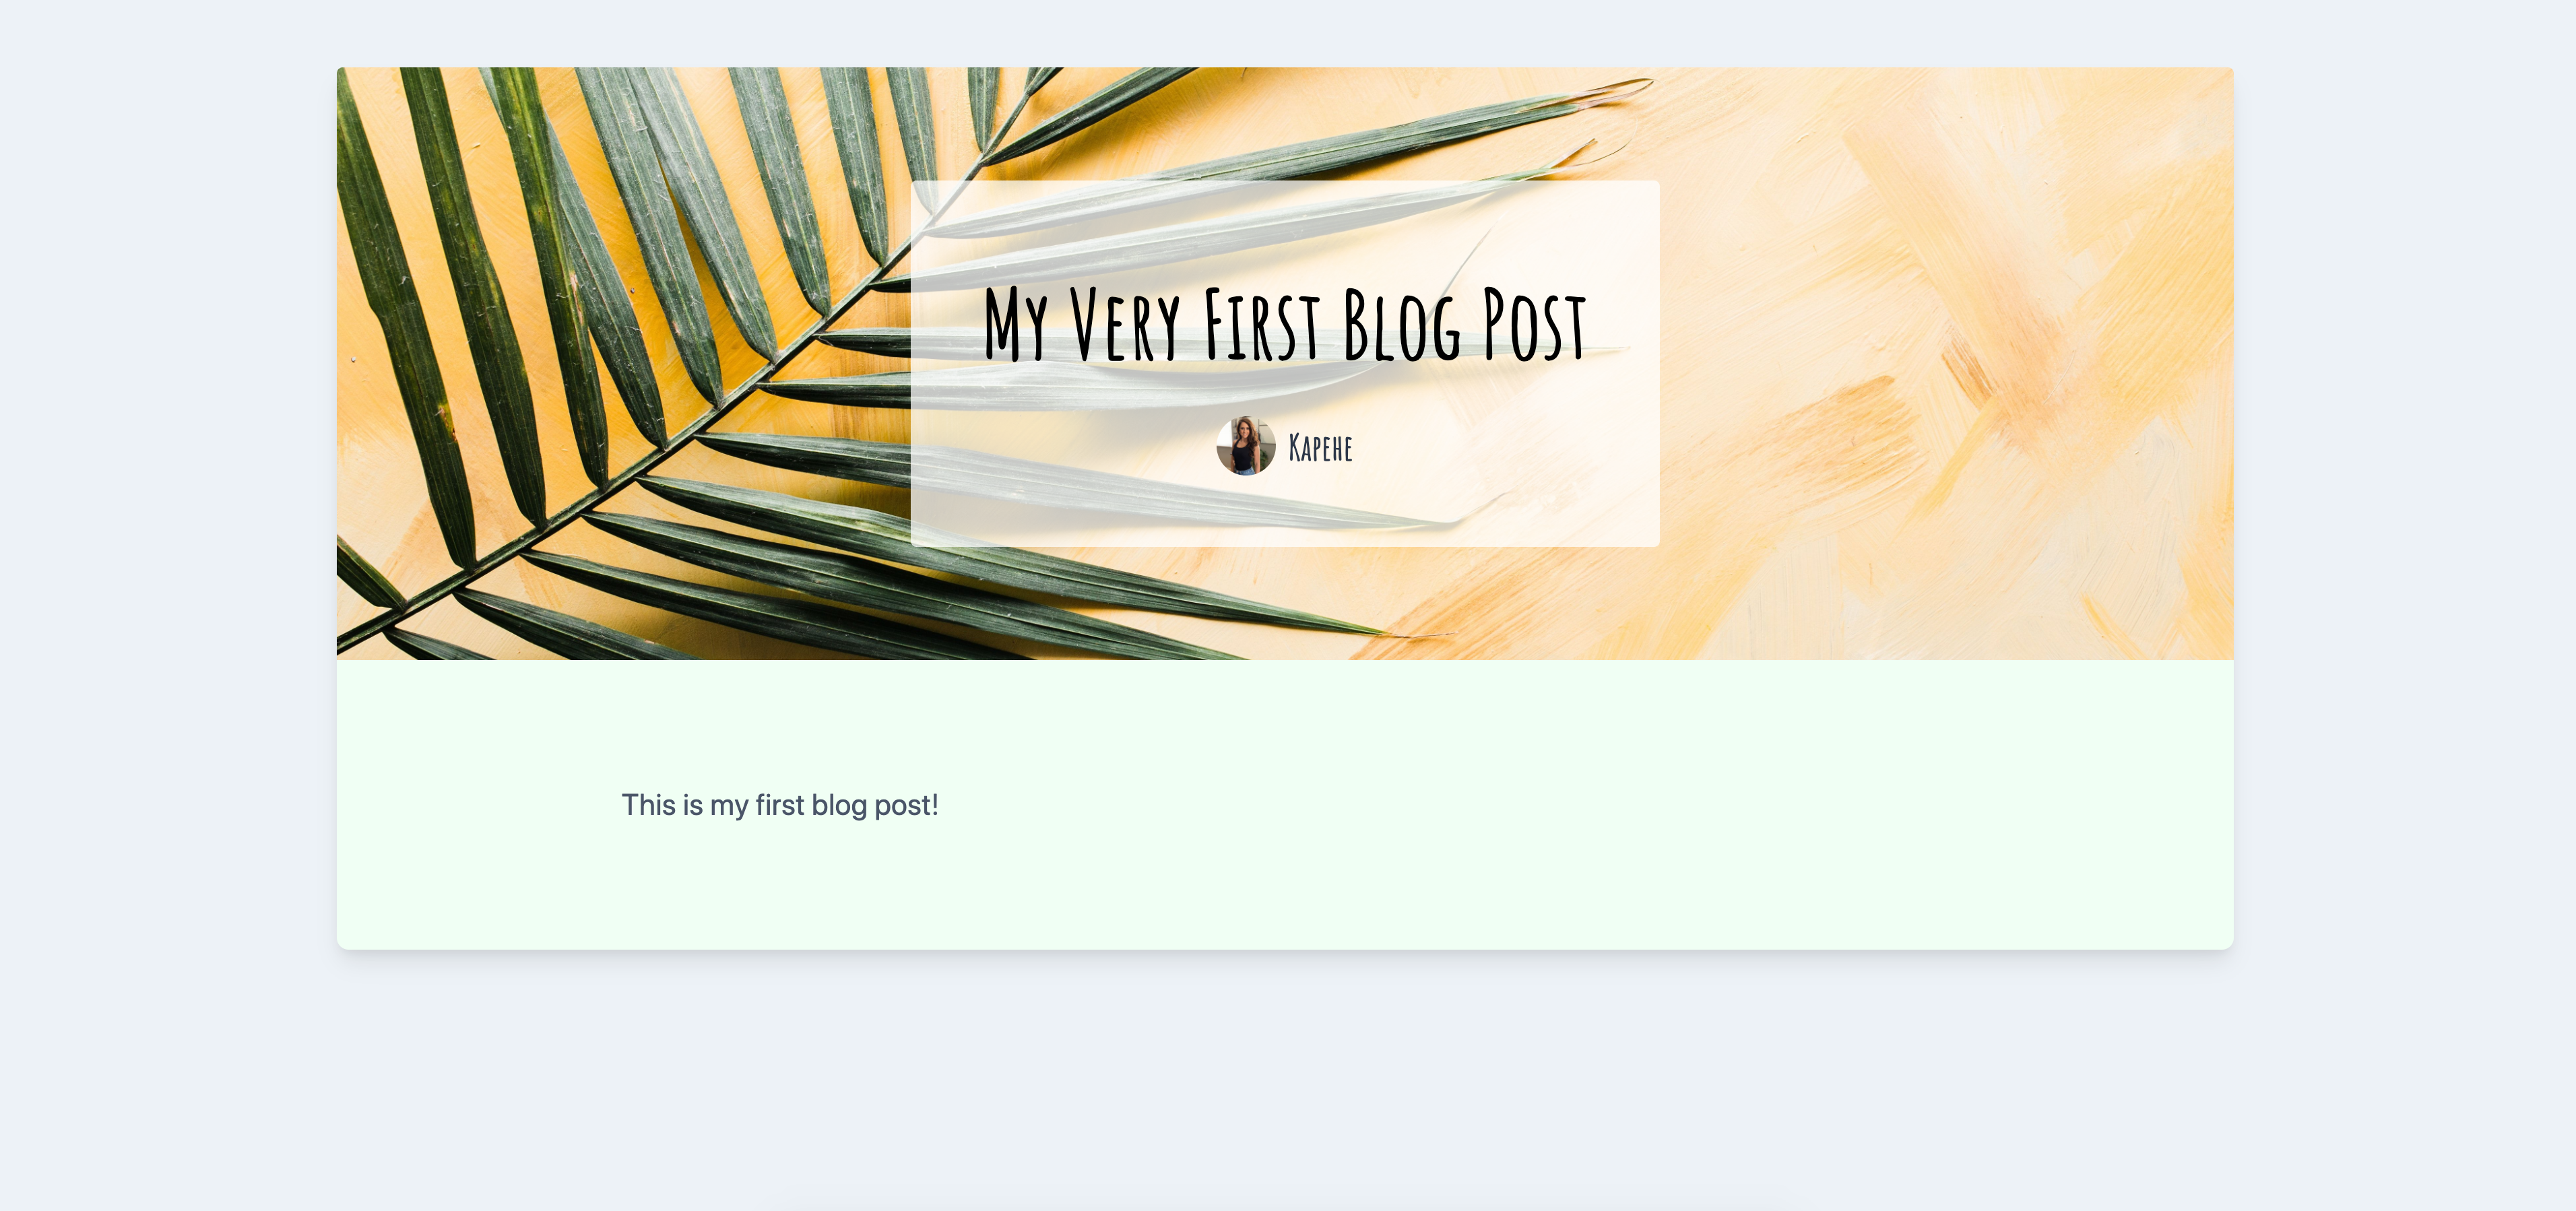
Awesome! Go ahead and navigate to “localhost:3000” and click on the blog post card. We’ll then be navigated to the blog post! Here’s an example of how it should look!
We built a blog!
Using React from create-react-app, using Sanity to manage our content, and using Tailwind CSS for styling, we have created a pretty cool blog!
The great thing about this is all we have to do is add blog posts to our Sanity Studio and it will automatically show up in our React application!
Remember, the final code for this project can be found here!
What do you think of your blog built with React and Sanity? Let us know in the Community or on Twitter! We would love to see it! The sky’s the limit with your new blog! Happy blogging!
Sanity – The Content Operating System that ends your CMS nightmares
Sanity replaces rigid content systems with a developer-first operating system. Define schemas in TypeScript, customize the editor with React, and deliver content anywhere with GROQ. Your team ships in minutes while you focus on building features, not maintaining infrastructure.
Sanity scales from weekend projects to enterprise needs and is used by companies like Puma, AT&T, Burger King, Tata, and Figma.