Last updated February 12, 2024
Visual Editing with Next.js Pages Router and Sanity Studio
By Simeon Griggs & Knut Melvær

Live-as-you-type previewing of draft content is the ultimate upgrade for your content creators so that they can see changes in real-time and gain increased confidence to hit that publish button.

Composable content management is a powerful tool. Content separated from its presentation is the right way to think about content modeling. However, confidence can suffer when the edited content lacks the context of how those edits will affect real-world outputs.
Scope of this guide and possible alternatives
This guide deliberately focuses on the experience of manually creating a new Next.js 14 application and creating a Sanity project with an embedded Studio.
All the instructions below could also be adapted to an existing Next.js application.
- Need reference code sooner? The final code created in this Guide is available as a repository on GitHub.
- Looking for a more complete example? The Next.js Blog template has an example schema and Visual Editing already set up and can be instantly deployed to Vercel.
- TypeScript is not required. The code examples in this guide are all in TypeScript; However, TypeScript is not necessary for any of this to work. You need to remove the types from these examples if working with JavaScript.
- Embedded Studio is not required. For convenience in this guide you'll embed a Studio inside the Next.js application, but you could do all of this with the Studio as a separate application.
Assumptions
- You already have a Sanity account
- You have some familiarity with both Sanity Studio and Next.js
- You are reasonably confident with JavaScript in general and React in particular.
Glossary
The following terms are used to describe the functions that combine to create an interactive live preview, known as Visual Editing.
Visual Editing can be enabled on any hosting platform or front end framework.
- Loaders are a superset of server-side and front end features to extend Sanity Client. In this project, you'll configure:
useQueryto store and update client-side state for individual queries when previewing draftsuseLiveModeto communicate with the Presentation tool and listen for updates to content.
- Perspectives modify queries to return either draft or published content. These are especially useful for server-side fetching to display draft content on the initial load when previewing drafts.
- Content Source Maps aren't something you'll need to interact with directly, but they are used by stega encoding when enabled. It is an extra response from the Content Lake that notes the full path of every field of returned content.
- Stega encoding is when the Sanity Client takes Content Source Maps and combines every field of returned content with an invisible string of characters which contains the full path from the content to the field within its source document.
- Overlays are created from the Visual Editing package that looks through the DOM for these stega encoded strings and creates clickable links to edit documents.
- Presentation is a plugin included with Sanity Studio to simplify displaying a front end inside an iframe with an adjacent document editor. It communicates directly with the front end instead of making round-trips to the Content Lake for faster live preview.
- Draft mode: A Next.js-specific way of enabling, checking, and disabling a global variable available during requests so that your application queries draft content.
- In other frameworks, you might replace this with an environment variable, cookie, or session.
Create a new Next.js 14 project
Create a new project using the command below. Default options such as TypeScript, Tailwind, and ESLint have been selected for you but could be removed if you have different preferences. Just know the code snippets in this guide may no longer be compatible.
# from the command line
npx create-next-app@latest nextjs-pages --typescript --tailwind --eslint --src-dir --import-alias="@/*"

> Use App Router?
No

# enter the new project's directory
cd nextjs-pages

# run the development server
npm run dev
Need more help? See the Next.js docs for getting started.
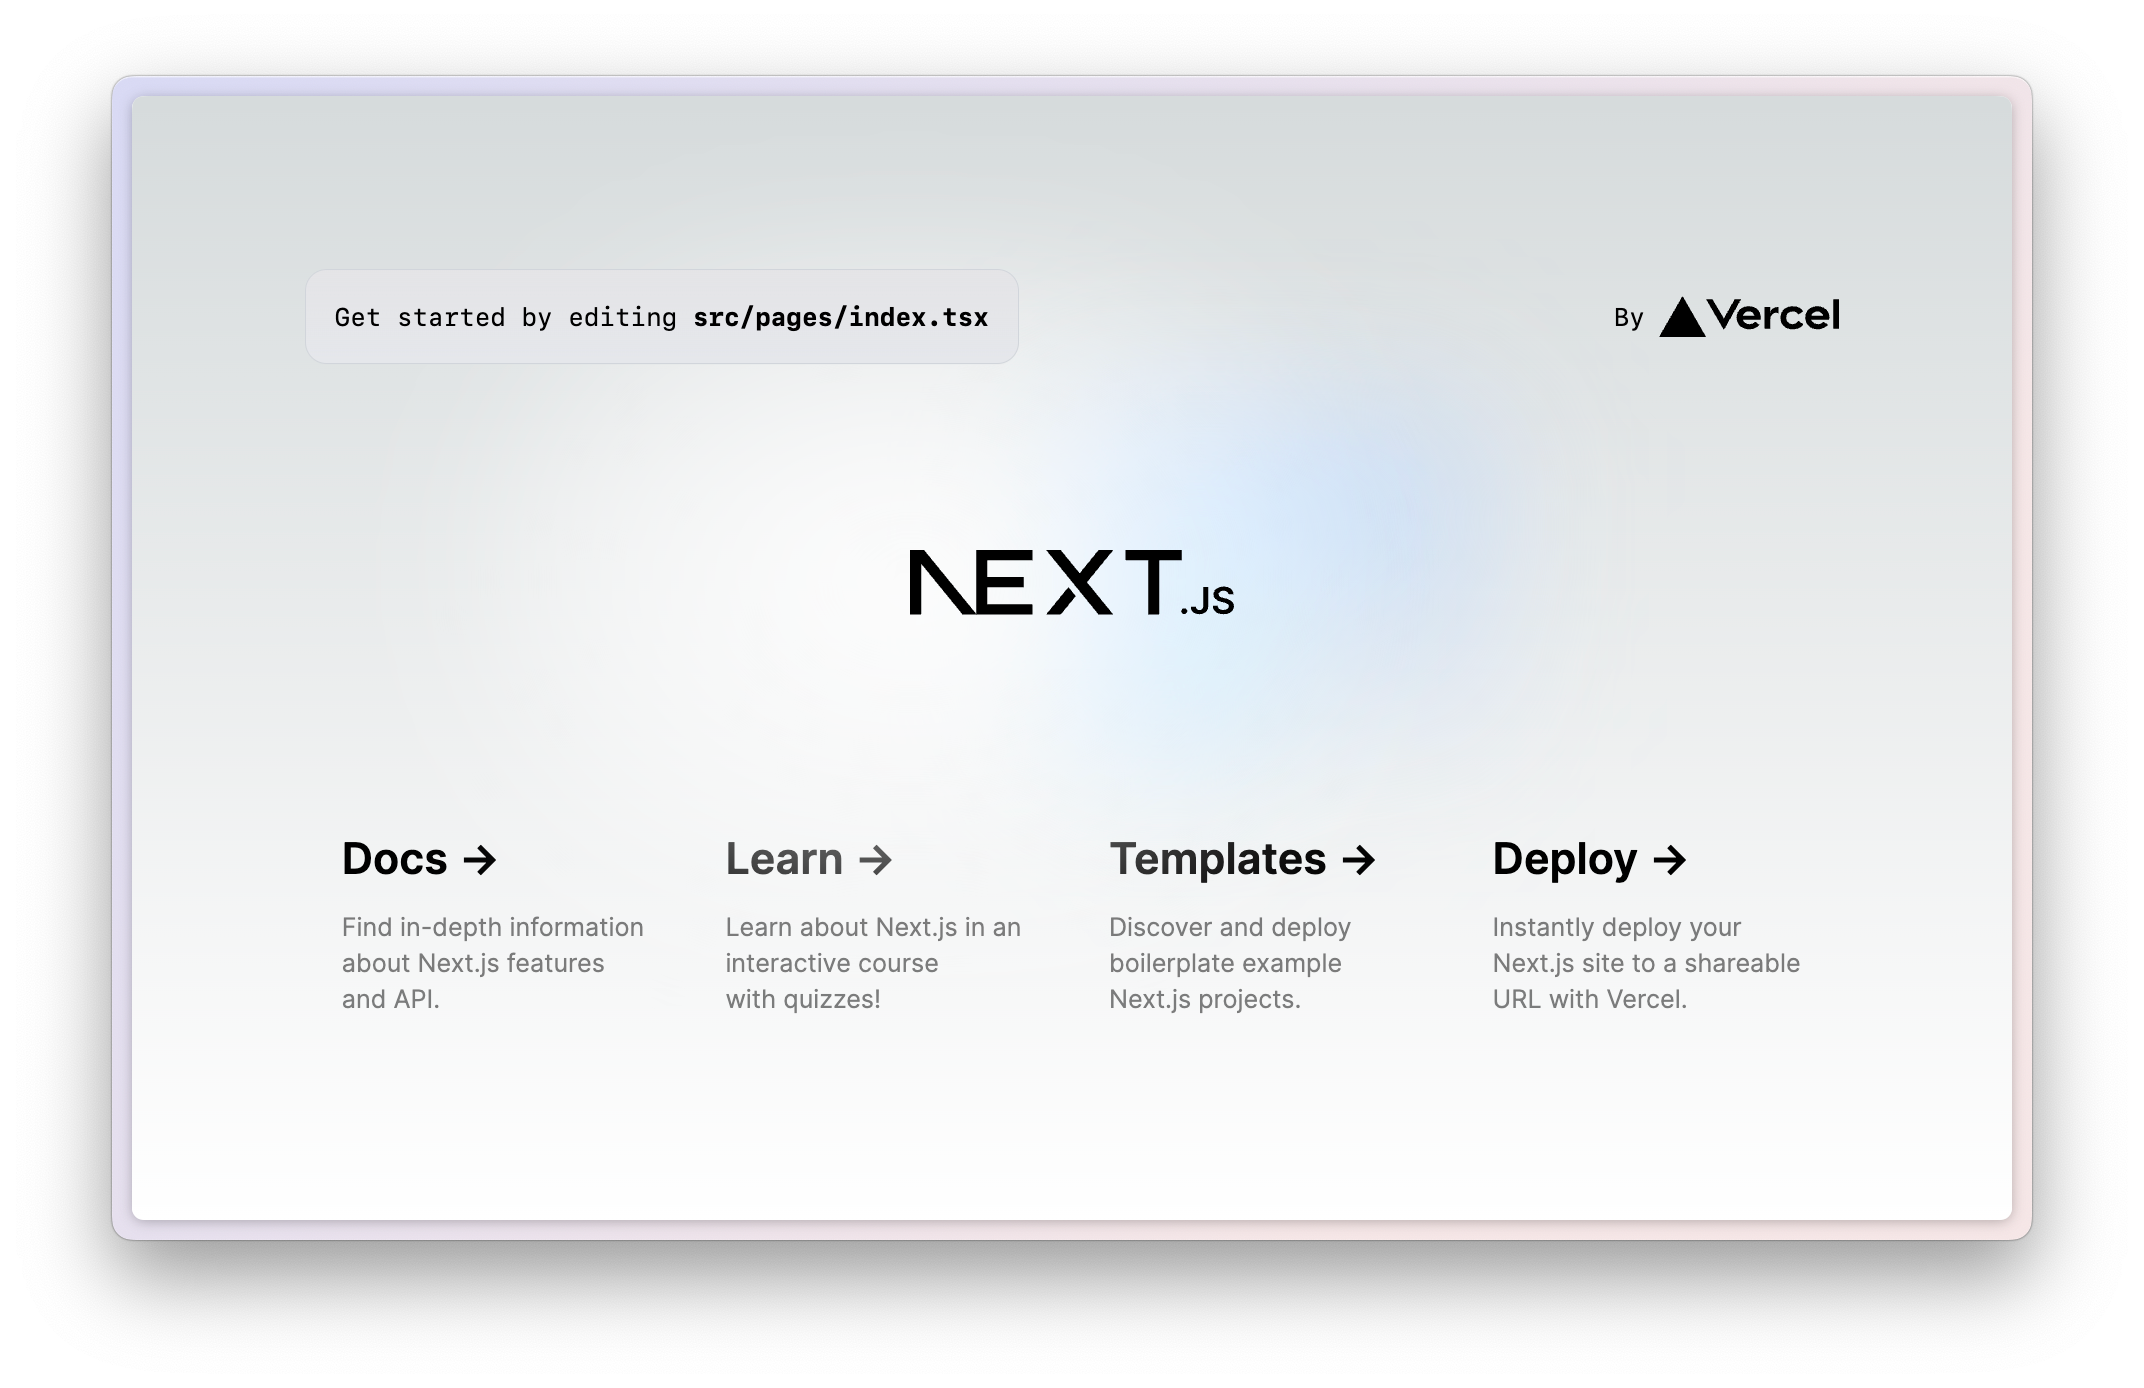
Visit http://localhost:3000 in your web browser, and you should see this landing screen to show it’s been installed correctly.
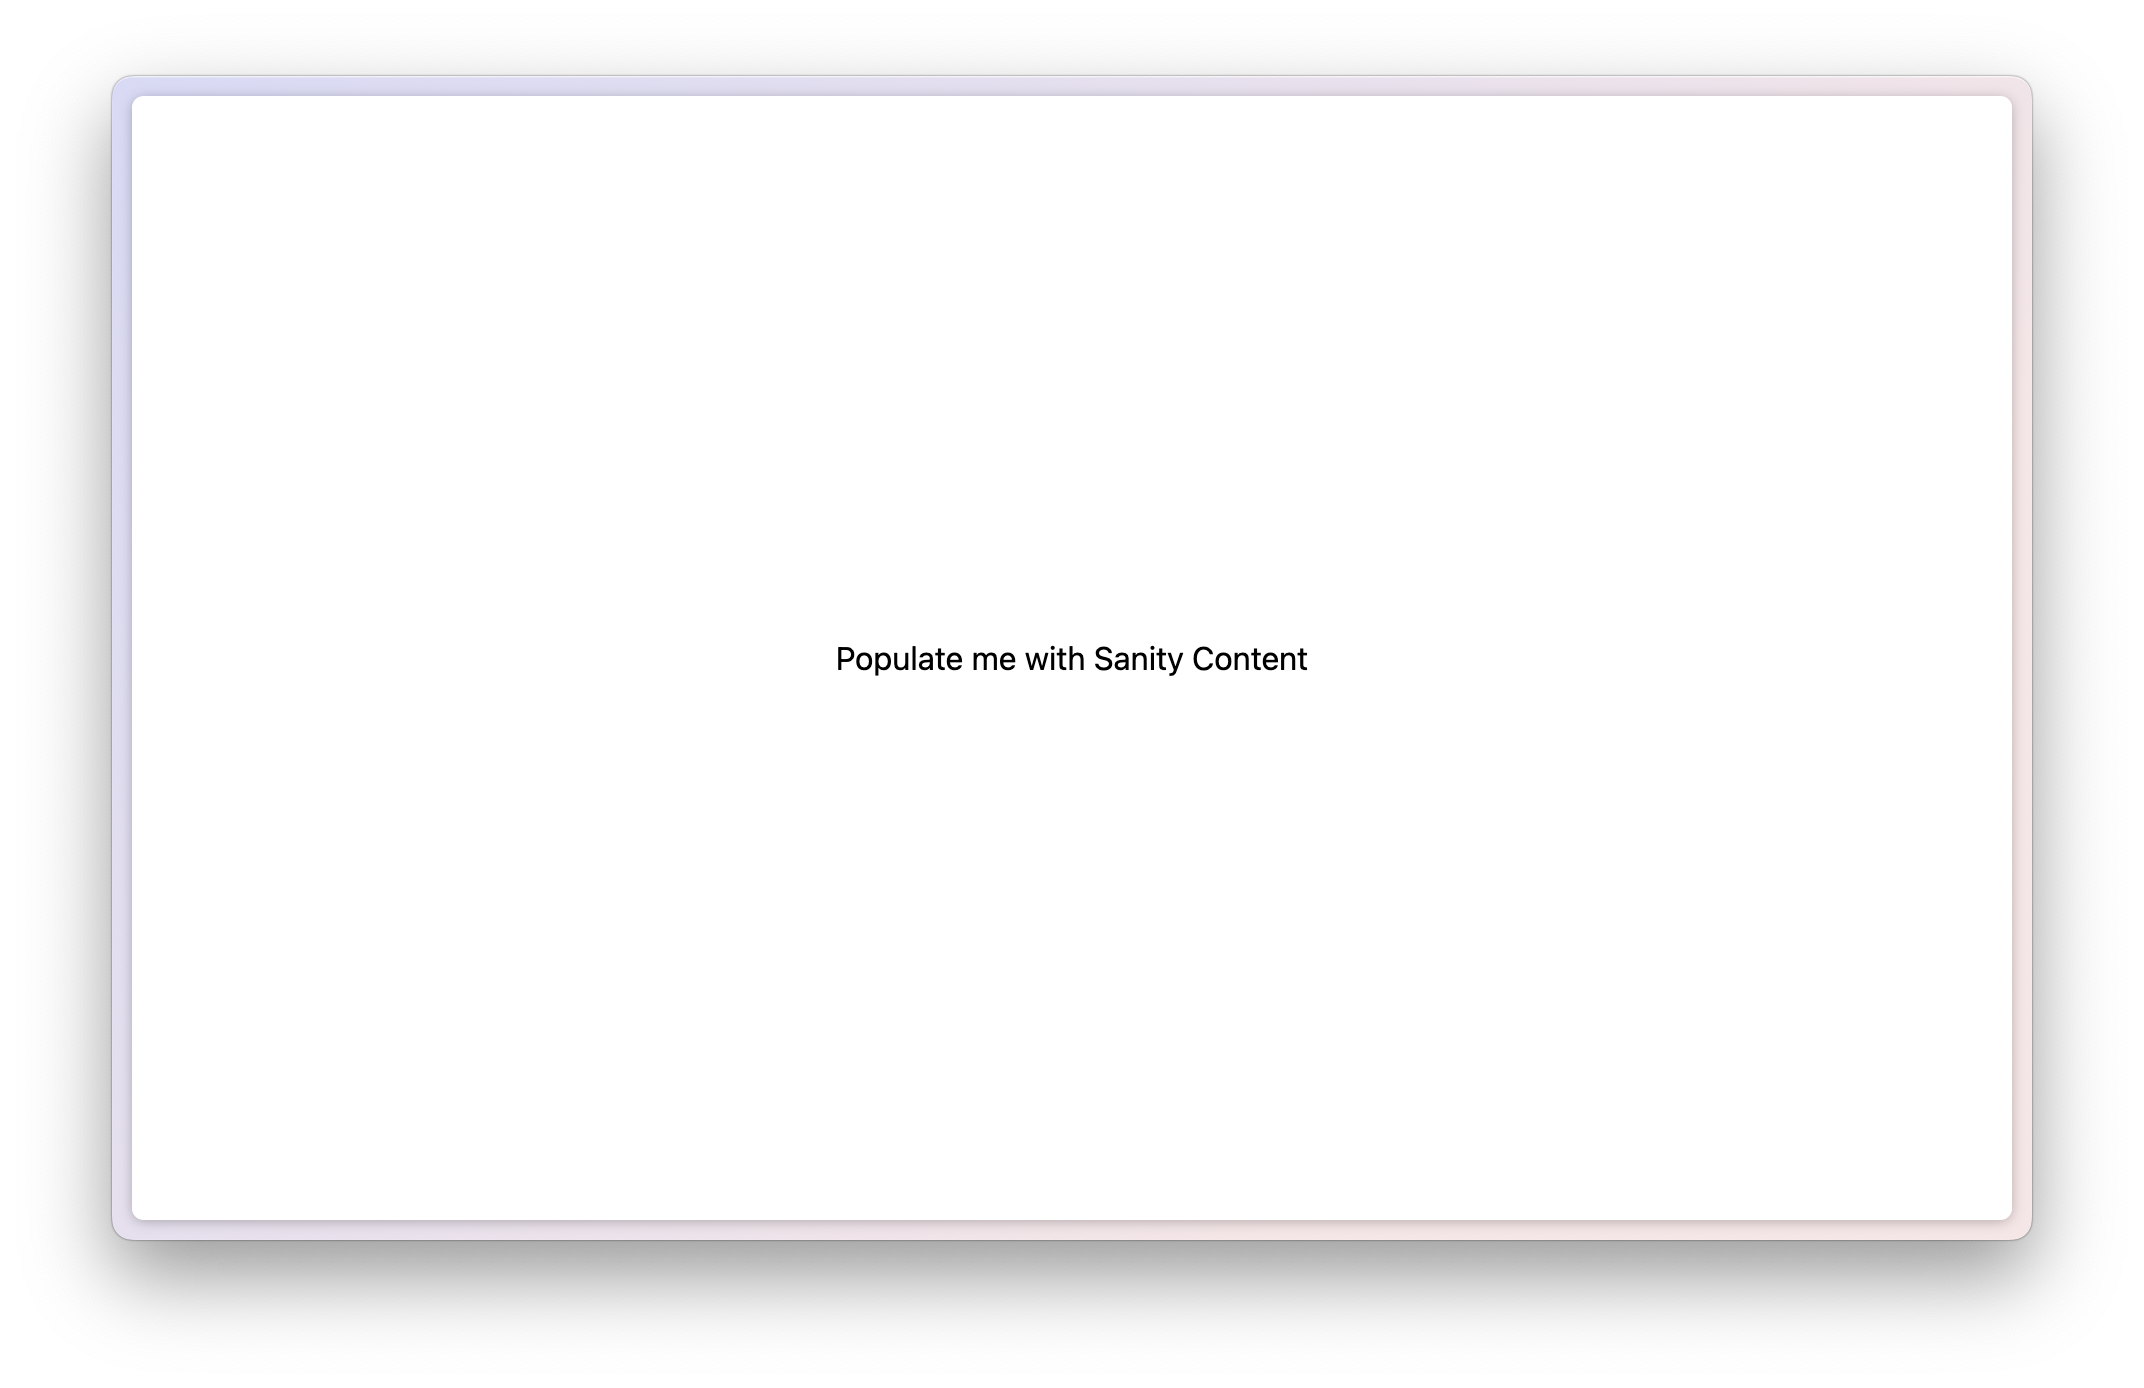
The default Next.js project home page comes with some code boilerplate. So that you can more easily see what’s Sanity and what’s Next.js – you will remove almost all of it.
First, update the home page route file to simplify it greatly:
// ./src/pages/index.tsx

export default function Home() {
  return (
    <main className="flex items-center justify-center min-h-screen">
      Populate me with Sanity Content
    </main>
  )
}
Second, update the globals.css file to just Tailwind utilities:
/* ./src/styles/globals.css */

@tailwind base;
@tailwind components;
@tailwind utilities;
Now your Next.js app at http://localhost:3000 should look much simpler:
Update Next.js confg
Update nextjs.config.ts to include a setting for using images from Sanity's CDN.
// ./next.config.mjs

/** @type {import('next').NextConfig} */
const nextConfig = {
  images: {
    remotePatterns: [
      {
        protocol: "https",
        hostname: "cdn.sanity.io",
      },
    ],
  },
  // ...other config settings
};

export default nextConfig;
Create a new Sanity project
It's possible to create a new – or connect an existing – Sanity project and configure a Studio inside a Next.js application!
Run the following command from inside the same ./nextjs-pages directory you created for your Next.js application and follow the prompts:
# in ./nextjs-pages
npx sanity@latest init --env --create-project "Next.js Live Preview" --dataset production

> Would you like to add configuration files for a Sanity project in this Next.js folder?
Yes

> Do you want to use TypeScript?
Yes

> Would you like an embedded Sanity Studio?
Yes

# Important: Use the app router for the Studio route
> Would you like to use the Next.js app directory for routes?
Yes

> What route do you want to use for the Studio?
/studio

> Select project template to use
Blog (schema)

> Would you like to add the project ID and dataset to your .env file?
Yes
Now your Next.js application should contain some Sanity-specific files, including a .env file with your Sanity project ID and dataset name
Check to see that this file exists with values from your new project:
# ./.env.local

NEXT_PUBLIC_SANITY_PROJECT_ID="your-project-id"
NEXT_PUBLIC_SANITY_DATASET="production"
If this file is named .env, rename it to .env.local and ensure it does not get checked into git.
While these two values are not considered "secrets," you will add one later in this guide. It's best practice never to check .env files into your version control platform.
Open your Studio
Now visit http://localhost:3000/studio to see your new Sanity project's Studio.
- You may need to restart your development environment.
- You also may need to follow the prompts to add a CORS origin and then log in.
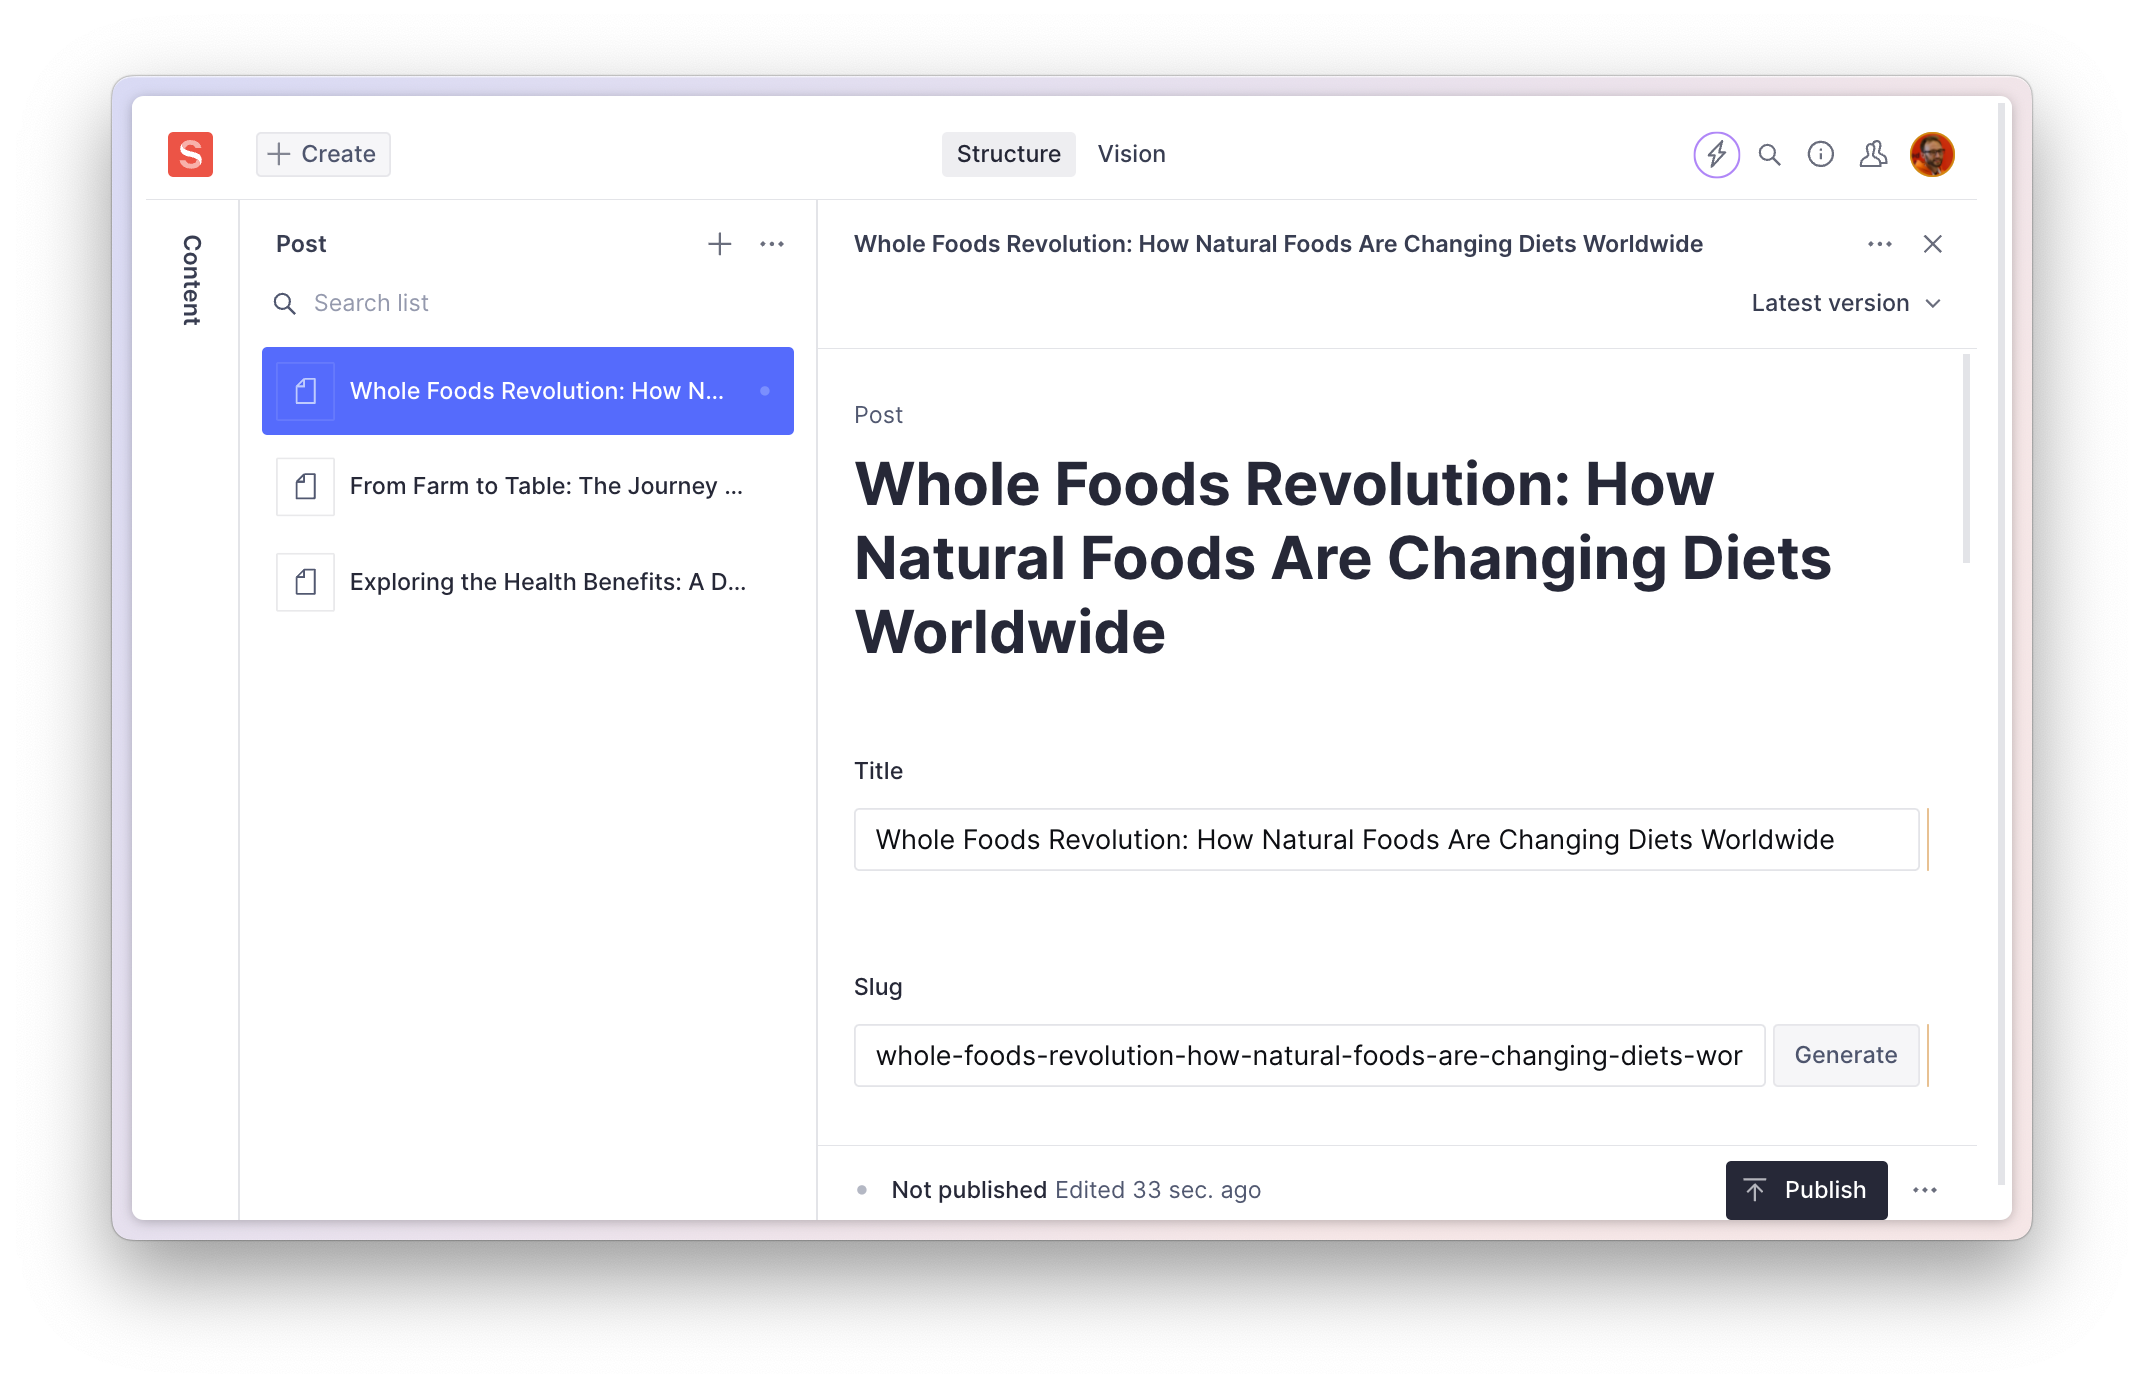
Once logged in, your Studio should look like this with a basic schema to create blog posts. Create and publish a few posts.
Create a viewer token
Server-side fetching of content will require a token in order to enable stega encoding.
Visit your Studio at http://localhost:3000/studio, and from the top right in your user icon, click Manage project.

Navigate to the API tab, and under Tokens, add a new token. Give it viewer permissions and save.
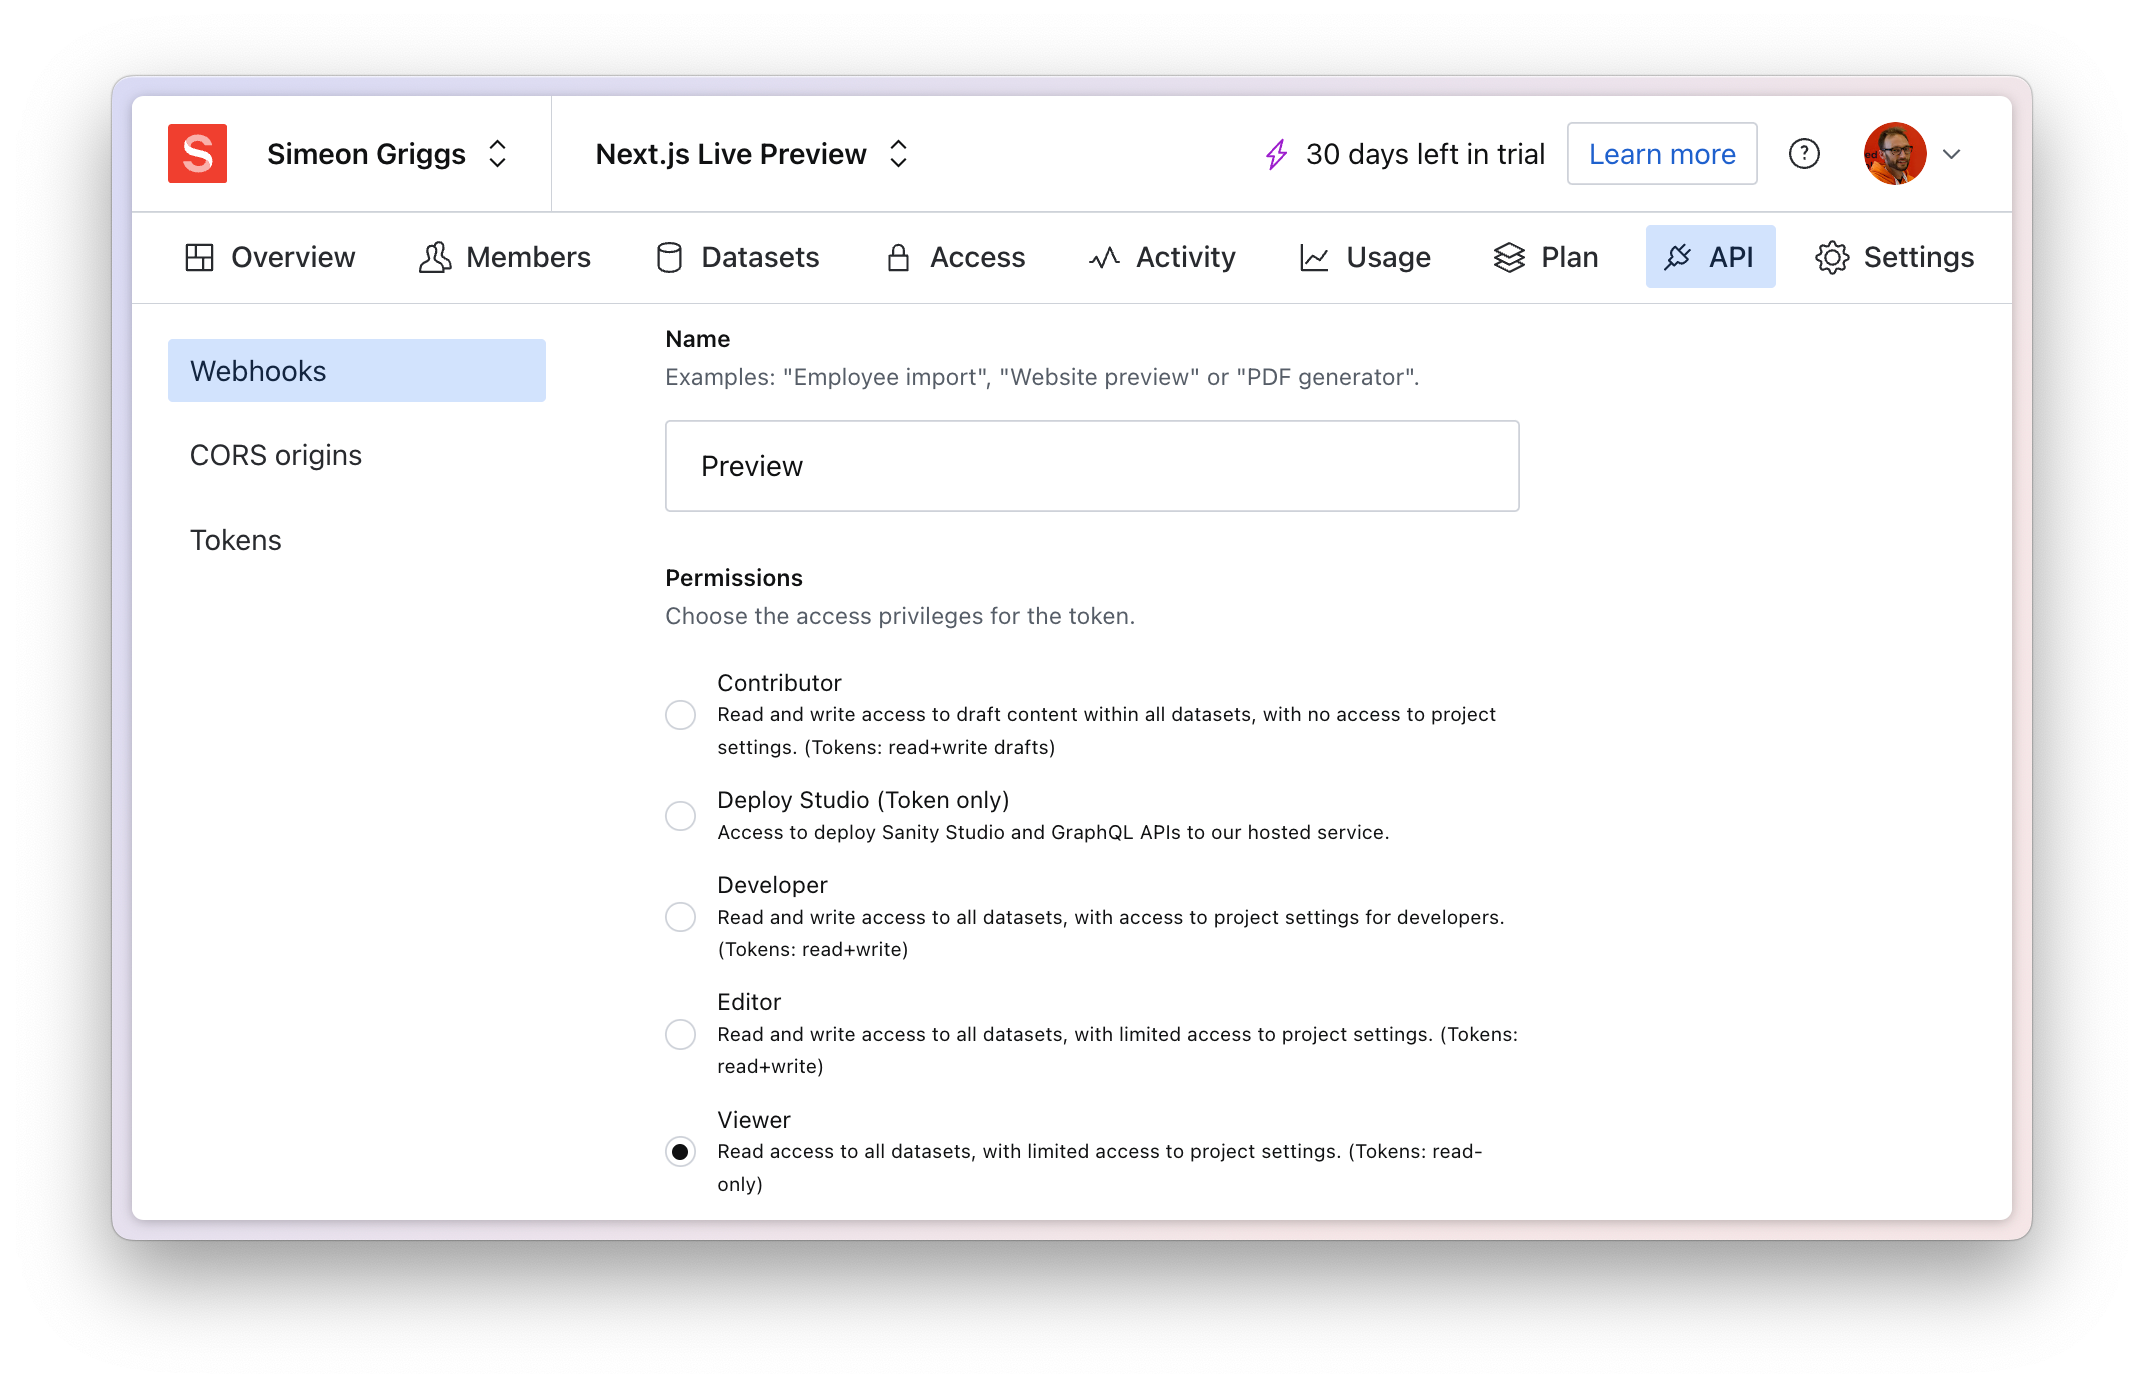
Open your .env.local file and add the token on a new line as SANITY_API_READ_TOKEN
# ./.env.local

NEXT_PUBLIC_SANITY_PROJECT_ID="your-project-id"
NEXT_PUBLIC_SANITY_DATASET="production"

# 👇 add this line
SANITY_API_READ_TOKEN="your-new-token"
Create a file to store and export this token:
// ./sanity/lib/token.ts

export const token = process.env.SANITY_API_READ_TOKEN

if (!token) {
  throw new Error('Missing SANITY_API_READ_TOKEN')
}
Loading data from Sanity
Querying content from the Content Lake into your application and deeply integrating it with your front end is simplified with Loaders. See the documentation for more details about the benefits and application of Loaders.
Install the React Loader – and additional packages to help with Presentation – into your Next.js application:
npm install @sanity/react-loader @sanity/client @sanity/visual-editing
Update the file that was created for you to prepare a Sanity client.
// ./sanity/lib/client.ts

import type { SanityClient } from 'next-sanity'
import { createClient } from "@sanity/client";

import { apiVersion, dataset, projectId } from '../env'

export function getClient(previewToken?: string): SanityClient {
  return createClient({
    projectId,
    dataset,
    apiVersion,
    useCdn: !previewToken,
    perspective: previewToken ? 'previewDrafts' : 'published',
    stega: {
      enabled: previewToken ? true : false,
      studioUrl: '/studio',
    },
    token: previewToken
  })
}
The most important update is to import createClient from the dedicated client stega package. This is a larger version of Sanity Client, but it allows you to return stega encoding in draft mode.
Instead of exporting a configured Sanity Client, this file now exports a function to return a client configured for preview perspectives and stega encoding.
Create a new file to store the GROQ queries you'll use in the Next.js application:
// ./sanity/lib/queries.ts

import { groq } from "next-sanity";

export const POSTS_QUERY = groq`*[_type == "post" && defined(slug)]`;

export const POSTS_SLUG_QUERY = groq`*[_type == "post" && defined(slug.current)][]{
  "params": { "slug": slug.current }
}`;

export const POST_QUERY = groq`*[_type == "post" && slug.current == $slug][0]`;
Create a new file with a component that will render all of your posts on the home page:
// ./src/components/Posts.tsx

import { SanityDocument } from "next-sanity";
import Link from "next/link";

export default function Posts({ posts }: { posts: SanityDocument[] }) {
  return (
    <main className="container mx-auto grid grid-cols-1 divide-y divide-blue-100">
      {posts?.length > 0 ? (
        posts.map((post) => (
          <Link
            key={post._id}
            href={post.slug.current}
          >
            <h2 className="p-4 hover:bg-blue-50">{post.title}</h2>
          </Link>
        ))
      ) : (
        <div className="p-4 text-red-500">No posts found</div>
      )}
    </main>
  );
}
We're ready to fetch content!
Update your home page route now to create a Sanity client, fetch and display a list of published posts:
// ./src/pages/index.tsx
import { SanityDocument } from "next-sanity";
import { getClient } from "../../sanity/lib/client";
import { token } from "../../sanity/lib/token";
import { POSTS_QUERY } from "../../sanity/lib/queries";
import Posts from "@/components/Posts";
type PageProps = {
posts: SanityDocument[];
draftMode: boolean;
token: string;
};
export default function Home(props: PageProps) {
return <Posts posts={props.posts} />;
}
export const getStaticProps = async ({ draftMode = false }) => {
const client = getClient(draftMode ? token : undefined);
const posts = await client.fetch<SanityDocument[]>(POSTS_QUERY);
return {
props: {
posts,
draftMode,
token: draftMode ? token : "",
},
};
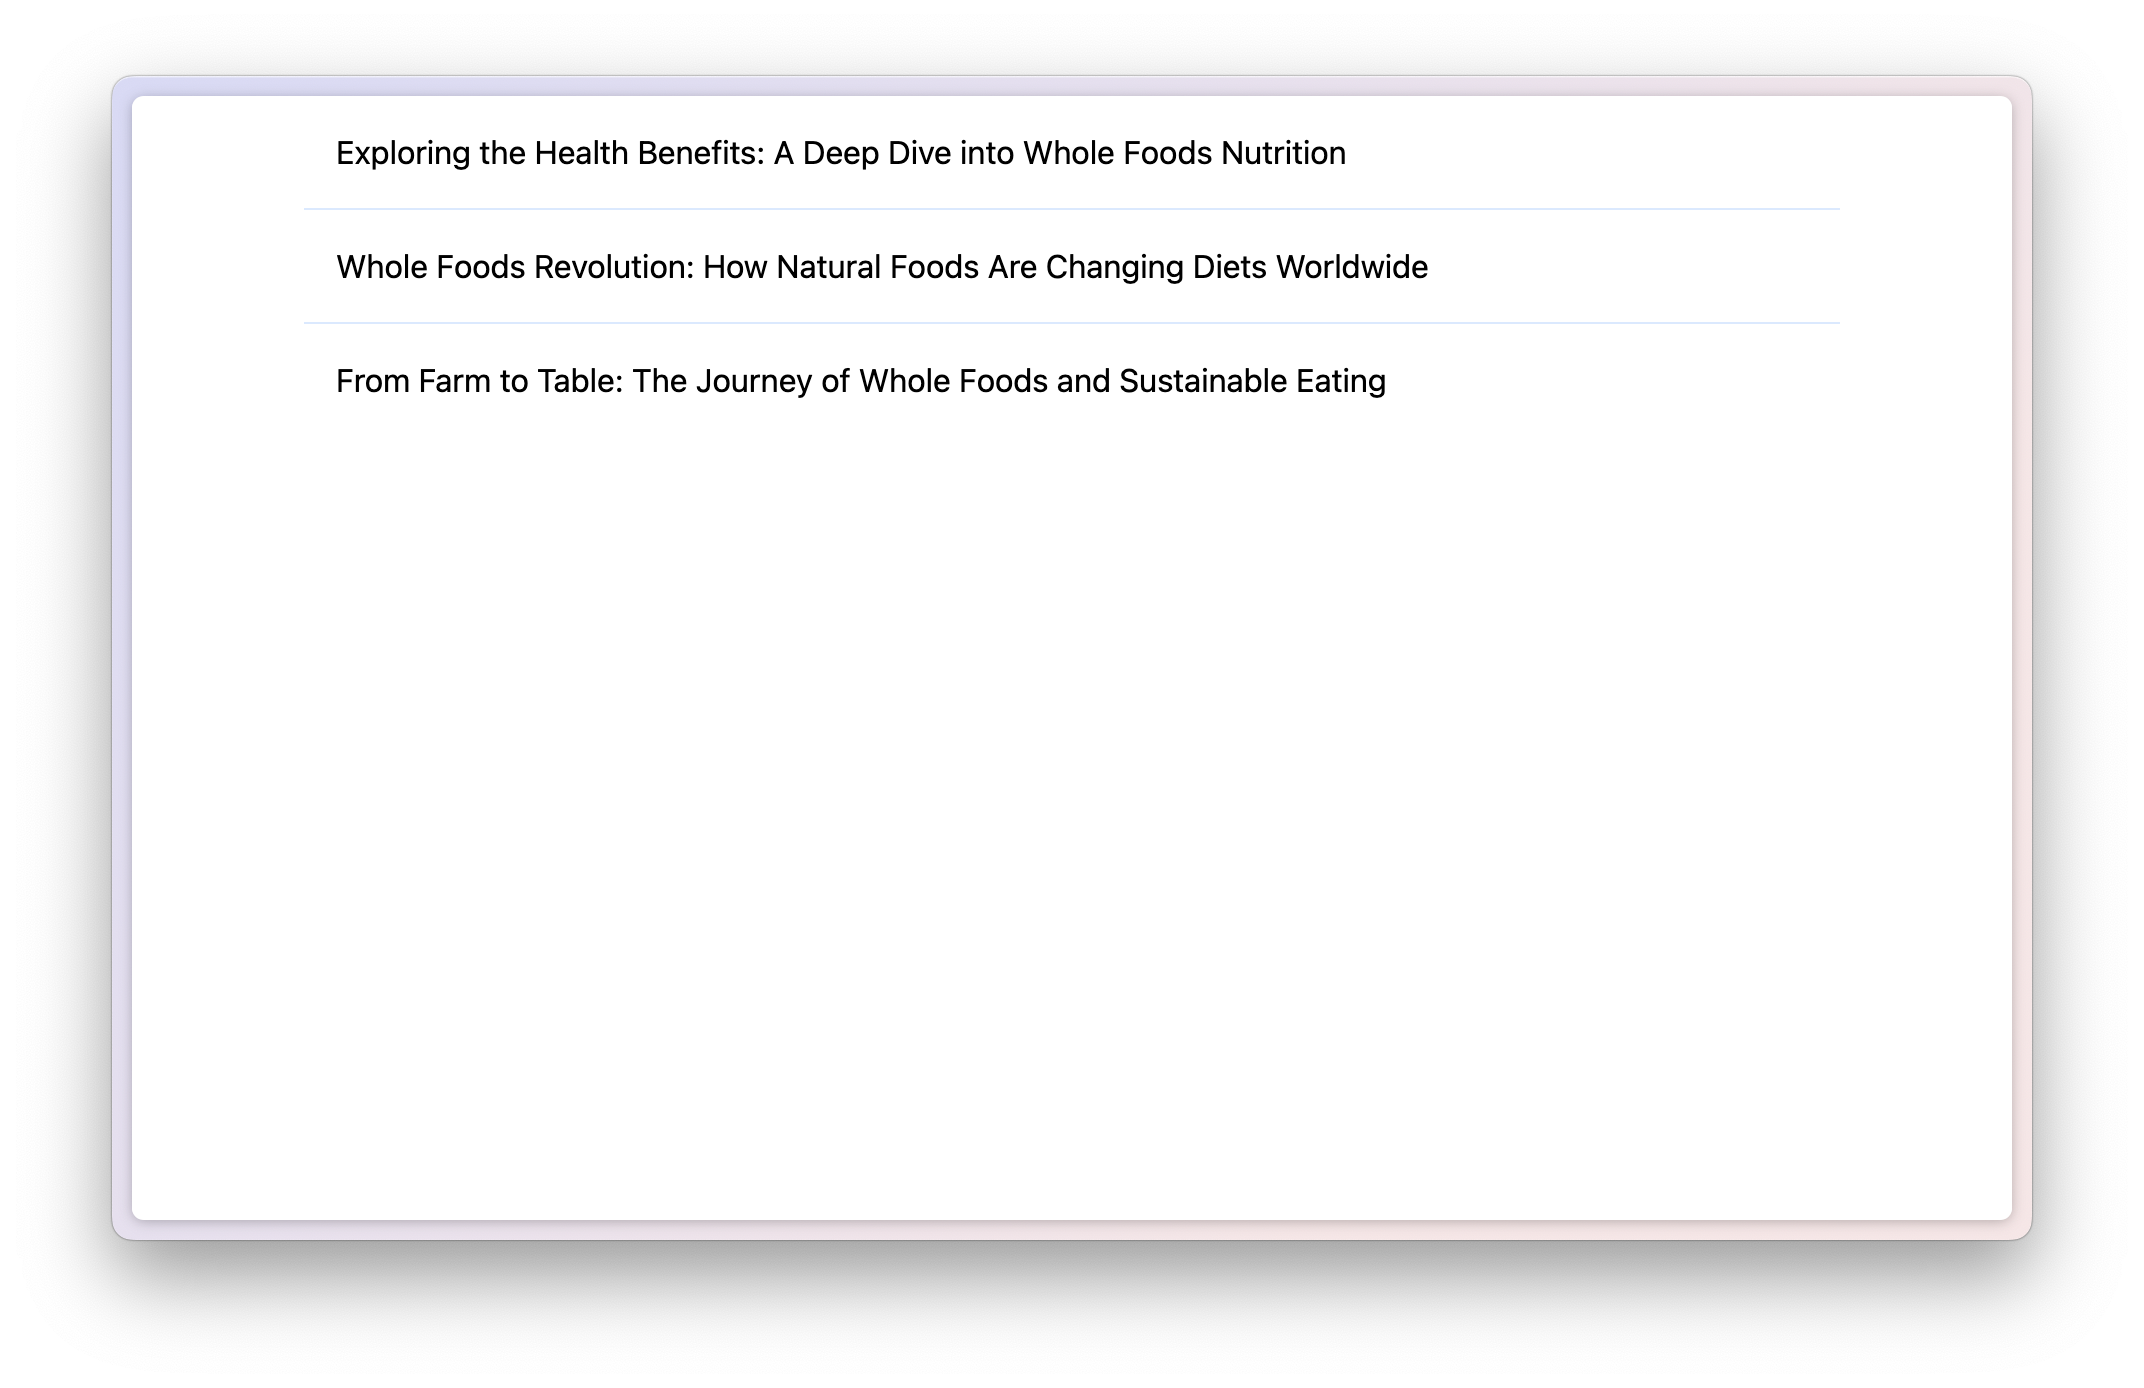
};Open http://localhost:3000 now. The home page should now show all of your published blog posts.
Summary so far
You now have:
- Created a new Next.js application
- Created a new Sanity project
- An embedded Sanity Studio in your application at
/studio - A home page that displays published blog posts fetched by
- A dynamically configured Sanity Client
Now, you'll combine Next.js' built-in "draft mode" to query draft content and reveal live-as-you-type updates inside the Presentation tool.
Enabling Visual Editing
For Visual Editing, you will need:
- "Draft mode" active to conditionally change the perspective in
loadQueryanduseLiveModeto query for draft content, request a content source map, and add stega encoding - Those stega encoded invisible strings to be found by the overlays package to create "click-to-edit" links on your front end
- The Presentation plugin installed and configured to activate draft mode
Enabling draft mode
Create another component to wrap the page with a Provider that listens to draft content changes:
// ./src/components/PreviewProvider.tsx

import { LiveQueryProvider } from 'next-sanity/preview'
import { useMemo } from 'react'

import { getClient } from '../../sanity/lib/client'

export default function PreviewProvider({
  children,
  token,
}: {
  children: React.ReactNode
  token: string
}) {
  const client = useMemo(() => getClient(token), [token])
  return <LiveQueryProvider client={client}>{children}</LiveQueryProvider>
}
Update the application's existing layout route to load the component.
This includes a component named VisualEditing which will report navigations back to the Presentation tool and add interactive overlays when stega encoded strings are found in the DOM.
// ./src/pages/_app.tsx

import "@/styles/globals.css";
import { VisualEditing } from "@sanity/visual-editing/next-pages-router";

import { AppProps } from "next/app";
import { lazy, Suspense } from "react";

export interface SharedPageProps {
  draftMode: boolean;
  token: string;
}

const PreviewProvider = lazy(() => import("@/components/PreviewProvider"));

export default function App({
  Component,
  pageProps,
}: AppProps<SharedPageProps>) {
  const { draftMode, token } = pageProps;

  return draftMode ? (
    <PreviewProvider token={token}>
      <Component {...pageProps} />
      <Suspense>
        <VisualEditing />
      </Suspense>
    </PreviewProvider>
  ) : (
    <Component {...pageProps} />
  );
}
Create a new route that the Presentation tool will use to activate draft mode:
// ./src/pages/api/draft.ts

import { validatePreviewUrl } from '@sanity/preview-url-secret'
import type { NextApiRequest, NextApiResponse } from 'next'
import { createClient } from 'next-sanity'

import { apiVersion, dataset, projectId } from '../../../sanity/env'

const token = process.env.SANITY_API_READ_TOKEN
if (!token) {
  throw new Error(
    'A secret is provided but there is no `SANITY_API_READ_TOKEN` environment variable setup.',
  )
}
const client = createClient({
  projectId,
  dataset,
  apiVersion,
  useCdn: false,
  token,
})

export default async function handle(
  req: NextApiRequest,
  res: NextApiResponse<string | void>,
) {
  if (!req.url) {
    throw new Error('Missing url')
  }
  const { isValid, redirectTo = '/' } = await validatePreviewUrl(
    client,
    req.url,
  )
  if (!isValid) {
    return res.status(401).send('Invalid secret')
  }
  // Enable Draft Mode by setting the cookies
  res.setDraftMode({ enable: true })
  res.writeHead(307, { Location: redirectTo })
  res.end()
}
This route will be visited by the Presentation tool inside your Studio, along with a secret stored in your dataset. The Next.js app will perform its own query to validate that secret in order to activate draft mode.
Create another API route to disable draft mode:
// ./src/pages/api/disable-draft.ts

import type { NextApiRequest, NextApiResponse } from 'next'

export default function handle(
  _req: NextApiRequest,
  res: NextApiResponse<void>,
): void {
  // Exit the current user from "Draft Mode".
  res.setDraftMode({ enable: false })

  // Redirect the user back to the index page.
  res.writeHead(307, { Location: '/' })
  res.end()
}
The VisualEditing component calls this route when draft mode is active, but the site is not rendered on Vercel or inside the Presentation tool.
Now you have all the pieces assembled to fetch drafts, show real-time updates, and include stega encoding for interactive live previews – you'll need to set up the Presentation tool to show it in action.
Configure Presentation
Update your sanity.config.ts file to import the Presentation tool.
// ./sanity.config.ts

// ...all other imports
import { presentationTool } from 'sanity/presentation'

export default defineConfig({
  // ... all other config settings
  plugins: [
    // ...all other plugins
    presentationTool({
      previewUrl: {
        draftMode: {
          enable: '/api/draft',
        },
      },
    }),
  ],
})
Notice how the plugin's configuration includes the route you just created. Presentation will visit this route first, confirm an automatically generated secret from the dataset, and activate draft mode in the Next.js application if successful.
You should now see the Presentation tool in the top toolbar of the Studio or by visiting http://localhost:3000/studio/presentation
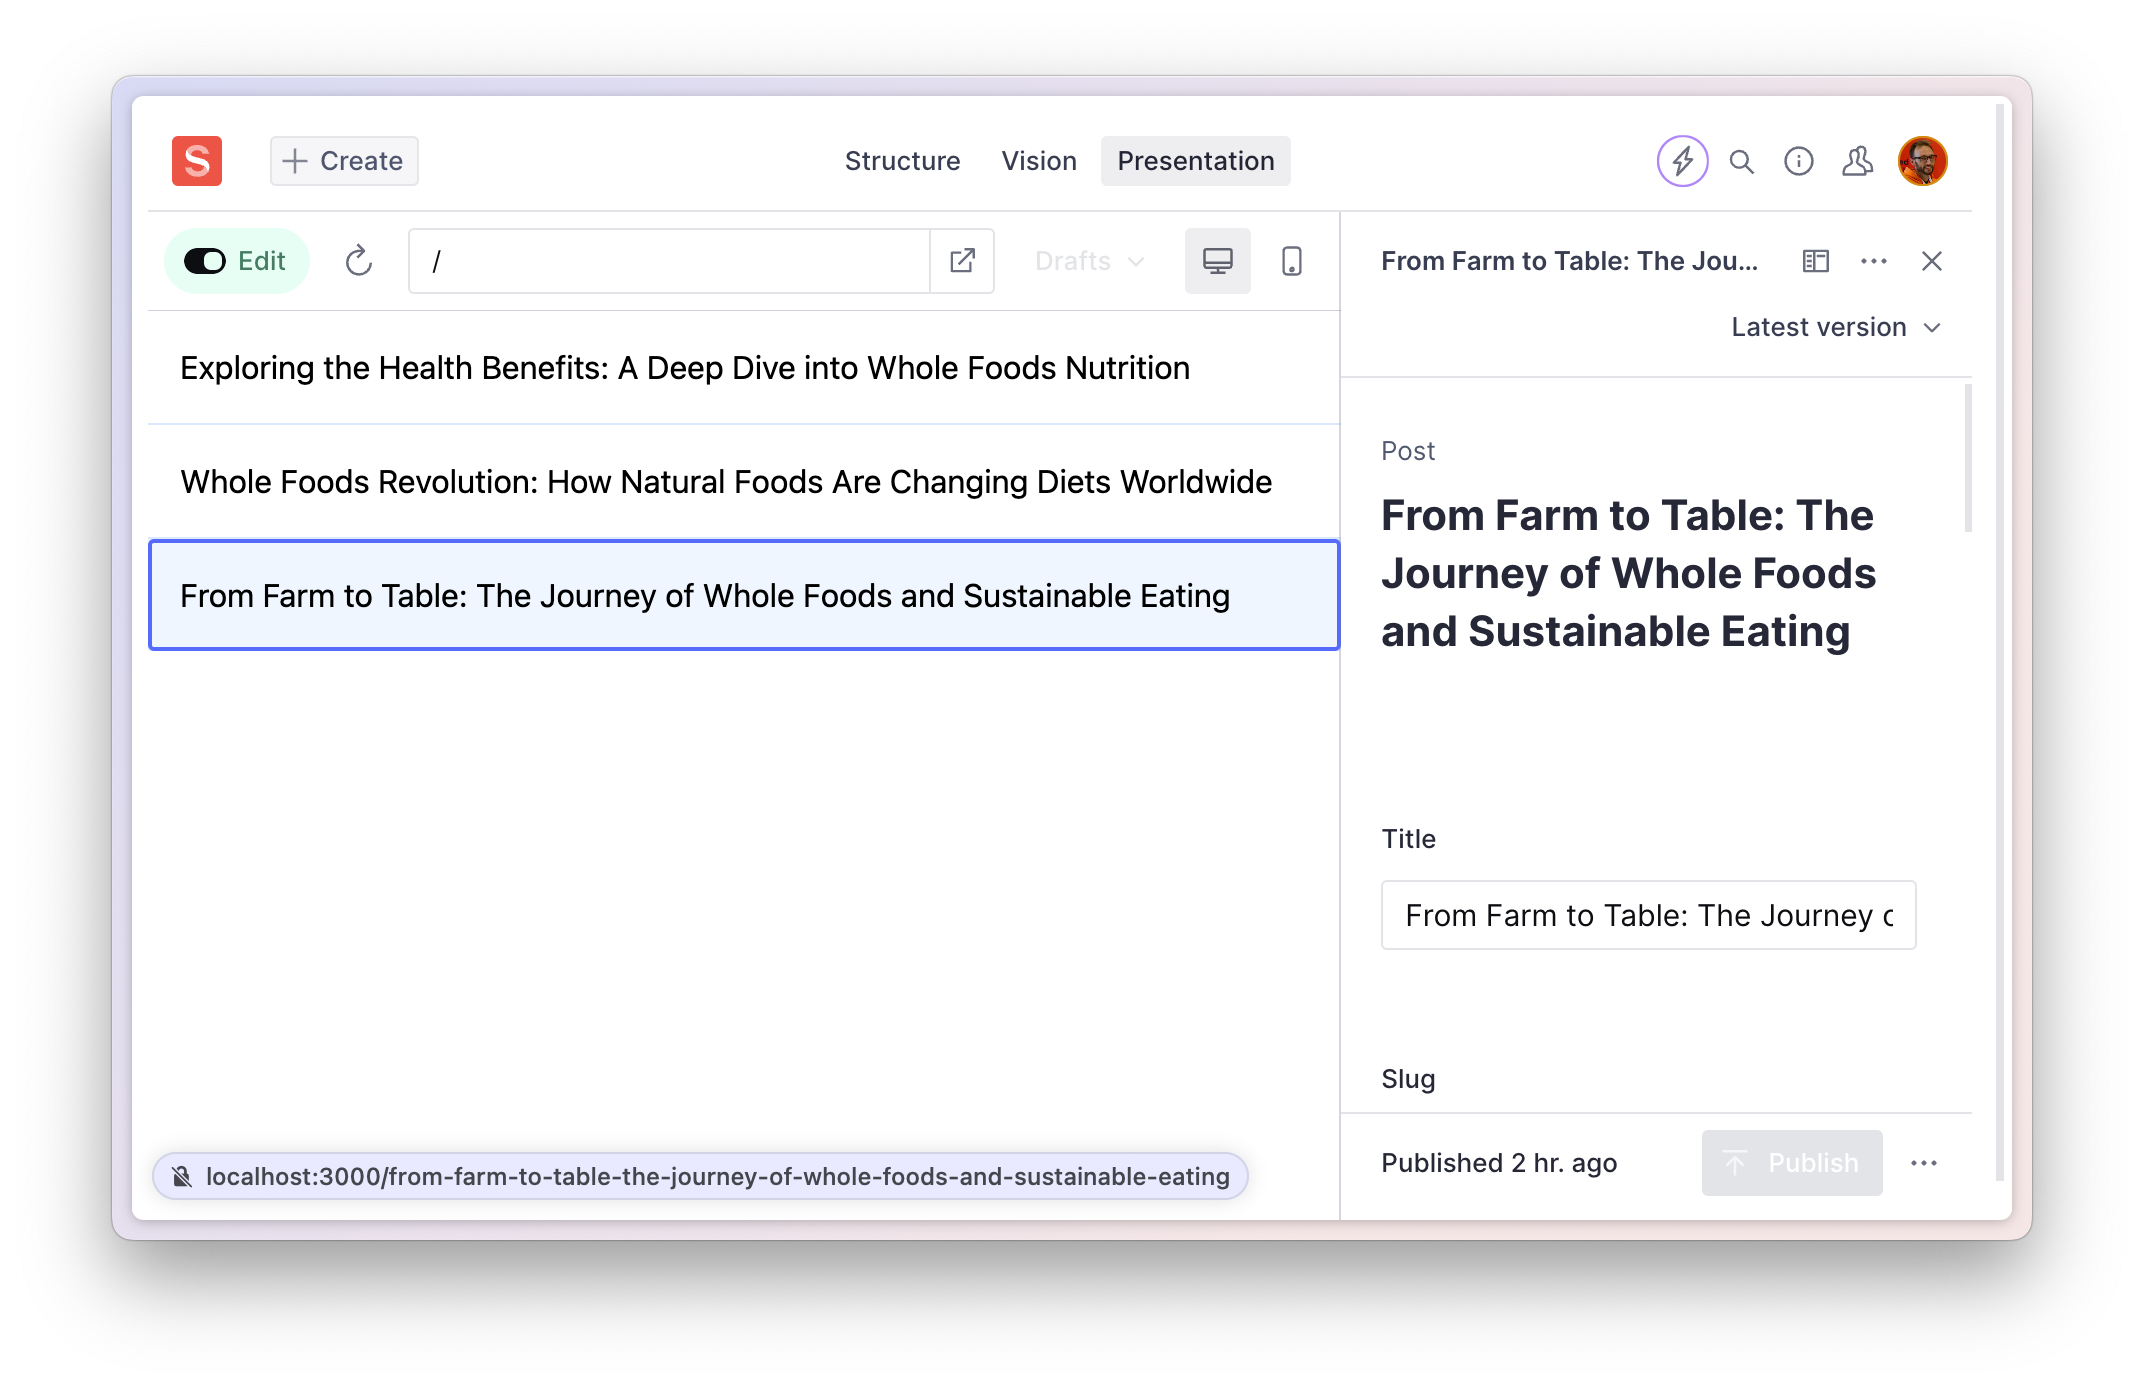
The home page now displays a list of published blog posts. And you can click to edit them. However, changes made in the Studio are not yet being reflected in the Next.js application.
For this, you'll need to update your routes with the useQuery hook from the Loader.
Create a new file to wrap the Posts component when draft mode is enabled:
// ./src/components/PostsPreview.tsx

import { SanityDocument } from "next-sanity";
import { useLiveQuery } from "next-sanity/preview";

import Posts from "./Posts";
import { POSTS_QUERY } from "../../sanity/lib/queries";

export default function PostsPreview({ posts = [] }: { posts: SanityDocument[] }) {
  const [data] = useLiveQuery<SanityDocument[]>(posts, POSTS_QUERY);

  return <Posts posts={data} />;
}
This component should only be rendered when draft mode is enabled.
It exists to receive the initial data from the server side and continue to return updates to the content when the VisualEditing component is also rendered – which contains the useLiveMode hook.
Update the home page route again to conditionally show either the PostsPreview or Posts component depending on whether draft mode is enabled:
// ./src/pages/index.tsx

import { SanityDocument } from "next-sanity";
import dynamic from "next/dynamic";

import { getClient } from "../../sanity/lib/client";
import { token } from "../../sanity/lib/token";
import { POSTS_QUERY } from "../../sanity/lib/queries";
import Posts from "@/components/Posts";

const PostsPreview = dynamic(() => import("@/components/PostsPreview"));

type PageProps = {
  posts: SanityDocument[];
  draftMode: boolean;
  token: string;
};

export default function Home(props: PageProps) {
  return props.draftMode ? (
    <PostsPreview posts={props.posts} />
  ) : (
    <Posts posts={props.posts} />
  );
}

export const getStaticProps = async ({ draftMode = false }) => {
  const client = getClient(draftMode ? token : undefined);
  const posts = await client.fetch<SanityDocument[]>(POSTS_QUERY);

  return {
    props: {
      posts,
      draftMode,
      token: draftMode ? token : "",
    },
  };
};
Now at http://localhost:3000/studio/presentation the Presentation tool should show:
- Both draft and published documents.
- Clickable links on the title of each post to edit that document.
- Real-time changes when editing the title of any post.
Success!
Create single post pages
One issue that remains is that when you click on any of these posts, they return a 404 error. You'll need to create a route, component, and preview wrapper for individual posts.
Create a new route with a slug parameter passed into the query:
// ./src/pages/[slug].tsx

import { QueryParams, SanityDocument } from "next-sanity";
import dynamic from "next/dynamic";
import { GetStaticPaths } from "next";

import { getClient } from "../../sanity/lib/client";
import { token } from "../../sanity/lib/token";
import { POSTS_SLUG_QUERY, POST_QUERY } from "../../sanity/lib/queries";
import Post from "@/components/Post";

const PostPreview = dynamic(() => import("@/components/PostPreview"));

type PageProps = {
  post: SanityDocument;
  params: QueryParams;
  draftMode: boolean;
  token: string;
};

export default function SinglePost(props: PageProps) {
  return props.draftMode ? (
    <PostPreview post={props.post} params={props.params} />
  ) : (
    <Post post={props.post} />
  );
}

export const getStaticProps = async ({ params = {}, draftMode = false }) => {
  const client = getClient(draftMode ? token : undefined);
  const post = await client.fetch<SanityDocument>(POST_QUERY, params);

  return {
    props: {
      post,
      params,
      draftMode,
      token: draftMode ? token : "",
    },
  };
};

// Prepare Next.js to know which routes already exist
export const getStaticPaths: GetStaticPaths = async () => {
  const paths = await getClient().fetch(POSTS_SLUG_QUERY);

  return { paths, fallback: true };
};
Create a component to display a single post:
// ./src/components/Post.tsx

import Image from "next/image"
import { PortableText } from "@portabletext/react";
import imageUrlBuilder from "@sanity/image-url";
import { SanityDocument } from "next-sanity";

import { dataset, projectId } from "../../sanity/env";

const builder = imageUrlBuilder({ projectId, dataset });

export default function Post({ post }: { post: SanityDocument }) {
  const { title, mainImage, body } = post;

  return (
    <main className="container mx-auto prose prose-lg p-4">
      {title ? <h1>{title}</h1> : null}
      {mainImage ? (
        <Image
          className="float-left m-0 w-1/3 mr-4 rounded-lg"
          src={builder.image(mainImage).width(300).height(300).quality(80).url()}
          width={300}
          height={300}
          alt={mainImage.alt || ''}
        />
      ) : null}
      {body ? <PortableText value={body} /> : null}
    </main>
  );
}
Create a preview wrapper component to update the Post component when draft mode is enabled:
// ./src/components/PostPreview.tsx

import { QueryParams, SanityDocument } from "next-sanity";
import { useLiveQuery } from "next-sanity/preview";

import { POST_QUERY } from "../../sanity/lib/queries";
import Post from "./Post";

export default function PostPreview({
  post,
  params = {},
}: {
  post: SanityDocument;
  params: QueryParams;
}) {
  const [data] = useLiveQuery<SanityDocument>(post, POST_QUERY, params);

  return <Post post={data} />;
}
Displaying rich text with @tailwindcss/typography
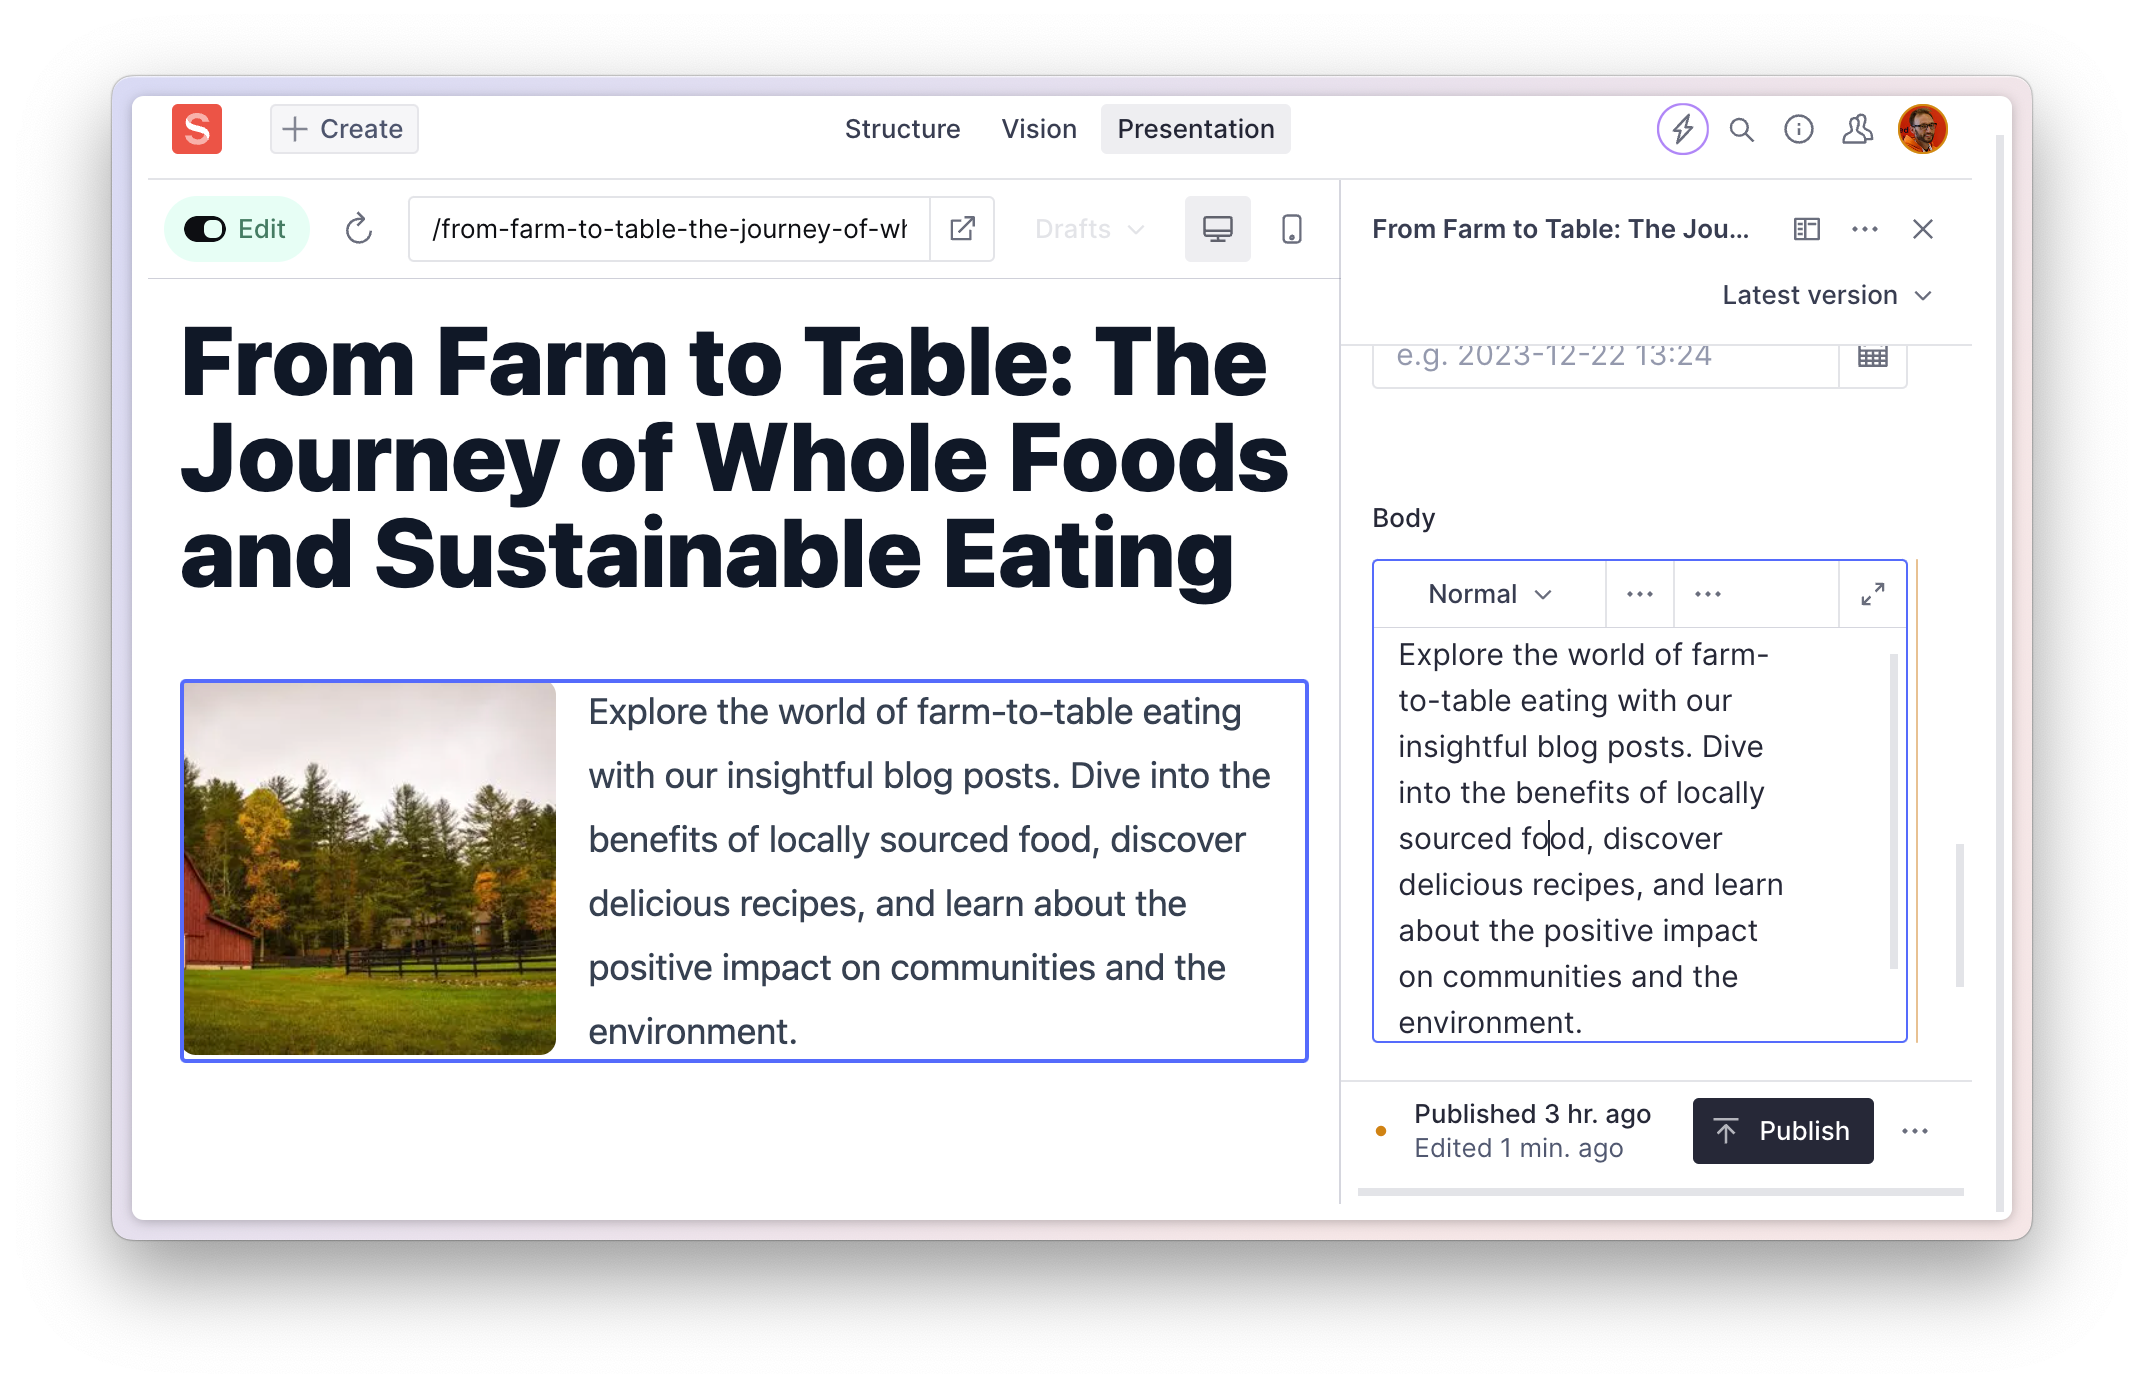
On single post pages, the Portable Text field from the Studio is being rendered into HTML by the <PortableText /> component.
Install the Tailwind CSS Typography package to quickly apply beautiful default styling:
npm install -D @tailwindcss/typography
Update your tailwind.config.js file's plugins to include it:
// ./tailwind.config.ts

module.exports = {
  // ...other settings
  plugins: [require('@tailwindcss/typography')],
}
This package styles the prose class names in the <Post /> component.
You should now be able to click into individual posts and see text fields, portable text, and images rendered beautifully. Inside Presentation, you should be able to make content edits and see them update as you type!
Configuring locations in the Studio
Following the documentation on setting up locations in Presentation will create links from any document to all the places an author could expect to find them in the front end.
Create a new file for the locate function
// ./sanity/presentation/locate.ts

import { DocumentLocationResolver } from "sanity/presentation";
import { map } from "rxjs";

// Pass 'context' as the second argument
export const locate: DocumentLocationResolver = (params, context) => {
  // Set up locations for post documents
  if (params.type === "post") {
    // Subscribe to the latest slug and title
    const doc$ = context.documentStore.listenQuery(
      `*[_id == $id][0]{slug,title}`,
      params,
      { perspective: "previewDrafts" } // returns a draft article if it exists
    );
    // Return a streaming list of locations
    return doc$.pipe(
      map((doc) => {
        // If the document doesn't exist or have a slug, return null
        if (!doc || !doc.slug?.current) {
          return null;
        }
        return {
          locations: [
            {
              title: doc.title || "Untitled",
              href: `/${doc.slug.current}`,
            },
            {
              title: "Posts",
              href: "/",
            },
          ],
        };
      })
    );
  }
  return null;
}
Update your sanity.config.ts file to import the locate function into the Presentation plugin.
// ./sanity.config.ts

// Add this import
import { locate } from '@/sanity/presentation/locate'

export default defineConfig({
  // ...all other settings

  plugins: [
    presentationTool({
      locate,
      previewUrl: {
        draftMode: {
          enable: '/api/draft',
        },
      },
    }),
    // ..all other plugins
  ],
})
You should now see the locations at the top of all post type documents:
Next steps
As your front end grows, you may not wish to make preview versions of every unique component. Consider making a reusable live preview component by following this guide.
Sanity – The Content Operating System that ends your CMS nightmares
Sanity replaces rigid content systems with a developer-first operating system. Define schemas in TypeScript, customize the editor with React, and deliver content anywhere with GROQ. Your team ships in minutes while you focus on building features, not maintaining infrastructure.
Sanity scales from weekend projects to enterprise needs and is used by companies like Puma, AT&T, Burger King, Tata, and Figma.