Join live – Get insights, tips, + Q&A from Sanity developers on our latest releases

Loaders and Overlays

Make your front end Presentation-aware.

This guide article introduces you to the concepts of Loaders and Overlays and how to implement them in a front end. They are necessary parts to enable Visual Editing in the Presentation tool for your content team.

What are Loaders

Loaders provide a convenient, unified way of loading data from Content Lake: A single front end data fetching implementation across production, development and preview states, for both server and client side rendering.

We built Loaders to make it easier to integrate full-fledged Visual Editing functionality in your front end with less maintenance and repeated code. Loaders handle the heavy lifting of implementing Visual Editing into your front end by:

  • Supporting rendering Overlays in your application, using Content Source Maps (CSM) to map your content to the exact documents and fields it came from.
  • Enabling seamless switching into preview mode, using Perspectives to display either published or draft content.
  • Setting up near instant, as-you-type updates in preview mode.

Crucially, loaders only run preview code paths in preview states, so your production site is kept fast and lean.

Loaders are available for several frameworks:

These framework specific loaders are built on top of a foundational Core Loader that can be used in any JavaScript-based project.

React Example

The following guide is intended for Next.js App Router use cases. However, the same principles apply to other frameworks.

Installation

Open your Next.js project in the terminal.

You can install the required packages with npm, or your preferred package manager:

npm install @sanity/react-loader
npm install @sanity/client
npm install @sanity/overlays

Loading content into your front end

@sanity/react-loader

The library exposes a createQueryStore function that returns 3 utilities:

  • useQuery: A React hook for loading and streaming content data on the client side. The useQuery hook returns an object with data, error, and loading properties:
    • data contains the result of the query.
    • error contains any errors that may have occurred when executing the query.
    • loading indicates whether the query is still in progress.
  • loadQuery : A loading function that returns a promise with query response and content source mapping data. This is typically used to fetch content during server-side-rendering (SSR), which can then be used to initially hydrate the data returned by the useQuery hook.
  • useLiveMode: a React hook that enables real-time updates for the queried data from the server to the client. It returns liveMode, a boolean value indicating whether the studio is in live preview mode. This is useful for scenarios where you want to adapt your UI based on whether the editor is in live preview. Any changes to the data in the Content Lake are reflected in the application without requiring a manual refresh. This enables creating applications that provide a seamless and responsive user experience with up-to-date data.

Create the query store

First, create a Sanity client, the query store, and expose the utility functions via a sanity/store.ts file:

// sanity/store.ts

import { createClient } from "@sanity/client/stega";
import { createQueryStore } from "@sanity/react-loader";

export const STUDIO_ORIGIN =
  process.env.NEXT_PUBLIC_STUDIO_ORIGIN || "http://localhost:3000";

// Only enable Stega encoded strings in preview
export const STEGA_ENABLED = process.env.NODE_ENV !== "production";

// Configure the client for production
const client = createClient({
  projectId: process.env.NEXT_PUBLIC_SANITY_PROJECT_ID,
  dataset: process.env.NEXT_PUBLIC_SANITY_DATASET,
  apiVersion: "2023-11-01",
  useCdn: true,
  perspective: "published",

  // The 'stega' object groups stega-specific options
  stega: {
    enabled: STEGA_ENABLED,
    studioUrl: STUDIO_ORIGIN,

    // High fidelity control over what strings to stega-encode
    // filter: ({sourcePath, sourceDocument, resultPath, value, filterDefault}) => boolean
    // Rich debug information
    // logger: console,
  },
});

// Export the loader utilities
export const { loadQuery, useQuery, useLiveMode } = createQueryStore({
  client,
});

Load data on a page

Then, use the loading utilities in app/page.tsx:

// app/page.tsx

import { loadQuery } from "@/sanity/store";
import Link from "next/link";

interface PageData {
  products: {
    _id: string;
    slug: { current: string };
    title: string | null;
  }[];
}

const PAGE_QUERY = `{
  'products': *[_type == 'product' && defined(slug)]{
    _id,
    slug,
    title
  }
}`;

export default async function Page() {
  const { data } = await loadQuery<PageData>(PAGE_QUERY);

  return (
    <main className="min-h-screen p-24">
      <h1 className="text-lg font-bold">Products</h1>

      {data?.products.map((product) => (
        <div key={product._id}>
          <Link
            className="text-blue-600 hover:text-black"
            href={`/products/${product.slug.current}`}
          >
            {product.title}
          </Link>
        </div>
      ))}
    </main>
  );
}

In client components you may use the useQuery hook instead of loadQuery:

// components/DocumentCount.tsx

"use client";

import { useQuery } from "@/sanity/store";

export function DocumentCount() {
  const { data, loading } = useQuery<number>(`count(*)`);

  if (loading) {
    return <div>Loading…</div>
  }

  return <div>Total # of documents: {data}</div>;
}

Enable live previews

When working with previews in the studio, use useLiveMode hooks to instantly propagate updates to the preview. useLiveMode transports changes to the preview as quickly as possible.

// components/VisualEditing.tsx

"use client";

import { STUDIO_ORIGIN, useLiveMode } from "@/sanity/store";

export function VisualEditing() {
  // TODO: enable overlay highlighting
  // See complete example in the following section 👇

  useLiveMode({ allowStudioOrigin: STUDIO_ORIGIN });

  return null;
}

Enable live mode preview and editing in the layout to make it available on all pages:

// app/layout.tsx

import { draftMode } from "next/headers";
import "./globals.css";
import { VisualEditing } from "@/components/VisualEditing";

export default function RootLayout({
  children,
}: {
  children: React.ReactNode;
}) {
  return (
    <html lang="en">
      <body>
        {children}
        {draftMode().isEnabled && <VisualEditing />}
      </body>
    </html>
  );
}

Render overlays for click-to-edit

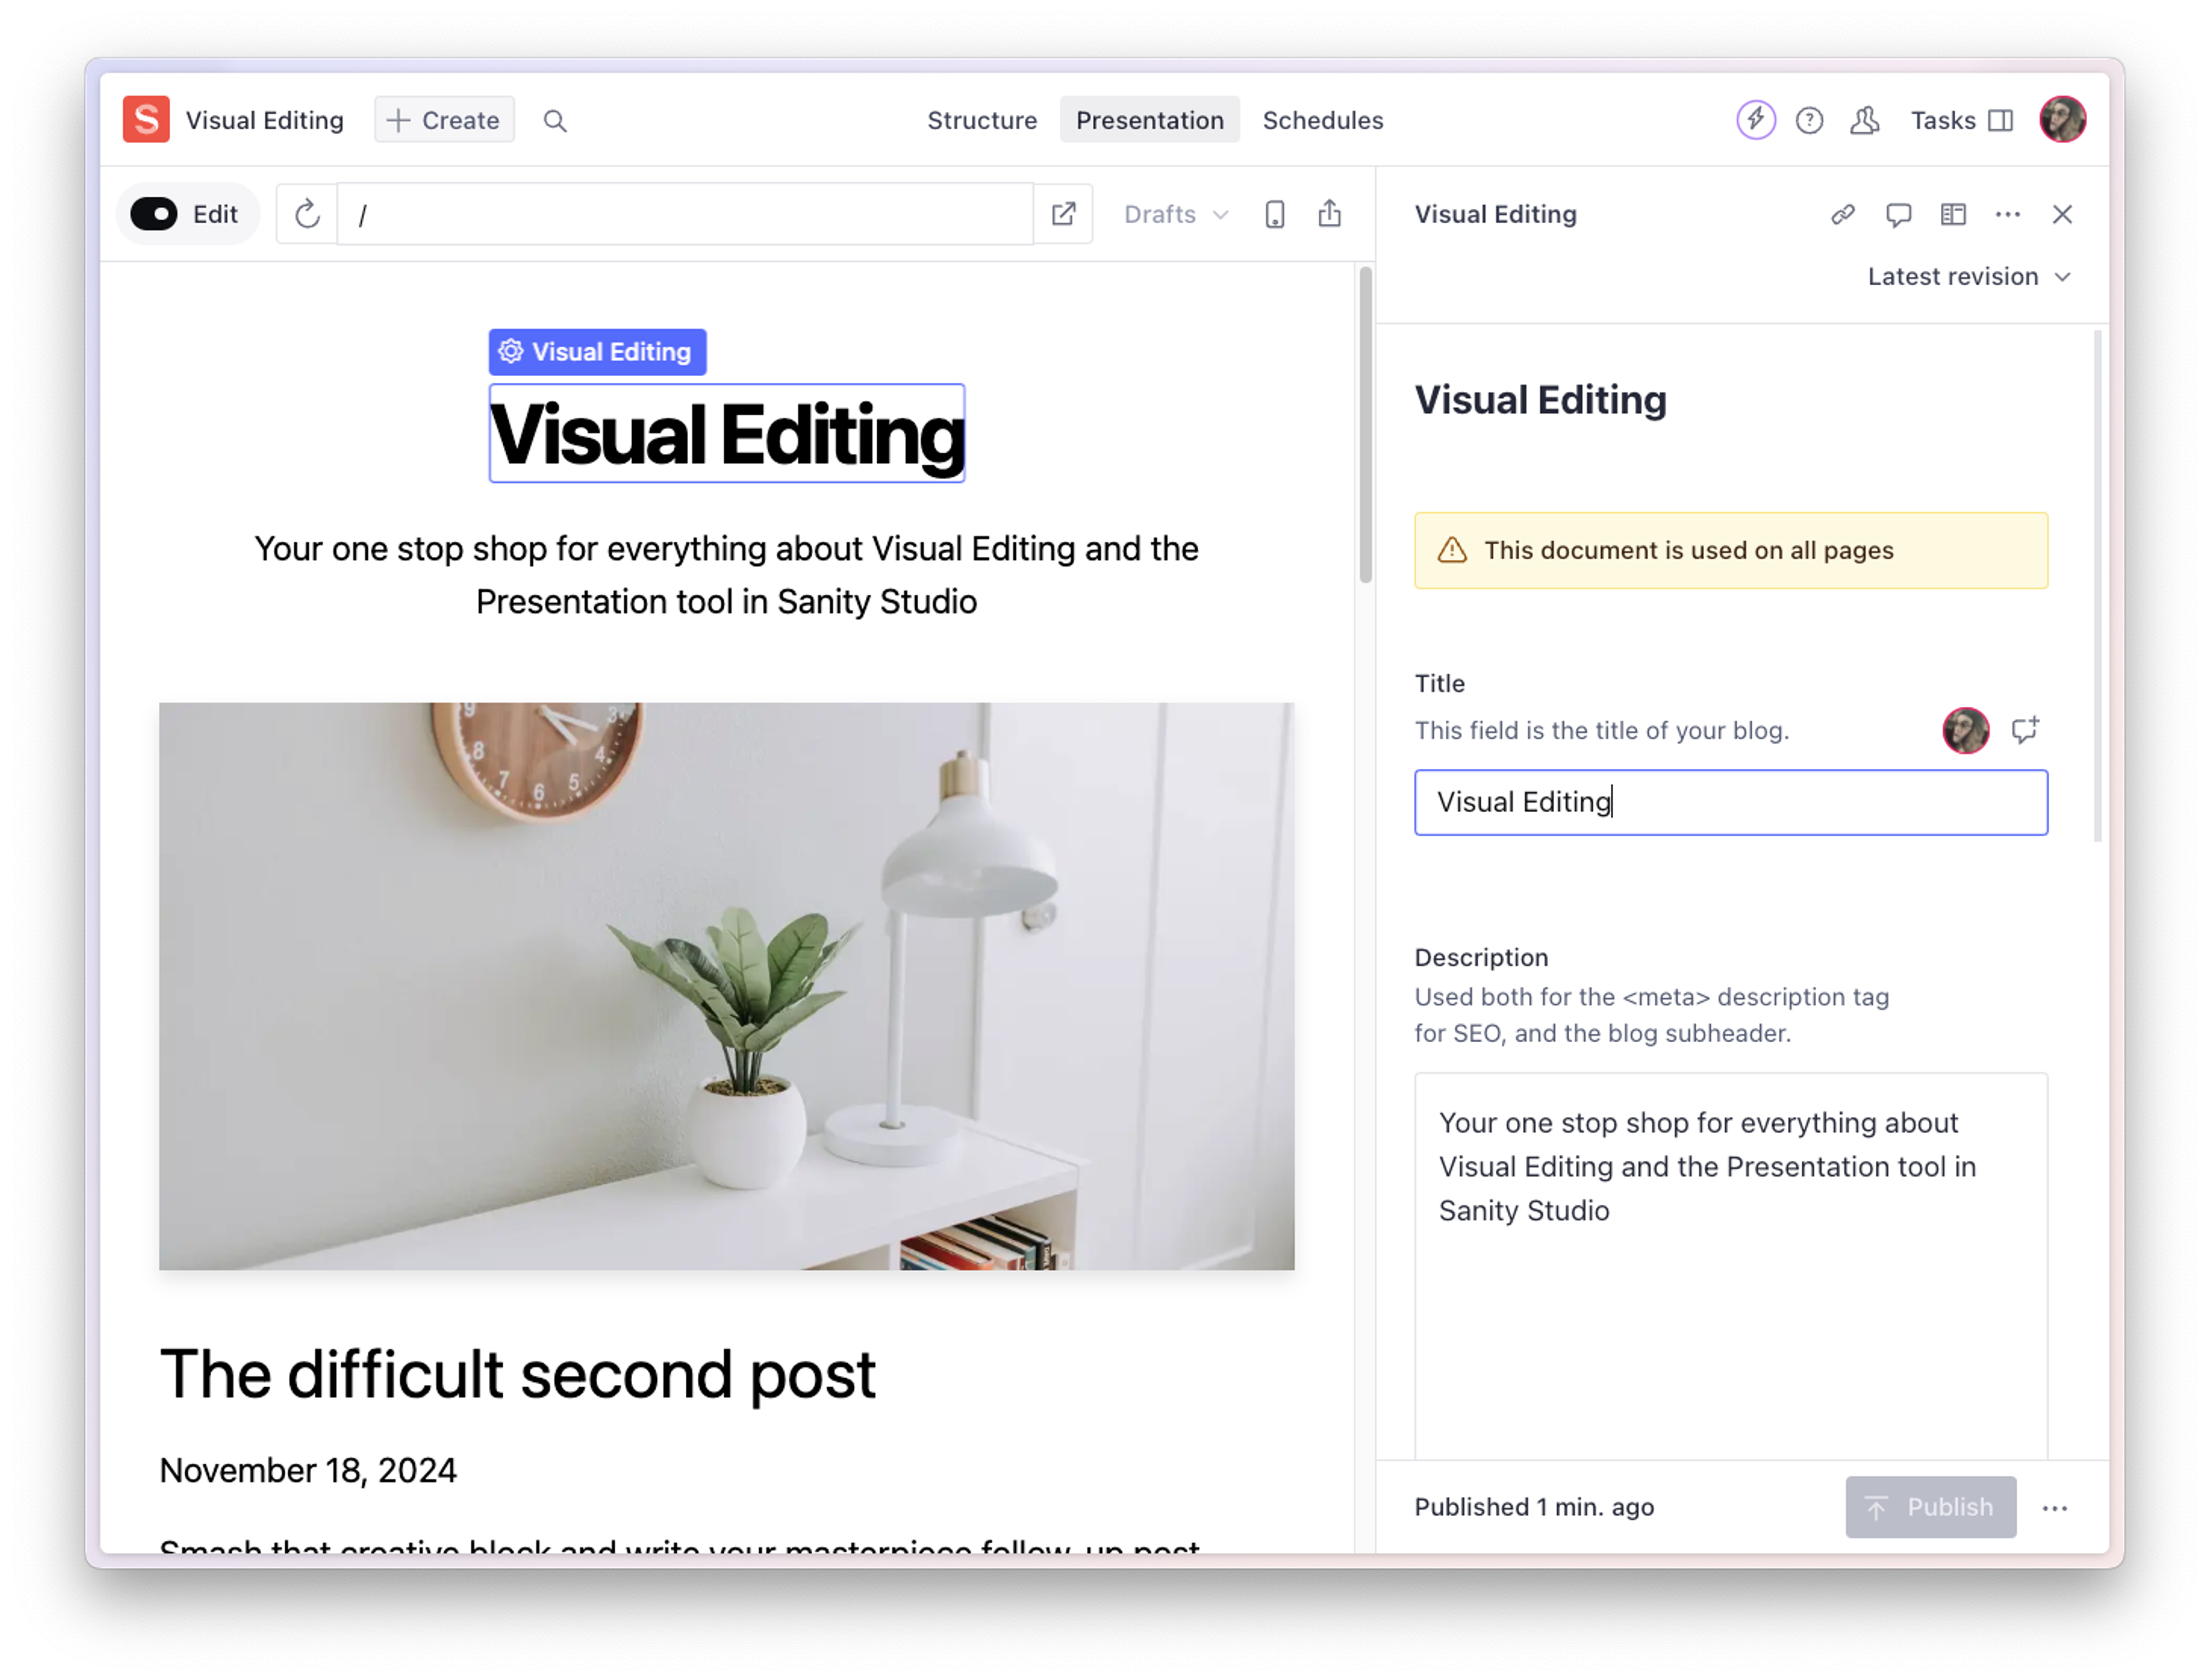
You need to add one more piece to complete the puzzle: render elements that help users visually identify editable elements on a page so that they can click and edit them in the studio.

To make this happen, you need the Content Source Maps (CSM) to make it into your front end.

For simple strings, you can do this automatically with Stega. Stega is a method to encode metadata inside of text strings that we invented in collaboration with Vercel. It encodes the CSM steganographically into as invisible characters strings in your front end. Your visitors won't see these encodings, but the Overlays will see them and overlay the editing UI on hover.

Gotcha

Stega is fast and can help you get started, but it will break any logic that depends on strings being pristine. For strings that are to be used for comparison or passed to functions like Date.parse() you need to use encodeDataAttribute and annotate the data-sanity attribute on DOM nodes manually.

Overlays render interactive visual indicators over your DOM elements. When they are clicked, we'll signal the Studio to display the right field, even deeply nested ones, we'll take the user right to it. Similarly, when a user clicks a field in a form - we'll scroll the DOM node into view if it exists on the page.

// components/VisualEditing.tsx

"use client";

import { STUDIO_ORIGIN, useLiveMode } from "@/sanity/store";
import { enableOverlays } from "@sanity/overlays";
import { useEffect } from "react";

export function VisualEditing() {
  useEffect(() => enableOverlays(), []);

  useLiveMode({ allowStudioOrigin: STUDIO_ORIGIN });

  return null;
}

We recommend providing a HistoryAdapter to keep the studio preview pane in sync with your application router or history state. HistoryAdapter Implementations may differ depending on the framework you use. In any case, they must provide two methods:

  • subscribe: receives a navigate parameter, which is a function to execute when a new HistoryUpdate is sent to the preview frame.
  • update: is called when the preview frame history changes. It receives a HistoryUpdate parameter to push/pop/replace your application history.
// components/VisualEditing.tsx

"use client";

import { STUDIO_ORIGIN, useLiveMode } from "@/sanity/store";
import {
  HistoryAdapter,
  HistoryAdapterNavigate,
  enableOverlays,
} from "@sanity/overlays";
import { usePathname, useRouter, useSearchParams } from "next/navigation";
import { useEffect, useMemo, useRef } from "react";

export function VisualEditing() {
  const router = useRouter();
  const pathname = usePathname();
  const searchParams = useSearchParams();
  const routerRef = useRef(router);
  const navigateRef = useRef<HistoryAdapterNavigate>();

  routerRef.current = router;

  const history: HistoryAdapter = useMemo(
    () => ({
      subscribe(navigate) {
        navigateRef.current = navigate;
        return () => {
          navigateRef.current = undefined;
        };
      },
      update(update) {
        switch (update.type) {
          case "push":
            return routerRef.current.push(update.url);
          case "pop":
            return routerRef.current.back();
          case "replace":
            return routerRef.current.replace(update.url);
          default:
            throw new Error(`Unknown update type: ${update.type}`);
        }
      },
    }),
    []
  );

  useEffect(
    () =>
      enableOverlays({
        allowStudioOrigin: STUDIO_ORIGIN,
        history,
      }),
    [history]
  );

  useEffect(() => {
    navigateRef.current?.({
      type: "push",
      url: `${pathname}${searchParams?.size ? `?${searchParams}` : ""}`,
    });
  }, [pathname, searchParams]);

  useLiveMode({ allowStudioOrigin: STUDIO_ORIGIN });

  return null;
}

Implementing overlays with data attributes

While Stega works for simple string values, you might want to enable overlays for more complex elements (like Product Card or Images) or for the cases where Stega strings don't work.

Overlays also work for elements that have a data-sanity attribute with the necessary information for where the field and studio are.

To generate this data object, you can use the encodeDataAttribute from the useQuery hook (in React front ends) and pass the field path for a given document type.

// Example from a Navigation component in a Next.js project

"use client";

import { type QueryResponseInitial } from "@sanity/react-loader/rsc";
import Link from "next/link";
import { NAV_QUERY } from "@/sanity/lib/queries";
import { resolveHref } from "@/sanity/lib/resolveHref";
import { useQuery } from "@/sanity/loader/useQuery";
import { NavigationData } from "@/types";
import { useCallback } from "react";
import { useEncodeDataAttribute } from "@sanity/react-loader";
import { STUDIO_ORIGIN } from "@/sanity/store";

type Props = {
  initial: QueryResponseInitial<NavigationData>;
};

export function Navigation(props: Props) {
  const { initial } = props;
  const { data, sourceMap } = useQuery<NavigationData>(
    NAV_QUERY,
    {},
    { initial }
  );

  const encodeDataAttribute = useEncodeDataAttribute(
    data,
    sourceMap,
    STUDIO_ORIGIN
  );

  return (
    <nav>
      {data.map((navItem) => {
        const href = resolveHref(navItem._type, navItem.slug);
        if (!href) {
          return null;
        }
        return (
          <Link
            key={navItem._key}
            href={href}
            data-sanity={encodeDataAttribute?.([
              "navigation",
              navItem._key,
              "slug",
            ])}
          >
            {navItem.title}
          </Link>
        );
      })}
    </nav>
  );
}

Troubleshooting Stega

A number of the solutions below rely on the vercelStegaSplit function from the @vercel/stega npm package. This works for any hosting provider, not just Vercel, as they both consume the same metadata.

Install it with:

npm install @vercel/stega

Comparing field values fails

Your production front end likely evaluates values returned from the Content Lake to perform specific logic. If these values contain encoded metadata from Content Source Maps, likely, they will no longer work.

How to fix

For example, imagine a function that determines that a Sanity document's market value is the same as the current market:

function showDocument(document: SanityDocument, currentMarket: string) {
  return document.market === currentMarket
}

Without Content Source Maps, this function works as expected. However, if document.market contains encoded metadata, this comparison will fail.

If document.market is never shown on the page and will not benefit from Visual Editing, it may be best to remove it from the encoded paths in encodeSourceMapAtPath.

Alternatively, "clean" the value before comparing it. Since you'll likely do this more than once, consider extracting to a helper function.

import {vercelStegaCleanAll} from "@sanity/client/stega"

function showDocument(document: SanityDocument, currentMarket: string) {
  return vercelStegaCleanAll(document.market) === currentMarket
}

The styling of the editable fields is incorrect

If the text on the page is breaking out of its container – or its container is much wider than normal – it can be resolved by splitting the encoded text out from the original text.

Note: This is not due to the encoded characters themselves. This problem should only present itself if the element also uses negative letter-spacing in its CSS or is inside of a <ReactWrapBalancer>.

Then identify where the problematic element is rendered in code, for example:

export function MyComponent({ text }: { text: string }) {
  return <h1>{text}</h1>;
}

Rewrite using @vercel/stega to avoid any styling issues:

import { vercelStegaSplit } from "@vercel/stega";

export function MyComponent({ text }: { text: string }) {
  const { cleaned, encoded } = vercelStegaSplit(text);

  return (
    <h1>
      {cleaned}
      <span style={{ display: "none" }}>{encoded}</span>
    </h1>
  );
}

If you find yourself doing this more than once, you might like to extract this logic to a reusable component:

import { vercelStegaSplit } from "@vercel/stega";

export default function Clean({ value }: { value: string }) {
  const { cleaned, encoded } = vercelStegaSplit(value);

  return encoded ? (
    <>
      {cleaned}
      <span style={{ display: "none" }}>{encoded}</span>
    </>
  ) : (
    cleaned
  );
}

export function MyComponent({ text }: { text: string }) {
  return (
    <h1>
      <Clean value={text} />
    </h1>
  );
}

The wrong element is being highlighted

If the wrong element is highlighted when hovering them, it can be resolved by adding an attribute to the correct element.

How to fix

For example, if this component highlights the <h1> and you want it to highlight the entire <section> element:

<section>
  <h1>{dynamicTitle}</h1>
  <div>Hardcoded Tagline</div>
</section>

Add a data attribute to highlight the correct item:

  • For Visual Editing with @sanity/overlays, add data-sanity-edit-target
  • For Vercel Visual Editing, add data-vercel-edit-target
<section data-sanity-edit-target>
  <h1>{dynamicTitle}</h1>
  <div>Hardcoded Tagline</div>
</section>

Was this article helpful?