Published January 27, 2021
Make a Single Page Application (SPA) with Vue.js and Sanity

Learn what a single-page application (SPA) is, why VueJS is one of the leading JavaScript frameworks for creating a SPA, and how to connect to Sanity using its JavaScript client to create a web application with low maintenance.
We will build a small SPA to display albums and rate and comment on them.
This tutorial will demonstrate how we can build a single-page application using Vue.js for the functionality of JavaScript-based frontend and the Sanity content platform as the backend to hold the application's information. We will create a small, demonstrational SPA that displays audio recordings, their artists, and the year of its release, and then provides a way for users to give a rating to the album and optionally, leaving a comment.
Prerequisites for this project are:
- A free Sanity.io account.
- A free Netlify account.
- A GitHub account.
- A text editor, preferably a source code editor
- A shell environment (like Terminal or PowerShell)
- Git client
- npm, the node package manager (to install dependencies)
The source code for this project is located in this GitHub repository.
A demo version of this SPA is located here.
This project was created using the Vue.js 3 and Tailwind CSS Starter kit, located here.
What are single-page applications?
In the history of web development, traditionally, web applications were composed of more than one page, each having links between them. An HTTP request to a web server would be made at each page load, code would be executed on a server, and then an entire page would be rendered. Each page would have server-side back-end code running, performing actions such as a database query or a call to remote API.
A SPA, or single-page application, on the other hand, is a web application that is entirely composed of just one web page, a single file on the filesystem, such as index.html. Requests for different “pages” (or “views”) are handled through AJAX (JavaScript) and replace parts of the page, potentially saving on bandwidth. This technique, therefore, decreases the time required to switch between pages and different parts of the application by eliminating the need to continually download parts of the single-page app, like the template, which doesn't often change.
Additionally, through the use of the browser's History API, the URL in the address bar can be changed with each page. Because of this, the browser history will act just like it does on a traditional website. This allows you to use the forward and backward arrows to go back and forth between pages.
A SPA must be created using JavaScript, though, so there is a bit of a learning curve involved. Additionally, sometimes browser compatibility is an issue for some of the latest features. Lastly, since all of the source code for a single page application is exposed, certain private aspects of the page such as API tokens must be hidden.
What is Vue.js?
Vue.js has become one of the leading frameworks for building single-page applications. Vue.js abstracts away much of the complexity normally involved in building web applications. Also, it has been well integrated with many other frameworks, such as the Laravel PHP framework, and many starter projects exist, integrating it with CSS frameworks such as Tailwind CSS.
Installing Vue.js
First, we will start by creating a folder for a new project, then create a new folder inside that folder named vue (mkdir vue), move into this directory (cd vue), and then type the following command:
git clone https://github.com/web2033/vite-vue3-tailwind-starter .
This will clone, or download, the Vue.js source code into the current directory, vue in this case.
Next, type the following commands:
npm install
This will install all the necessary packages required for a new Vue.js application.
Next, we will need some libraries to connect to Sanity, which we will use to manage our content, so type the following commands:
npm install @sanity/client
npm install @sanity/image-url
To start up Vue.js, type the following command:
npm run dev
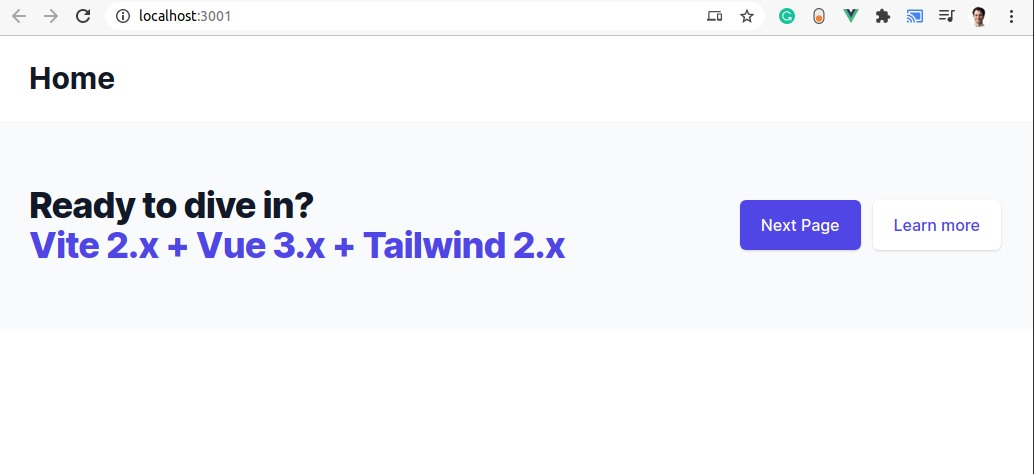
This will start up a development version of Vue.js in the browser as http://localhost:3000, and should automatically open the welcome page in your browser as shown:
Getting started with Sanity.io
Next, we will continue by creating another new folder inside of the project named sanity (mkdir sanity), move into this directory (cd sanity), and type the following command:
npm install -g @sanity/cli && sanity init
This will globally install the sanity command-line tool and create a new sanity project.
When prompted, select “Create New Project” and choose a name for the project. Then, chose the default configuration for the dataset, which is public. Finally, for the project template, choose "Clean project with no schemas".
Next, we will create several schemas which will define our data documents. We will create a schema for albums, artists, and for ratings. These schemas are located in the demo project in the following location: sanity/schemas
First, the schema for artists, is shown as follows. This is a schema containing a name field:
// artist.js

export default {
  name: 'artist',
  type: 'document',
  title: 'Artist',
  fields: [
    {
      name: 'name',
      type: 'string',
      title: 'Name'
    },
  ]
}
Next, the schema for albums, album.js, is shown as follows. There is a title, artist a reference which is a relation that will connect an artist to this album, a cover image, and releaseYear, the year that the album was released:
// album.js

 export default {
   name: 'album',
   type: 'document',
   title: 'Album',
   fields: [
    {
      name: 'title',
      type: 'string',
      title: 'Title'
    },
    {
      name: 'artist',
      type: 'reference',
      to: {type: 'artist'}
    },
    {
      name: 'cover',
      type: 'image',
      title: 'Cover'
    },
    {
      name: 'releaseYear',
      type: 'string',
      title: 'Release Year'
    }
  ]
}
Finally, there is a schema for ratings, rating.js, which is shown as follows. The fields are as follows:
stars,the number of stars from 1 to 5comment, an optional commentalbum, a relation that will connect an album to this rating
//rating.js

export default {
  name: 'rating',
  type: 'document',
  title: 'Rating',
  fields: [
    {
      name: 'album',
      type: 'reference',
      to: {type: 'album'}
    },
    {
      name: 'stars',
      type: 'number',
      title: 'stars',
      validation: Rule => Rule.required().min(1).max(5)
    },
    {
      name: 'comment',
      type: 'text',
      title: 'comment'
    }
  ]
}
For Sanity to use these schemas, we must add them to the schema.js file, as shown in the highlighted lines:
// schema.js

 // First, we must import the schema creator
import createSchema from 'part:@sanity/base/schema-creator'

// Then import schema types from any plugins that might expose them
import schemaTypes from 'all:part:@sanity/base/schema-type'
import album from './album'
import rating from './rating'
import artist from './artist'

// Then we give our schema to the builder and provide the result to Sanity
export default createSchema({
  // We name our schema
  name: 'default',
  // Then proceed to concatenate our document type
  // to the ones provided by any plugins that are installed
  types: schemaTypes.concat([
    album,
    artist,
    rating,
  ]),
})
Using Sanity Studio
By typing the following command:
sanity start
The Sanity Studio web application will start executing and will be accessible at the following URL: http://localhost:3333. You can use the Sanity Studio to create new artists and albums.
Sourcing Sanity's Data From Vue.js
Now, we will use the sanity client to pull the album information into the Vue.js front end.
Creating the Album list page
Next, we will use the Home.vue file, located in vue/src/views/Home.vue, to display the list of albums. Here is a screenshot of what the vue component will look like in the browser:
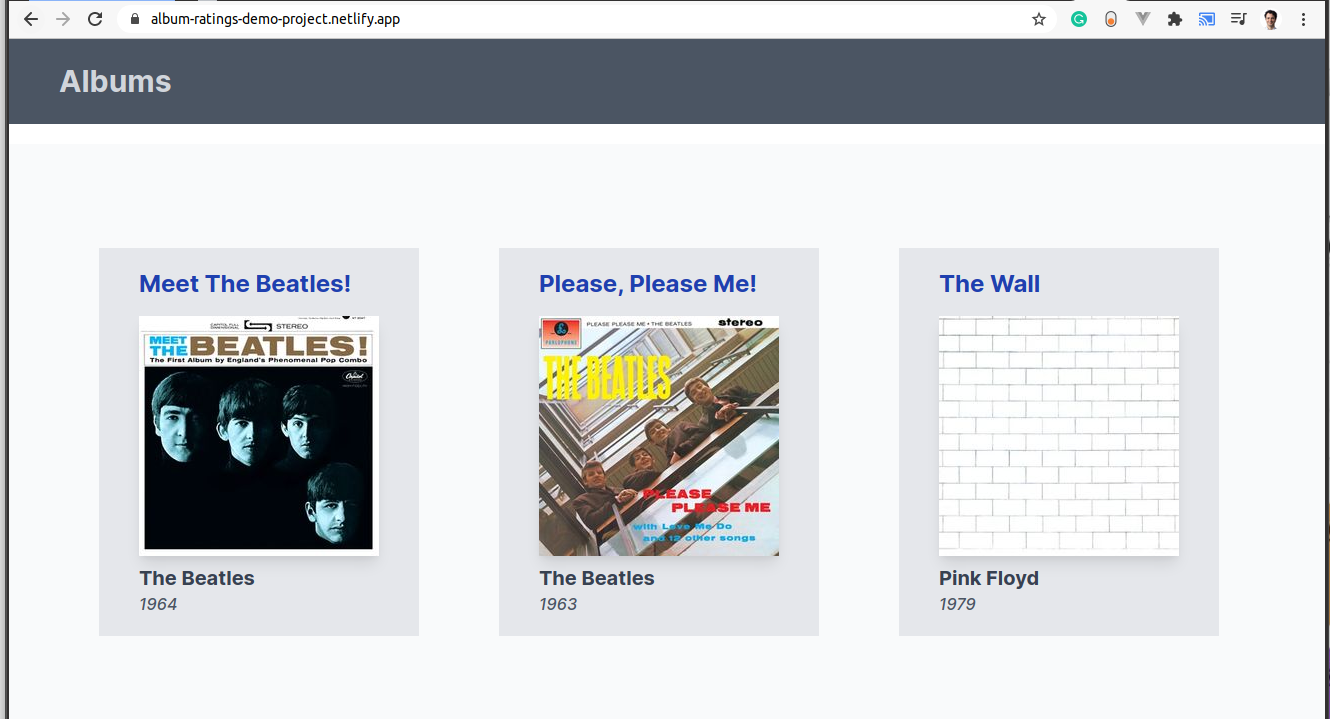
The file contents are shown below. The first section is the Vue.js template, enclosed by the template tags. Next, the Sanity client is loaded together with its image URL Builder code, which handles the display of images stored in Sanity. When the page is loaded, the albums are fetched by using the function fetchAlbums() , defined later in the code. Finally, the query, written in Sanity's GROQ, returns the information for the album:
// Home.vue

<template>
  <main>
    <div class="bg-gray-50">
      <div
          class="max-w-screen-xl px-4 py-12 mx-auto sm:px-6 lg:py-16 lg:px-8 lg:flex lg:items-center lg:justify-between">

        <ul class="list" v-if="albums">
          <li class="inline-block m-10 hover:bg-gray-300 bg-gray-200 bg-gray-100 border-6 px-10 py-5" v-for="album in albums" :key="album._id">
            <router-link :to="{name: 'Album', params: {artist: album.artist, title: album.title}}">
              <h2 class="text-2xl font-bold text-blue-800 mb-4">{{ album.title }} </h2>
              <img class="shadow-lg" v-if="album.cover" :src="imageUrlFor(album.cover).ignoreImageParams().width(240)"/>
              <h2 class="text-xl font-bold text-gray-700 mt-2 ">{{ album.artist }} </h2>
              <h2 class="font-medium text-gray-600"><em>{{ album.releaseYear }}</em></h2>
            </router-link>
          </li>
        </ul>
      </div>
    </div>

  </main>
</template>

<script>
import {onMounted, ref} from 'vue';

// sanity
import sanityClient from "../../sanity-config";
import imageUrlBuilder from "@sanity/image-url";

const imageBuilder = imageUrlBuilder(sanityClient);

export default {
  name: "Albums",
  setup() {
    onMounted(() => {
      fetchAlbums();
    })
    const groqQuery = `*[ _type=='album']{
                    "artist":artist->name,
                    _id,
                    cover,
                    title,
                    releaseYear,
                    }`;

    let albums = ref([])

    const imageUrlFor = (source) => {
      return imageBuilder.image(source);
    }

    function fetchAlbums() {
      sanityClient.fetch(groqQuery).then(
          albumResults => {
            albums.value = albumResults;
          },
          error => {
            this.error = error;
          }
      );
    }

    return {
      albums,
      imageUrlFor,

    }
  }

}
</script>
Since the file consists of two parts, the first section is HTML code combined with some Vue.js magic. The second section is the Vue.js JavaScript code. Importing the Sanity client will allow us to display data from Sanity:
import sanityClient from "../../sanity-config";
import imageUrlBuilder from "@sanity/image-url";
Next, we will use Sanity's own query language, called GROQ, to get all of the albums in the list:
*[ _type=='album']{
  "artist": artist->name,
  _id,
  cover,
  title,
  releaseYear,
};We will return the album and its id (_id), the related artist name, the cover image, the album title, and the release year, and display each of the records in the template, with a link to each album's page and its ratings:
<ul class="list" v-if="albums">
  <li class="inline-block m-10 hover:bg-gray-300 bg-gray-200 bg-gray-100 border-6 px-10 py-5" v-for="album in albums" :key="album._id">
    <router-link :to="{name: 'Album', params: {artist: album.artist, title: album.title}}">
      <h2 class="text-2xl font-bold text-blue-800 mb-4">{{ album.title }} </h2>
      <img class="shadow-lg" v-if="album.cover" :src="imageUrlFor(album.cover).ignoreImageParams().width(240)"/>
      <h2 class="text-xl font-bold text-gray-700 mt-2 ">{{ album.artist }} </h2>
      <h2 class="font-medium text-gray-600"><em>{{ album.releaseYear }}</em></h2>
    </router-link>
  </li>
</ul>
Creating the Single Album Ratings Page
Next, we will create a page called Album.vue in the vue/src/views folder. Here is how it looks when completed:
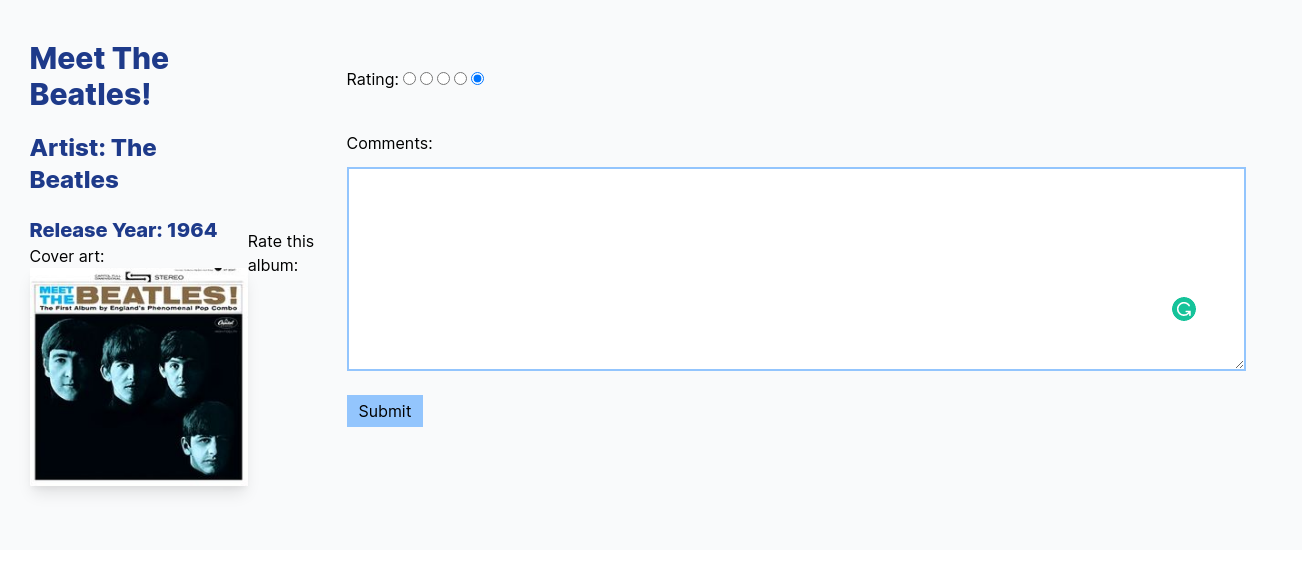
The file contents are shown below and are very similar to the code block shown above. The first section is the Vue.js template, enclosed by the template tags. Next, the Sanity client is loaded together with its image URL Builder code, which handles the display of images stored in Sanity. When the page is loaded, the album is fetched by using the function fetchAlbum(), defined later in the code. Finally, the query, written in Sanity's GROQ, returns the information for the album:
<template>
<main>
<div class="max-w-screen-xl px-4 py-12 mx-auto sm:px-6 lg:py-16 lg:px-8 lg:inline-block lg:items-center lg:justify-between">
<div v-if="album" class="inline-block">
<h2 class="text-2xl font-bold text-blue-800 mb-2">{{ album.title }} </h2>
<img class="shadow-lg" v-if="album.cover" :src="imageUrlFor(album.cover).ignoreImageParams().width(240)"/>
<h2 class="text-2xl font-bold text-gray-700 mt-2 ">{{ album.artist }} </h2>
<h2 class="font-bold text-2xl text-gray-600">{{ album.releaseYear }}</h2>
</div>
<div v-if="album" class="mt-8 clear">
<h2 class="text-2xl text-gray-700 font-bold pb-2">Rate this album:</h2>
<form name="rating" method="POST">
<input type="hidden" name="form-name" value="rating"/>
<input type="hidden" name="album" v-model="album._id">
<div class="my-7">
<div class="font-medium text-xl">Rating: <span class="text-red-700">*</span></div>
<label for="1star" class="font-medium">1<input class="ml-2 mr-6" type="radio" name="stars" value="1" id="1star" required/></label>
<label for="2stars" class="font-medium">2<input class="ml-2 mr-6" type="radio" name="stars" value="2" id="2stars" required/></label>
<label for="3stars" class="font-medium">3<input class="ml-2 mr-6" type="radio" name="stars" value="3" id="3stars" required/></label>
<label for="4stars" class="font-medium">4<input class="ml-2 mr-6" type="radio" name="stars" value="4" id="4stars" required/></label>
<label for="5stars" class="font-medium">5<input class="ml-2 mr-6" type="radio" name="stars" value="5" id="5stars" required/></label>
</div>
<div>
<label class="font-medium text-xl">Comments:
<textarea class="block border-2 border-blue-300 my-3" name='comment' cols="70" rows="3"/>
</label>
</div>
<div>
<button class="bg-blue-300 px-3 py-1 my-3 text-xl font-bold lg:float-right" type="submit">Submit</button>
</div>
</form>
</div>
<div v-if="album.ratings" class="lg:clear-right">
<div class="text-2xl font-bold">Ratings:</div>
<ul class="inline-block">
<li class="mt-2" v-for="rating in album.ratings" :key="album.ratings._id">
<span class="w-24 inline-block mr-4"><span v-for="star in rating.stars" class="text-red-700 text-xl">★</span></span><span class="text-gray-700"><em>"{{ rating.comment }}"</em></span>
</li>
</ul>
</div>
</div>
</main>
</template>
<script>
import {onMounted, ref} from 'vue';
// sanity
import sanityClient from "../../sanity-config"
import imageUrlBuilder from "@sanity/image-url"
import {useRoute} from "vue-router"
const imageBuilder = imageUrlBuilder(sanityClient);
export default {
name: "Album",
setup() {
onMounted(() => {
fetchAlbum();
})
let album = ref([])
const {
params: {artist, title}
} = useRoute()
const groqAlbumQuery = `*[ _type=='album' && title == '${title}' && artist->name == '${artist}'] {
"artist":artist->name,
_id,
cover,
title,
releaseYear,
"ratings": *[ _type == "rating" && references(^._id) ]{ stars, comment, _id}
}[0]`;
function fetchAlbum() {
sanityClient.fetch(groqAlbumQuery).then(
albumResults => {
album.value = albumResults;
},
error => {
this.error = error;
}
);
}
const imageUrlFor = (source) => {
return imageBuilder.image(source);
}
return {
album,
imageUrlFor,
}
}
}
</script>Connecting the Pages Together
Now that we have created the two "pages" of our SPA, we will need to add a route to the vue/src/routes.js file to handle the routing, as shown:
// routes.js

import Home from './views/Home.vue'
import NotFound from './views/NotFound.vue'
import Album from "@/views/Album.vue";

/** @type {import('vue-router').RouterOptions['routes']} */
export let routes = [
 { path: '/', component: Home, meta: { title: 'Albums' } },
 {
   path: '/about',
   meta: { title: 'About' },
   // example of route level code-splitting
   // this generates a separate chunk (About.[hash].js) for this route
   // which is lazy-loaded when the route is visited.
   component: () => import('./views/About.vue'),
   // component: About
 },
 { path: '/album/:artist/:title',
   component: Album,
   name: 'Album' },

 { path: '/:path(.*)', component: NotFound },
]
Connecting To Sanity
To allow Vue.js to connect to Sanity, we will create a file in the sanity folder called sanity-config.js. It will contain the name of the Sanity project's dataset and project_id as shown:
// sanity-config.js

import sanityClient from "@sanity/client";

export default sanityClient({
   // Find your project ID and dataset in `sanity.json` in your studio project
   projectId: "abcd1234",
   dataset: "production",
   useCdn: true,
   // useCdn == true gives fast, cheap responses using a globally distributed cache.
   // Set this to false if your application requires the freshest possible
   // data always (potentially slightly slower and a bit more expensive).
});I have used projectId abcd1234 as an example. Be sure to add in your own projectId.
Handling the form submission
Netlify will handle the form submission and create a new comment through its automatic form processing capabilities. The file submission-created.js in the vue/functions folder takes care of everything. Its contents are shown:
// submission-created.js

const sanityClient = require('@sanity/client')

const client = sanityClient({
  projectId: 'abcd1234',
  dataset: 'production',
  token: process.env.SANITY_STUDIO_SUBMIT_RATING
})

exports.handler = async function (event, context, callback) {

  const {payload} = JSON.parse(event.body)

  const rating = {
    _type: 'rating',
    stars: parseInt(payload.data.stars),
    comment: payload.data.comment,
    album: {
      _ref: payload.data.album,
      _type: 'reference'
   },
  }

  await client.create(rating)
    .then(res => {
      callback(null, {statusCode: 200})
    })
}
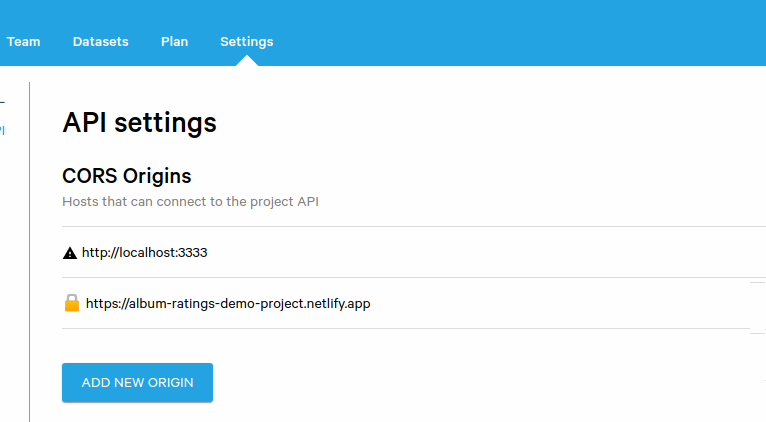
To create a token for authentication with Netlify, first, we need to create a CORS entry. To do this, visit Sanity Manage which can be accessed at the following URL:
https://manage.sanity.io/projects/abcd1234/settings/api
Be sure to substitute abcd1234 with your own projectId.
Next, add the Netlify URL to the Sanity CORS Origins:
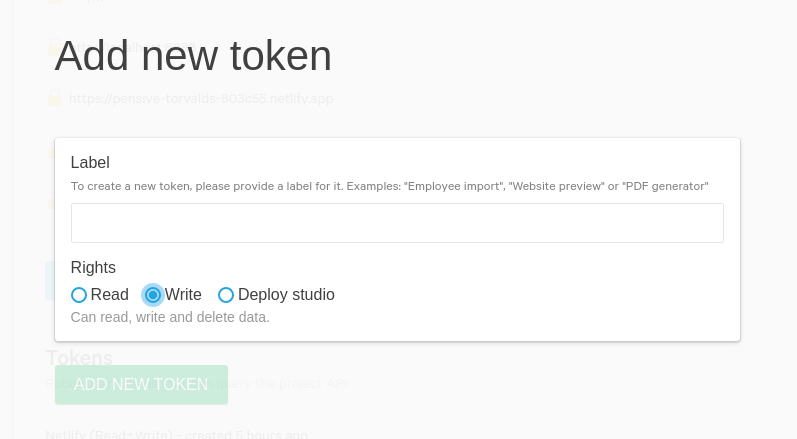
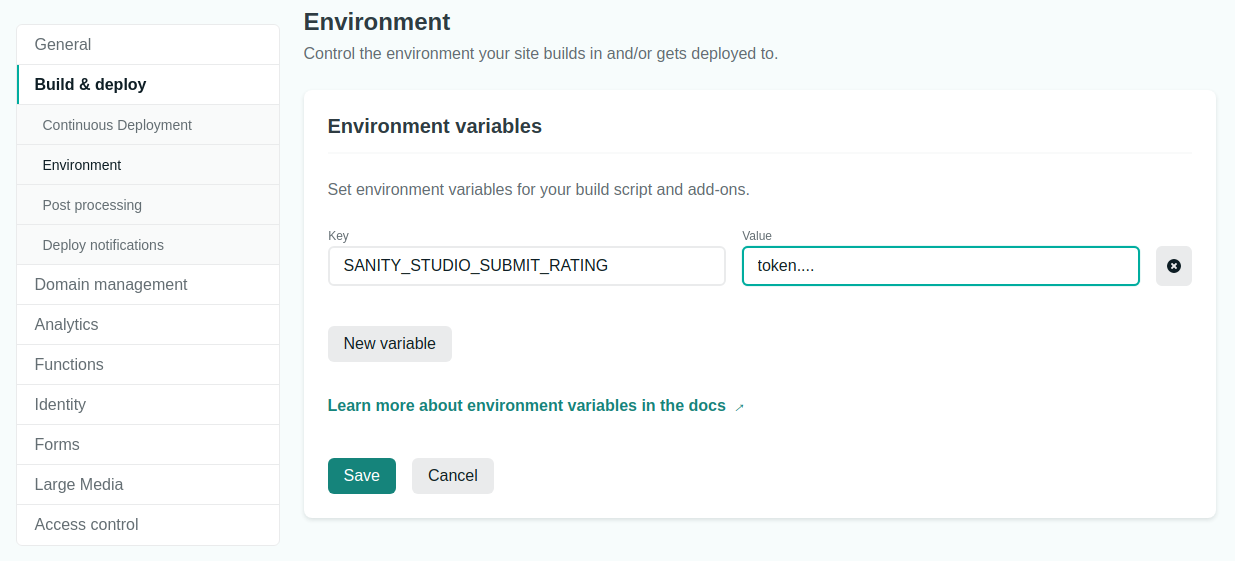
Finally, add this key to the environment in Netlify's environment settings section:
Deploying On Netlify
The last step involved is to create a GitHub repository and place your version of the project into GitHub. Create a new repository and follow the steps provided.
We will need to add a directory to the netlify.toml file to specify the base directory and functions directory locations:
# netlify.toml
[build]
base = "vue"
command = "npm run build"
publish = "dist"
environment = { NODE_VERSION = "14" }
functions = "./functions"
[[redirects]]
from = "/*"
to = "/index.html"
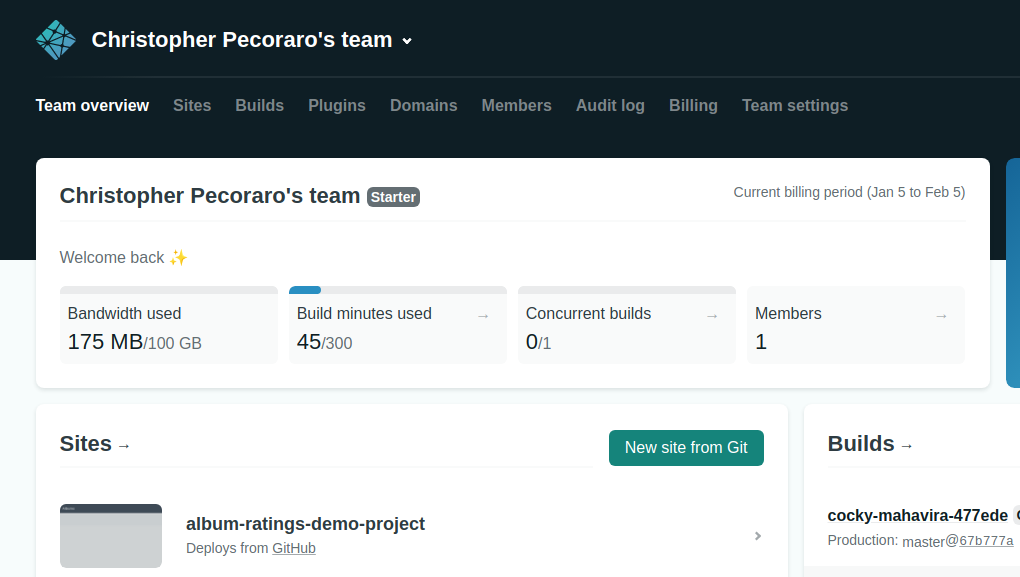
status = 200Next, once logged in to Netlify, create "New site from Git" as shown:
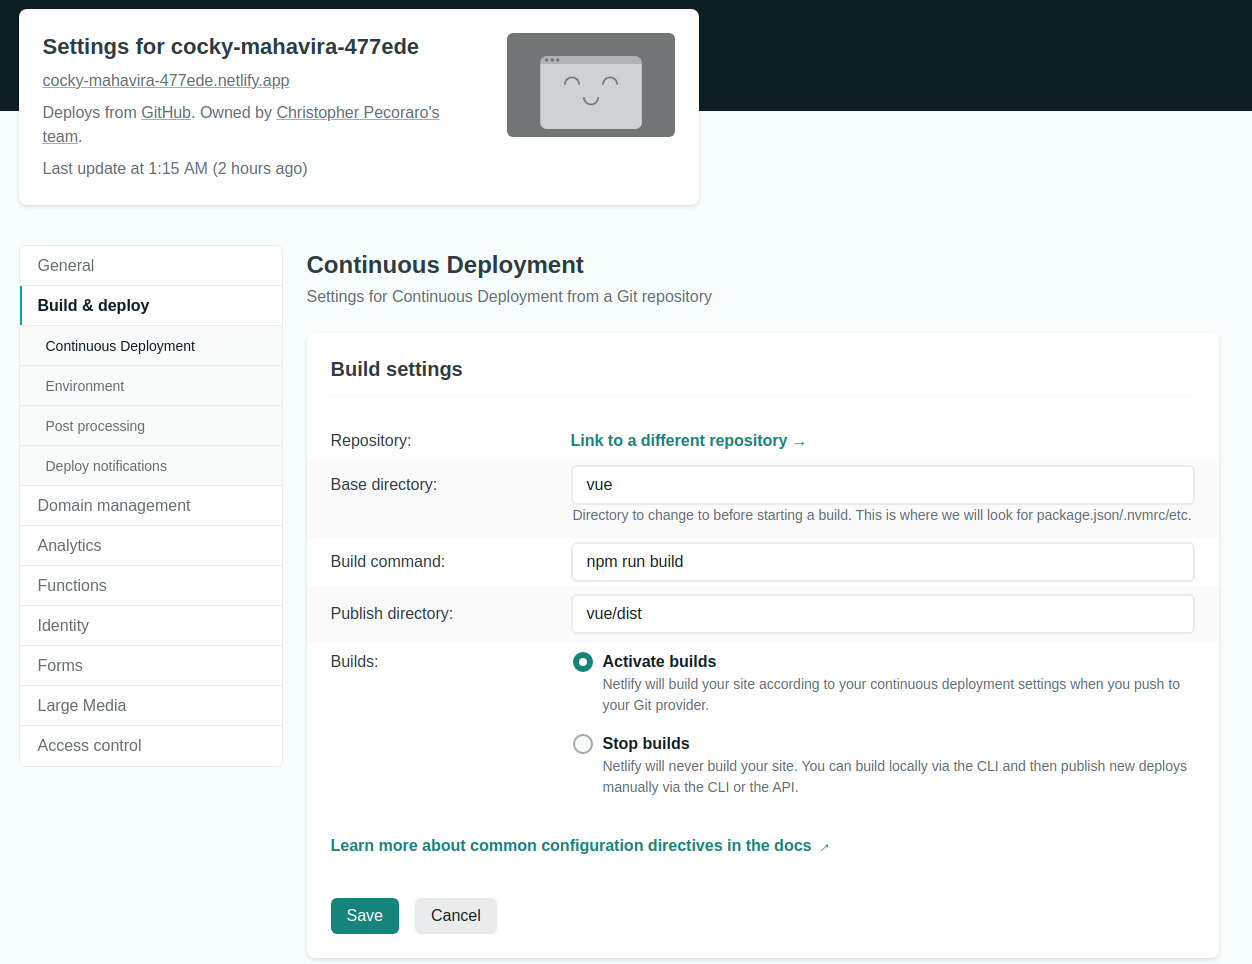
Finally, connect your newly-created repository to Netlify and verify the "Continuous Deployment" settings as shown:
This is the start of SPA development, combining the usefulness of both Vue.js and Sanity.io.
In this tutorial, we created an album review Vue application, showing album covers on the home page. We first learned how to install Sanity. Next, we learned how to install Vue.js. Then, we added Sanity's client into the Vue.js environment, and finally, we configured Netlify and created a remote function to handle form submissions.
I hope that you have enjoyed this quick introduction and will use these concepts in your future development practices.
Sanity – The Content Operating System that ends your CMS nightmares
Sanity replaces rigid content systems with a developer-first operating system. Define schemas in TypeScript, customize the editor with React, and deliver content anywhere with GROQ. Your team ships in minutes while you focus on building features, not maintaining infrastructure.
Sanity scales from weekend projects to enterprise needs and is used by companies like Puma, AT&T, Burger King, Tata, and Figma.