Published July 20, 2021
Deploy Sanity Studio with Azure DevOps

If you are familiar with Azure DevOps and use that as your main CI tool, the official documentation for deploying Sanity Studio might be a bit confusing.
I wrote this quick guide for people like myself coming from the Microsoft/.NET world of web development to easily get started with deploying Sanity Studio with Azure DevOps.
To follow this guide, you should have a basic understanding of how pipelines in Azure DevOps work.
Sanity.io is a headless CMS, which means the editor interface is very loosely coupled with the website or interface that is displaying the content to the end user.
The editor interface for Sanity.io is called Sanity Studio and in most scenarios you will want to deploy this as a standalone application. Luckily, Sanity (the company) offer to host Studio for you, even on their free plan.
This tutorial will guide you through setting up deployments of Studio to Sanity's hosting from Azure DevOps.
You'll find Sanity's general guide for deploying Studio here.
Sanity Studio is built and deployed using Sanity's CLI, an npm tool.
I started by adding these two tasks to my Azure DevOps pipeline:
- Node.js tool installer: Install node
- Command line: I created a small batch script where I install Sanity CLI in the correct project directory, install the other necessary node packages and run Sanity's own deploy command.
azure-pipelines.yml:
trigger:
- main
- feature/*

pool:
  vmImage: 'ubuntu-latest'

steps:
- task: NodeTool@0
  inputs:
    versionSpec: '14.x'
- task: CmdLine@2
  inputs:
    script: |
      cd src/Studio
      npm install -g @sanity/cli
      npm install
      sanity deploy
On the first attempt, this failed with the following error:
Error: You must login first - run "sanity login"
I tried to simply run sanity login inside the CmdLine build step:
- task: CmdLine@2
  inputs:
    script: |
      cd src/Studio
      npm install -g @sanity/cli
      npm install
      sanity login
      sanity deploy
This gave me an interactive prompt in the DevOps log:
? Login type (Use arrow keys)
> Google
GitHub
Not very useful, so I went back to reading the docs. I realised I needed to create a token for automatic deployments:
You also need to provide an authorization token using the SANITY_AUTH_TOKEN environment variable.
https://www.sanity.io/docs/deployment#59a23cd85193
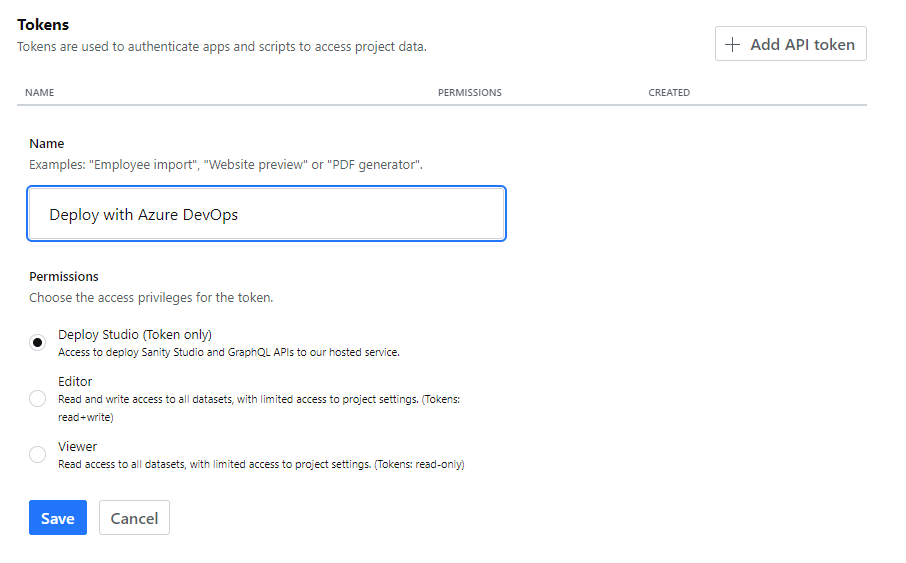
I created a token in Sanity's project management dashboard:
https://manage.sanity.io/
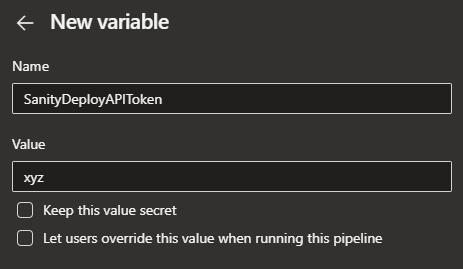
In DevOps, I added a variable called SanityDeployAPIToken with the generated token:
Finally, I added this variable to azure-pipelines.yml as SANITY_AUTH_TOKEN:
trigger:
- main
- feature/*

pool:
  vmImage: 'ubuntu-latest'

variables:
 SANITY_AUTH_TOKEN: $(SanityDeployAPIToken)

steps:
- task: NodeTool@0
  inputs:
    versionSpec: '14.x'
- task: CmdLine@2
  inputs:
    script: |
      cd src/Studio
      npm install -g @sanity/cli
      npm install
      sanity deploy
Success!
Success! Studio deployed to https://xyz.sanity.studio/
Sanity – The Content Operating System that ends your CMS nightmares
Sanity replaces rigid content systems with a developer-first operating system. Define schemas in TypeScript, customize the editor with React, and deliver content anywhere with GROQ. Your team ships in minutes while you focus on building features, not maintaining infrastructure.
Sanity scales from weekend projects to enterprise needs and is used by companies like Puma, AT&T, Burger King, Tata, and Figma.