Published February 06, 2021
Run end-to-end test with Jest and Puppeteer

What is Jest?
In Jest, there is truth - William Shakespeare
Jest is a Javascript testing framework that helps to ensure that our code-base is correct. It is a great testing library that requires little configuration.
What is Puppeteer? Puppeteer is a Node library that provides a high-level API to control headless Chrome, Firefox, and Chromium over the DevTools protocol.
Puppeteer is for integration testing. It creates a programmable browser (in this case, but not always, a headless browser) to check your site. It also simulates an actual user experience on your application.
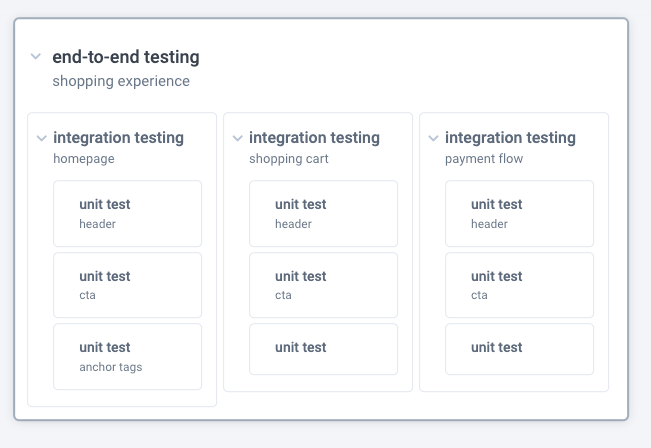
Where unit testing is concerned with validating the smallest chunks of source code in isolation, integration testing finds errors in how these chunks interact with each other.
What is End-to-End testing?
This is a software testing technique used to test the flow of an application from beginning to end. It helps to validate if an application is behaving as it should.
The goal of end-to-end testing is to reproduce real user experience in order to validate data integrity and system integration.
Why should we use Jest and Puppeteer together?
Knowing that Puppeteer is basically a programmable browser and Jest is a testing framework, therefore, in order to be able to test the User Interface, you would need to use Jest and puppeteer together. You can check out the state of JS 2020 testing frameworks.
Setup and Configuration
Node setup
You'll need to have node and npm installed on your machine. To verify you have both tools properly installed locally, run the following commands.
node -vnpm -vAnd if it doesn't work, head over to the Node documentation to download and install.
Jest and Puppeteer setup
You'll start by installing Jest and Puppeteer in your project directory. Open the project in your cli and run the following commands.
If you're using yarn, run:
yarn add --dev jest puppeteer jest-puppeteer
If you're using npm, run:
npm install --save-dev jest puppeteer jest-puppeteer
Once they are installed, they are added to the list of dependencies in your project. You should have them in the devDependencies section in your package.json file as shown below.
./project-directory/package.json
"devDependencies": {
        ...,
        "jest": "^26.6.3",
        "puppeteer": "7.0.1",

    }
Now that you have Jest and Puppeteer installed, it's time you configure your test environment and global setup.
You'll start by creating a jest.config.js file in the root directory of your project and write or copy the following code into it.
./project-directory/jest.config.js
"devDependencies": {
        ...,
        "jest": "^26.6.3",
        "puppeteer": "7.0.1"
    },
module.exports = {
preset: "jest-puppeteer",
globals: { URL: "<http://localhost:3000>" },
verbose: true
};jest-puppeteerpreset is used as a base for Jest's configuration. This allows you to use Jest with Puppeteer.globalsis where the variables that will be available in your whole test suites resides.URLpoints to where our application is running.verbose: truethis helps provide more information on logs regarding each test you run.
In your ./project-directory/package.json file add the following code
"scripts": { "test": "jest" },"test": "jest"allows Jest to run your tests.
You'll also need to create a jest-puppeteer.config.js in the root directory of your project and write or copy the following code into it.
./project-directory/jest-puppeteer.config.js
module.exports = {
  launch: {
    headless: false,
    slowMo: 30,
  }
}launchthis object enables you to give specific options for chrome or chromium instance. It is usually launched before your test runs.- Note that, you can either specify your options in
puppeteer.launch()or you canjest-puppeteer.config.jsfile as we did here. headless: falseenables you to see your browser while your tests run. Originally, it is set to true so your browser runs in the background, which means that you don't get to see your browser running the tests.slowMo: 30This slows the test actions by 35 milliseconds so you'll be able to see every action made by Puppeteer on your browser.
One thing to note is by default, the timeout is 30 seconds in puppeteer which is not usually enough time for your code to run. That's why you use slowMo (to cause a delay).
Yay, you're finally done with the setup process. It's time to do some end-to-end testing.
End-to-end testing
Testing the title of your homepage
Create an app.test.js file in the src folder of your project. This is where you'll be writing the test for the title of your homepage. Jest is configured to run tests on files that end with .test.js or .spec.js, hence the reason behind the naming convention. Once you've created the app.test.js file, copy the following code into it.
./project-directory/src/app.test.js
const timeout = 15000;
beforeAll(async () => {await page.goto(URL, {waitUntil: 'domcontentloaded'});

});
describe('Test page title and header', () => {
test('page title', async () => {
  const title = await page.title(); expect(title).toBe('Testing'); }, timeout);

});
Then run:
npm run testIt takes a while to run the tests. When it's done, you should get something like this:
PASS src/app.test.js Test page title and header √ page title (20ms) Test Suites: 1 passed, 1 total Tests: 1 passed, 1 total Snapshots: 0 total Time: 0.746s, estimated 1s Ran all test suites.
Looking at the first line of your code, you assigned a value to a variable(timeout) that specifies the time duration for your tests. This ensures that your tests run before timing out.
Note that if your tests take a long time to run and a timeout value is not specified, your tests might fail.
beforeAll allows Puppeteer to navigate to the specified URL which was declared earlier as a global variable and tells it to waitUntil your content has loaded before it runs the test. It is part of the tests setup
describe allows you to group tests into units.
Lastly, there's your test function where the page title is fetched and you used the expect which is Jest built-in assertion library to check if the content of the title is 'Testing'.
When using the assert operation e.g expect there are so many other matcher functions that can be used alongside such as .toMatch(regexp | string) , .toBeDefined() , .toContain(item) , etc. You'll find more of these matchers in the documentation.
Testing the h1 tag of your homepage
In the describe block you wrote earlier, add the following code to it:
./project-directory/src/app.test.js
test('Header', async () => {const headerOne = await page.$('.header');
const header = await page.evaluate(headerOne => headerOne.innerHTML, headerOne); expect(header).toBe("Run End-to-End testing with Jest and Puppeteer");
}, timeout);
Your file should look like this:
const timeout = 15000;
beforeAll(async () => {await page.goto(URL, {waitUntil: 'domcontentloaded'});
});
describe('Test page title and header', () => {test('page title', async () => {const title = await page.title(); expect(title).toBe('Testing');
}, timeout);
test('Header', async () => {
const headerOne = await page.$('.header');
const header = await page.evaluate(headerOne => headerOne.innerHTML, headerOne); expect(header).toBe("Run End-to-End testing with Jest and Puppeteer");
}, timeout);
});
Then run:
npm run testYou should see this once the tests are completed.
PASS src/app.test.js Test page title and header √ page title (28ms) √ Header (80ms) Test Suites: 1 passed, 1 total Tests: 2 passed, 2 total Snapshots: 0 total Time: 1.652s, estimated 4s Ran all test suites.
page.$() is used to select the HTML element using it CSS selector. This returns an ElementHandle(represents an in-page DOM element) which is then used by page.evaluate() to get access to the innerHTML of that Element.
Debugging tests
It's one thing for your tests to pass. What if you have one or more failing tests how do you resolve that in Puppeteer? There are several ways to debug your tests but then you'll be focusing on jestPuppeteer.debug()
jestPuppeteer.debug() as in the documentation (on GitHub) suspends test execution and allows you to see what's going on in the browser. It uses the jestPuppeteer.debug() method which enables you to pause the tests to inspect the browser.
Conclusion
In this guide, you explored Jest and Puppeteer and have seen that to use use them together.
You've learned how to set up the Jest and Puppeteer environment, write tests and debug your tests. To learn more head over to the official documentation of Jest and Puppeteer.
Happy learning 😄 !
Sanity – The Content Operating System that ends your CMS nightmares
Sanity replaces rigid content systems with a developer-first operating system. Define schemas in TypeScript, customize the editor with React, and deliver content anywhere with GROQ. Your team ships in minutes while you focus on building features, not maintaining infrastructure.
Sanity scales from weekend projects to enterprise needs and is used by companies like Puma, AT&T, Burger King, Tata, and Figma.