Published August 28, 2021
Deploy a Gatsby Preview Server on AWS for use in Sanity Studio
By Evan Kohout

This guide is intended for anyone running Gatsby who is interested in running a preview server. A preview server in gatsby is a dedicated, standalone backend that is running `gatsby develop` on a particular port and exposes the ability to view changes made to a page in near-realtime. We will be defining AWS cloud resources using a new typescript CDK package which will automatically provision and host our Gatsby preview server for us in a full CD/CI pipeline which takes source from a Github repo.
Getting started
This guide requires some basic knowledge of networking and cloud computing. It also makes the assumption you already have an AWS account setup and that your source repo is using GitHub. However, it's important to note that the concepts covered in this guide are not specific to just AWS, but any cloud hosting provider that can run docker images.
What is preview server?
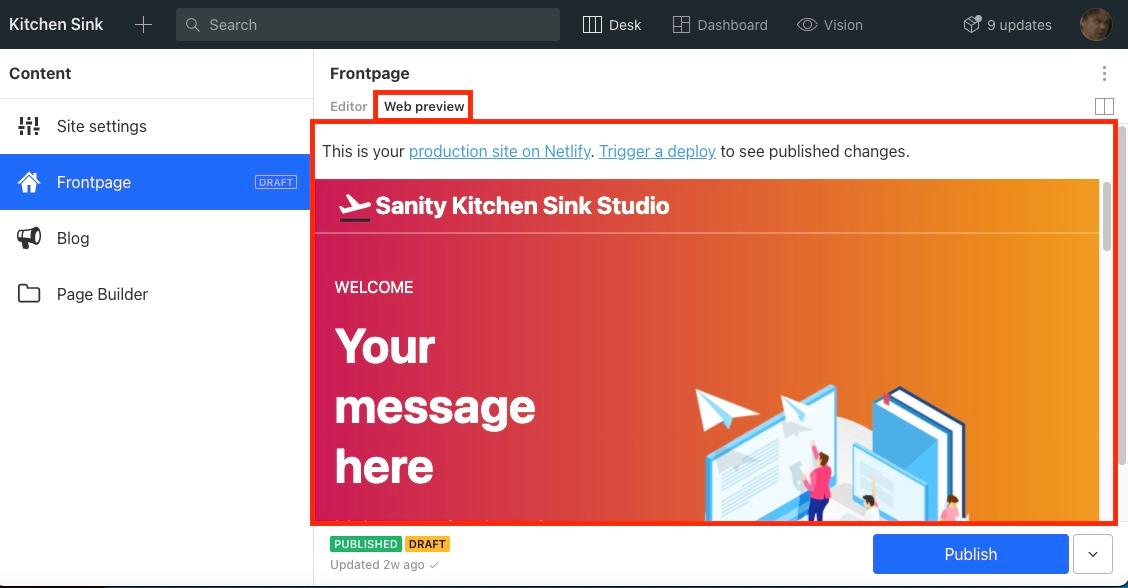
The sanity 'Kitchen Sink' demo template provides a nice example of how the preview server in sanity studio can be implemented. Gatsby is a Static Site Generator and in order to view previews of pages rendered for content creators and editors before a deployment occurs, a backend server needs to be stood up to re-render the pages. The preview server offers them the ability to see how rendered pages would look once content has been edited/uploaded/created in the content lake from studio.
Package structure
The structure of this tutorial conforms to the following package tree. Be sure to change any directories or relative paths in the tutorial to match the structure in your project.
root
├─ infra  <--this is where our CDK code will go
├─ web   <-- this is where our gatsby project root
├─ studio   <-- this is where our sanity studio and schema live
Prerequisites
Make sure the following tools are installed:
brew install aws-cli aws-cdk
The first thing we will do is configure the aws cli with IAM credentials for your user. Creating IAM credentials are out of scope of this document but there are many guides online that show how to create them.
❯ aws configure

AWS Access Key ID [****************GCVI]:
AWS Secret Access Key [****************P4nt]:
Default region name [us-west-2]:
Default output format [None]:
Make sure your aws cli accepts your access key and id and that your correct region is specified. This is important as this region is where CDK will later be deploying resources to.
Next navigate to your /infra directory and create a new directory for our new CDK app.
mkdir gatsbyPreviewStack
cd gatsbyPreviewStack
Setup Credentials in GitHub
For the full CD deployment pipeline to work, AWS needs to be able to have access to your gitHub repo in order to trigger off of pushes to mainline (or whatever branch you set). In effect, what ends up happening is that every time you push to mainline (or your chosen branch), a new build will kick off and be run through the pipeline which gets deployed to the ECS cluster, thereby always providing the latest version of your Gatsby app/site to view preview with.
Login to your github account and go to settings > developer settings > personal access tokens
Create a new PAT for CodePipelines to access your repo with. It should have Repo permissions set. Make sure no expiration is set.
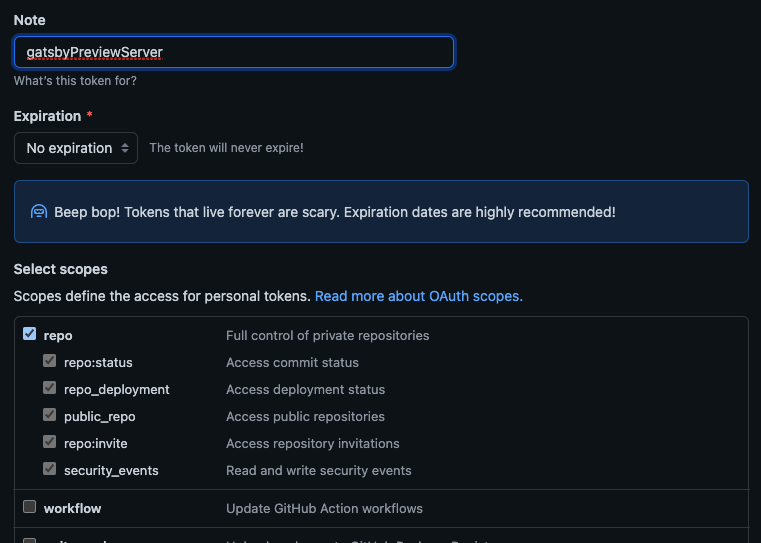
Once you create the PAT, save the key, we will be uploading that to AWS Secrets manager in a bit.
Setup Credentials in DockerHub
Docker now requires you to authenticate with a paid account if you pull public images at a rate of > 1 over a 6 hour period. We will be using the public node Docker images and it is a good idea to have a paid account (the cheapest paid dockerHub account is ~$7/mo at the time of this writing).
Create a DockerHub account if you don't already have one and keep the username/password handy as we will be uploading them to AWS Secrets manager in a bit.
Setup Credentials in Sanity
Its a good idea but not required to inject your sanity read token used for making api calls to the sanity content store for things like Gatsby's WatchMode. If you already have a token, make sure it's handy for the next step.
Credential Storage in AWS
AWS offers 2 types of key/value stores that we will be using for this project, AWS Secrets Manager and AWS Systems Manager. The former offers encrypted storage and retrieval of sensitive strings such as keys and passwords. The latter offers parameter retrieval for commonly referenced values such as usernames and project id's.
Run the following commands to store the needed values in AWS. Be sure to replace the values with the values from your project and accounts.
aws ssm put-parameter \
    --name GITHUB_OWNER \
    --type String \
    --value <the_owner_of_your_repo_here>

aws ssm put-parameter \
    --name GITHUB_REPO \
    --type String \
    --value <the_uri_of_your_repo_here>

aws secretsmanager create-secret \
    --name GITHUB_TOKEN \
    --secret-string <your_github_pat_here>

aws secretsmanager create-secret \
    --name DOCKER_USER \
    --secret-string <your_docker_username_here>

aws secretsmanager create-secret \
    --name DOCKER_PWD \
    --secret-string <your_docker_password_here>

aws secretsmanager create-secret \
    --name GATSBY_SANITY_TOKEN \
    --secret-string <your_sanity_read_api_key_here>
Setting up CDK
Now we will init our new CDK project within the directory we just created. CDK stands for Cloud Development Kit and is a relatively new IAC (infrastructure as code) offering from amazon. CDK works by defining a base 'application' which synthesizes cloudformation code in the background when built and run. It includes a very, very deep api which lets you create anything you would in the console, yet in a repeatable manner that you can check into a repo.
cdk init app --language typescript
Wait for the command to complete. The structure of the new CDK app is as follows:
root/
├─ infra/
│  ├─ gatsbyPreviewStack/
│  │  ├─ test/
│  │  ├─ lib/
│  │  ├─ bin/
├─ studio/
├─ web/
Now build the new application for the first time.
npm run buildWe will run the above build command every time we make a change to the CDK application itself, which in turn, is affecting our cloudformation changeset and the specific resources that we are creating/updating/deleting in our AWS account when we later go to deploy.
Just to verify the build succeeded, run the following list command which should show our new stack called gatsbyPreviewStack.
❯ cdk ls
GatsbyPreviewStack
Installing Dependencies
Before proceeding, we will install all the dependencies needed to build the various stacks for our CDK application.
npm install @aws-cdk/aws-ecs @aws-cdk/core \
@aws-cdk/aws-ecs-patterns @aws-cdk/aws-route53 \
@aws-cdk/aws-ecr @aws-cdk/aws-certificatemanager \
@aws-cdk/aws-elasticloadbalancingv2
Defining our infrastructure
Creating a Config file
Before starting to build the stacks, we need to define a config file to store all our variables for the project. Create a new file in ./infra/gatsbyPreviewStack called config.ts
Copy and paste the following code (be mindful to replace the domain with your own domain if you have a route53 hosted domain in your AWS account):
const GITHUB_TOKEN = "GITHUB_TOKEN"
const GITHUB_REPO = "GITHUB_REPO"
const GITHUB_OWNER = "GITHUB_OWNER"
const PIPELINE_NAME = "GatsbyPreviewProject"
const SECRET_MANAGER_DOCKER_USER = "DOCKER_USER"
const SECRET_MANAGER_DOCKER_PWD = "DOCKER_PWD"
const ECR_REPO_NAME = "GatsbyPreviewECRRepo"
const FARGATE_SERVICE_NAME = "GatsbyPreviewService"
const CLUSTER_NAME = "GatsbyPreviewCluster"
const DOMAIN = "example.com"
const PREVIEW = "preview"
const GATSBY_SANITY_PROJECT_ID = "GATSBY_SANITY_PROJECT_ID"
const GATSBY_SANITY_DATASET = "production"
const GATSBY_SANITY_TOKEN = "GATSBY_SANITY_TOKEN"

export {
    GITHUB_TOKEN,
    GITHUB_REPO,
    GITHUB_OWNER,
    PIPELINE_NAME,
    SECRET_MANAGER_DOCKER_USER,
    SECRET_MANAGER_DOCKER_PWD,
    ECR_REPO_NAME,
    FARGATE_SERVICE_NAME,
    CLUSTER_NAME,
    DOMAIN,
    PREVIEW,
    GATSBY_SANITY_PROJECT_ID,
    GATSBY_SANITY_DATASET,
    GATSBY_SANITY_TOKEN
}
Cluster Stack
The CDK application is broken out into 3 separate parts. The ECS Cluster definition, the ECS Service and Task definition, and the CodePipelines definition which orchestrates the automation of deployments. We will create the ECS Cluster definition first.
Create a new file in ./infra/gatsbyPreviewStack/lib called cluster-infra-stack.ts
Copy and paste the following code:
import cdk = require("@aws-cdk/core");
import ecs = require("@aws-cdk/aws-ecs");

import { CLUSTER_NAME } from "../config";

class ClusterInfraStack extends cdk.Construct {
  readonly ecsCluster: ecs.Cluster;

  constructor(scope: cdk.Construct, id: string) {
    super(scope, id);
    this.ecsCluster = new ecs.Cluster(this, CLUSTER_NAME);
    this.output();
  }

  output() {
    new cdk.CfnOutput(this, "Cluster_ARN", { value: this.ecsCluster.clusterArn });
  }
}

export { ClusterInfraStack };
This file is defining the construct for a new ECS Cluster which will be used by our service in the next stack.
ECS Stack
This stack is the meat and potatoes of the entire CDK app and AWS infrastructure for hosting a Gatsby preview server in AWS. It defines our ECS service, the service type (fargate), ECR repo, the task definition, health check configuration, route53 domain configuration and certificate attached to that domain.
Create another new file in ./infra/gatsbyPreviewStack/lib called ecs-infra-stack.ts
Copy and paste the following code:
import cdk = require('@aws-cdk/core');
import ecs = require("@aws-cdk/aws-ecs");
import ecsPatterns = require("@aws-cdk/aws-ecs-patterns");
import route53 = require("@aws-cdk/aws-route53");
import ecr = require('@aws-cdk/aws-ecr');
import cm = require('@aws-cdk/aws-certificatemanager');
import elb = require('@aws-cdk/aws-elasticloadbalancingv2');
import { ClusterInfraStack } from './cluster-infra-stack';

import {
    ECR_REPO_NAME,
    FARGATE_SERVICE_NAME,
    DOMAIN,
    PREVIEW,
    GATSBY_SANITY_PROJECT_ID,
    GATSBY_SANITY_DATASET,
    GATSBY_SANITY_TOKEN
} from '../config';

interface EcsInfraStackProps {
    readonly cluster: ClusterInfraStack;
}

class EcsInfraStack extends cdk.Construct {
    private fargateService: ecsPatterns.ApplicationLoadBalancedFargateService;

    public readonly service: ecs.IBaseService;
    public readonly containerName: string;
    public readonly ecrRepo: ecr.Repository;

    previewSubdomain = `${PREVIEW}.${DOMAIN}`

    constructor(scope: cdk.Construct, id: string, props: EcsInfraStackProps) {
        super(scope, id);
        const hostedZone = new route53.HostedZone(this, "HostedZone", {
            zoneName: this.previewSubdomain
        })
        const nameServers: string[] = hostedZone.hostedZoneNameServers!;
        const rootZone = route53.HostedZone.fromLookup(this, "Zone", {
            domainName: DOMAIN
          });
        new route53.ZoneDelegationRecord(this, "Delegation", {
            recordName: this.previewSubdomain,
            nameServers,
            zone: rootZone,
            ttl: cdk.Duration.minutes(1)
        });
        const cert = new cm.DnsValidatedCertificate(this, "Certificate",
            {
                hostedZone: hostedZone,
                domainName: `${PREVIEW}.${DOMAIN}`
            }
        )
        this.fargateService = this.createService(props.cluster.ecsCluster, hostedZone, cert);
        this.ecrRepo = new ecr.Repository(this, ECR_REPO_NAME);
        this.ecrRepo.grantPull(this.fargateService.taskDefinition.executionRole!);
        this.service = this.fargateService.service;
        this.fargateService.targetGroup.configureHealthCheck({
            protocol: elb.Protocol.HTTP,
            interval: cdk.Duration.seconds(90),
            timeout: cdk.Duration.seconds(60),
            healthyHttpCodes: "200,300-308"
        })
        this.containerName = this.fargateService.taskDefinition.defaultContainer!.containerName;

        this.output();
    }

    private createService(cluster: ecs.Cluster, zone: route53.HostedZone, cert: cm.Certificate) {
        const token = cdk.SecretValue.secretsManager(GATSBY_SANITY_TOKEN);
        return new ecsPatterns.ApplicationLoadBalancedFargateService(this, FARGATE_SERVICE_NAME, {
            cluster: cluster,
            cpu: 512,
            memoryLimitMiB: 2048,
            domainName: this.previewSubdomain,
            domainZone: zone,
            certificate: cert,
            protocol: elb.ApplicationProtocol.HTTPS,
            redirectHTTP: true,
            healthCheckGracePeriod: cdk.Duration.seconds(120),
            taskImageOptions: {
                image: ecs.ContainerImage.fromAsset('../web'),
                environment: {
                    "GATSBY_SANITY_PROJECT_ID": GATSBY_SANITY_PROJECT_ID,
                    "GATSBY_SANITY_DATASET": GATSBY_SANITY_DATASET,
                    "GATSBY_SANITY_TOKEN": token.toString()
                }
            }
        });
    }

    private output() {
        new cdk.CfnOutput(this, 'ECRRepo_ARN', { value: this.ecrRepo.repositoryArn });
        new cdk.CfnOutput(this, 'ContainerName', { value: this.containerName });
    }
}

export { EcsInfraStack, EcsInfraStackProps };Pipeline Stack
The last stack is the CD/pipeline part which glues everything together and handles everything from triggering a deployment when a push occurs on your repo to building the new docker image, to deploying that new image to ECR and later the ECS fargate service.
Create another new file in ./infra/gatsbyPreviewStack/lib called pipeline-infra-stack.ts
Copy and paste the following code:
import cdk = require('@aws-cdk/core');
import codebuild = require('@aws-cdk/aws-codebuild');
import codepipeline = require('@aws-cdk/aws-codepipeline');
import codepipeline_actions = require('@aws-cdk/aws-codepipeline-actions');
import ssm = require("@aws-cdk/aws-ssm");
import ecr = require('@aws-cdk/aws-ecr');
import ecs = require('@aws-cdk/aws-ecs');
import { EcsInfraStack } from './ecs-infra-stack';

import {
  GITHUB_TOKEN,
  GITHUB_REPO,
  GITHUB_OWNER,
  PIPELINE_NAME,
  SECRET_MANAGER_DOCKER_USER,
  SECRET_MANAGER_DOCKER_PWD,
} from "../config"

interface PipelineProps {
  readonly ecs: EcsInfraStack;
}

class PipelineInfraStack extends cdk.Construct {
  private readonly ecs: EcsInfraStack;

  readonly service: ecs.IBaseService;
  readonly containerName: string;
  readonly ecrRepo: ecr.Repository;

  public readonly pipeline: codepipeline.Pipeline;

  constructor(scope: cdk.Construct, id: string, props: PipelineProps) {
    super(scope, id);
    this.ecs = props.ecs;
    this.service = this.ecs.service;
    this.ecrRepo = this.ecs.ecrRepo;
    this.containerName = this.ecs.containerName;

    this.pipeline = this.createPipeline();
    this.output();
  }

  private createPipeline(): codepipeline.Pipeline {
    const sourceOutput = new codepipeline.Artifact();
    const buildOutput = new codepipeline.Artifact();
    return new codepipeline.Pipeline(this, 'Pipeline', {
      stages: [
        this.createSourceStage('Source', sourceOutput),
        this.createImageBuildStage('Build', sourceOutput, buildOutput),
        this.createDeployStage('Deploy', buildOutput),
      ]
    });
  }

  private createSourceStage(stageName: string, output: codepipeline.Artifact): codepipeline.StageProps {
    const secret = cdk.SecretValue.secretsManager(GITHUB_TOKEN, {
      jsonField: "Token"
    });
    const repo = ssm.StringParameter.valueForStringParameter(this, GITHUB_REPO);
    const owner = ssm.StringParameter.valueForStringParameter(this, GITHUB_OWNER);
    const githubAction = new codepipeline_actions.GitHubSourceAction({
      actionName: 'Github_Source',
      owner: owner,
      repo: repo,
      oauthToken: secret,
      output: output,
      branch: 'master'
    });
    return {
      stageName: stageName,
      actions: [githubAction],
    };
  }

  private createImageBuildStage(
    stageName: string,
    input: codepipeline.Artifact,
    output: codepipeline.Artifact
  ): codepipeline.StageProps {
    const project = new codebuild.PipelineProject(
      this,
      PIPELINE_NAME,
      {
        buildSpec: this.createBuildSpec(),
        environment: {
          buildImage: codebuild.LinuxBuildImage.STANDARD_2_0,
          privileged: true,
        },
        environmentVariables: {
          REPOSITORY_URI: { value: this.ecrRepo.repositoryUri },
          CONTAINER_NAME: { value: this.containerName }
        }
      }
    );
    this.ecrRepo.grantPullPush(project.grantPrincipal);

    const codebuildAction = new codepipeline_actions.CodeBuildAction({
      actionName: 'CodeBuild_Action',
      input: input,
      outputs: [output],
      project: project,
    });

    return {
      stageName: stageName,
      actions: [codebuildAction],
    };
  }

  createDeployStage(stageName: string, input: codepipeline.Artifact): codepipeline.StageProps {
    const ecsDeployAction = new codepipeline_actions.EcsDeployAction({
      actionName: 'ECSDeploy_Action',
      input: input,
      service: this.service,
    });
    return {
      stageName: stageName,
      actions: [ecsDeployAction],
    }
  }

  createBuildSpec(): codebuild.BuildSpec {
    const dockerUser = cdk.SecretValue.secretsManager(SECRET_MANAGER_DOCKER_USER);
    const dockerPwd = cdk.SecretValue.secretsManager(SECRET_MANAGER_DOCKER_PWD);
    return codebuild.BuildSpec.fromObject({
      version: '0.2',
      phases: {
        install: {
          'runtime-versions': {
            'nodejs': '10'
          },
          commands: [
            'npm install -g npm',
          ],
        },
        pre_build: {
          commands: [
            'cd web',
            'echo Logging in to Amazon ECR...',
            '$(aws ecr get-login --no-include-email | sed \'s|https://||\')',
            'echo Logging in to DockerHub...',
            `echo ${dockerPwd} | docker login --username ${dockerUser} --password-stdin`,
            'COMMIT_HASH=$(echo $CODEBUILD_RESOLVED_SOURCE_VERSION | cut -c 1-7)',
            'IMAGE_TAG=${COMMIT_HASH:=latest}'
          ]
        },
        build: {
          commands: [
            'docker build -t $REPOSITORY_URI:latest .',
            'docker tag $REPOSITORY_URI:latest $REPOSITORY_URI:$IMAGE_TAG',
          ]
        },
        post_build: {
          commands: [
            'cd ../',
            'docker push $REPOSITORY_URI:latest',
            'docker push $REPOSITORY_URI:$IMAGE_TAG',
            'printf "[{\\"name\\":\\"${CONTAINER_NAME}\\",\\"imageUri\\":\\"${REPOSITORY_URI}:latest\\"}]" > imagedefinitions.json'
          ]
        }
      },
      artifacts: {
        files: [
          'imagedefinitions.json'
        ]
      }
    });
  }

  output() {
    new cdk.CfnOutput(this, 'Pipeline ARN', { value: this.pipeline.pipelineArn })
  }
}

export { PipelineInfraStack, PipelineProps };Modifying your CDK application main
In order for our stacks to be interdependent on one another and be able to pass parameters, we will need to instantiate them in our main CDK app file.
Open ./infra/gatsbyPreviewStack/bin and edit the file gatsbyPreviewStack.ts
Copy and paste the following code:
#!/usr/bin/env node
import 'source-map-support/register';
import * as cdk from '@aws-cdk/core';
import { EcsInfraStack } from '../lib/ecs-infra-stack';
import { PipelineInfraStack } from '../lib/pipeline-infra-stack';
import { ClusterInfraStack } from '../lib/cluster-infra-stack';

const env = {
  account: '<your_aws_accnt_id_here>',
  region: '<your_region_here>'
}

class GatsbyPreviewInfraStack extends cdk.Stack {
  constructor(scope: cdk.Construct, id: string, props?: cdk.StackProps) {
  super(scope, id, props);
  const cluster = new ClusterInfraStack(this, 'ClusterInfraStack');
  const ecs = new EcsInfraStack(this, 'EcsInfraStack', {
    cluster: cluster
  });
  const pipeline = new PipelineInfraStack(this, 'PipelineInfraStack', {
    ecs: ecs
  });
  }
}

// stacks
const app = new cdk.App();
new GatsbyPreviewInfraStack(app, 'GatsbyPreviewInfraStack', {env: env});
app.synth();Defining our DockerFile
The nice folks at Sanity have already given us a starter DockerFile of which the DockerFile below is based off of, with the exception of the base image used. https://github.com/sanity-io/sanity-template-kitchen-sink/blob/main/template/web/Dockerfile
Create a new file in ./web called DockerFile and copy and paste the following code:
# Use the official lightweight Node.js 16.7 image.
# https://hub.docker.com/_/node
FROM node:16.7-bullseye-slim
EXPOSE 80

# Create and change to the app directory.
WORKDIR /usr/src/app

# Copy application dependency manifests to the container image.
# A wildcard is used to ensure both package.json AND package-lock.json are copied.
# Copying this separately prevents re-running npm install on every code change.
COPY package*.json ./

# Install production dependencies.
RUN npm install -g npm
RUN npm install

# Copy local code to the container image.
COPY . ./

# Run the web service on container startup.
CMD npx gatsby develop -H 0.0.0.0 -p 80
Next, copy and paste the below .dockerignore (also from the sanity repo) and place in ./web as well.
.cache
Dockerfile
node_modules
npm-debug.log
yarn.json
Deploy
This is the step we have been waiting for! Its finally time to deploy the stack that we have just built.
CDK deployment
Navigate to ./infra/gatsbyPreviewStack and run the following commands
npm run build
cdk deploy
You will then see CDK download the needed images and containers from dockerHub (setting up docker-engine or docker desktop on mac/windows is out of scope for this document) and create the image, upload to the ECR repo you defined in your CDK and deploy the other resources.
The resulting output is a URL of our new gatsby preview server! (it will be using the version of your gatsby website of whatever is checked into the branch you configured your pipeline for).
Sanity Studio
Setting up sanity studio with the necessary components to see the iframe for the preview server is out of scope for this document, however you can see a working implementation in the sanity kitchen sink demo here:
If you have implemented a similar preview server iframe into your studio and deployed it, then you will need to make the following change to ./studio/resolvePreviewUrl.js as shown below.
const env = process.env.NODE_ENV || 'development'
import { PREVIEW, DOMAIN } from "../infra/config"

export default function resolvePreviewUrl(document) {
  const baseUrl = env === 'development' ? 'http://localhost:8000' : `https://${PREVIEW}.${DOMAIN}`
  switch (document._type) {
    case 'route':
      if (!document.slug || !document.slug.current) {
        return baseUrl
      }
      return `${baseUrl}/${document.slug.current}`
    case 'post':
      return `${baseUrl}/blog/${document.slug.current}`
    case 'siteSettings':
      return baseUrl
    case 'page':
      if (document._id === 'frontpage' || document._id === 'drafts.frontpage') {
        return baseUrl
      }
      return null
    default:
      return null
  }
}
Notice here we import our config file from the ./infra directory and insert our preview server subdomain and root domain as variables into the prod value. The value for localhost remains the same.
🎉 Done!
Congrats, you have just stood up your very own full CD gatsby preview server that tracks your own projects github repo and rebuilds when changes get pushed.
Happy coding!
Sanity – The Content Operating System that ends your CMS nightmares
Sanity replaces rigid content systems with a developer-first operating system. Define schemas in TypeScript, customize the editor with React, and deliver content anywhere with GROQ. Your team ships in minutes while you focus on building features, not maintaining infrastructure.
Sanity scales from weekend projects to enterprise needs and is used by companies like Puma, AT&T, Burger King, Tata, and Figma.