Published June 21, 2021
Guide to sending SMS with the Twilio API

Learn how to dispatch SMS notifications from a Single Page Application (SPA)
Introduction
In a fast-paced environment, it is becoming increasingly important that software systems keep customers abreast with the latest information - whether or not they are actively interacting with the system. This is especially true in situations where the customer needs to be notified of events that weren't a direct result of their activity on the system (such as an order being made for a product or payment being received for a delivered service).
These days, notifications can either be sent via email, SMS, or even via popular messaging platforms like WhatsApp or Telegram. However, SMS notifications top the bunch because, unlike the other notification mediums, the customer is not required to have an internet connection in order to receive SMS messages. Additionally, SMS messages will be more accessible since there is the chance that more than a few customers may not even have a WhatsApp or Telegram account to start with.
Twilio is a platform that allows you to connect with customers everywhere they want to interact with you in real-time —from SMS messages to emails, phone calls to video, intelligent chatbots, and back. With helper libraries for popular programming languages, Twilio makes managing/dispatching programmable SMS a breeze.
In this tutorial, we'll build an e-commerce web application using Next.js and implement an SMS notification feature. We'll also learn about React Context which will be used to implement the cart functionality. The content for the e-commerce site will be hosted (and served) using Sanity.io. A customer can make a selection of items and purchase them. Once a customer has purchased an item, a text message will be sent to the phone number provided by the customer, confirming the order details and the expected delivery date in the message body. The application we will build can be previewed here. The code for the complete project is available on Github should you get stuck at any point.
Prerequisites
To keep up with the concepts that will be introduced in this article, you will need a fair grasp of JavaScript ES6. While we won't delve too deep into React and Next.js, it will be helpful to have some understanding of both.
You will also need to have the following installed on your workstation:
- Node Package Manager (NPM)
- Sanity CLI
- A Github account
- A Twilio account
- A code editor of your choice
Getting started
Setting up Sanity
For this article, we'll be using the Next.js E-commerce official starter to build our web application. To get started, open the starter page in your browser. A screenshot of the starter page is shown below
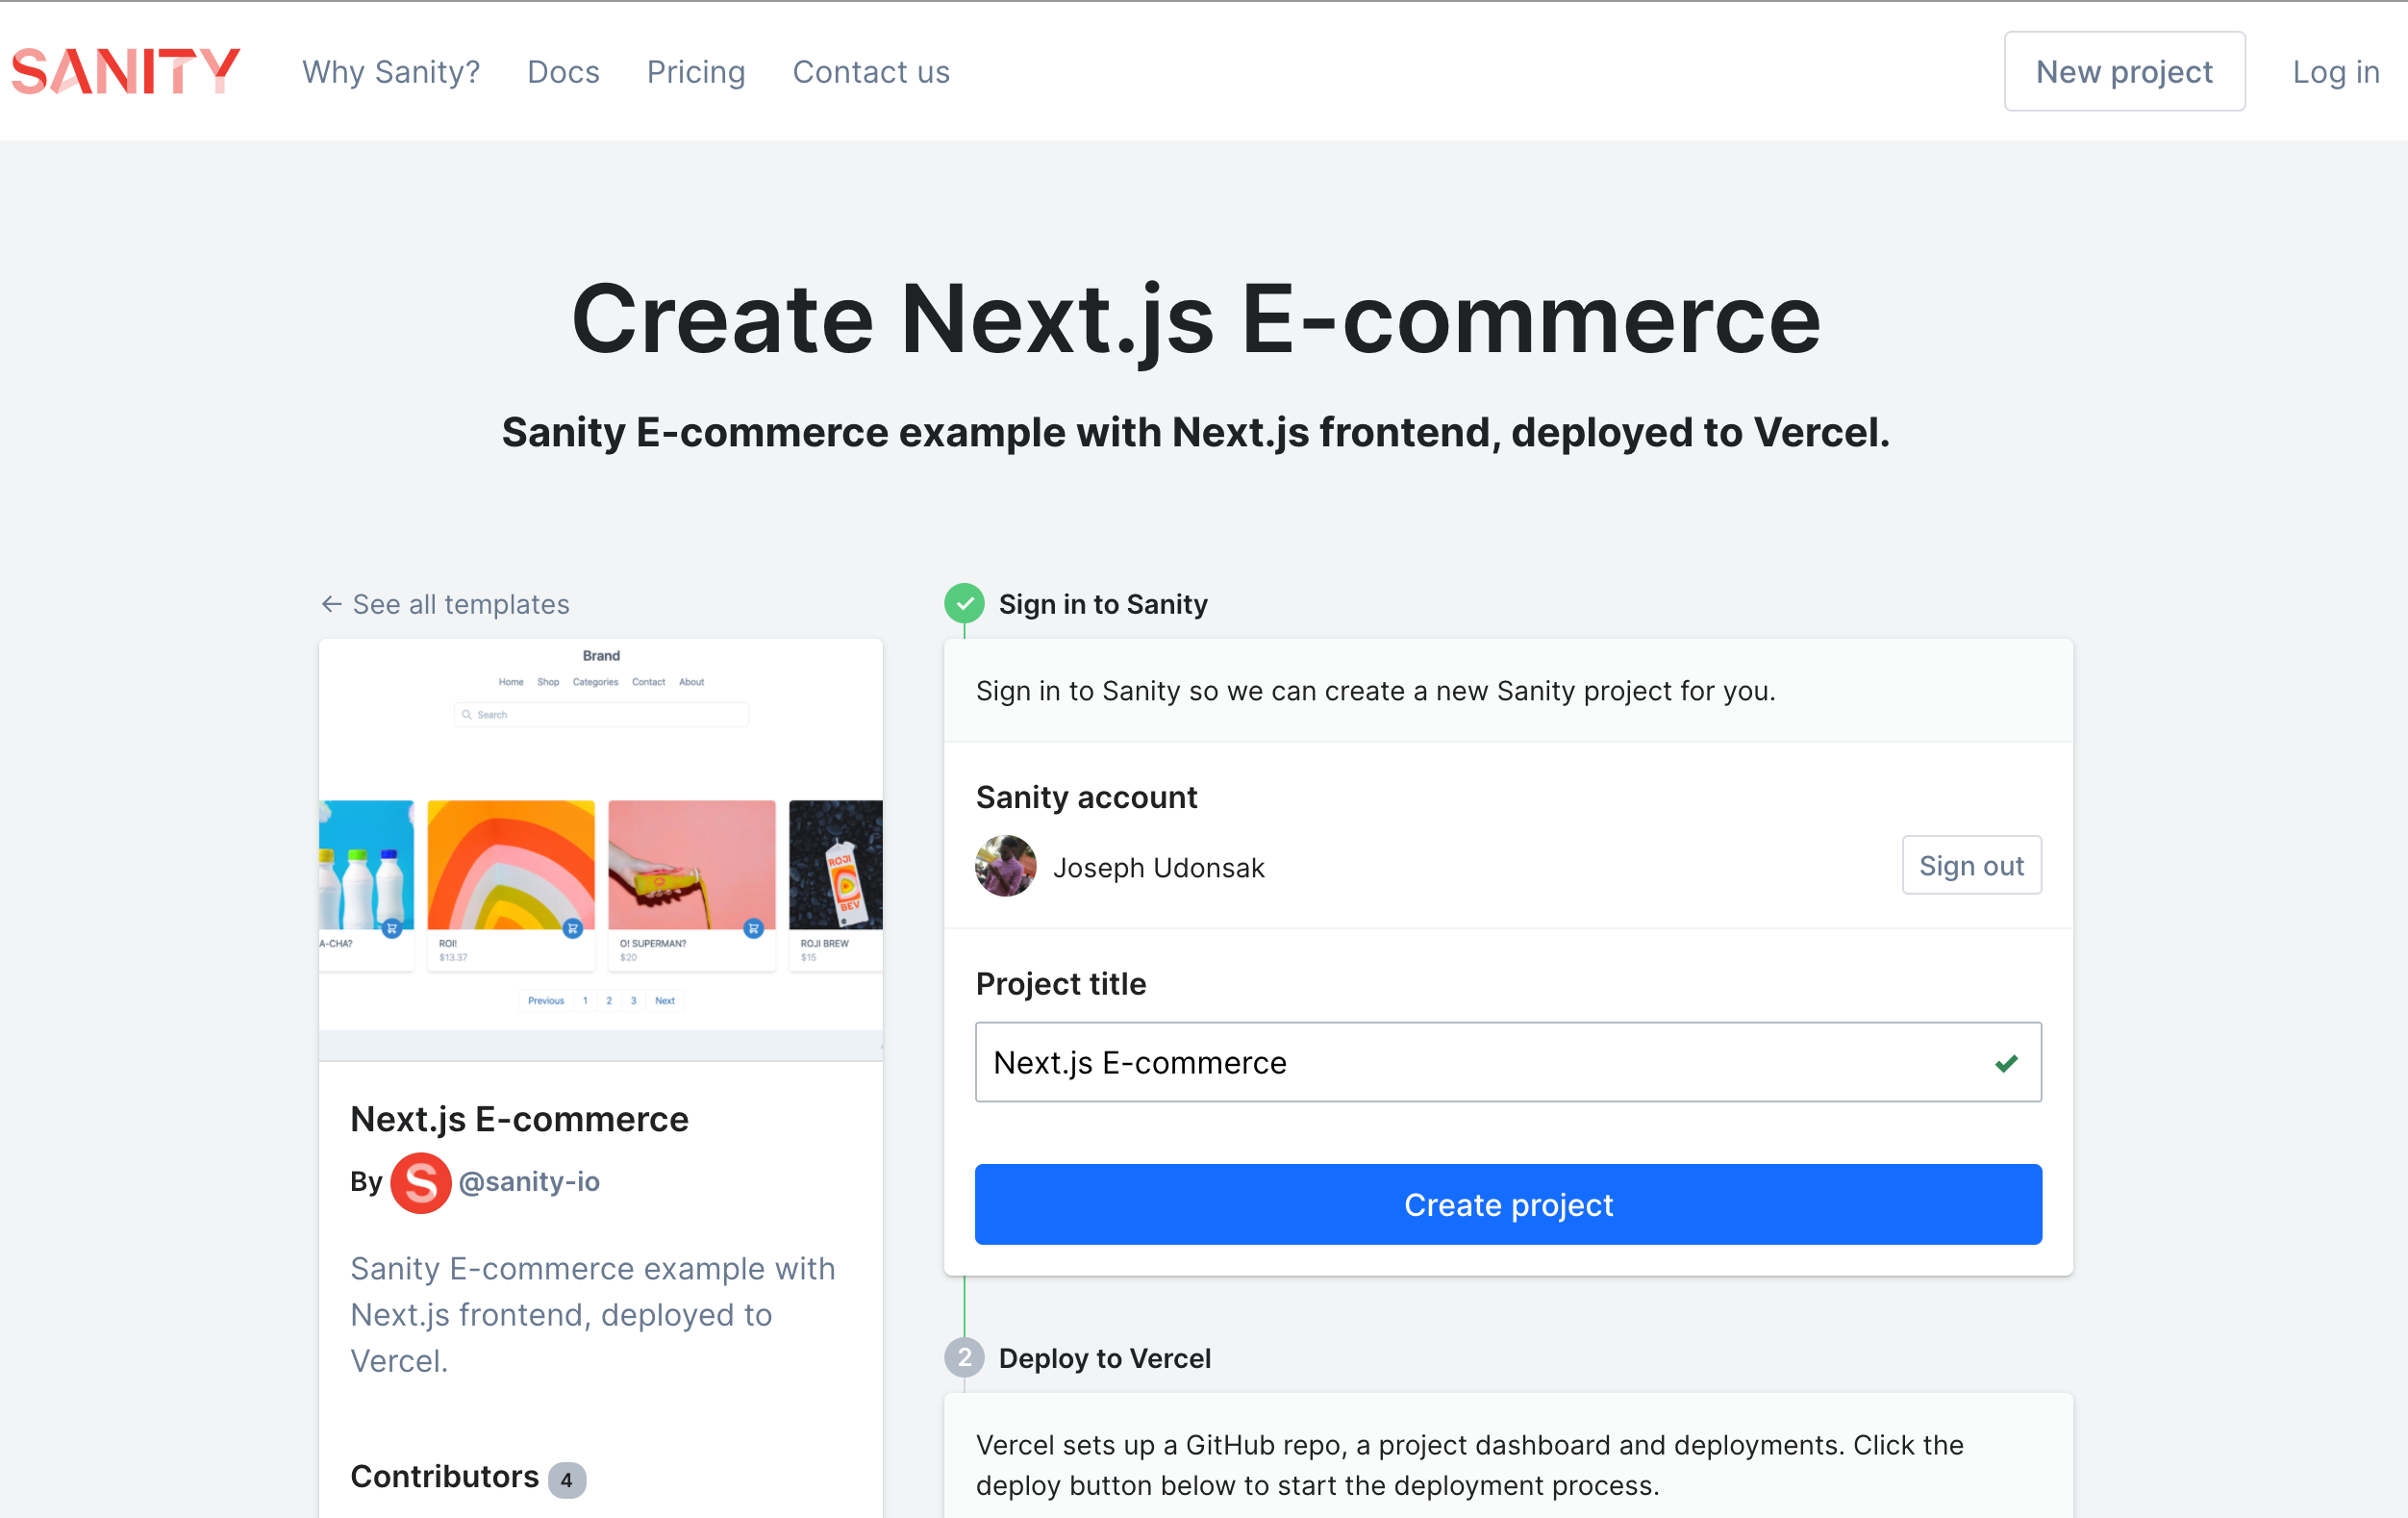
Follow the instructions on the starter page to set up the project. In addition to receiving an email with the details of the Vercel deployment and newly created Sanity project, a Github repository will be created for you to clone and start working with. Clone the repository using the following command:
git clone https://github.com/<YOUR_GITHUB_ID>/next-js-e-commerce.git
sanity-twilio

cd sanity-twilio
This command pulls the repository into a folder named sanity-twilio. Before we start adding code to the project, let's set our environment variables. To do this, make a copy of the .env.test file named .env.
cp .env.test .envIn the .env file, replace the SANITY_STUDIO_API_PROJECT_ID and NEXT_PUBLIC_SANITY_PROJECT_ID with your sanity project id.
We also need to provide the project details for our sanity studio project. In the studio directory, edit the api node in sanity.json as follows:
"api": {
    "projectId": "INSERT_YOUR_PROJECT_ID",
    "dataset": "production"
  },
Next, install the project dependencies using npm
npm installStart the application using NPM.
npm run devBy default, the application will run on port 3000. Navigate to http://localhost:3000/ to see the application.

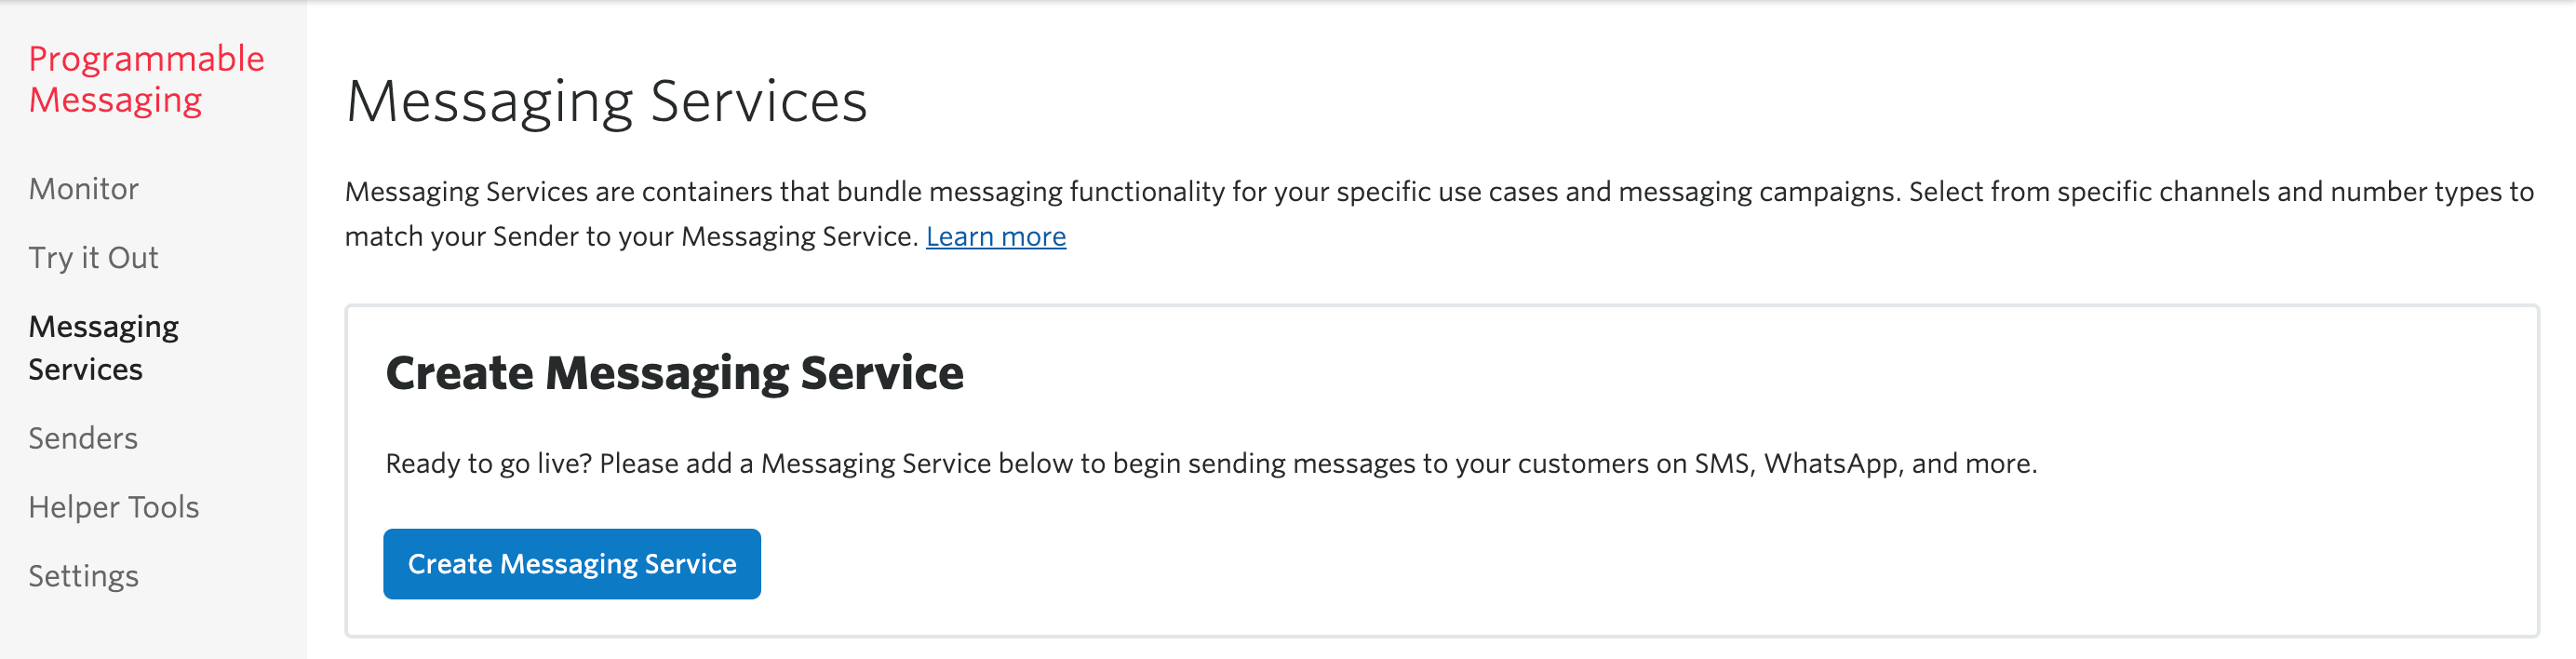
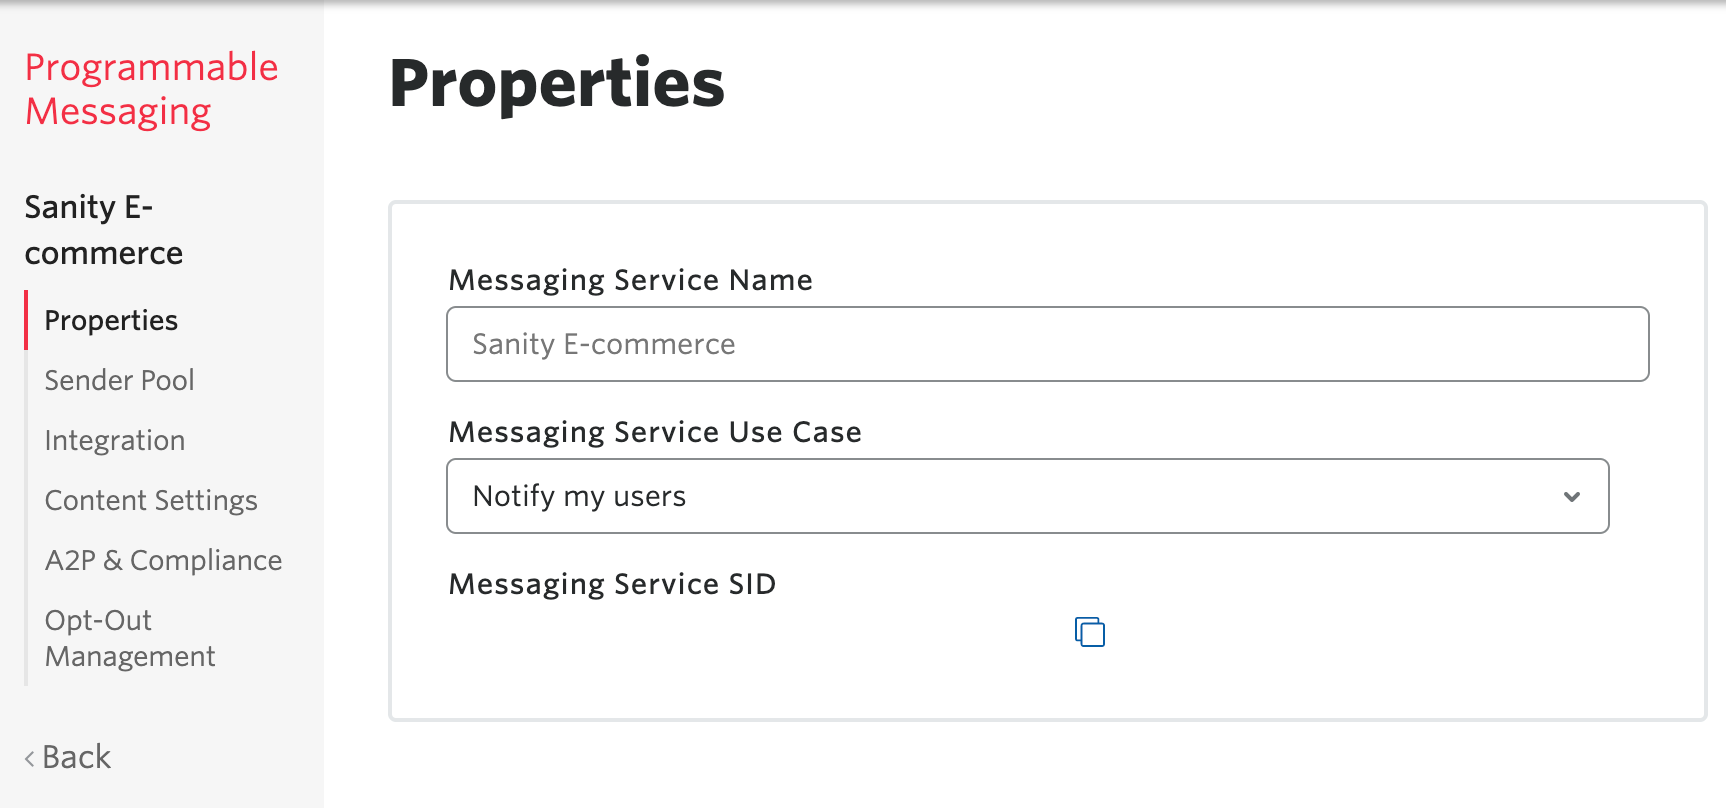
Next, we need to set up a messaging service on our Twilio account. To do this, head to your Twilio console and click the Create Messaging Service button.
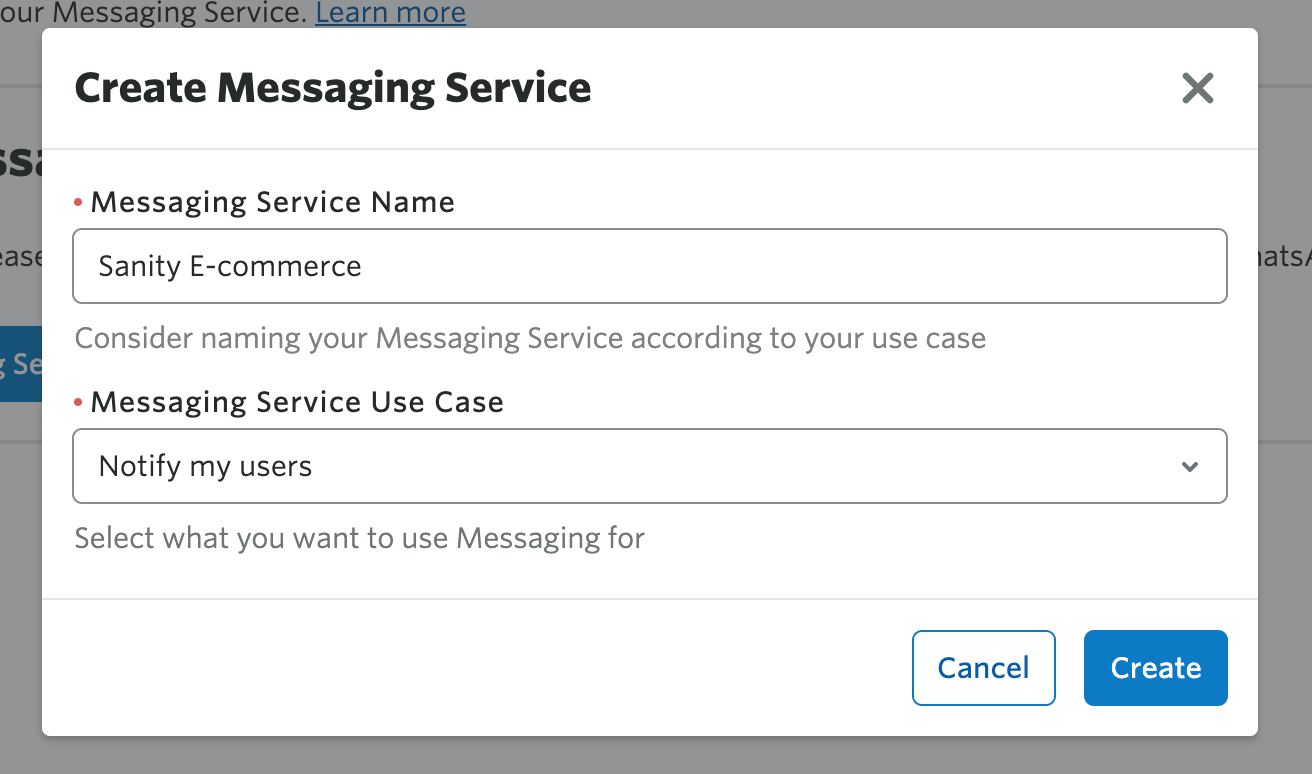
We'll name this service Sanity E-commerce and our use case is to notify the users. Complete the form as shown below and click Create.
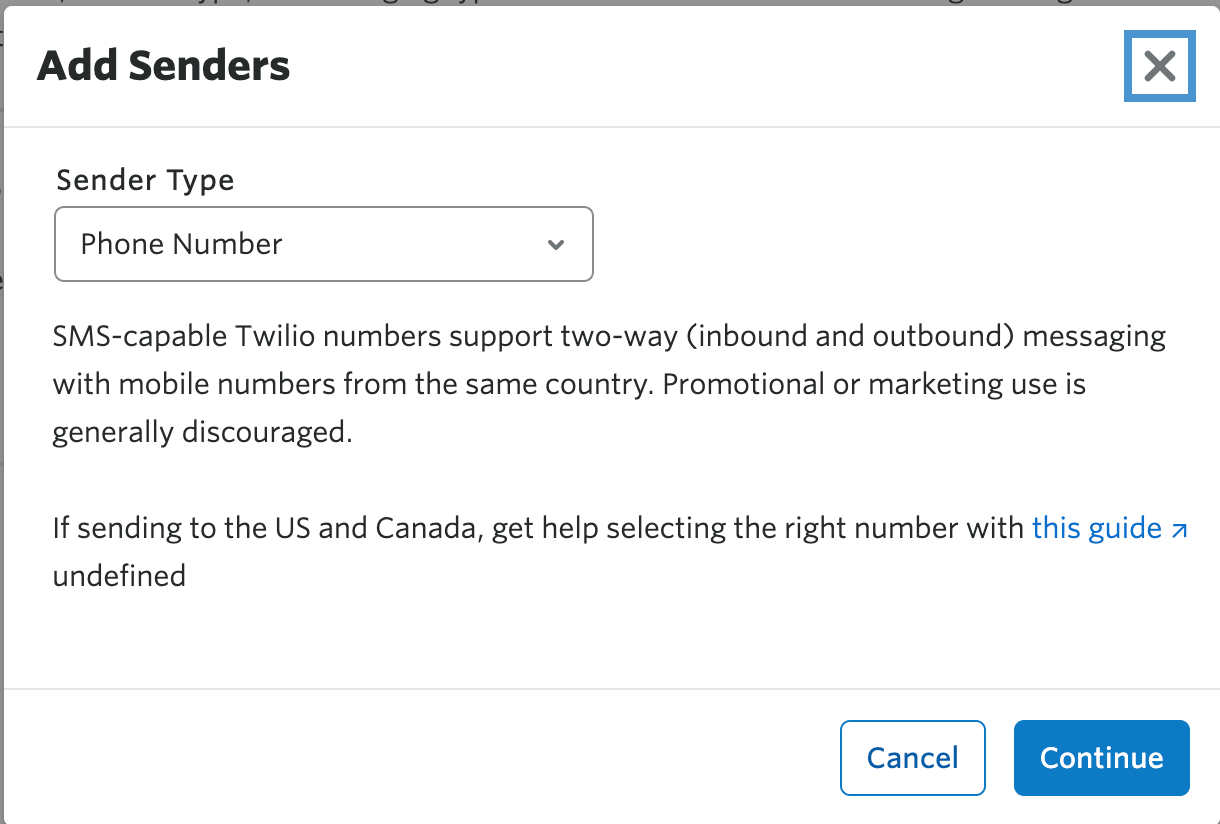
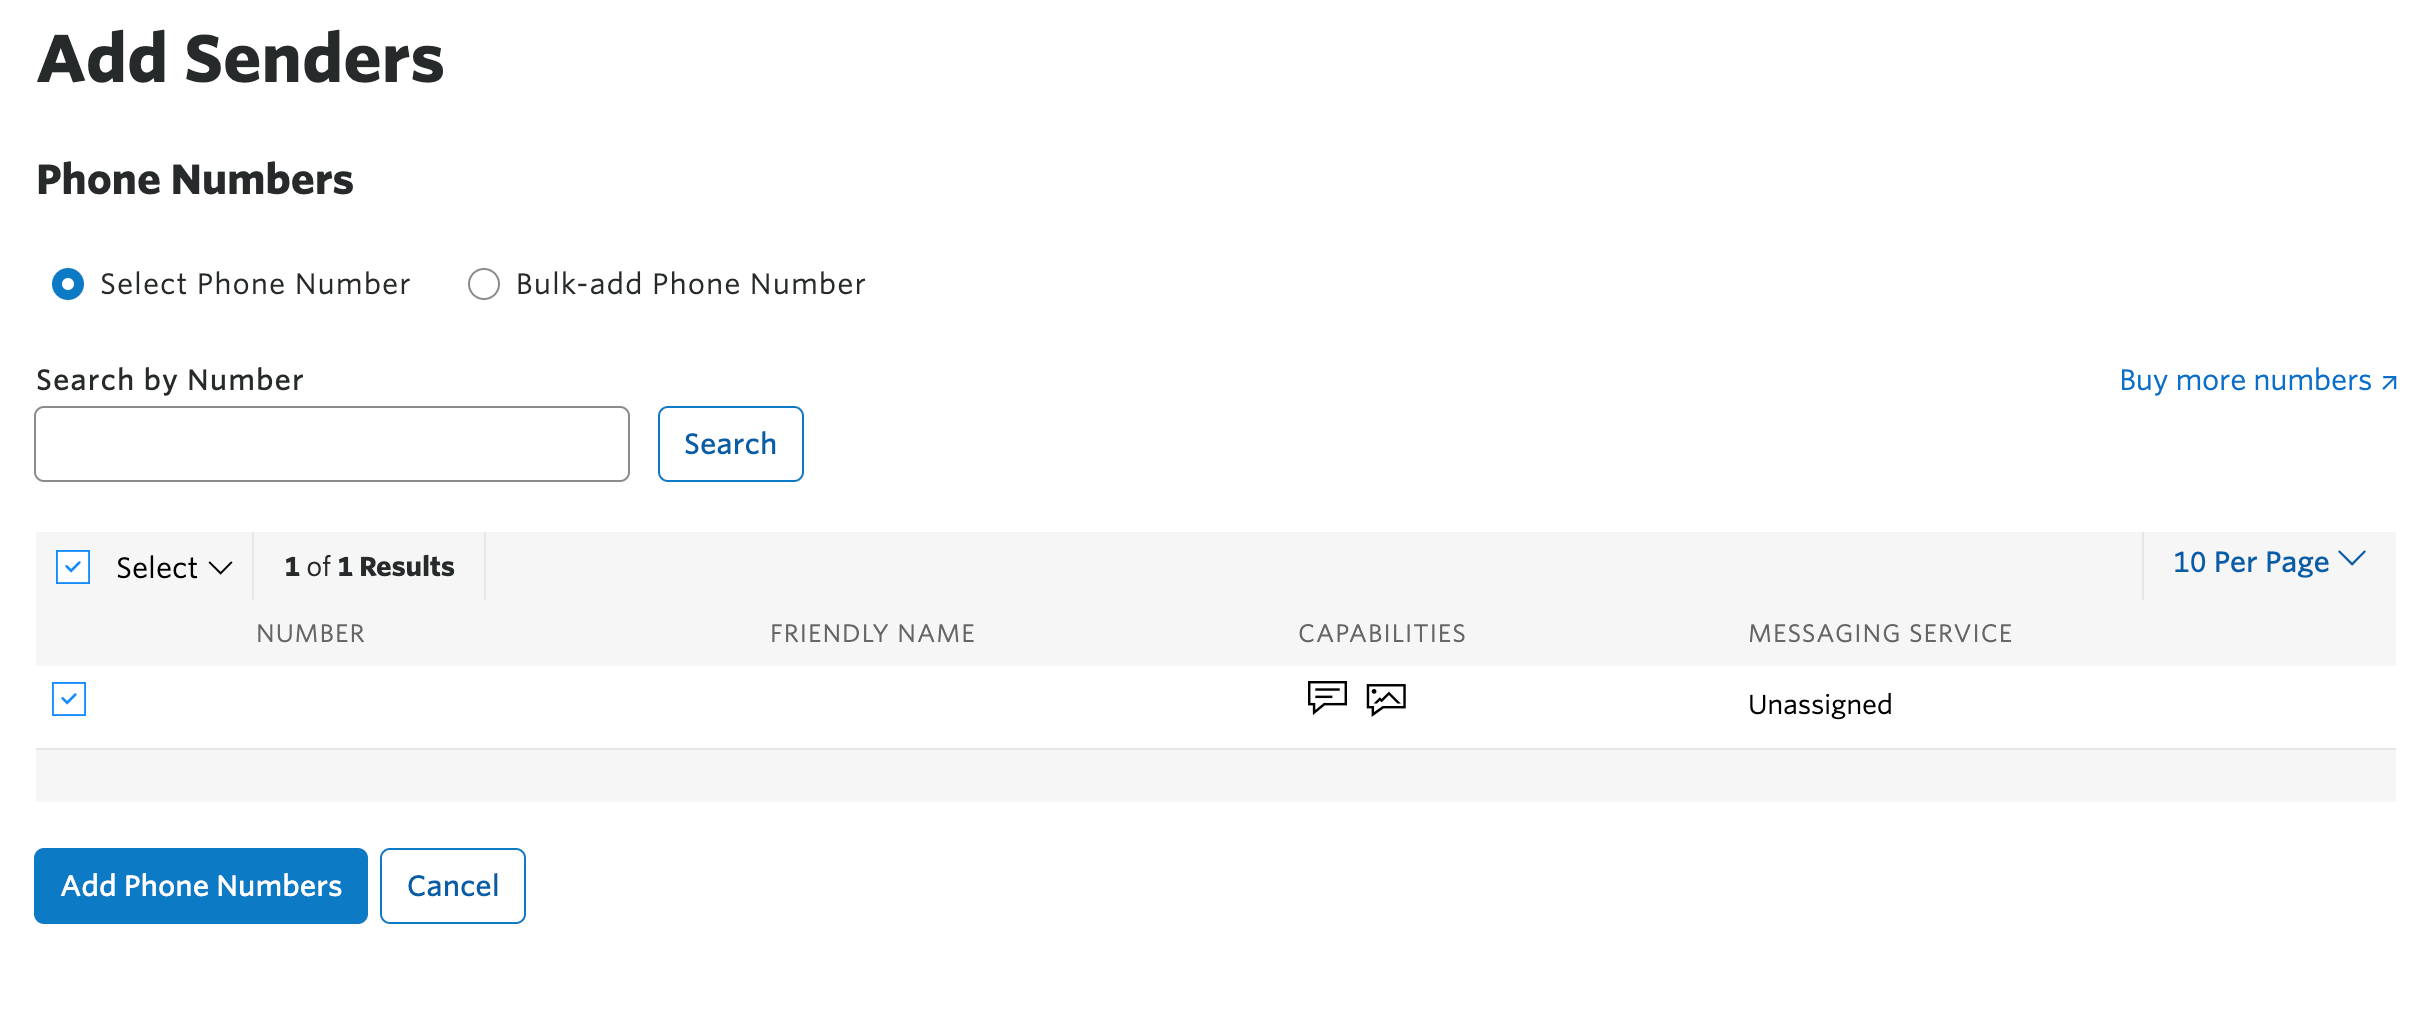
Next, we need to add a sender to our service. In our case, we need a phone number. Click Add Senders and select Phone Number then click Continue.
Finally, you will need to add at least one phone number to this service. If you don't have one (or need a new one), you can buy more numbers. Select a phone number and click Add Phone Numbers to complete the set up.
Click on the Properties menu option to view the Messaging Service SID. Make a copy of this as we will use it to integrate our e-commerce web application with Twilio.
In addition to the Messaging Service ID, you will also need your Twilio phone number, ACCOUNT SID and AUTH TOKEN to integrate with Twilio. You can find these on your dashboard.
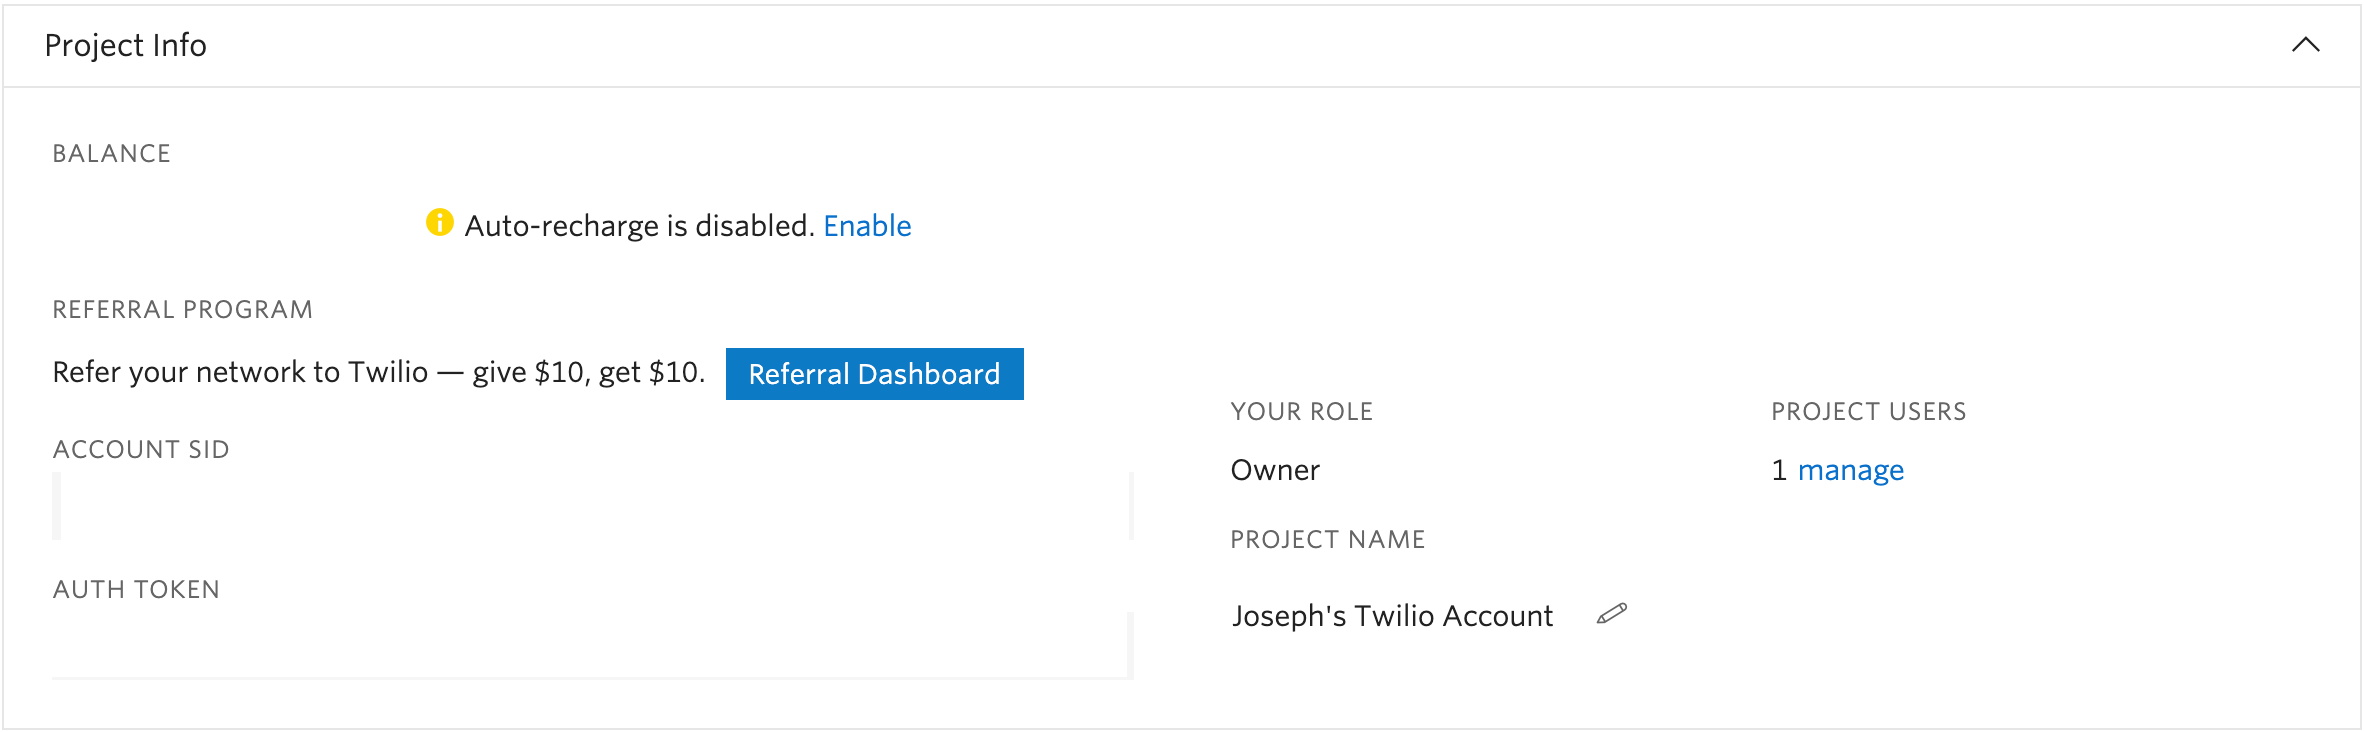
As a security precaution, your AUTH TOKEN will not be shown on screen, click on the copy icon to copy it.
Making the 'Cart' work
At the moment, the cart feature of our application doesn't work. We can't add or remove items to our cart. We can't even see it. Let's fix that before we implement the checkout feature.
To manage the cart in this application, we'll take advantage of the React Context API. To get started, create a file named context.js in the utils directory. This context will control the visibility of the cart and the items in the cart. It will also provide helper functions that will allow us to add or remove items from the cart, or update the quantity of items in the cart. Finally, it will also provide a hook that allows us to access exactly what we need from the context in each component.
touch utils/context.jsAdd the following to context.js
// utils/context.js
import { createContext, useContext, useState } from "react";

const CartContext = createContext();

const CartContextProvider = ({ children }) => {
  const [cart, setCart] = useState([]);
  const [cartOpen, setCartVisibility] = useState(false);

  const removeAllItemsFromCart = () => {
    setCart([]);
  };

  const showCart = () => {
    setCartVisibility(true);
  };

  const hideCart = () => {
    setCartVisibility(false);
  };

  const toggleCartVisibility = () => {
    setCartVisibility(oldVisibility => !oldVisibility);
  };

  const findOrderInCart = productId => cart.find(({ id }) => id === productId);

  const updateOrderQuantity = (productId, newQuantity) => {
    const predicate = ({ id }) => id === productId;

    setCart(oldCart => {
      const order = oldCart.find(predicate);
      order.quantity = newQuantity;
      const orderIndex = oldCart.findIndex(predicate);
      const newCart = [...oldCart];
      newCart[orderIndex] = order;
      return newCart;
    });
  };

  const addOrderToCart = order => {
    const orderInCart = findOrderInCart(order.id);
    if (!orderInCart) {
      setCart(oldCart => [...oldCart, order]);
    } else {
      const newOrderQuantity = orderInCart.quantity + order.quantity;
      updateOrderQuantity(order.id, newOrderQuantity);
    }
    showCart();
  };

  const removeOrderFromCart = productId => {
    setCart(oldCart => oldCart.filter(({ id }) => id !== productId));
    showCart();
  };

  return (
    <CartContext.Provider
      value={{
        cart,
        addOrderToCart,
        findOrderInCart,
        removeOrderFromCart,
        updateOrderQuantity,
        cartOpen,
        showCart,
        hideCart,
        toggleCartVisibility,
        removeAllItemsFromCart
      }}>
      {children}
    </CartContext.Provider>
  );
};

export const useCartContext = () => {
  const context = useContext(CartContext);
  if (context === undefined) {
    throw new Error("useCartContext must be used within a CartContextProvider");
  }
  return context;
};

export default CartContextProvider;
Next, we need to wrap the root component of our application with the CartContextProvider. To do this, open pages/_app.js and update it to match the following:
// pages/_app.js
import "../styles/index.css";
import Layout from "../components/Layout";
import CartContextProvider from "../utils/context";

function MyApp({ Component, pageProps }) {
  return (
    <CartContextProvider>
      <Layout>
        <Component {...pageProps} />
      </Layout>
    </CartContextProvider>
  );
}

export default MyApp;
Next, we need a component that will render a single item in our cart. An item in our cart will be represented as an object comprising of the following:
- The product id.
- The title (name) of the product.
- The slug for the product. This will be used to create a link to the product page.
- The price for a single unit of the product.
- The number of units the customer intends to order.
- The product image.
In the components directory, create a new file called CartItem.js.
touch components/CartItem.jsIn CartItem.js add the following:
// components/CartItem.js
import { urlFor } from "../utils/sanity";
import Link from "next/link";
import { useCartContext } from "../utils/context";

const CartItem = ({
                    id,
                    title,
                    slug,
                    price,
                    quantity,
                    mainImage
                  }) => {

  const { removeOrderFromCart, updateOrderQuantity } = useCartContext();

  const handleRemoveButtonClick = () => {
    removeOrderFromCart(id);
  };

  const reduceOrderQuantity = () => {
    if (quantity > 1) {
      updateOrderQuantity(id, quantity - 1);
    } else {
      removeOrderFromCart(id);
    }
  };

  const increaseOrderQuantity = () => {
    updateOrderQuantity(id, quantity + 1);
  };

  return (
    <div className="flex justify-between mt-6">
      <div className="flex">
        <button
          onClick={handleRemoveButtonClick}
          className="text-gray-600 focus:outline-none mx-2"
        >
          <svg
            className="h-5 w-5"
            fill="none"
            strokeLinecap="round"
            strokeLinejoin="round"
            strokeWidth="2"
            viewBox="0 0 24 24"
            stroke="currentColor"
          >
            <path d="M6 18L18 6M6 6l12 12" />
          </svg>
        </button>
        <img
          className="h-20 w-20 object-cover rounded"
          src={urlFor(mainImage)
            .auto("format")
            .fit("crop")
            .width(750)
            .quality(80)}
          alt=""
        />
        <div className="mx-3">
          <Link href={`/products/${slug.current}`}>
            <a><h3 className="text-sm text-gray-600">{title}</h3></a>
          </Link>
          <div className="flex items-center mt-2">
            <button
              onClick={increaseOrderQuantity}
              className="text-gray-500 focus:outline-none focus:text-gray-600">
              <svg
                className="h-5 w-5"
                fill="none"
                strokeLinecap="round"
                strokeLinejoin="round"
                strokeWidth="2"
                viewBox="0 0 24 24"
                stroke="currentColor"
              >
                <path
                  d="M12 9v3m0 0v3m0-3h3m-3 0H9m12 0a9 9 0 11-18 0 9 9 0 0118 0z"
                />
              </svg>
            </button>
            <span className="text-gray-700 mx-2">{quantity}</span>
            <button
              onClick={reduceOrderQuantity}
              className="text-gray-500 focus:outline-none focus:text-gray-600">
              <svg
                className="h-5 w-5"
                fill="none"
                strokeLinecap="round"
                strokeLinejoin="round"
                strokeWidth="2"
                viewBox="0 0 24 24"
                stroke="currentColor"
              >
                <path d="M15 12H9m12 0a9 9 0 11-18 0 9 9 0 0118 0z" />
              </svg>
            </button>
          </div>
        </div>
      </div>
      <span className="text-gray-600">${quantity * price}</span>
    </div>
  );
};

export default CartItem;
The cart item provided as a prop to the CartItem is destructured to get its contents. Then we use the useCartContext hook to get helper functions for removing items from the cart and updating the ordered quantity for the cart item. Using the helper functions, we add functionality for the buttons in the component. Clicking on the + icon should increase the number of units to be ordered while clicking the - icon should reduce the number. We also add a button to remove the item entirely from the cart. Finally, we return the JSX for the CartItem component.
The next thing we need to do is fix our Cart component. At the moment, the Cart component is hardcoded to render 3 items. It also takes two props - a cartOpen flag, which determines whether the cart is displayed or collapsed. It also takes a handleOpen function as a prop. This function toggles the cartOpen flag to display or collapse the cart. Since we have a context that manages this for us, we no longer need these props. Update the Cart component to match the following:
// components/Cart.js
import { useCartContext } from "../utils/context";
import CartItem from "./CartItem";

function Cart() {

  const { cartOpen, toggleCartVisibility, cart } = useCartContext();

  const orderTotal = cart.reduce(
    (accumulator, { price, quantity }) => (price * quantity) + accumulator,
    0
  );

	const [phoneNumber, setPhoneNumber] = useState("");

  const updatePhoneNumber = event => {
    setPhoneNumber(event.target.value);
  };

  return (
		  <div
          className={`${
					cartOpen ? "translate-x-0 ease-out" : "translate-x-full ease-in"}
          fixed right-0 top-0 max-w-xs w-full h-full px-6 py-4 transition
          duration-300 transform overflow-y-auto
          bg-white border-l-2 border-gray-300`}
      >
      <div className="flex items-center justify-between">
        <h3 className="text-2xl font-medium text-gray-700">Your cart</h3>
        <button
          onClick={toggleCartVisibility}
          className="text-gray-600 focus:outline-none"
        >
          <svg
            className="h-5 w-5"
            fill="none"
            strokeLinecap="round"
            strokeLinejoin="round"
            strokeWidth="2"
            viewBox="0 0 24 24"
            stroke="currentColor"
          >
            <path d="M6 18L18 6M6 6l12 12" />
          </svg>
        </button>
      </div>
      <hr className="my-3" />
      {cart.map(order => <CartItem key={order.id} {...order} />)}
      <div className="mt-8">
        <form className="flex items-center justify-center">
					<label htmlFor="phoneNumber" className="hidden">Phone Number</label>
          <input
						id="phoneNumber"
            className="form-input w-48"
            type="text"
						placeholder="Enter phone number"
            value={phoneNumber}
            onInput={updatePhoneNumber}
          />
        </form>
      </div>
      <hr className="my-3" />
      <span className="text-l font-medium text-gray-700 mr-48">Total</span>
      <span>${orderTotal}</span>
      <a
					className="flex items-center justify-center mt-4 px-3 py-2 bg-blue-600
          text-white text-sm uppercase font-medium rounded hover:bg-blue-500
          focus:outline-none focus:bg-blue-500"
       >
        <span>Checkout</span>
        <svg
          className="h-5 w-5 mx-2"
          fill="none"
          strokeLinecap="round"
          strokeLinejoin="round"
          strokeWidth="2"
          viewBox="0 0 24 24"
          stroke="currentColor"
        >
          <path d="M17 8l4 4m0 0l-4 4m4-4H3" />
        </svg>
      </a>
    </div>
  );
}

export default Cart;
In our newly modified component, we retrieve the cartOpen flag from our useContext hook, along with the items that have been added to the cart and the cartOpen flag. We also calculate the total amount of all the orders in the cart before returning the JSX for the Cart component.
Now that our cart is functional, we can update the cart from the products page. In the components directory, open ProductPage.js and update it to match the following:
// components/ProductPage.js
import { useState } from "react";
import { urlFor, PortableText } from "../utils/sanity";
import { useCartContext } from "../utils/context";

function ProductPage(props) {
  const {
    title,
    defaultProductVariant,
    mainImage,
    body,
    id: productId,
    slug,
  } = props;

  const {
    findOrderInCart,
    addOrderToCart,
    removeOrderFromCart,
    updateOrderQuantity,
    showCart,
    toggleCartVisibility,
  } = useCartContext();

  let orderInCart = findOrderInCart(productId);

  const [count, setCount] = useState(orderInCart?.quantity || 1);

  const handleCount = (value) =>
    !(count === 0 && value === -1) ? setCount(count + value) : count;

  const handleOrderButtonClick = () => {
    if (count === 0 && orderInCart) {
      removeOrderFromCart(productId);
      orderInCart = undefined;
    }
    if (!orderInCart && count > 0) {
      addOrderToCart({
        title,
        slug,
        id: productId,
        price: defaultProductVariant?.price,
        quantity: count,
        mainImage,
      });
    }
    if (orderInCart) {
      updateOrderQuantity(productId, count);
    }
    showCart();
  };

  return (
    <div className="container mx-auto px-6">
      <div className="md:flex md:items-center">
        <div className="w-full h-64 md:w-1/2 lg:h-96">
          <img
            className="h-full w-full rounded-md object-cover max-w-lg mx-auto"
            src={urlFor(mainImage)
              .auto("format")
              .width(1051)
              .fit("crop")
              .quality(80)}
            alt={mainImage?.alt || `Photo of ${title}`}
          />
        </div>
        <div className="w-full max-w-lg mx-auto mt-5 md:ml-8 md:mt-0 md:w-1/2">
          <h3 className="text-gray-700 uppercase text-lg">{title}</h3>
          <span className="text-gray-500 mt-3">
            ${defaultProductVariant?.price}
          </span>
          <hr className="my-3" />
          <div className="mt-2">
            <label className="text-gray-700 text-sm" htmlFor="count">
              Count:
            </label>
            <div className="flex items-center mt-1">
              <button
                onClick={() => handleCount(1)}
                className="text-gray-500 focus:outline-none focus:text-gray-600"
              >
                <svg
                  className="h-5 w-5"
                  fill="none"
                  strokeLinecap="round"
                  strokeLinejoin="round"
                  strokeWidth="2"
                  viewBox="0 0 24 24"
                  stroke="currentColor"
                >
                  <path
                    d="M12 9v3m0 0v3m0-3h3m-3 0H9m12 0a9
                  9 0 11-18 0 9 9 0 0118 0z"
                  />
                </svg>
              </button>
              <span className="text-gray-700 text-lg mx-2">{count}</span>
              <button
                onClick={() => handleCount(-1)}
                className="text-gray-500 focus:outline-none focus:text-gray-600"
              >
                <svg
                  className="h-5 w-5"
                  fill="none"
                  strokeLinecap="round"
                  strokeLinejoin="round"
                  strokeWidth="2"
                  viewBox="0 0 24 24"
                  stroke="currentColor"
                >
                  <path d="M15 12H9m12 0a9 9 0 11-18 0 9 9 0 0118 0z" />
                </svg>
              </button>
            </div>
          </div>
          <div className="flex items-center mt-6">
            <button
              onClick={handleOrderButtonClick}
              className="px-8 py-2 bg-indigo-600 text-white text-sm font-medium
              rounded hover:bg-indigo-500 focus:outline-none focus:bg-indigo-500"
            >
              Order Now
            </button>
            <button
              onClick={toggleCartVisibility}
              className="mx-2 text-gray-600 border rounded-md p-2
              hover:bg-gray-200 focus:outline-none"
            >
              <svg
                className="h-5 w-5"
                fill="none"
                strokeLinecap="round"
                strokeLinejoin="round"
                strokeWidth="2"
                viewBox="0 0 24 24"
                stroke="currentColor"
              >
                <path
                  d="M3 3h2l.4 2M7 13h10l4-8H5.4M7 13L5.4 5M7 13l-2.293
                2.293c-.63.63-.184 1.707.707 1.707H17m0 0a2 2 0 100 4 2 2 0
                000-4zm-8 2a2 2 0 11-4 0 2 2 0 014 0z"
                />
              </svg>
            </button>
          </div>
        </div>
      </div>
      <div className="mt-16 md:w-2/3">
        <h3 className="text-gray-600 text-2xl font-medium">Description</h3>
        {body && <PortableText blocks={body?.en} className="text-gray-600" />}
      </div>
    </div>
  );
}

export default ProductPage;
On the ProductPage component, we use the helper functions provided by the useCartContext hook to handle the functionality for adding the rendered product to the cart (if it is not already in the cart). Additionally, we can increase or decrease the units we wish to purchase.
On the products page, we see that on each product, there is a button to directly add the product to the cart. At the moment, it doesn't work. Clicking the cart icon also takes us to the product page which we don't really want. To fix that, open components/ProductCard.js and update it to match the following:
// components/ProductCard.js
import Link from "next/link";
import { urlFor } from "../utils/sanity";
import { useCartContext } from "../utils/context";

function ProductCard({ _id, title, mainImage, slug, defaultProductVariant }) {
  const { addOrderToCart } = useCartContext();

  const handleCartButtonClick = () => {
    const order = {
      title,
      slug,
      id: _id,
      price: defaultProductVariant?.price,
      quantity: 1,
      mainImage,
    };
    addOrderToCart(order);
  };

  return (
    <div className="w-full max-w-sm mx-auto rounded-md shadow-md overflow-hidden">
      <div
        className="flex items-end justify-end h-56 w-full bg-cover"
        style={{
          backgroundImage: `url('${urlFor(mainImage)
            .auto("format")
            .fit("crop")
            .width(750)
            .quality(80)}`,
        }}
      >
        <button
          onClick={handleCartButtonClick}
          className="p-2 rounded-full bg-blue-600 text-white mx-5 -mb-4
          hover:bg-blue-500 focus:outline-none focus:bg-blue-500"
        >
          <svg
            className="h-5 w-5"
            fill="none"
            strokeLinecap="round"
            strokeLinejoin="round"
            strokeWidth="2"
            viewBox="0 0 24 24"
            stroke="currentColor"
          >
            <path
              d="M3 3h2l.4 2M7 13h10l4-8H5.4M7 13L5.4 5M7 13l-2.293
              2.293c-.63.63-.184 1.707.707 1.707H17m0 0a2 2 0 100 4 2 2 0
              000-4zm-8 2a2 2 0 11-4 0 2 2 0 014 0z"
            />
          </svg>
        </button>
      </div>
      <div className="px-5 py-3">
        <Link href={`/products/${slug?.current}`}>
          <a>
            <h3 className="text-gray-700 uppercase">{title}</h3>
          </a>
        </Link>
        <span className="text-gray-500 mt-2">
          ${defaultProductVariant?.price}
        </span>
      </div>
    </div>
  );
}

export default ProductCard;
Here we use the addOrderToCart function provided by the useCartContext hook to add the product to the cart (or increase the units ordered if it has already been added). We also refactor the JSX such that the user is only taken to the project page by clicking the product title.
In order to see the changes we have made, we need to render the Cart component. If you look at lines 122–124 in components/Layout.js, you'll see that the Cart component is commented out. We can go ahead to uncomment those lines and remove the props that are being passed to the Cart component since those are being handled via the Context API. Update components/Layout.js to match the following code:
omponents/Layout.js
import { useState } from "react";
import Link from "next/link";
import Cart from "./Cart";
import { useCartContext } from "../utils/context";

function Layout({ children }) {
  const [menuOpen, setMenuOpen] = useState(false);
  const handleMenu = () => setMenuOpen(!menuOpen);
  const { toggleCartVisibility } = useCartContext();
  return (
    <div className="bg-white">
      <header>
        <div className="container mx-auto px-6 py-3">
          <div className="flex items-center justify-between">
            <div className="hidden w-full text-gray-600 md:flex md:items-center">
              <svg
                className="h-5 w-5"
                viewBox="0 0 24 24"
                fill="none"
                xmlns="http://www.w3.org/2000/svg"
              >
                <path
                  fillRule="evenodd"
                  clipRule="evenodd"
                  d="M16.2721 10.2721C16.2721 12.4813 14.4813 14.2721 12.2721
                  14.2721C10.063 14.2721 8.27214 12.4813 8.27214 10.2721C8.27214
                  8.06298 10.063 6.27212 12.2721 6.27212C14.4813 6.27212 16.2721
                  8.06298 16.2721 10.2721ZM14.2721 10.2721C14.2721 11.3767 13.3767
                  12.2721 12.2721 12.2721C11.1676 12.2721 10.2721 11.3767 10.2721
                  10.2721C10.2721 9.16755 11.1676 8.27212 12.2721 8.27212C13.3767
                  8.27212 14.2721 9.16755 14.2721 10.2721Z"
                  fill="currentColor"
                />
                <path
                  fillRule="evenodd"
                  clipRule="evenodd"
                  d="M5.79417 16.5183C2.19424 13.0909 2.05438 7.39409 5.48178
                  3.79417C8.90918 0.194243 14.6059 0.054383 18.2059
                  3.48178C21.8058 6.90918 21.9457 12.6059 18.5183
                  16.2059L12.3124 22.7241L5.79417 16.5183ZM17.0698
                  14.8268L12.243 19.8965L7.17324 15.0698C4.3733 12.404
                  4.26452 7.97318 6.93028 5.17324C9.59603 2.3733 14.0268 2.26452
                  16.8268 4.93028C19.6267 7.59603 19.7355 12.0268 17.0698 14.8268Z"
                  fill="currentColor"
                />
              </svg>
              <span className="mx-1 text-sm">NY</span>
            </div>
            <div
              className="w-full text-gray-700 md:text-center
              text-2xl font-semibold"
            >
              Pulp Inc.
            </div>
            <div className="flex items-center justify-end w-full">
              <button
                onClick={toggleCartVisibility}
                className="text-gray-600 focus:outline-none mx-4 sm:mx-0"
              >
                <svg
                  className="h-5 w-5"
                  fill="none"
                  strokeLinecap="round"
                  strokeLinejoin="round"
                  strokeWidth="2"
                  viewBox="0 0 24 24"
                  stroke="currentColor"
                >
                  <path
                    d="M3 3h2l.4 2M7 13h10l4-8H5.4M7 13L5.4 5M7 13l-2.293
                    2.293c-.63.63-.184 1.707.707 1.707H17m0 0a2 2 0 100 4 2 2 0
                    000-4zm-8 2a2 2 0 11-4 0 2 2 0 014 0z"
                  />
                </svg>
              </button>

              <div className="flex sm:hidden">
                <button
                  onClick={handleMenu}
                  type="button"
                  className="text-gray-600 hover:text-gray-500
                  focus:outline-none focus:text-gray-500"
                  aria-label="toggle menu"
                >
                  <svg viewBox="0 0 24 24" className="h-6 w-6 fill-current">
                    <path
                      fillRule="evenodd"
                      d="M4 5h16a1 1 0 0 1 0 2H4a1 1 0 1 1 0-2zm0 6h16a1 1 0 0 1
                      0 2H4a1 1 0 0 1 0-2zm0 6h16a1 1 0 0 1 0 2H4a1 1 0 0 1 0-2z"
                    />
                  </svg>
                </button>
              </div>
            </div>
          </div>
          <nav
            className={`${
              menuOpen ? "" : "hidden"
            } sm:flex sm:justify-center sm:items-center mt-4`}
          >
            <div className="flex flex-col sm:flex-row">
              <Link href="/">
                <a className="mt-3 text-gray-600 hover:underline sm:mx-3 sm:mt-0">
                  Home
                </a>
              </Link>
              <Link href="/products">
                <a className="mt-3 text-gray-600 hover:underline sm:mx-3 sm:mt-0">
                  Shop
                </a>
              </Link>
              <Link href="/about">
                <a className="mt-3 text-gray-600 hover:underline sm:mx-3 sm:mt-0">
                  About
                </a>
              </Link>
            </div>
          </nav>
          <div className="relative mt-6 max-w-lg mx-auto">
            <span className="absolute inset-y-0 left-0 pl-3 flex items-center">
              <svg
                className="h-5 w-5 text-gray-500"
                viewBox="0 0 24 24"
                fill="none"
              >
                <path
                  d="M21 21L15 15M17 10C17 13.866 13.866 17 10 17C6.13401 17 3
                  13.866 3 10C3 6.13401 6.13401 3 10 3C13.866 3 17 6.13401 17 10Z"
                  stroke="currentColor"
                  strokeWidth="2"
                  strokeLinecap="round"
                  strokeLinejoin="round"
                />
              </svg>
            </span>

            <input
              className="w-full border rounded-md pl-10 pr-4 py-2
              focus:border-blue-500 focus:outline-none focus:shadow-outline"
              type="text"
              placeholder="Search"
            />
          </div>
        </div>
      </header>

      {/* // This Cart works… well sort of! */}
      <Cart />

      <main className="my-8">{children}</main>
      <footer className="bg-gray-200">
        <div
          className="container mx-auto px-6 py-3 flex
          justify-between items-center"
        >
          <a
            href="#"
            className="text-xl font-bold text-gray-500 hover:text-gray-400"
          >
            Pulp Inc.
          </a>
          <p className="py-2 text-gray-500 sm:py-0">All rights reserved</p>
        </div>
      </footer>
    </div>
  );
}

export default Layout;
Implementing the Checkout Feature
At the moment, clicking on the Checkout button does nothing. For this tutorial, we'll create a simple endpoint that expects an HTTP Post request containing the customer's phone number, the ordered items, and the order total. When we send a request to this endpoint, it will send an SMS to the customer and return the content of the message as a response. We can do this in our current project as Next.js provides a solution for us to build APIs with it.
Before we build this endpoint, let's add the Twilio Javascript SDK to our project.
npm install twilioThis library is only for back end applications running on Node.js.
Next, update the .env file as follows:
# For Twilio Locally
TWILIO_MESSAGING_SID = "your_twilio_messaging_sid"
TWILIO_AUTH_TOKEN = "your_twilio_auth_token"
TWILIO_ACCOUNT_SID = "your_twilio_account_sid"
TWILIO_PHONE_NUMBER = "your_twilio_phone_number"
Next, in the utils directory, create a new file called twilio.js.
touch utils/twilio.jsIn the utils/twilio.js file add the following:
const twilio = require("twilio");
const client = new twilio(
  process.env.TWILIO_ACCOUNT_SID,
  process.env.TWILIO_AUTH_TOKEN
);
const twilioPhoneNumber = process.env.TWILIO_PHONE_NUMBER;
const messagingServiceSid = process.env.TWILIO_MESSAGING_SID;

const sendSMS = async (recipient, message) => {
  return await client.messages.create({
    body: message,
    to: recipient,
    from: twilioPhoneNumber,
    messagingServiceSid,
  });
};

export default sendSMS;
The sendSMS function will be used by our API to send text messages. It takes two parameters, the recipient's phone number and the message to be sent. In this function, a Twilio client is instantiated using our TWILIO_ACCOUNT_SID and TWILIO_AUTH_TOKEN. We also retrieve our twilio phone number and messaging_sid from the .env file. In addition to the recipient's phone number and message content, these are added to the options for the request to the Twilio rest API.
Next, create the endpoint to handle orders from the front-end. In the pages directory, create a new directory called api.
mkdir pages/apiIn the pages/api directory, create a new file called order.js.
touch pages/api/order.jsIn pages/api/order.js, add the following code:
// pages/api/order.js
import sendSMS from "../../utils/twilio";
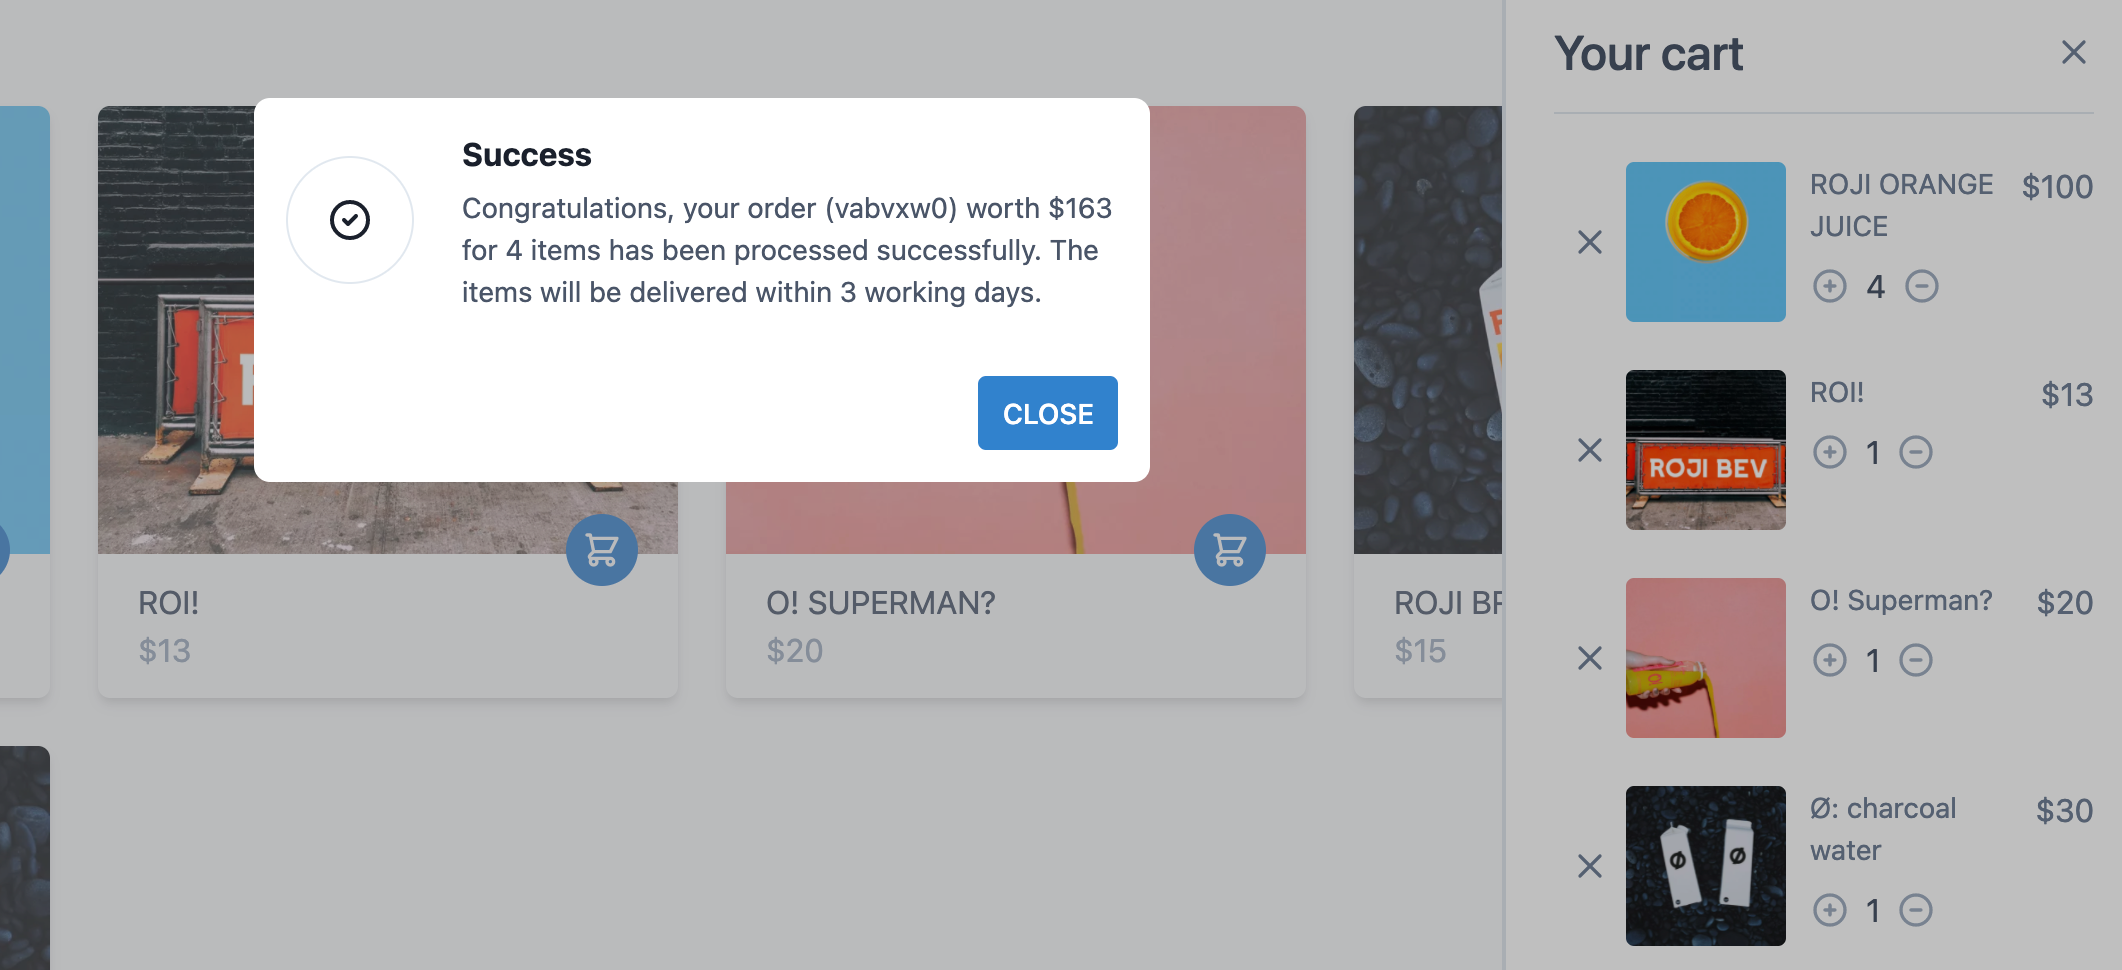
const getMessage = (cart, orderTotal) => {
const orderId = Math.random().toString(36).substring(2, 9);
return `Congratulations, your order (${orderId}) worth $${orderTotal}\
for ${cart.length} items has been processed successfully. The items will be \
delivered within 3 working days.`;
};
const handler = async (request, response) => {
switch (request.method) {
case "POST":
const { cart, orderTotal, phoneNumber } = request.body;
const message = getMessage(cart, orderTotal);
await sendSMS(phoneNumber, message);
response.status(200).json({ message });
break;
default:
response.status(405).end("This method is not allowed for this route.");
}
};
export default handler;Here, we declare an async function named handler which will handle the requests made to the API. Since we only want to handle POST requests, we return a 405 response for all other request methods. When a POST request is received, we retrieve the cart (ordered items), the total amount of the order, and the customer's phone number from the request body. Using the sendSMS helper function we created earlier, we send a request to the Twilio API and trigger the dispatch of a text message to the customer's phone number. We use the async/await keyword so that our API does not send the response before the Twilio API responds to our request.
To test this, we'll update our Cart component to make an API request and display the response message in a modal. But before we do that, let's create a component for the modal. Create a file named Modal.js in the components directory.
touch components/Modal.jsIn Modal.js, add the following code:
// components/Modal.js
import React from "react";

const Modal = ({ title, message, showModal, closeModal }) => {
  return (
    showModal && (
      <div
        className="absolute inset-0 bg-gray-300 text-gray-900
      bg-opacity-25 overflow-x-hidden"
      >
        <div
          className="relative px-4 min-h-screen md:flex
      md:items-center md:justify-center"
        >
          <div
            className="bg-black opacity-25 w-full h-full absolute
        z-10 inset-0"
          ></div>
          <div
            className="bg-white rounded-lg md:max-w-md md:mx-auto p-4
          fixed inset-x-0 bottom-0 z-50 mb-4 mx-4 md:relative"
          >
            <div className="md:flex items-center">
              <div
                className="rounded-full border border-gray-300 flex
              items-center justify-center w-16 h-16 flex-shrink-0
              mx-auto"
              >
                <svg
                  xmlns="http://www.w3.org/2000/svg"
                  className="h-6 w-6"
                  fill="none"
                  viewBox="0 0 24 24"
                  stroke="currentColor"
                >
                  <path
                    strokeLinecap="round"
                    strokeLinejoin="round"
                    strokeWidth={2}
                    d="M9 12l2 2 4-4m6 2a9 9 0 11-18 0 9 9 0 0118 0z"
                  />
                </svg>
              </div>
              <div
                className="mt-4 md:mt-0 md:ml-6 text-center
              md:text-left"
              >
                <p className="font-bold">{title}</p>
                <p className="text-sm text-gray-700 mt-1">{message}</p>
              </div>
            </div>
            <div
              className="text-center md:text-right mt-4 md:flex
            md:justify-end"
            >
              <button
                onClick={closeModal}
                className="flex items-center justify-center mt-4 px-3
                py-2 bg-blue-600 text-white text-sm uppercase
                font-medium rounded hover:bg-blue-500 focus:outline-none
                focus:bg-blue-500"
              >
                Close
              </button>
            </div>
          </div>
        </div>
      </div>
    )
  );
};

export default Modal;
Update the Cart component to match the following:
// components/Cart.js
import { useCartContext } from "../utils/context";
import CartItem from "./CartItem";
import React, { useState } from "react";
import Modal from "./Modal";

function Cart() {
  const {
    cartOpen,
    toggleCartVisibility,
    cart,
    removeAllItemsFromCart,
  } = useCartContext();

  const orderTotal = cart.reduce(
    (accumulator, { price, quantity }) => price * quantity + accumulator,
    0
  );

  const [showModal, setShowModal] = useState(false);

  const [modalTitle, setModalTitle] = useState(null);

  const [modalContent, setModalContent] = useState(null);

  const [phoneNumber, setPhoneNumber] = useState("");

  const updatePhoneNumber = (event) => {
    setPhoneNumber(event.target.value);
  };

  const closeModal = () => {
    removeAllItemsFromCart();
    setPhoneNumber("");
    setShowModal(false);
  };

  const makeOrder = () => {
    fetch("/api/order", {
      method: "POST",
      headers: {
        "Content-Type": "application/json",
      },
      body: JSON.stringify({ cart, orderTotal, phoneNumber }),
    })
      .then((response) => response.json())
      .then((data) => {
        setModalContent(data.message);
        setModalTitle("Success");
        setShowModal(true);
      });
  };

  return (
    <>
      <Modal
        title={modalTitle}
        message={modalContent}
        showModal={showModal}
        closeModal={closeModal}
      />
      <div
        className={`${
          cartOpen ? "translate-x-0 ease-out" : "translate-x-full ease-in"
        }
          fixed right-0 top-0 max-w-xs w-full h-full px-6 py-4 transition
          duration-300 transform overflow-y-auto
          bg-white border-l-2 border-gray-300`}
      >
        <div className="flex items-center justify-between">
          <h3 className="text-2xl font-medium text-gray-700">Your cart</h3>
          <button
            onClick={toggleCartVisibility}
            className="text-gray-600 focus:outline-none"
          >
            <svg
              className="h-5 w-5"
              fill="none"
              strokeLinecap="round"
              strokeLinejoin="round"
              strokeWidth="2"
              viewBox="0 0 24 24"
              stroke="currentColor"
            >
              <path d="M6 18L18 6M6 6l12 12" />
            </svg>
          </button>
        </div>
        <hr className="my-3" />
        {cart.map((order) => (
          <CartItem key={order.id} {...order} />
        ))}
        <div className="mt-8">
          <form className="flex items-center justify-center">
            <input
              className="form-input w-48"
              type="text"
              placeholder="Enter phone number"
              value={phoneNumber}
              onInput={updatePhoneNumber}
            />
          </form>
        </div>
        <hr className="my-3" />
        <span className="text-l font-medium text-gray-700 mr-48">Total</span>
        <span>${orderTotal}</span>
        <button
          onClick={makeOrder}
          className="flex items-center justify-center mt-4 px-3 py-2 bg-blue-600
          text-white text-sm uppercase font-medium rounded hover:bg-blue-500
          focus:outline-none focus:bg-blue-500"
        >
          <span>Checkout</span>
          <svg
            className="h-5 w-5 mx-2"
            fill="none"
            strokeLinecap="round"
            strokeLinejoin="round"
            strokeWidth="2"
            viewBox="0 0 24 24"
            stroke="currentColor"
          >
            <path d="M17 8l4 4m0 0l-4 4m4-4H3" />
          </svg>
        </button>
      </div>
    </>
  );
}

export default Cart;
Here, we add functionality to the Checkout button by calling the makeOrder function when it is clicked. This function makes a HTTP request to the api/order route which will be handled by the handler function we declared in pages/api/order.js. Upon a successful response, the modal is rendered letting the customer know that the order was processed successfully as shown below.
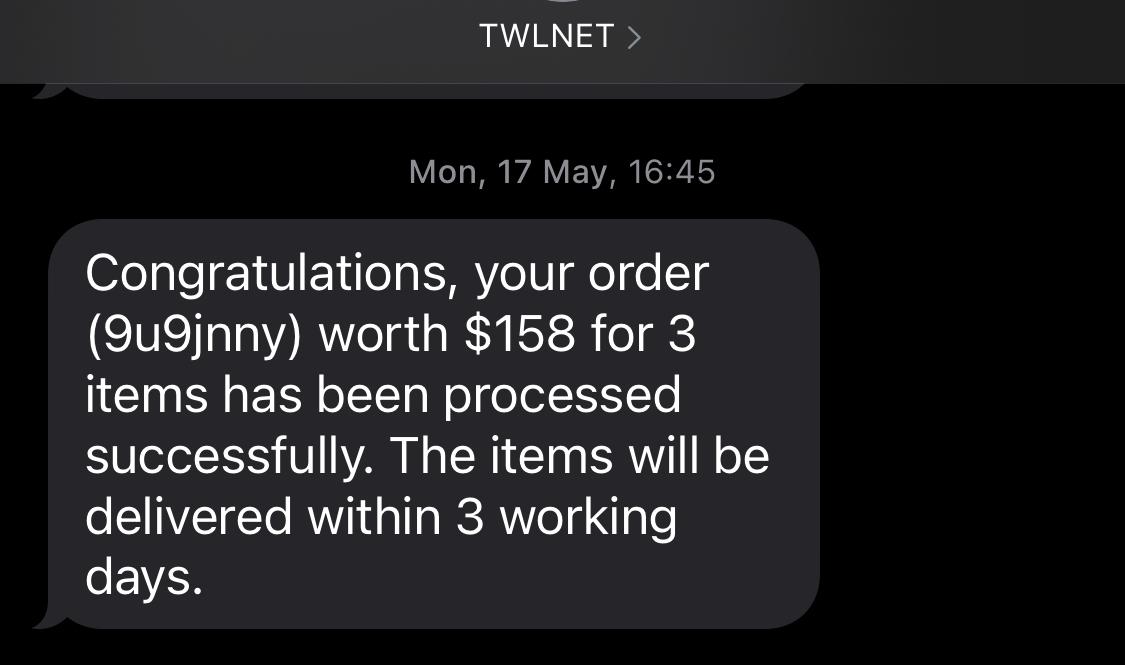
An SMS will also be sent to the specified phone number as shown below.
With that, our e-commerce website is ready for launch, Congratulations!!!
Conclusion
In this article, we've seen how programmable messaging can be used to provide a better customer experience by sending notifications in the form of text messages to customers with Twilio SMS as a case study. Using Twilio's JavaScript SDK, we were able to trigger an outbound SMS request to the Twilio API. The API reference, as well as code samples in Javascript and other languages (PHP, Python, Java to name a few), can be found here
Sanity – The Content Operating System that ends your CMS nightmares
Sanity replaces rigid content systems with a developer-first operating system. Define schemas in TypeScript, customize the editor with React, and deliver content anywhere with GROQ. Your team ships in minutes while you focus on building features, not maintaining infrastructure.
Sanity scales from weekend projects to enterprise needs and is used by companies like Puma, AT&T, Burger King, Tata, and Figma.