Published June 10, 2021
Creating a navigation schema
By Lo Etheridge

In part 1 of navigation as structured content, we built a small navigation structure using an array of references input field. In this guide, we will take navigation as structured content further and build a navigation schema that will allow for any type of navigation for a website, application, or table of contents for digital media.
Prerequisites
- Sanity project
- Knowledge of structured content and custom schemas
- Code editor of your choice
To follow along, you will need an existing Sanity studio project or you can go Sanity create to use a starter project.
Creating a navigation schema
Building a navigation schema will provide a content structure that can be used for any navigation use case and context. Content modeling and custom schemas are a powerful way to organize your content because it allows you use the structure repeatedly without having to repeat yourself. This will require some planning and thinking through what your content model should contain for a particular use case. For navigation, we want the able to create different menus that can contain both internal and external links. To start, we need to create navigation document that will be the basis of our navigation structure.
Within your Sanity project within the studio directory and create a new files called navigation.js inside the documents folder located in the schema directory and add the following code:
//File name: navigation.js
//File location: schemas/documents

import { GrNavigate } from "react-icons/gr";

export default {
    name: 'navigation',
    title: 'Navigation',
    type: 'document',
    icon: GrNavigate,
    fields: [
        {
            name: "title",
            type: "string",
            title: "Title"
          },
          {
            name: 'navId',
            type: 'slug',
            title: "Navigation Id"
          }
    ]
}
So, now we have a navigation schema, but it doesn't do very much. We need a couple of objects to have the ability to make multiple navigations and to add external links.
Navigation item object-type
An object is a collection of fields and can be used as a value in another document. In our case, we want to add an object to our navigation.js file. To do that, we need to create a new directory inside our schemas directory called objects. Inside the objects directory, we need to define an object type in a new file called navItem.js:
//File name: navItem.js
//File location: schemas/objects
import { GrNavigate } from "react-icons/gr";

export default {
    name: 'navigationItem',
    title: 'Navigation Item',
    type: 'object',
    icon: GrNavigate,
    fields: [
        {
            name: "text",
            type: "string",
            title: "Navigation Text"
          },
          {
            name: "navigationItemUrl",
            type: "link",
            title: "Navigation Item URL"
          }
    ]
}
The code for an object is very similar to a document with the only difference being that we declare the type as an 'object' instead of document. Object types do not appear in the sidebar document list in the studio, they are meant solely to be embedded into documents. However, object files still need to be imported into the schema.js file as you would a document.
Link object-type
Now that we have added a navigation item object type, we need to create a link object type so that we can add both internal and external links to the navigation document type. So, in your objects directory, create a file called link.js:
//File name: link.js
//File location: schemas/objects

export default {
  name: 'link',
  type: 'object',
  title: 'Link',
  fields: [
    {
    title: 'Internal Link',
    name: 'internalLink',
    description: 'Select pages for navigation',
    type: 'reference',
    to: [{ type: 'page' },{ type: 'post' }],
    },
    {
      name: 'externalUrl',
      title: 'External URL',
      description:"Use fully qualified URLS for external link",
      type: 'url',
    },
  ]
};
Let's talk about what is happening in the code above. We have created a link object that contains a reference to internal pages and posts as well as a URL field so that we can add external links to a navigation.
Connecting the navigationItem object to the navigation document
You will notice that this link object is the field we added to the navigationItem object type in our navItem.js file. The navigationItem object is then added to our navigation document type. In your navigation.js file add an array type of navigationItem:
//File name: navigation.js
//File location: schemas/documents

import { GrNavigate } from "react-icons/gr";

export default {
    name: 'navigation',
    title: 'Navigation',
    type: 'document',
    icon: GrNavigate,
    fields: [
        {
            name: "title",
            type: "string",
            title: "Title"
          },
          {
            name: 'navId',
            type: 'slug',
            title: "Navigation Id"
          },
          {
            name: "items",
            type: "array",
            title: "Navigation items",
            of: [{ type: "navigationItem" }]
          }
    ]
}
Your studio should now have a Navigation document type that allows you to create multiple navigation documents and add navigation items to the document.

Next, we need to add reference schema type fields to your siteConfig "singleton" . As in Navigation as structured content Part 1, you can use the structure builder to customize the document workflow inside your studio. In this example, we will create main navigation and social navigation. However, you can create any type of navigation you want from menus for products or a table of contents for digital annual reports or magazines. From the root of your Sanity studio project, go to your siteConfig.js file and add the following:
export default {
name: 'siteConfig',
type: 'document',
title: 'Site Settings',
fields: [
{
name: 'title',
type: 'string',
title: 'Site title',
},
{
title: 'URL',
name: 'url',
type: 'url',
description: 'The main site url. Used to create canonical url',
},
{
name: 'frontpage',
type: 'reference',
description: 'Choose page to be the frontpage',
to: { type: 'page' },
},
{
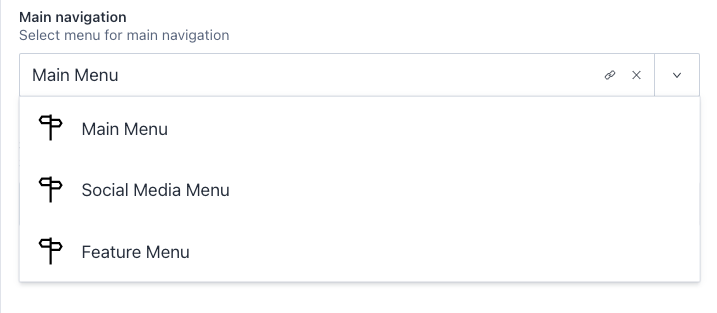
title: 'Main navigation',
name: 'mainNav',
description: 'Select menu for main navigation',
type: 'reference',
to: {type: 'navigation'},
},
{
title: 'Social navigation',
name: 'socialNav',
description: 'Select menu for social navigation',
type: 'reference',
to: {type: 'navigation'},
},
],
};The 'Main Navigation' reference field makes a reference to the navigation document that we used to create our navigations.
We now have a complete navigation schema that can be used for any type of navigation needed without having to repeat code or continuously enter the same content. In part 3, we will build out a front-end use case for our navigation schema using GROQ and React.
Sanity – The Content Operating System that ends your CMS nightmares
Sanity replaces rigid content systems with a developer-first operating system. Define schemas in TypeScript, customize the editor with React, and deliver content anywhere with GROQ. Your team ships in minutes while you focus on building features, not maintaining infrastructure.
Sanity scales from weekend projects to enterprise needs and is used by companies like Puma, AT&T, Burger King, Tata, and Figma.