Dynamic folder structure using the currentUser and workflow states
In this guide you will learn how to setup such a listener-based structure and also how to combine the results with the workflow plugin metadata.
This developer guide was contributed by Saskia Bobinska (Senior Support Engineer).
Building dynamic structures is easy enough using the filters in documentTypeLists or documentList. But what if you want to get more from the structure, such as a document count, which will also update whenever something in your content changes?
Well, you can do so using listeners.
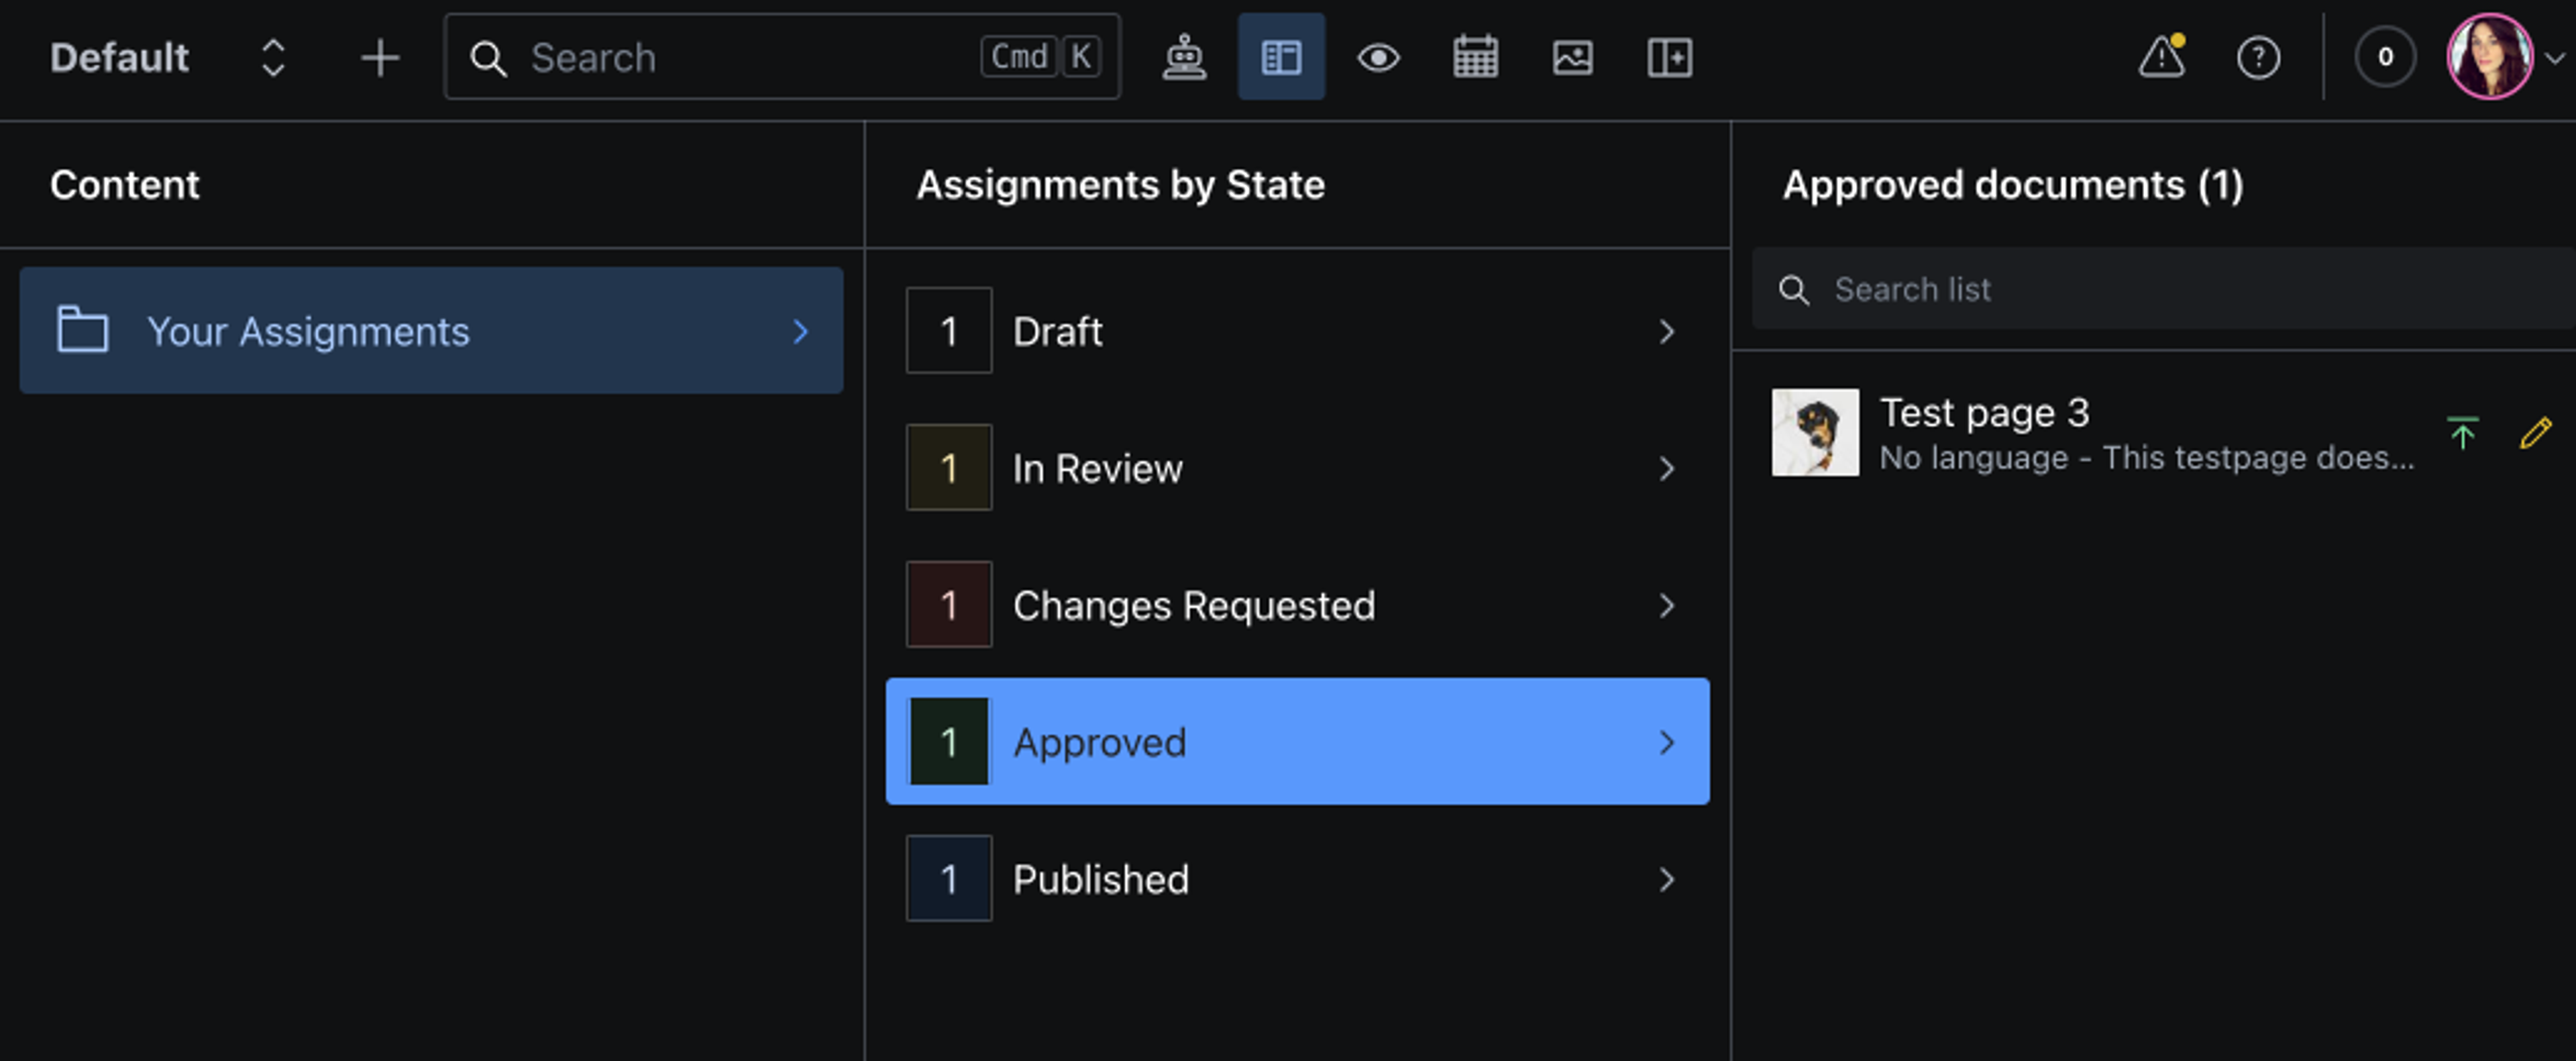
In this guide, you will learn how to set up such a dynamic structure, using an example based on the workflow plugin and a structure that will show users their assigned documents filtered by states.
The crux will be getting the number of documents in each state into the pane titles and also using them in the folder icon component for some 💅 bling.
Why can’t we just use a filter for this?
Because we need the states and assignments stored on the meta-document, not the documents in question.
Plus, we want to get the number of documents in each state (folder), which we cannot just get as easily from the query itself.
This is because we cannot use the document IDs in the initial queries without doing a lot of acrobatics, thus making the query less performant.
Let’s talk about the main concepts first and then get to the overall code.
Understanding the overall functionality
Besides the small code snippets in the first chapter, the code will be in TypeScript.
The thought behind this is that reasons for the way we construct code will be more easily understandable if we use types. If you need to use JavaScript, you can just remove the types behind variables and props.
For example: (TS) export const WORKFLOW_STATES: State[] = [...] will become (JS) export const WORKFLOW_STATES = [...]
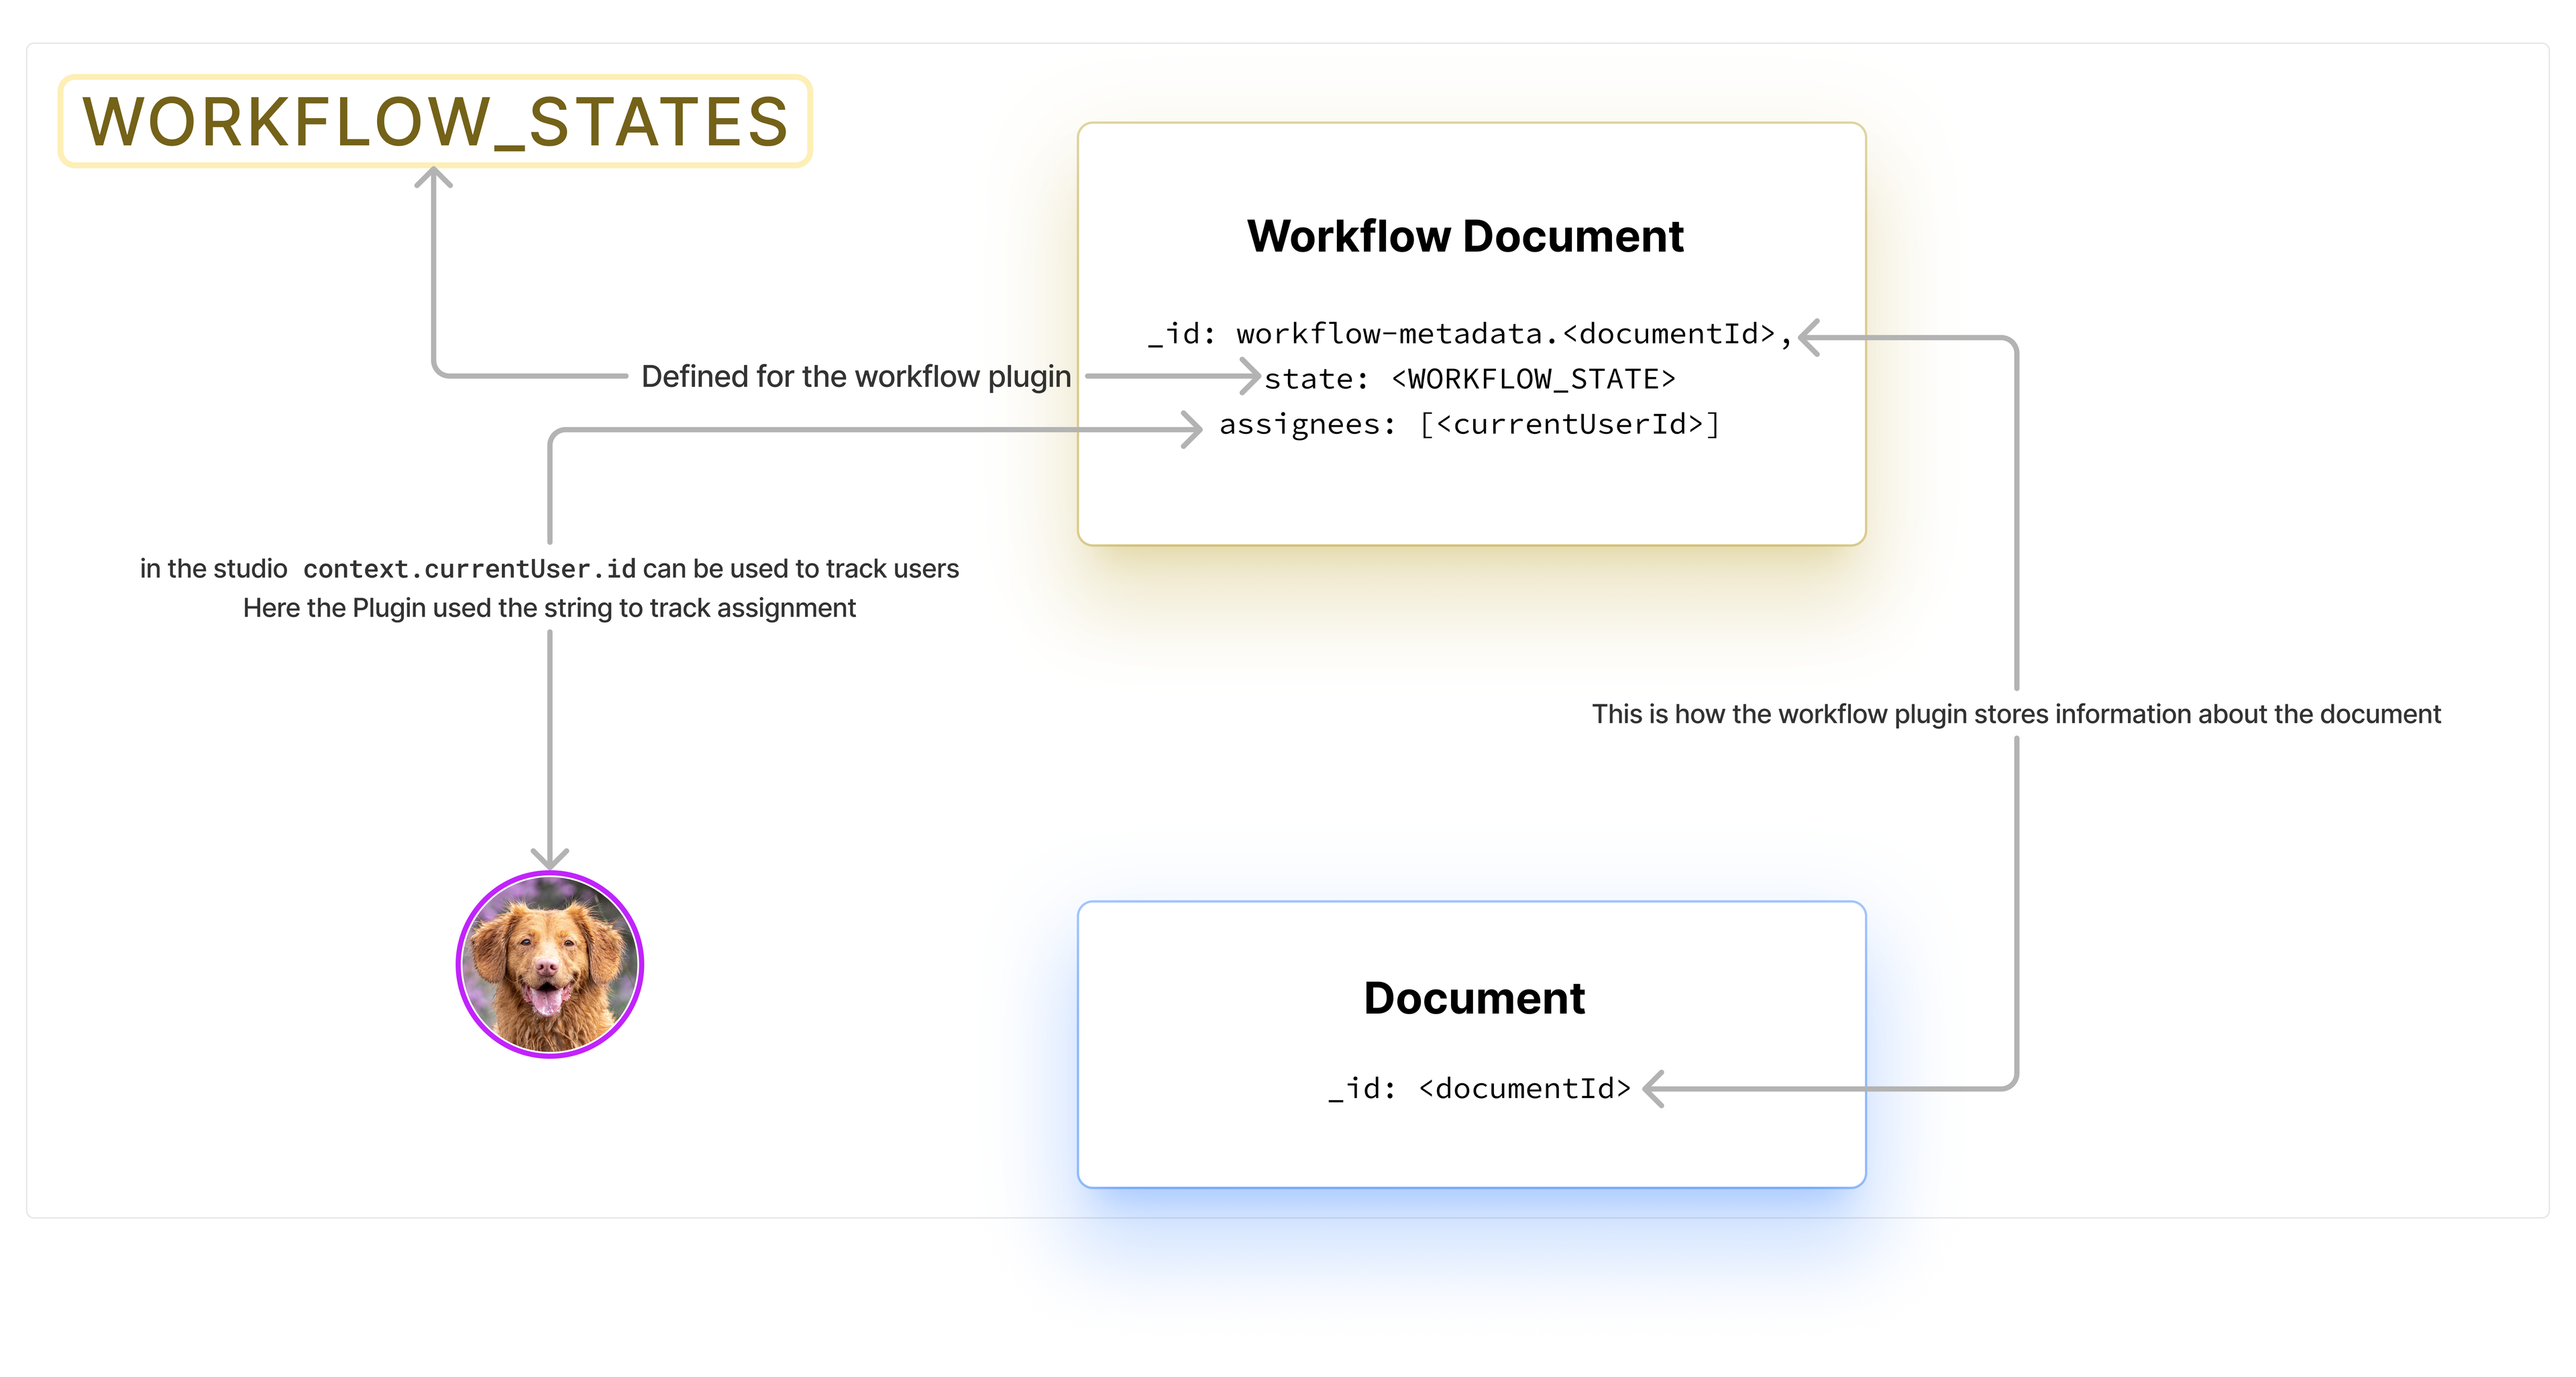
Workflow meta documents and documents
To understand how the workflow metadata relates to the documents we want to display in our lists (folders), we need to see how these two documents rely on other data. Not displayed in the illustration is the value documentId of the workflow.metadata document, which is the same as the document _id. This ID string is not a reference, which is why I decided not to show it here.
What we need to make thins work
In our workflow plugin definition in sanity.config.ts we need to define an array of states. In order for us to later map the titles to the assignment data and determine the amount of documents in each folder in our dynamic structure, we define the states objects in a standalone file and then import the array in both the config as well as our custom list file (use your own here please).
// workflow_states.ts

// these types are the same as the ones used in the plugin
declare type State = {
  id: string
  transitions: string[]
  title: string
  roles?: string[]
  requireAssignment?: boolean
  requireValidation?: boolean
  color?: 'primary' | 'success' | 'warning' | 'danger'
}

export const WORKFLOW_STATES: State[] = [
  {
    id: 'draft',
    title: 'Draft',
    transitions: ['inReview'],
  },
  {
    id: 'inReview',
    title: 'In Review',
    color: 'warning',
    roles: ['publisher', 'administrator'],
    requireAssignment: true,
    requireValidation: true,
    transitions: ['draft', 'changesRequested', 'approved', 'published'],
  },
  {
    id: 'changesRequested',
    title: 'Changes Requested',
    color: 'danger',
    roles: ['publisher', 'administrator'],
    requireAssignment: true,
    requireValidation: true,
    transitions: ['inReview'],
  },
  {
    id: 'approved',
    title: 'Approved',
    color: 'success',
    roles: ['publisher', 'administrator'],
    requireAssignment: true,
    requireValidation: true,
    transitions: ['published'],
  },
  {
    id: 'published',
    title: 'Published',
    color: 'primary',
    roles: ['publisher', 'administrator'],
    requireValidation: true,
    transitions: ['inReview'],
  },
]
StructureBuilderContext
Some parts of the configuration export their own contexts, as is the case for the StructureBuilder. This means that we have things like the currentUser, getClient and the documentSore passed down from the context we can access in our custom structure.
In TypeScript, you can follow the type definitions by right-clicking on the variable or type definition and following its trail.
How listeners work
When we fetch data from the content lake, this data will be static. Since we want our list to update automagically 🪄 when we update the workflow metadata (for example, changing the state or the assignees), we need to fetch the data and listen to changes.
In order to do so, we can use the documentStore.listenQuery from in our context:
// type definition context.documentStore.listenQuery
DocumentStore.listenQuery: (query: string | {
    fetch: string;
    listen: string;
}, params: QueryParams, options: ListenQueryOptions) => Observable<any>
As you can see, you can either pass down a query string or an object with two queries – one to fetch and one to listen.
Why is that?
Because you cannot use some of the GROQ functions in listening queries, you have the option to pass down a fetch query which uses score() for example – and a listening query which does not:
const queryListening = `*[$userId in assignees[]]
  {state, _id, _score}`

  // This query will be used for fetching the data
  // we mimic the same sorting as in the workflow plugin
  const queryWithSorting = `*[$userId in assignees[]]
  | score(
    boost(state == "draft", 1),
    boost(state == "inReview", 2),
    boost(state == "changesRequested", 3),
    boost(state == "approved", 4),
    boost(state == "published", 5)
  )
  {state, _id, _score}
  | order(_score asc)`
  const params = {userId: userId as string}

  const queryAssignments = () => {
    return documentStore.listenQuery({fetch: queryWithSorting, listen: queryListening}, params, {
      tag: 'assignments',
    })
  }
As a listener will not return the usual array of results but an observable we need to make sure to get the results rendered out correctly. Additionally, the results need to be mapped to the values we get back from the listener. This is important because we want the values to update without reloading the studio page.
Just resolving the promise(s) would make the values static again.
So we use the rxjs way and pipe then map over the observable variable:
// this is a rxjs observable variable
const $assignments = queryAssignments()

// and this is how we then us the variable later on
return $assignments.pipe(
  // every time we get an updated list of assignments
  // map from rxjs just applies a function to the latest value
	map((assignments) => {
		/* Do something to the observable data -> Next step */
		return /* Your dynamic list based on the data */
 }))
Remove duplicate states from the returned data and add titles and count via WORKFLOW_STATES
Removing duplicate states returned from the listenQuery can be done with new Set() and removing items that share the same state
// create shallow copy for the assignments without duplicate states
const uniqueStates = new Set(
	assignments.map((assignment) => assignment.state)
)
Next, we need to use uniqueStates and merge it with the titles defined in WORKFLOW_STATES. Following a similar approach we determine count by using the original assigments from our rxjs map function:
// create count for each state and get title from WORKFLOW_STATES
const statesWithCount = Array.from(uniqueStates).map((state) => {
	return {
      state,
      title: states.find((workflowState) => workflowState.id === state)?.title!,
      count: assignments.filter((assignment: Assignment) => assignment.state === state).length,
	}
})
Now we have everything to next construct dynamic lists for each of our states in statesWithCount 🥳
Let’s go and construct the lists we’ve been talking about! 💪
Setting things up (final code in TypeScript)
Recap
In order to make things work in tandem with the workflow plugin, we need to refactor the workflow plugin config for the states into its own file and export it. Then we add two more files, workflowStructureByUserId.tsx and SateIcon.tsx, to our project.
In this workflowStructureByUserId.tsx , we will export our list for the structure, which we import into our deskTool later.
Building dynamic lists with documentStore.listenQuery and the Structure Builder
In workflowStructureByUserId.tsx we export our list for the custom structure (all steps are explained inline), that we then import into our deskTool in sanity.config.ts:
import groq from 'groq'
import { map } from 'rxjs'
import { StructureBuilder, StructureResolverContext } from 'sanity/structure'
import { StateIcon } from './StateIcon'

// The workflow states are defined in their own file, and imported to both the plugin config as well as used here to get the titles and colorsfor later use
// see https://github.com/sanity-io/sanity-plugin-workflow?tab=readme-ov-file#configuring-states for more info

interface Assignment {
  state: string
  count: number
  title: string
}

export const workflowStructureByUserId = (
  S: StructureBuilder,
  context: StructureResolverContext,
) => {
  // get the current user id from the context to be able to dynamically get the documents assigned to the user
  const userId = context.currentUser?.id

  // get the workflow states from workflow_states.ts also used for the plugin config
  const states = WORKFLOW_STATES

  // We need to get all assignments for the current user and then group them by state
  // This query will be used for listening, because score() is not supported for listening
  const queryListening = groq`*[_type == 'workflow.metadata' && $userId in assignees[]]
  {state, _id, _score}`

  // This query will be used for fetching the data
  // we mimic the same sorting as in the workflow plugin
  const queryWithSorting = groq`*[_type == 'workflow.metadata' && $userId in assignees[]]
  | score(
    boost(state == "draft", 1),
    boost(state == "inReview", 2),
    boost(state == "changesRequested", 3),
    boost(state == "approved", 4),
    boost(state == "published", 5)
  )
  {state, _id, _score}
  | order(_score asc)`
  const params = { userId: userId as string }

  // get the document store from the context
  const { documentStore } = context
  // listen to the query to make sure it updates when the states change
  const queryAssignments = () => {
    return documentStore.listenQuery(
      { fetch: queryWithSorting, listen: queryListening },
      params,
      {
        tag: `assignments-${userId}`,
      },
    )
  }

  // return the list item for the workflow structure
  return S.listItem()
    .title('Your Assignments')
    .child(() => {
      // this is a rxjs observable variable
      const $assignments = queryAssignments()

      return $assignments.pipe(
        // every time we get an updated list of assignments
        // map from rxjs just applies a function to the latest value
        map((assignments) => {
          // create shallow copy for the assignments without duplicate states
          const uniqueStates = new Set(
            assignments.map((assignment: Assignment) => assignment.state),
          )

          // create count for each state
          const statesWithCount = Array.from(uniqueStates).map((state) => {
            return {
              state,
              count: assignments.filter(
                (assignment: Assignment) => assignment.state === state,
              ).length,
              title: states.find((workflowState) => workflowState.id === state)
                ?.title!,
            }
          })

          // create a list item for each state
          return S.list()
            .title('Assignments by State')
            .items(
              // map over assigments to create a list item for each state
              statesWithCount.map((assignment) => {
                return S.listItem()
                  .title(assignment.title)
                  .icon(() => (
                    // use the state icon component to show the state and count
                    <StateIcon
                      state={
                        (assignment.state as StateIconProps['state']) ||
                        'unknown'
                      }
                      count={assignment.count}
                    />
                  ))
                  .child(
                    // create a document list returning all documents which are assigned to the current user and has the current state in the meta document
                    S.documentList()
                      .title(
                        `${assignment.title} documents (${assignment.count})`,
                      )
                      .id('workflow-documents')
                      .filter(
                        '_id in *[$userId in assignees[] && state == $state].documentId',
                      )
                      .params({ userId, state: assignment.state })
                      .apiVersion('v2023-08-01'),
                  )
              }),
            ) // end of items
        }), // end of rxjs map
      ) // end of pipe
    })
}
Define a StateIcon component – Our indicator for the amount of documents in each state folder
import { WORKFLOW_STATES } from '@/sanity/plugins/workflow-states'
import { Card, CardTone, Text } from '@sanity/ui'
import { ComponentType } from 'react'

export interface StateIconProps {
  state:
    | 'draft'
    | 'changesRequested'
    | 'inReview'
    | 'approved'
    | 'published'
    | 'unknown'
  count: number
}

const StateIcon: ComponentType<StateIconProps> = (props) => {
  const { state, count } = props

  const CardToneMap: Record<StateIconProps['state'], CardTone> = {
    draft: 'default',
    published: 'primary',
    approved: 'positive',
    inReview: 'caution',
    changesRequested: 'critical',
    unknown: 'transparent',
    //undefined: 'inherit',
  }

  return (
    <Card tone={CardToneMap[state]} padding={3}>
      <Text>{count}</Text>
    </Card>
  )
}
export default StateIconAdd the new list to your structure.ts
If you don’t know how to import structure into your deskTool config, check the first chapter of the guide 😉
// structure.ts

import {StructureBuilder, StructureResolverContext} from 'sanity/structure'

import {workflowStructureByUserId} from './workflowStructureByUserId'

const hiddenDocTypes = (listItem: any) =>
  ![
    // your hidden document type names
  ].includes(listItem.getId())

export const structure = (S: StructureBuilder, context: StructureResolverContext) =>
  S.list()
    .title('Content')
    .items([
      workflowStructureByUserId(S, context),

      S.divider(),

      // The rest of this document is from the original manual grouping in this series of articles
      ...S.documentTypeListItems().filter(hiddenDocTypes),
    ])
And we are done! 🥳
A similar approach can also be used to generate folders for
- documents and their translations in tandem with the
translation.metadatadocuments - documents that are scheduled for publishing – as a possible extension of the example above
- marketing resource workflows AND scheduling combined: think editing, approving and scheduling social media posts – where you can additionally leverage the power of Sanity AI Assist to help create posts from your other content!
And and and ...