Published October 02, 2020
Creating custom diff components for 3 different field types

Create 3 different custom diff components to visually show changes to data in your documents.
Sanity provides default ways for editors to view granular changes that happen within a field. These default views work well for many types of data, but sometimes you need to have a custom view to make the data make the most sense to an editor.
In this guide, we'll explore how to create a custom view, called custom diff components, for standard inputs as well as custom inputs inside the Studio Changes panel. We'll take a look at adding these components to the standard e-commerce Sanity Studio.
Prerequisites
- Knowledge of React
- Knowledge of creating schemas for Sanity Studio
- Knowledge of creating a custom input component
- A basic Studio created using the "e-commerce" template created using the
sanity createcommand in the CLI
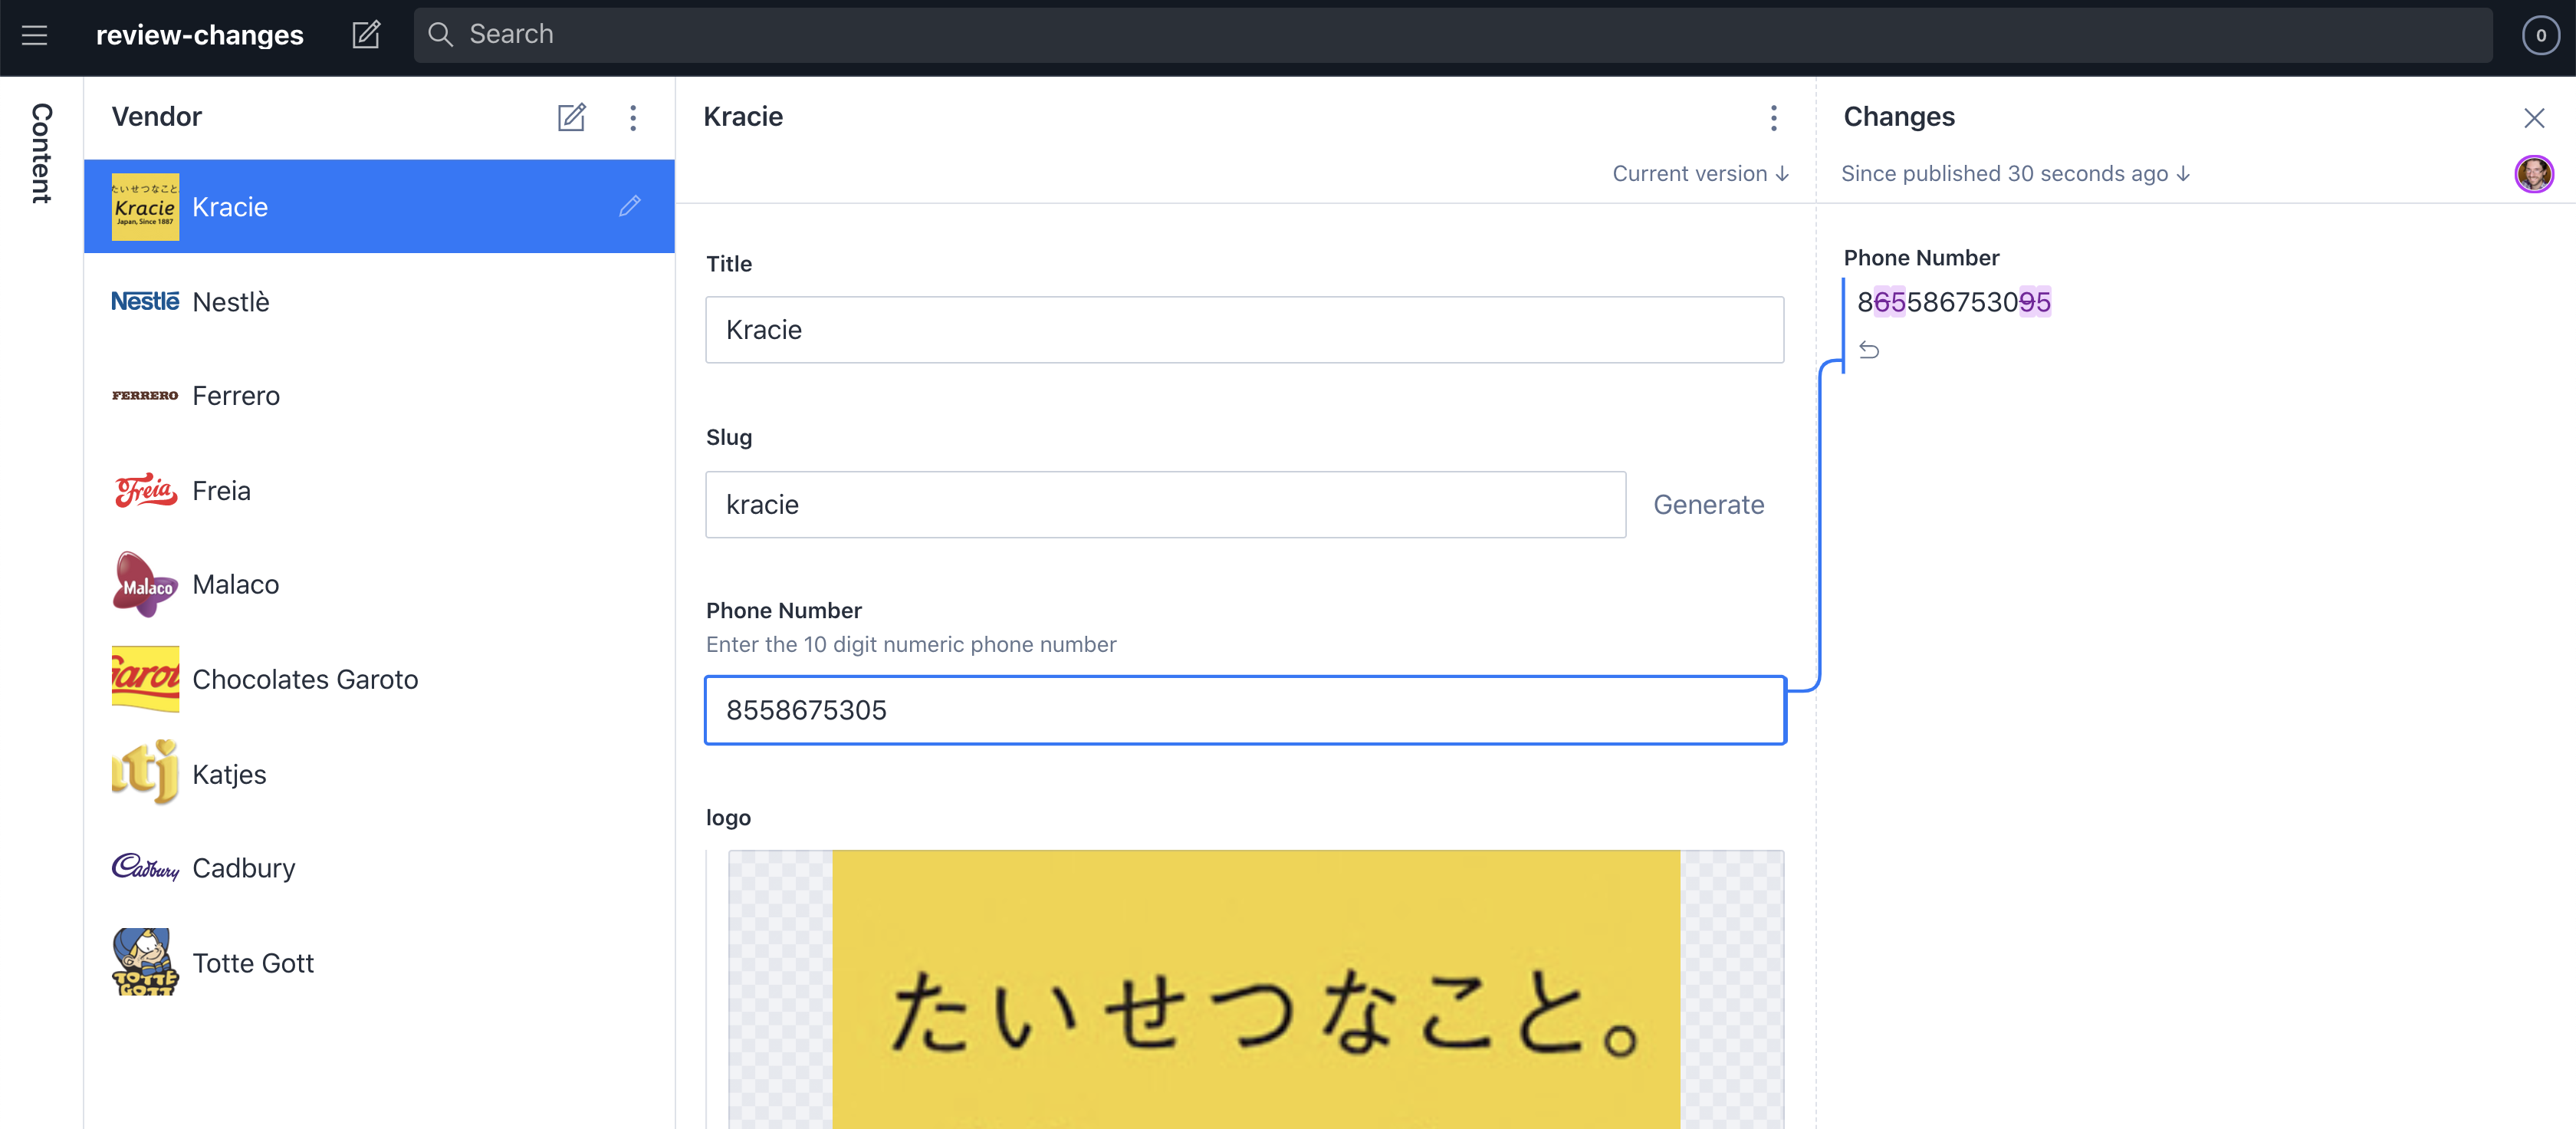
Show how a phone number changed in a readable format
In our e-commerce schema, we have a vendor document type. The vendor has some basic information about the company: a logo, title, and description. Depending on the type of store we're building, we may want to include some contact information, as well.
To do this, we'll set up a string field to handle the phone number. At this point, we could set up a custom input to handle the phone number, to show the phone number formatted correctly when entered, but let's keep our example simple.
// vendor.js
export default {
  name: 'vendor',
  title: 'Vendor',
  type: 'document',
  fields: [
    {
      name: 'title',
      title: 'Title',
      type: 'string'
    },
    {
      name: 'slug',
      title: 'Slug',
      type: 'slug',
      options: {
        source: 'title',
        maxLength: 96
    },
    },
    {
      name: 'phoneNumber',
      title: 'Phone Number',
      description: "Enter the 10 digit numeric phone number",
      type: 'string',
    }
    // ... Rest of the Schema
]
This provides an area for a user to add a phone number, but when we review changes made to the data, it's not simple to visualize the change.
Let’s clean the preview to showcase how the data will impact the final view in most uses of the string.
First, we need a place to hold our diff code. This can be stored anywhere in our project. For these examples, let’s create a diffComponents directory at the root of our project. In more complex projects, this should live with any other customizations powering your Studio.
Inside this directory, we need to create a file for this specific component: phoneNumberDiff.js.
Since what we’re creating is a React component, we first need to import React. Then, we’ll set up our exported component, which we'll use in our schema.
// phoneNumberDiff.js
import React from 'react'

export function PhoneNumberFieldDiff({diff, schemaType}) {
    // Where our component code will live
}
A custom diff component will receive an object containing a diff object and a schemaType object. These contain all the information about what has changed in our data.
The return of this function should be a component that can be inserted into the Changes panel in the Studio. There are a few different helper components that we can use to build out our visualization. In this example, we'll use the most basic of them: <DiffFromTo />. This component will follow all the design elements of the built-in UI elements, but allow us to change the format of the contents of a “before” and “after” view. The component requires a diff property with the full diff object, as well as a schemaType prop containing the full schemaType object. We can then specify a preview component that we can define inline or separately.
// phoneNumberDiff.js.
import React from 'react'
import {DiffFromTo} from '@sanity/field/diff' // Import the helper

function TelephonePreview({value}) {
    // Our Preview component
}

export function PhoneNumberFieldDiff({diff, schemaType}) {
    return (
        <DiffFromTo
            diff={diff}
            schemaType={schemaType}
            previewComponent={TelephonePreview}
        />
    )
}
Inside our TelephonePreview function, we have access to the value of the diff, as well as, optionally, the schemaType object. In this example, we only need the value.
Inside of our preview component, we need to do some minor formatting on our data and return back a component based on some simple conditionals to check the number of characters of our phone number data.
// phoneNumberDiff.js.
import React from 'react'
import {DiffFromTo} from '@sanity/field/diff'

function TelephonePreview({value}) {
    if (value.length === 10) {
        return (
            <div>({value.slice(0,3)}) {value.slice(3,6)}-{value.slice(6)}</div>
        )
    }
    if (value.length === 7) {
        return (
            <div>{value.slice(0,3)}-{value.slice(3)}</div>
        )
    }
    return (<div>{value}</div>)
}

export function PhoneNumberFieldDiff({diff, schemaType}) {
    return (
        <DiffFromTo
            diff={diff}
            schemaType={schemaType}
            previewComponent={TelephonePreview}
            layout="inline" // "grid" is also an option
        />
    )
}
Now that our component is formed, we need to attach it to our field. To do this, we need to add the diffComponent property to our phoneNumber string field in vendor.js.
// vendor.js
// Import the named function from our component file
import {PhoneNumberFieldDiff} from '../diffComponents/phoneNumberDiff'

export default {
  name: 'vendor',
  title: 'Vendor',
  type: 'document',
  fields: [
    // ... additional fields
    {
      name: 'phoneNumber',
      title: 'Phone Number',
      description: "Enter the 10 digit numeric phone number",
      type: 'string',
      diffComponent: PhoneNumberFieldDiff
    },
    // ... additional fields and previews
  ]
}
Now, when a change gets made, the Changes panel will show a formatted string for our phone numbers, depending on the length of the string.

Showing a visual diff for the barcode input field
Some changes need both broad graphical information and granular diffs on data. For example, in our e-commerce Studio, we have a custom input of a Barcode generator using react-barcode. It's created via an object field type. It would be nice to show the difference between the barcodes as well as the discrete data changes that created the difference.
For our graphical changes, we’ll use <DiffFromTo /> and for the granular changes, we’ll use the helper component <ChangeList /> to present certain fields of data in their default presentation.
Much like our previous example, we need to add a new file in our diffComponents directory to house our code. We'll create a barCodeDiff.js file. The scaffolding for this will be very similar to our phone number diff. We import our required helpers up top and then export our barcode diff component.
In our barCodeDiff function, we’ll pass the diff and schemaType to our two helper functions for rendering. Our DiffFromTo component will have a previewComponent defined.
The <ChangeList /> helper has a fields prop, which we can pass an array of field name values to display. These fields will have their defined or default diff components rendered.
Our diff preview component will take the value from the diff. Since this field type is an object, the value will also be an object containing the values of the various fields inside the object. In this case, we have a barcode value and a format. Both of these values are necessary for making react-barcode display the barcode.
// barCodeDiff.js
import React from 'react'
import {DiffFromTo, ChangeList} from '@sanity/field/diff'
import Barcode from 'react-barcode'

export function barCodeDiff({diff, schemaType}) {
  return (<div>
    <DiffFromTo
      diff={diff}
      schemaType={schemaType}
      previewComponent={barCodeDiffPreviewComponent}
      layout="grid"
    />
    <ChangeList
      diff={diff}
      schemaType={schemaType}
      fields={['barcode', 'format']}
    />
  </div>)
}

function barCodeDiffPreviewComponent({value}) {
  return (<div style={{display: "flex", padding: "5px", justifyContent: "center", alignItems: "center"}}>
    <Barcode
      textAlign="center"
      value={value.barcode}
      format={value.format || ''}
      width={1}
    />
  </div>)
}
We can also specify any additional styles needed to render the preview appropriately. In this case, we need to add a little padding and centering with inline styling on an anonymous <div />. This is optional but makes for a nicer looking component.
Custom layouts for diff views
There are helper functions for many parts of a change’s view. You can tweak exactly how things are displayed while taking advantage of how the diffs are generated by Sanity.
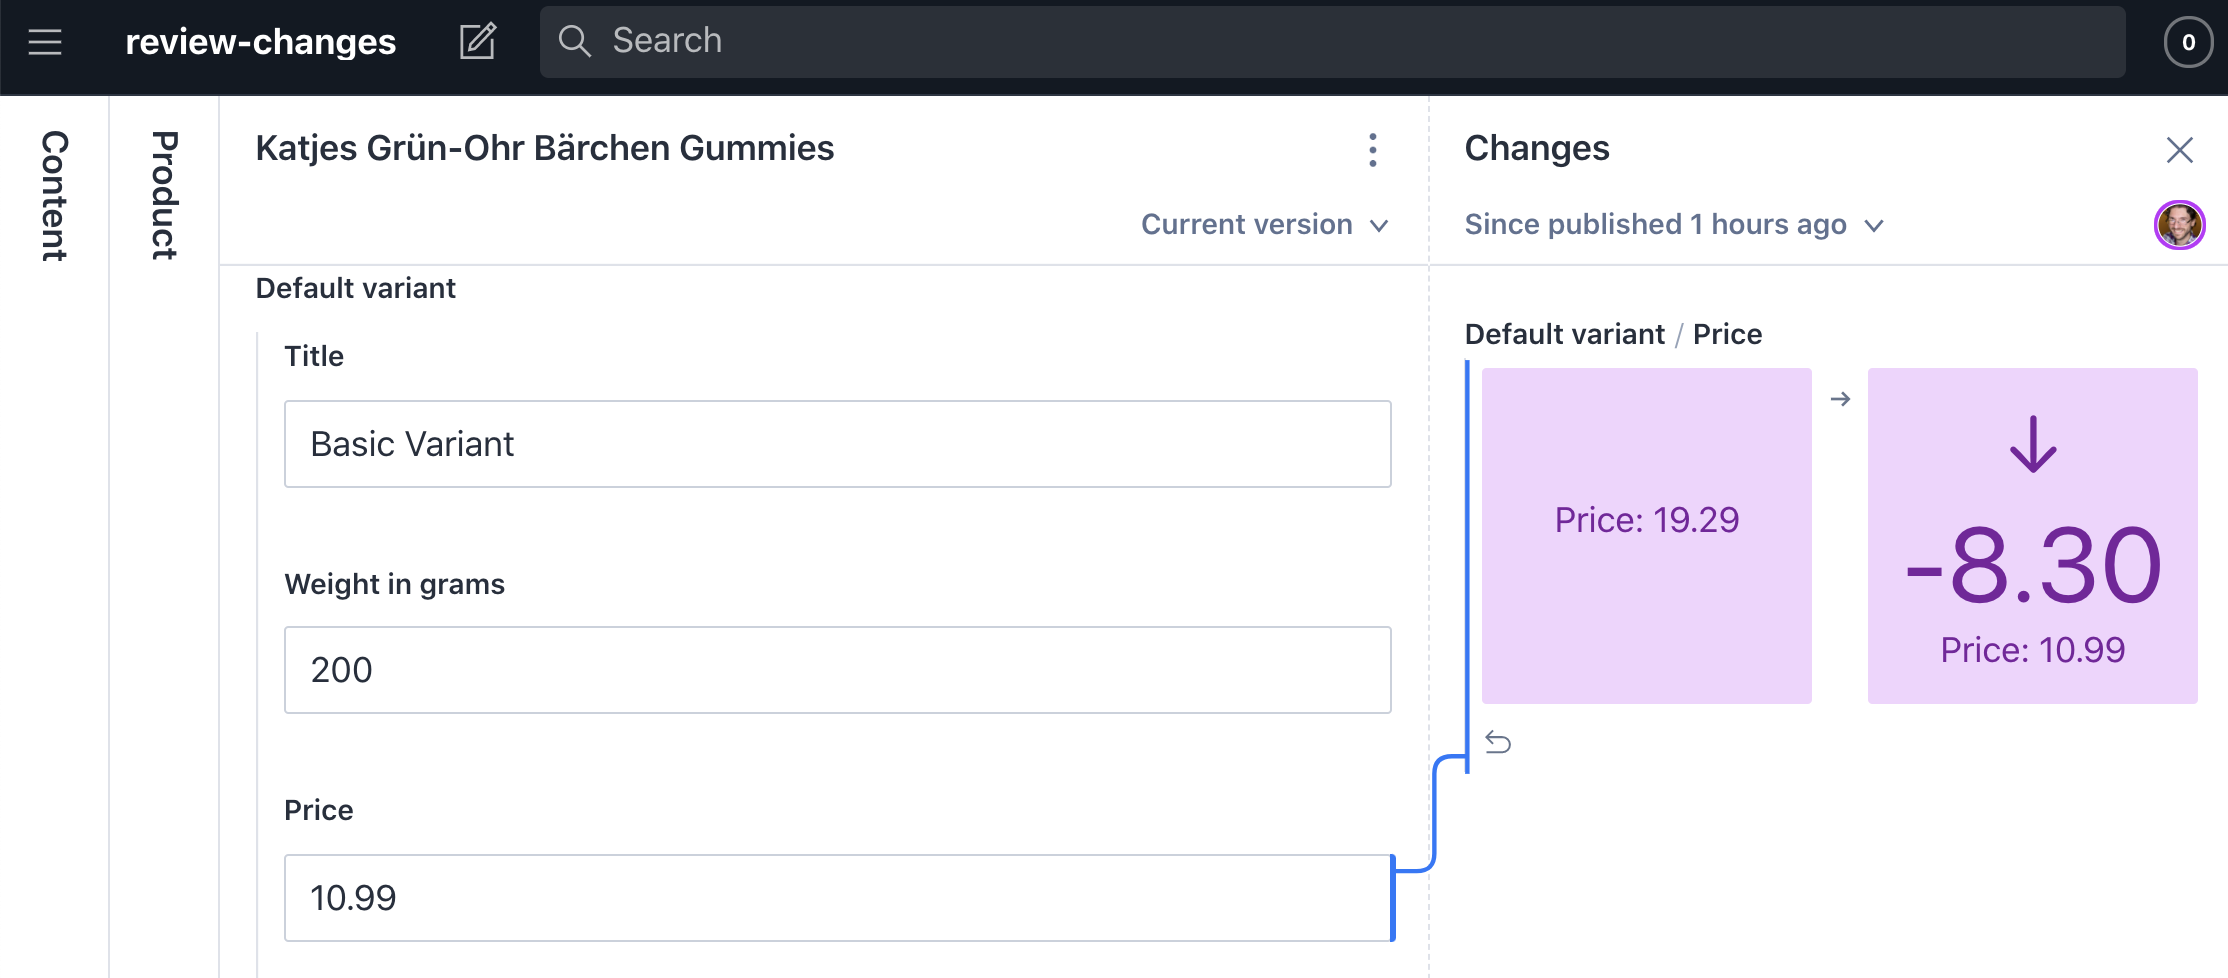
In this example, we create a custom view for looking at pricing changes inside our productVariant schema. This will visualize the difference in the price with an arrow, the numeric difference, the old and current price, and a customized size and layout.
Let’s create a new component file in our diffComponents directory called priceDiff.js.
Using the <FromTo /> helper component, we can pass custom components to a from and to prop to allow for different views or data for each. We also can calculate a new piece of data from our diff values. In order to calculate a price difference, we check the toValue and subtract the fromValue from it. This will give us a +/- view of our data change.
We pass that into the to prop’s component to display conditionally in our preview component.
The preview component has two special helpers in use:
<DiffToolTip />will create a change tooltip you hover its children. This tooltip will display the change’s author and the time it was changed.<DiffCard />will give allow us to take advantage of the diff’s user’s color to showcase who changed the data while allowing us to fully customize the interior.
To make the example concise, we have used inline styles. You are of course free to use CSSmodules in yours.
// priceDiff.js
import React from 'react'
import { FromTo, DiffTooltip, DiffCard } from '@sanity/field/diff'
function PriceDiffComponent ({ value, priceChange, diff }) {
return (
<div
style={{
width: '100%',
textAlign: 'center',
display: 'grid',
alignSelf: 'stretch',
alignItems: 'stretch'
}}
>
<DiffTooltip diff={diff}>
<DiffCard as="div" diff={diff} style={{ display: 'grid' }}>
<div
style={{
minHeight: '100px',
marginBottom: '1rem',
width: '100%',
display: 'flex',
justifyContent: 'center',
flexDirection: 'column'
}}
>
{priceChange ? (
<p style={{ fontSize: '3rem', margin: '0' }}>
{priceChange > 0 ? (
<span style={{ fontSize: '.75em' }}>↑</span>
) : (
<span style={{ fontSize: '.75em' }}>↓</span>
)}{' '}
{priceChange}
</p>
) : (
''
)}
<p style={{ margin: '0' }}>Price: {value}</p>
</div>
</DiffCard>
</DiffTooltip>
</div>
)
}
export function priceDiff ({ diff }) {
const { fromValue, toValue } = diff
const priceDifference = (toValue - fromValue).toFixed(2)
return (
<div>
<FromTo
from={<PriceDiffComponent value={diff.fromValue} diff={diff} />}
to={
<PriceDiffComponent
value={diff.toValue}
priceChange={priceDifference}
diff={diff}
/>
}
layout="grid" // Allows for even sizing of areas
/>
</div>
)
}Just like before, we now need to hook this into our price field in our productVariant.js schema.
// priceVariant.js
import {priceDiff} from '../diffComponents/priceDiff'

export default {
  title: 'Product variant',
  name: 'productVariant',
  type: 'object',
  fields: [
    // ... Previous fields
    {
      title: 'Price',
      name: 'price',
      type: 'number',
      diffComponent: priceDiff
    },
    // ... Next fields
  ]
}
Next Steps
The sky is the limit for what you can do in a custom diff component. While this guide has scratched the surface, there are plenty of use cases where a little more visual communication can make an editor’s life easier. When we create custom components – or even interesting use cases for a common field type – we should think about how we can make the change more obvious for our editors.
Ideas for custom diff components
- Visualize edits to an SVG
- Use Watson’s “sentiment checker” to see how content changes have affected a text’s emotional impact
- Check how a change might affect SEO with Yoast.js
Sanity – The Content Operating System that ends your CMS nightmares
Sanity replaces rigid content systems with a developer-first operating system. Define schemas in TypeScript, customize the editor with React, and deliver content anywhere with GROQ. Your team ships in minutes while you focus on building features, not maintaining infrastructure.
Sanity scales from weekend projects to enterprise needs and is used by companies like Puma, AT&T, Burger King, Tata, and Figma.