Published June 19, 2021
How to create a Telegram bot with Node.js and Sanity
By Joe Holmes

Are you looking for a better way to store your favorite memes?
In this tutorial, we'll build a simple chatbot for "meme storage" in Telegram using NodeJS and Replit. We'll use it to store selected images in a Sanity studio instance, and it will hopefully serve as a friendly introduction to the art and science of chatbot construction.
Of the many platforms that have seen a surge in use over the past year, the privacy-focused chat app Telegram is among the most successful. In April 2020, Telegram announced it hit 400 million monthly users. It now plans to reach a billion by 2022.
If you're a privacy advocate, beginner developer, or simply like chatting with your friends, creating Telegram chatbots is a great way to practice coding and build something cool. The platform is only getting more popular, so knowledge of the Telegram API is a great skill to have!
There are plenty of options for an aspiring chatbot builder— Discord, Facebook, Slack... So why are we going with Telegram?
For one, its API is beginner-friendly. If you're a new developer, building your own Telegram bot should be more approachable than the alternatives.
Secondly, Telegram is open source and can be rebuilt from the ground up using the source code (check out the React version on Github). So if you have fun with our project, there's no limit to how far you can extend it in the ecosystem!
Requirements
- Basic knowledge of NodeJS
- Sanity CLI installed
- Telegram account created
- Replit account created
Initializing the Telegram bot with Botfather
To begin let's use Botfather, Telegram's in-house bot wizard, to initialize our bot and grab its API keys.
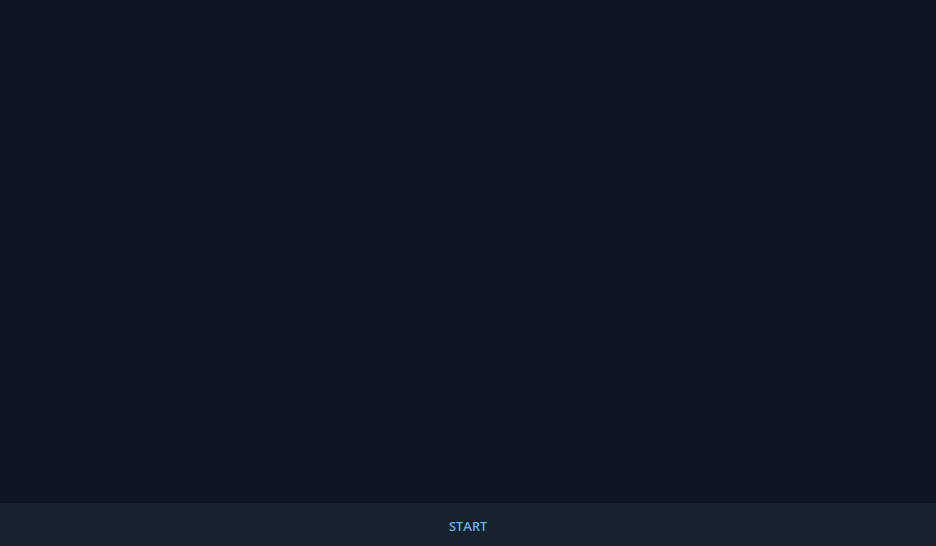
Download Telegram desktop. Visit Botfather to immediately open a chat and begin creating your bot.
Running /start tells Botfather to boot up and show you all of its available commands.
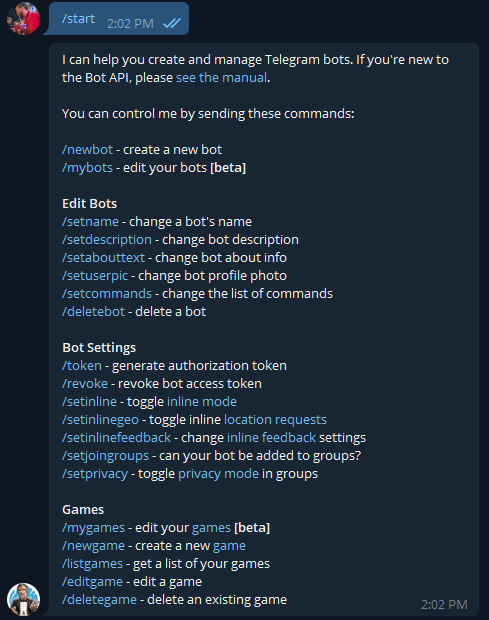
As you can see, there are many options available.
We'll run /newbot. Give your bot a display name, then a username that will be registered with Telegram. The latter has to end with "bot." I chose sanity_gc_memebot for the purposes of this tutorial.
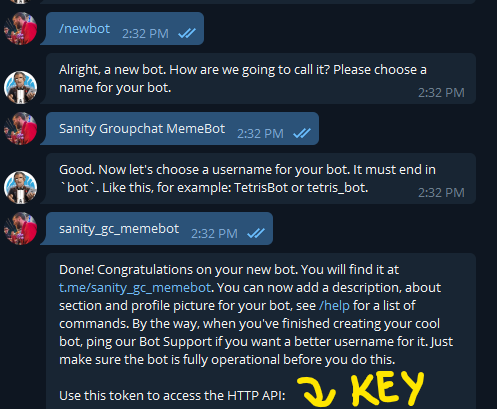
When you give Botfather your bot's username, he'll respond with an API key you can use to program your bot. Copy it and store it somewhere safe. This is all you need to get started!
Next, we'll head to Replit and start hacking on our bot's code.
Starting a new Replit with NodeJS
Replit is an amazing tool for cloud coding. It allows us to write and run our code directly in the browser, free from the tedium of setting up a development environment.
With its pre-built Node.js template we can install Node packages without downloading anything to our hard drive. If you want to leave the Replit on indefinitely you'll need to purchase their paid plan, but once you write the code you can easily transport it to a free tier on Heroku or a similar service.
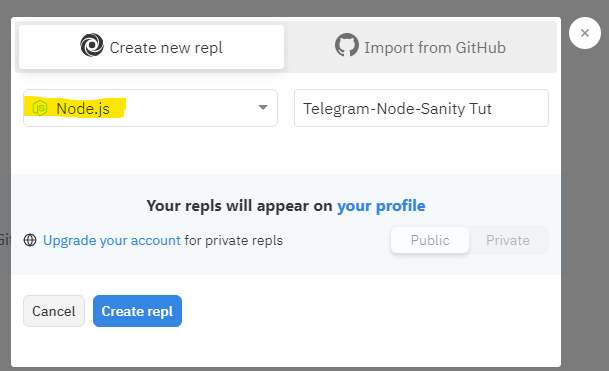
If you haven't already, create a Replit account. Then select "New Repl" on the left sidebar and "Node.js" from the dropdown.
You should now be greeted with an empty index.js file. Let's get to work!
Setting up our environment variables
At this point, maybe you're a little suspicious. "I'm supposed to keep my API key secret at all times. Am I expected to just paste the key into an in-browser sandbox?" Good instincts!
Thankfully, Replit comes with support for environment variables. Your REPL is likely public since private REPLs are a paid feature, but that is no cause for alarm. Only the creator and team members of the REPL will be able to view the secret keys.
Click the lock icon on the left sidebar to access the environment variable screen. Once you get there, input the key TELEGRAM_BOT_KEY and paste the value you received from Botfather.
Now we're ready to initialize our bot.
Booting up our bot
In your index.js file write the following code:
// index.js

// imports the node package for us
const TelegramBot = require('node-telegram-bot-api');

// grabs the environment variable
const token = process.env.TELEGRAM_BOT_KEY;

// starts a new Telegram bot instance that "polls" for updates
const bot = new TelegramBot(token, {polling: true});
Click the big green button 'Run' at the top of the Replit window. You should see two things happen automatically: your package.json initializes, and the node-telegram-bot-api package on npm is installed. Usually, you have to do both of these things by hand. Pretty sweet!
Giving our bot some basic functionality
Now let's make the bot do a couple of tricks and confirm that it's working.
The node package we're working with, node-telegram-bot-api, comes with great documentation. Let's start with one of the methods from the README. We'll tell our bot to send an introduction anytime a user runs /start.
// index.js

// ... after everything we wrote already

// we're using the API's in-built "onText" method
// it takes in a regex and the message
bot.onText(/\/start/, (msg) => {
// listens for "/start" and responds with the greeting below.
bot.sendMessage(msg.chat.id,
"Hey, I'm a brand new Telegram bot. I live inside a Sanity tutorial.");
});
Be sure to click the "Run" button in Replit again, then head over to Telegram and test it out. (If you don't have a dialogue open with your bot yet, head back to your chat with the Botfather and follow the URL he sent you. It should look like t.me/your_bot.)
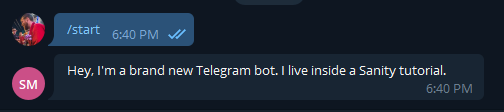
Success!
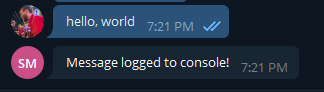
Now let's add a message listener. We'll use this later to upload our photos to Sanity.
// index.js

// ... at the bottom
bot.on('message', (msg) => {
  console.log(msg);
	bot.sendMessage(msg.chat.id, "Message logged to console!")
})
Testing this out will show us what the message object looks like in the Telegram API.
Meanwhile, in Replit:
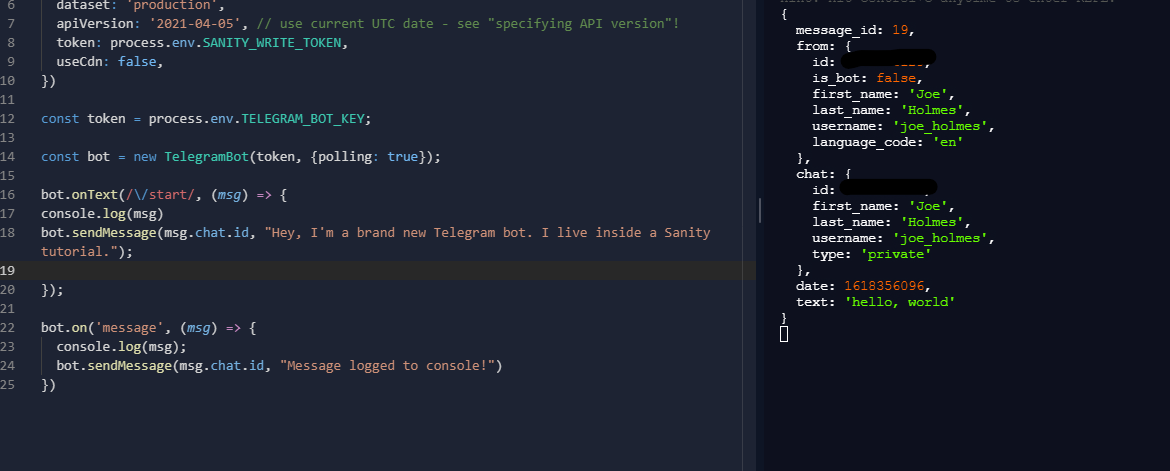
There's our msg object logged on the right-hand side. This is helpful for debugging when our bot becomes more complex.
Initializing Sanity
Now let's get our Studio ready to accept incoming memes. Create a new blog by navigating to your preferred file path and running sanity init. Name it anything you want and select the blog schema.
Let's throw in a quick meme schema to our studio.
In the schemas folder, add meme.js.
// your-studio-folder/schemas/meme.js

export default {
  name: "meme",
  title: "Meme",
  type: "document",
  fields: [
    {
      name: "mainImage",
      title: "Main image",
      type: "image",
    },
    {
      name: "publishedAt",
      title: "Published at",
      type: "datetime",
    },
    {
      name: "author",
      title: "Author",
      type: "string",
    },
  ],
};
Then, in the schema.js file (also in your schemas directory), import the meme.js file and export it along with your blog information.
// your-studio-folder/schemas/schema.js

import meme from "./meme.js"
//and export it with the rest of the schema
//...
meme,
//...
That was fast, huh? Now run sanity deploy and take our studio live.
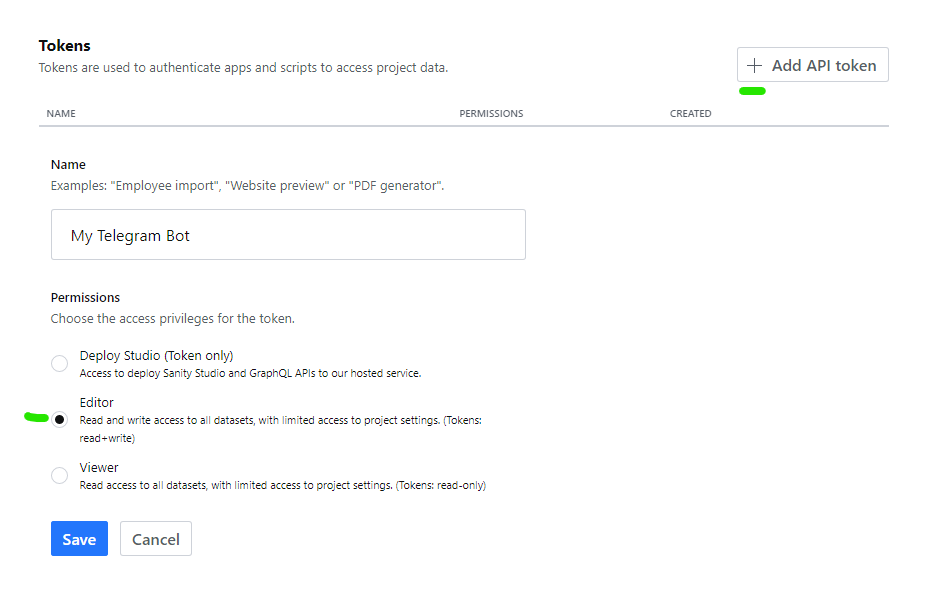
Secure the write token
Usually, we create new documents in Sanity with the user interface of the Studio app. In this case, we'll be using the Javascript client to create documents using our Replit code. To do that, we need a special key that gives our application write access.
This is a powerful key, so be sure to keep it safe!
First, let's head to sanity.io/manage. It got a new design recently, so go check out some pretty UI goodness if you haven't yet.
Find the project you just initialized, click 'Settings' on the top bar, then 'API settings' on the left, and scroll down to 'Tokens'. Add a new API token named 'My Telegram Bot' and give it the 'Editor' permissions.
A key will appear on the screen. Save it somewhere safe!
Back in Replit, let's add a new environmental variable named SANITY_WRITE_TOKEN. Paste your very powerful, very secret value in the field provided and we'll be ready to test it out.
Testing the Sanity client
When building small projects like this one, it can be tempting to put all our code into one file.
This is usually a bad idea because it makes our code harder to read. Any time we can abstract out some simpler operations into another file, we should. It helps keep us organized and makes it easier for newcomers to grok what we've built.
Let's do that here. First create a new file in the Replit called helpers.js.
Add the Sanity client to the helpers file and export it.
// helpers.js

const sanityClient = require('@sanity/client')

const client = sanityClient({
  projectId: 'your_project_id',
  dataset: 'production',
//define your apiVersion as the current date
  apiVersion: '2021-04-05',
  token: process.env.SANITY_WRITE_TOKEN,
  useCdn: false,
})

module.exports = { client }
Note we add the date per Sanity's new Content Lake API upgrade.
Remember we are using Replit and don't need to npm install the Sanity client.
Let's create a new "post" doc to test the Sanity client.
// index.js

// ...
const { client } = require('./helpers')
// ...

bot.on('message', (msg) => {
//here, an in-built method from Sanity creates a new doc for us
  client.create({
    _type: 'post',
    title: msg.text
    })
//when it's done, the bot sends a success message
	.then(res=>bot.sendMessage(msg.chat.id, "Doc was published!"))
  .catch(error => console.error(error));
})
Try it out by pressing the green start button on the Replit again and heading to Telegram. When you send the bot a message, it should create a new Sanity post with the title as your message's text.
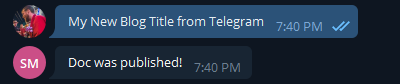
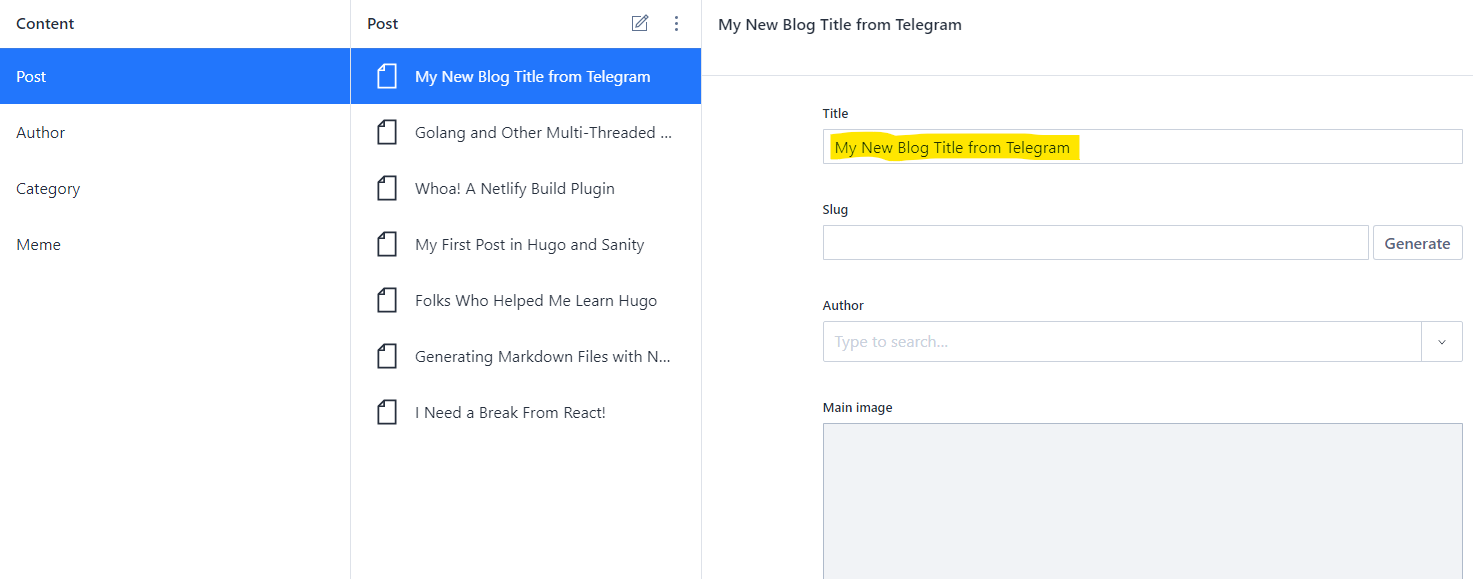
It worked!
Send memes from groupchat to Sanity
With our tests passed, we can move on to more complex functions. Now we will try sending images from Telegram to Sanity.
This is a little tricky. We'll need to use Node to download our images from the Telegram API, where we'll store them in a temp folder on our Replit. Then we can grab the image in that folder and upload it to the Sanity media library. Once the image is safely in Sanity's cloud, we'll reference its ID when we create a new meme document.
This may sound difficult now, but I believe it will become much clearer when you see the code.
Create helper function and temp folder
We'll start by adding a helper function to download the image from Telegram to our Replit.
// helpers.js

const fs = require('fs')
const request = require('request')
const sanityClient = require('@sanity/client')

const client = sanityClient({
// ...
})

const download = (url, path, callback) => {
//the "request" library helps us make HTTP requests in node
//though it is deprecated, it works for our purposes.
//more here: https://www.npmjs.com/package/request
  request.head(url, (err, res, body) => {
    request(url)
//using Node's .pipe() method, we connect the
//readable stream to a writeable stream.
      .pipe(fs.createWriteStream(path))
      .on('close', callback)
  })
}

module.exports = { client, download }
We use the request library to fetch the URL of the file we want to download. Then we tell Node to create a new file from the data we've fetched and place it at the path we specify.
We'll give this function the URL of the Telegram endpoint that downloads our image for us. Replit lets us store files on its server, so we'll save it to a temporary folder called images and make that the file path.
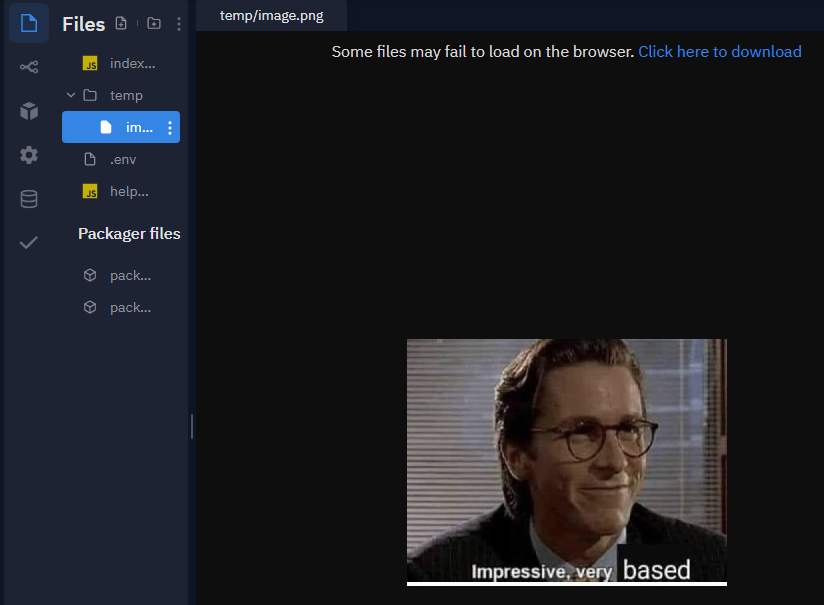
Before we go further let's make that folder. Create temp/image.png in Replit. You can create new files and folders using the icons in the upper right of the picture below.

Testing photo functionality
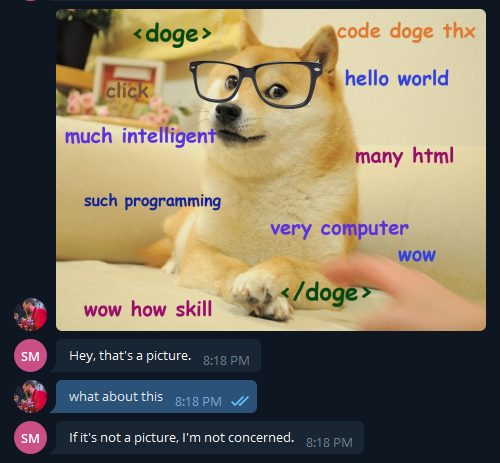
We only want this bot to send over photos. Telegram's API makes it trivial for us to find out if there's a photo in an incoming message.
// index.js

// ...

bot.on('message', (msg) => {
  // this will give us easier access to the chat ID
  const chatId = msg.chat.id;
  // checking if the msg has a photo
  if (msg.photo) {
    bot.sendMessage(chatId, "Hey, that's a picture.")
  }
  else {bot.sendMessage(chatId, "If it's not a picture, I'm not concerned.")}

})
Try it out by attaching a photo to your message.
Importing more modules
Since NodeJS doesn't come with support for ES6's fetch method, we need to add it ourselves. We'll also add Node's file system module so we can manipulate image files on Replit.
// index.js

// ...
const fetch = require("node-fetch");
const fs = require('fs')
// ...
Use Node to download our images from the Telegram server to Replit
Replace the bot.on(...) code with the following:
bot.on('message', (msg) => {
// this will give us easier access to the chat ID
const chatId = msg.chat.id;
// checking if the msg has a photo
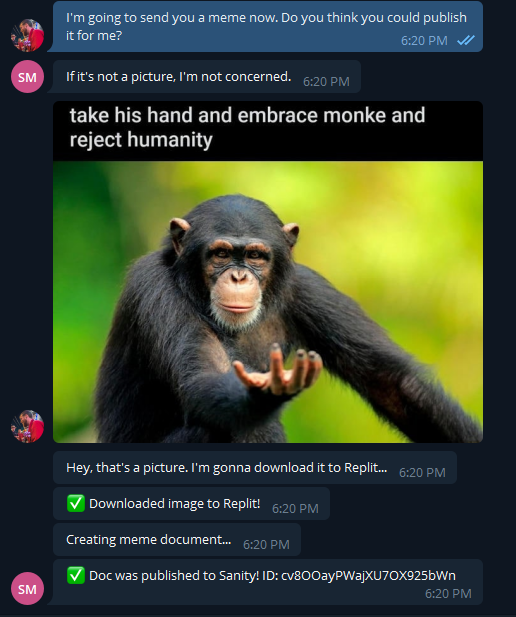
if (msg.photo) {
bot.sendMessage(
chatId,
"Hey, that's a picture. I'm gonna download it to Replit...")
//retrieves the file ID from the photo
const imageID = msg.photo[0].file_id;
//finds the file in the Telegram servers
const imageSender =
fetch(
`https://api.telegram.org/bot${token}/getFile?file_id=${imageID}`
)
.then(res => res.json())
.then(data => {
//sets the file path on Telegram servers
const filePath = data.result.file_path;
//finds the URL to download the image from Telegram servers
const url =
`https://api.telegram.org/file/bot${token}/${filePath}`;
//defines where we want Node to download the image
const path = `./temp/image.png`
//uses our helper function to download file
download(url, path, () => {
bot.sendMessage(chatId, '✅ Downloaded image to Replit!')
})
})
}
})Now try sending a photo to the bot in Telegram.
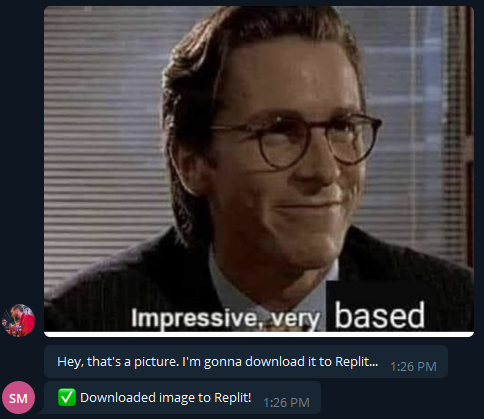
Go back to Replit and check out the temp folder.
Impressive! We're now halfway there.
Sending image from temp folder to Sanity studio
Alright, the first part is done. Now we'll tell Replit what to do with the image in its temp folder. The Sanity client makes asset uploading relatively painless, so this is simpler than it could be!
Where your download helper function is, add this code.
// index.js

// ...
// inside bot.on('message'...

download(url, path, () => {
          bot.sendMessage(chatId, '✅ Downloaded image to Replit!');
          //using Sanity's upload methods
          client.assets
          .upload('image',
          //tell Node to read the image and create a new file in Sanity
          fs.createReadStream(path), {filename: `img-${imageID}.png`})
          .then((document) => {
          bot.sendMessage(chatId, 'Creating meme document...', document)
          //destructure the image ID from document object
          const {_id} = document;
          //create the meme document!
          client.create({
            _type: 'meme',
            mainImage: {
            asset: {
              _type: 'reference',
              //feed the image ID into the mainImage field as its reference
              _ref: _id,
              }
            },
            //fill out the author and publishedAt fields
            author: `${msg.from.first_name} ${msg.from.last_name}`,
            publishedAt: new Date().toISOString()
          })
					//let us know when it's received
          .then(res=>bot.sendMessage(chatId, `✅ Doc was published to Sanity!
						ID: ${res._id}`))
					//catch any errors
          .catch(error => {
            bot.sendMessage(chatId, `❌ Upload failed, check console.`);
            console.error(error);
            })
        })
      .catch((error) => {
      bot.sendMessage(chatId, `❌ Upload failed, check console.`);
      console.error('Upload failed:', error.message)
      })
    })

// ... end of bot.on('message'..) function
In the above code, we do two things with Sanity. First, we upload our asset to the Sanity media library. That way, when it's time to create our document, we only need to reference the ID of the image in the mainImage field and it is attached to our new meme document. Then we create the meme, adding the name of the Telegram user as the author and the current datetime as our publishedAt field.
When we're done, we send a message to the Telegram room letting the user know what happened.
Let's try it out!
Does it appear in Sanity?
Head over to your Sanity studio and see if it appeared.
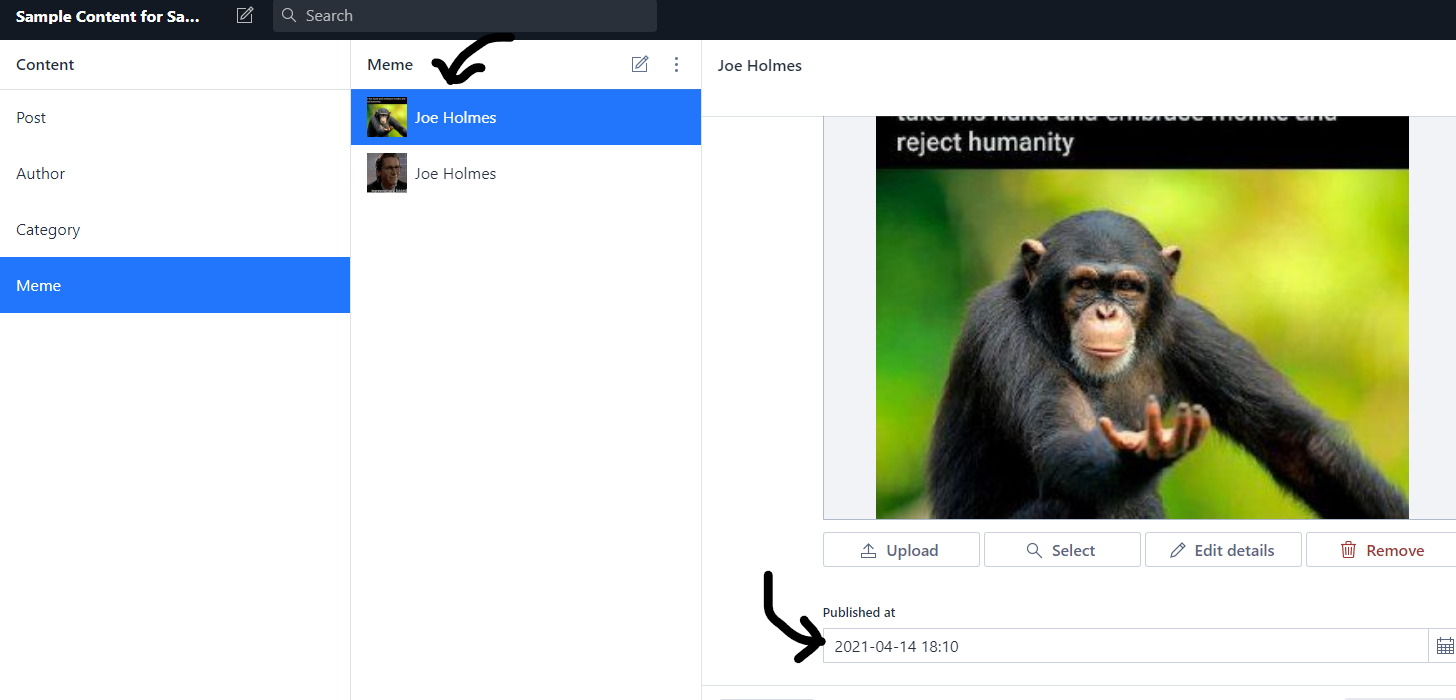
Yes! With name and date fields. Beautiful! We can now export the dankest memes from our groupchat to the world's most advanced publishing platform.
Robot complete!
I've shared the complete code for this bot on Replit. Just switch the toggle in the top left from "Output" to "Code".
To use it, fork the REPL and add a .env with your API keys, then add your Sanity project ID to the helpers.js file.
What should you do from here?
- Naturally, you'll need a front end. If you're going to keep your blog fresh with the day's latest memes, you'll need some fast build times. Maybe consider Hugo?
- I've left you code that could use a little cleaning up. Try running
/startin the completed bot. See what happens? How do we get the "... I'm not concerned" message to not show up when the start command is issued? A conditional combined with a regex, maybe? - How do you call this bot when you're actually chatting in a group? You could add "@your_bot" to your Telegram group, but how do you get it to retrieve text messages? For now, you need to DM your bot, but maybe you can figure out how to talk to it "in public."
Congratulations making it this far! I had a lot of fun and I hope you did too. If you have questions, feedback, or just want to show off the cool stuff you made, reach out on Twitter.
Sanity – The Content Operating System that ends your CMS nightmares
Sanity replaces rigid content systems with a developer-first operating system. Define schemas in TypeScript, customize the editor with React, and deliver content anywhere with GROQ. Your team ships in minutes while you focus on building features, not maintaining infrastructure.
Sanity scales from weekend projects to enterprise needs and is used by companies like Puma, AT&T, Burger King, Tata, and Figma.