Build your blog with Astro and Sanity
A complete guide to setting up your blog using Astro and Sanity
This developer guide was contributed by Knut Melvær (Head of Developer Community and Education), Chris LaRocque (Senior Solution Architect), and Rune Botten (Principal Solutions Engineer and Architect at Sanity working mainly with our enterprise clients.).
Astro is a modern web framework that lets you build fast, content-focused websites. Combined with Sanity's flexible content platform, you can create a blog with powerful content management and real-time editing capabilities.
In this guide, we'll dive deeper into what you'll need to know in order to make a blog with Astro and Sanity. You'll learn how to:
- Set up static and dynamic routes based on content from your Sanity project
- Implement block content with Portable Text, and add custom block types
- Work with images from the Sanity CDN
- Configure Sanity's Presentation Tool tool for live Visual Editing
This guide won't add styling to the markup, we'll leave that up to you. That said, it's often easier to develop the design when the basic markup and content are in place.
Prerequisites
This guide uses TypeScript for code examples, but you can adapt them to JavaScript if preferred. You don't need prior experience with Sanity or Astro, though familiarity with the
Before starting, make sure you have
- Node.js 22 or later. (link)
- A code editor.
- Basic familiarity with TypeScript (optional).
- This guide uses Astro v6 and Sanity v5.16. We recommend following along with these major versions.
Initialize a new Astro project
To create a new Astro project, run the following command:
npm create astro@latestpnpm create astro@latestyarn create astro@latestbun create astro@latestFollow the instructions. When asked How would you like to start your new project? select A basic, minimal starter . You don't need to use TypeScript, but the examples in this guide will be using it.
Add dependencies
To add Sanity to your Astro project, install the official Sanity integration for Astro:
npx astro add @sanity/astro @astrojs/react
pnpm dlx astro add @sanity/astro @astrojs/react
yarn dlx astro add @sanity/astro @astrojs/react
bunx astro add @sanity/astro @astrojs/react
The command should add the Sanity and React configuration to your astro.config.mjs file. This is where you'll tell Astro what your Sanity project ID is, as well as the name of your dataset (most likely production).
The @astrojs/react dependency is needed to embed the Studio on a route.
Note: If you plan to add server-rendered pages or use the Visual Editing features mentioned later in this guide, you’ll also need to add a server adapter. For this example, we’ll use Node.
npx astro add @astrojs/node
pnpm dlx astro add @astrojs/node
yarn dlx astro add @astrojs/node
bunx astro add @astrojs/node
Then update the astro.config.mjs to include it.
import node from "@astrojs/node";

export default defineConfig({
  adapter: node({ mode: "standalone" }),
  integrations: [
    // ...
  ],
});
Note for static-site users
If you don't plan to use the Presentation Tool and want a fully static build, you can avoid the adapter by adding studioRouterHistory: 'hash' to the Sanity integration config instead. This switches the embedded Studio to hash-based routing, which allows it to be prerendered. However, the default browser history mode provides cleaner Studio URLs and is required for the Presentation Tool.
To add TypeScript support, create a file /src/env.d.ts and add the types for the Astro module:
// ./src/env.d.ts
/// <reference types="astro/client" />
/// <reference types="@sanity/astro/module" />
You may need to restart your TypeScript server for this file to be recognized.
Initialize a new Sanity project
To initialize your Sanity project and configure environment variables, run:
npx sanity@latest init --env .env
pnpm dlx sanity@latest init --env .env
yarn dlx sanity@latest init --env .env
bunx sanity@latest init --env .env
Follow the instructions from the CLI, and don't worry about messing up, with Sanity, you can make as many projects as you want. You can always go to sanity.io/manage to find information about your projects.
When the init command is completed Astro will have written 2 new environment variables to your .env file: PUBLIC_SANITY_PROJECT_ID and PUBLIC_SANITY_DATASET. These variables are prefixed with PUBLIC_ because they're not considered secrets.
Sanity Client configuration
Astro has a unique limitation where you can't use variables from .env files directly in your astro.config.mjs file. Because your project ID and dataset name aren't considered sensitive you can directly copy + paste their values from your .env file. Go here for instructions if you wish to use the .env file instead.
Update the sanity integration in your astro.config.mjs file to include the information needed by the Sanity client.
// astro.config.mjs
import { defineConfig } from "astro/config";

import sanity from "@sanity/astro";
import react from "@astrojs/react";

// https://astro.build/config
export default defineConfig({
  integrations: [
    sanity({
      projectId: 'YOUR_PROJECT_ID',
      dataset: '<dataset-name>',
      useCdn: false, // See note on using the CDN
      apiVersion: "2025-01-28", // insert the current date to access the latest version of the API
    }),
    react(),
  ],
});
CDN or not?
Sanity lets you query content through a global CDN. If you plan to keep the site static and set up webhooks that trigger rebuilds when updates are published, then you probably want useCdn to be false to make sure you don't hit stale content when the site builds.
If you plan to use Server Side Rendering, then you probably want to set useCdn to true for performance and cost. You can also override this setting if you run the site in hybrid, for example:
useSanityClient.config({useCdn: false}).fetch(*[_type == "liveBlog"]).
Embedding Sanity Studio
Sanity Studio is where you can edit and manage your content. It's a Single Page Application that's easy to configure and that can be customized in a lot of ways. It's up to you to keep the Studio in a separate repository, in a separate folder (as a monorepo), or embed it into your Astro website.
For the sake of simplicity, this guide will show you how to embed the Studio on a dedicated route (remember /wp-admin?).
Update astro.config.mjs to add a Studio at yoursite.com/studio
// astro.config.mjs
import { defineConfig } from "astro/config";
import sanity from "@sanity/astro";
import react from "@astrojs/react";

// https://astro.build/config
export default defineConfig({
  integrations: [sanity({
    projectId: 'YOUR_PROJECT_ID',
    dataset: '<dataset-name>',
    useCdn: false, // See note on using the CDN
    apiVersion: "2025-01-28", // insert the current date to access the latest version of the API
    studioBasePath: '/studio' // If you want to access the Studio on a route
  }), react()]
});
You must also add a configuration file for Sanity Studio in the project root. Create a new file called sanity.config.ts and add the following, note that we're able to use environment variables here:
// ./sanity.config.ts
import { defineConfig } from "sanity";
import { structureTool } from "sanity/structure";

export default defineConfig({
  projectId: import.meta.env.PUBLIC_SANITY_PROJECT_ID,
  dataset: import.meta.env.PUBLIC_SANITY_DATASET,
  plugins: [structureTool()],
  schema: {
    types: [],
  },
});
Start the Astro local development server, you should be able to visit the Studio at http://localhost:4321/studio. The first time you load this URL, you'll be asked to add the URL to your project's CORS Origins. This is to enable authenticated requests from the browser to the Sanity APIs. Follow the instructions and reload the Studio route once you've added the setting.
Your project folder should now look like this:
.
├── public/
│   └── favicon.svg
├── src/
│   ├── assets/
│   │   ├── astro.svg
│   │   └── background.svg
│   ├── components/
│   │   └── Welcome.astro
│   ├── layouts/
│   │   └── Layout.astro
│   ├── pages/
│   │   └── index.astro
│   └── env.d.ts
├── .env
├── .gitignore
├── astro.config.mjs
├── package-lock.json
├── package.json
├── README.md
├── sanity.config.ts
└── tsconfig.json
Define the studio schema
Sanity is different from most headless CMSes. Content Lake, where your content is stored, is a schema-less backend that lets you store any JSON document and makes it instantly queryable with GROQ. Sanity Studio is a decoupled application that enables you to define a schema using simple JavaScript objects. The Studio uses the schema to build an editor interface where you can collaborate on content in real-time.
This guide isn't going to cover schema creation in-depth, for now we'll copy and paste some starting schema definitions.
Create a new directory inside the src directory, called sanity with a directory schemaTypes inside of it. Create the following files inside /src/sanity/schemaTypes :
// ./src/sanity/schemaTypes/author.ts
import { defineField, defineType } from "sanity";

export const authorType = defineType({
  name: "author",
  type: "document",
  fields: [
    defineField({
      name: "name",
      type: "string",
    }),
    defineField({
      name: "slug",
      type: "slug",
      options: {
        source: "name",
        maxLength: 96,
      },
    }),
    defineField({
      name: "image",
      type: "image",
      options: {
        hotspot: true,
      },
      fields: [
        {
          name: "alt",
          type: "string",
          title: "Alternative Text",
        },
      ],
    }),
    defineField({
      name: "bio",
      type: "array",
      of: [
        {
          type: "block",
          styles: [{ title: "Normal", value: "normal" }],
          lists: [],
        },
      ],
    }),
  ],
  preview: {
    select: {
      title: "name",
      media: "image",
    },
  },
});
// ./src/sanity/schemaTypes/blockContent.ts
import { defineType, defineArrayMember } from "sanity";
/**
* This is the schema type for block content used in the post document type
* Importing this type into the studio configuration's `schema` property
* lets you reuse it in other document types with:
* {
* name: 'someName',
* title: 'Some title',
* type: 'blockContent'
* }
*/
export const blockContentType = defineType({
title: "Block Content",
name: "blockContent",
type: "array",
of: [
defineArrayMember({
type: "block",
// Styles let you define what blocks can be marked up as. The default
// set corresponds with HTML tags, but you can set any title or value
// you want, and decide how you want to deal with it where you want to
// use your content.
styles: [
{ title: "Normal", value: "normal" },
{ title: "H1", value: "h1" },
{ title: "H2", value: "h2" },
{ title: "H3", value: "h3" },
{ title: "H4", value: "h4" },
{ title: "Quote", value: "blockquote" },
],
lists: [{ title: "Bullet", value: "bullet" }],
// Marks let you mark up inline text in the Portable Text Editor
marks: {
// Decorators usually describe a single property – e.g. a typographic
// preference or highlighting
decorators: [
{ title: "Strong", value: "strong" },
{ title: "Emphasis", value: "em" },
],
// Annotations can be any object structure – e.g. a link or a footnote.
annotations: [
{
title: "URL",
name: "link",
type: "object",
fields: [
{
title: "URL",
name: "href",
type: "url",
},
],
},
],
},
}),
// You can add additional types here. Note that you can't use
// primitive types such as 'string' and 'number' in the same array
// as a block type.
defineArrayMember({
type: "image",
options: { hotspot: true },
fields: [
{
name: "alt",
type: "string",
title: "Alternative Text",
},
],
}),
],
});// ./src/sanity/schemaTypes/category.ts
import { defineField, defineType } from "sanity";
export const categoryType = defineType({
name: "category",
type: "document",
fields: [
defineField({
name: "title",
type: "string",
}),
defineField({
name: "description",
type: "text",
}),
],
});// ./src/sanity/schemaTypes/post.ts
import { defineField, defineType } from "sanity";
export const postType = defineType({
name: "post",
type: "document",
fields: [
defineField({
name: "title",
type: "string",
}),
defineField({
name: "slug",
type: "slug",
options: {
source: "title",
maxLength: 96,
},
}),
defineField({
name: "author",
type: "reference",
to: { type: "author" },
}),
defineField({
name: "mainImage",
type: "image",
options: {
hotspot: true,
},
fields: [
{
name: "alt",
type: "string",
title: "Alternative Text",
},
],
}),
defineField({
name: "categories",
type: "array",
of: [{ type: "reference", to: { type: "category" } }],
}),
defineField({
name: "publishedAt",
type: "datetime",
}),
defineField({
name: "body",
type: "blockContent",
}),
],
preview: {
select: {
title: "title",
author: "author.name",
media: "mainImage",
},
prepare(selection) {
const { author } = selection;
return { ...selection, subtitle: author && `by ${author}` };
},
},
});Create a file index.ts inside /src/sanity/schemaTypes
// ./src/sanity/schemaTypes/index.ts
import type { SchemaTypeDefinition } from "sanity";
import { authorType } from "./author";
import { blockContentType } from "./blockContent";
import { categoryType } from "./category";
import { postType } from "./post";

export const schema: { types: SchemaTypeDefinition[] } = {
  types: [authorType, blockContentType, categoryType, postType],
};
Update your sanity.config.ts file to include the new schema:
import { defineConfig } from "sanity";
import { structureTool } from "sanity/structure";
import { schema } from "./src/sanity/schemaTypes";

export default defineConfig({
  projectId: import.meta.env.PUBLIC_SANITY_PROJECT_ID,
  dataset: import.meta.env.PUBLIC_SANITY_DATASET,
  plugins: [
    structureTool(),
  ],
  schema,
});
To recap: you created 3 document types - author, category, and post; as well as a reusable array type blockContent for editing Portable Text. If you refresh your Studio at http://localhost:4321/studio you should see the 3 document types listed, and the blockContent array will be visible when creating a post in the next step.
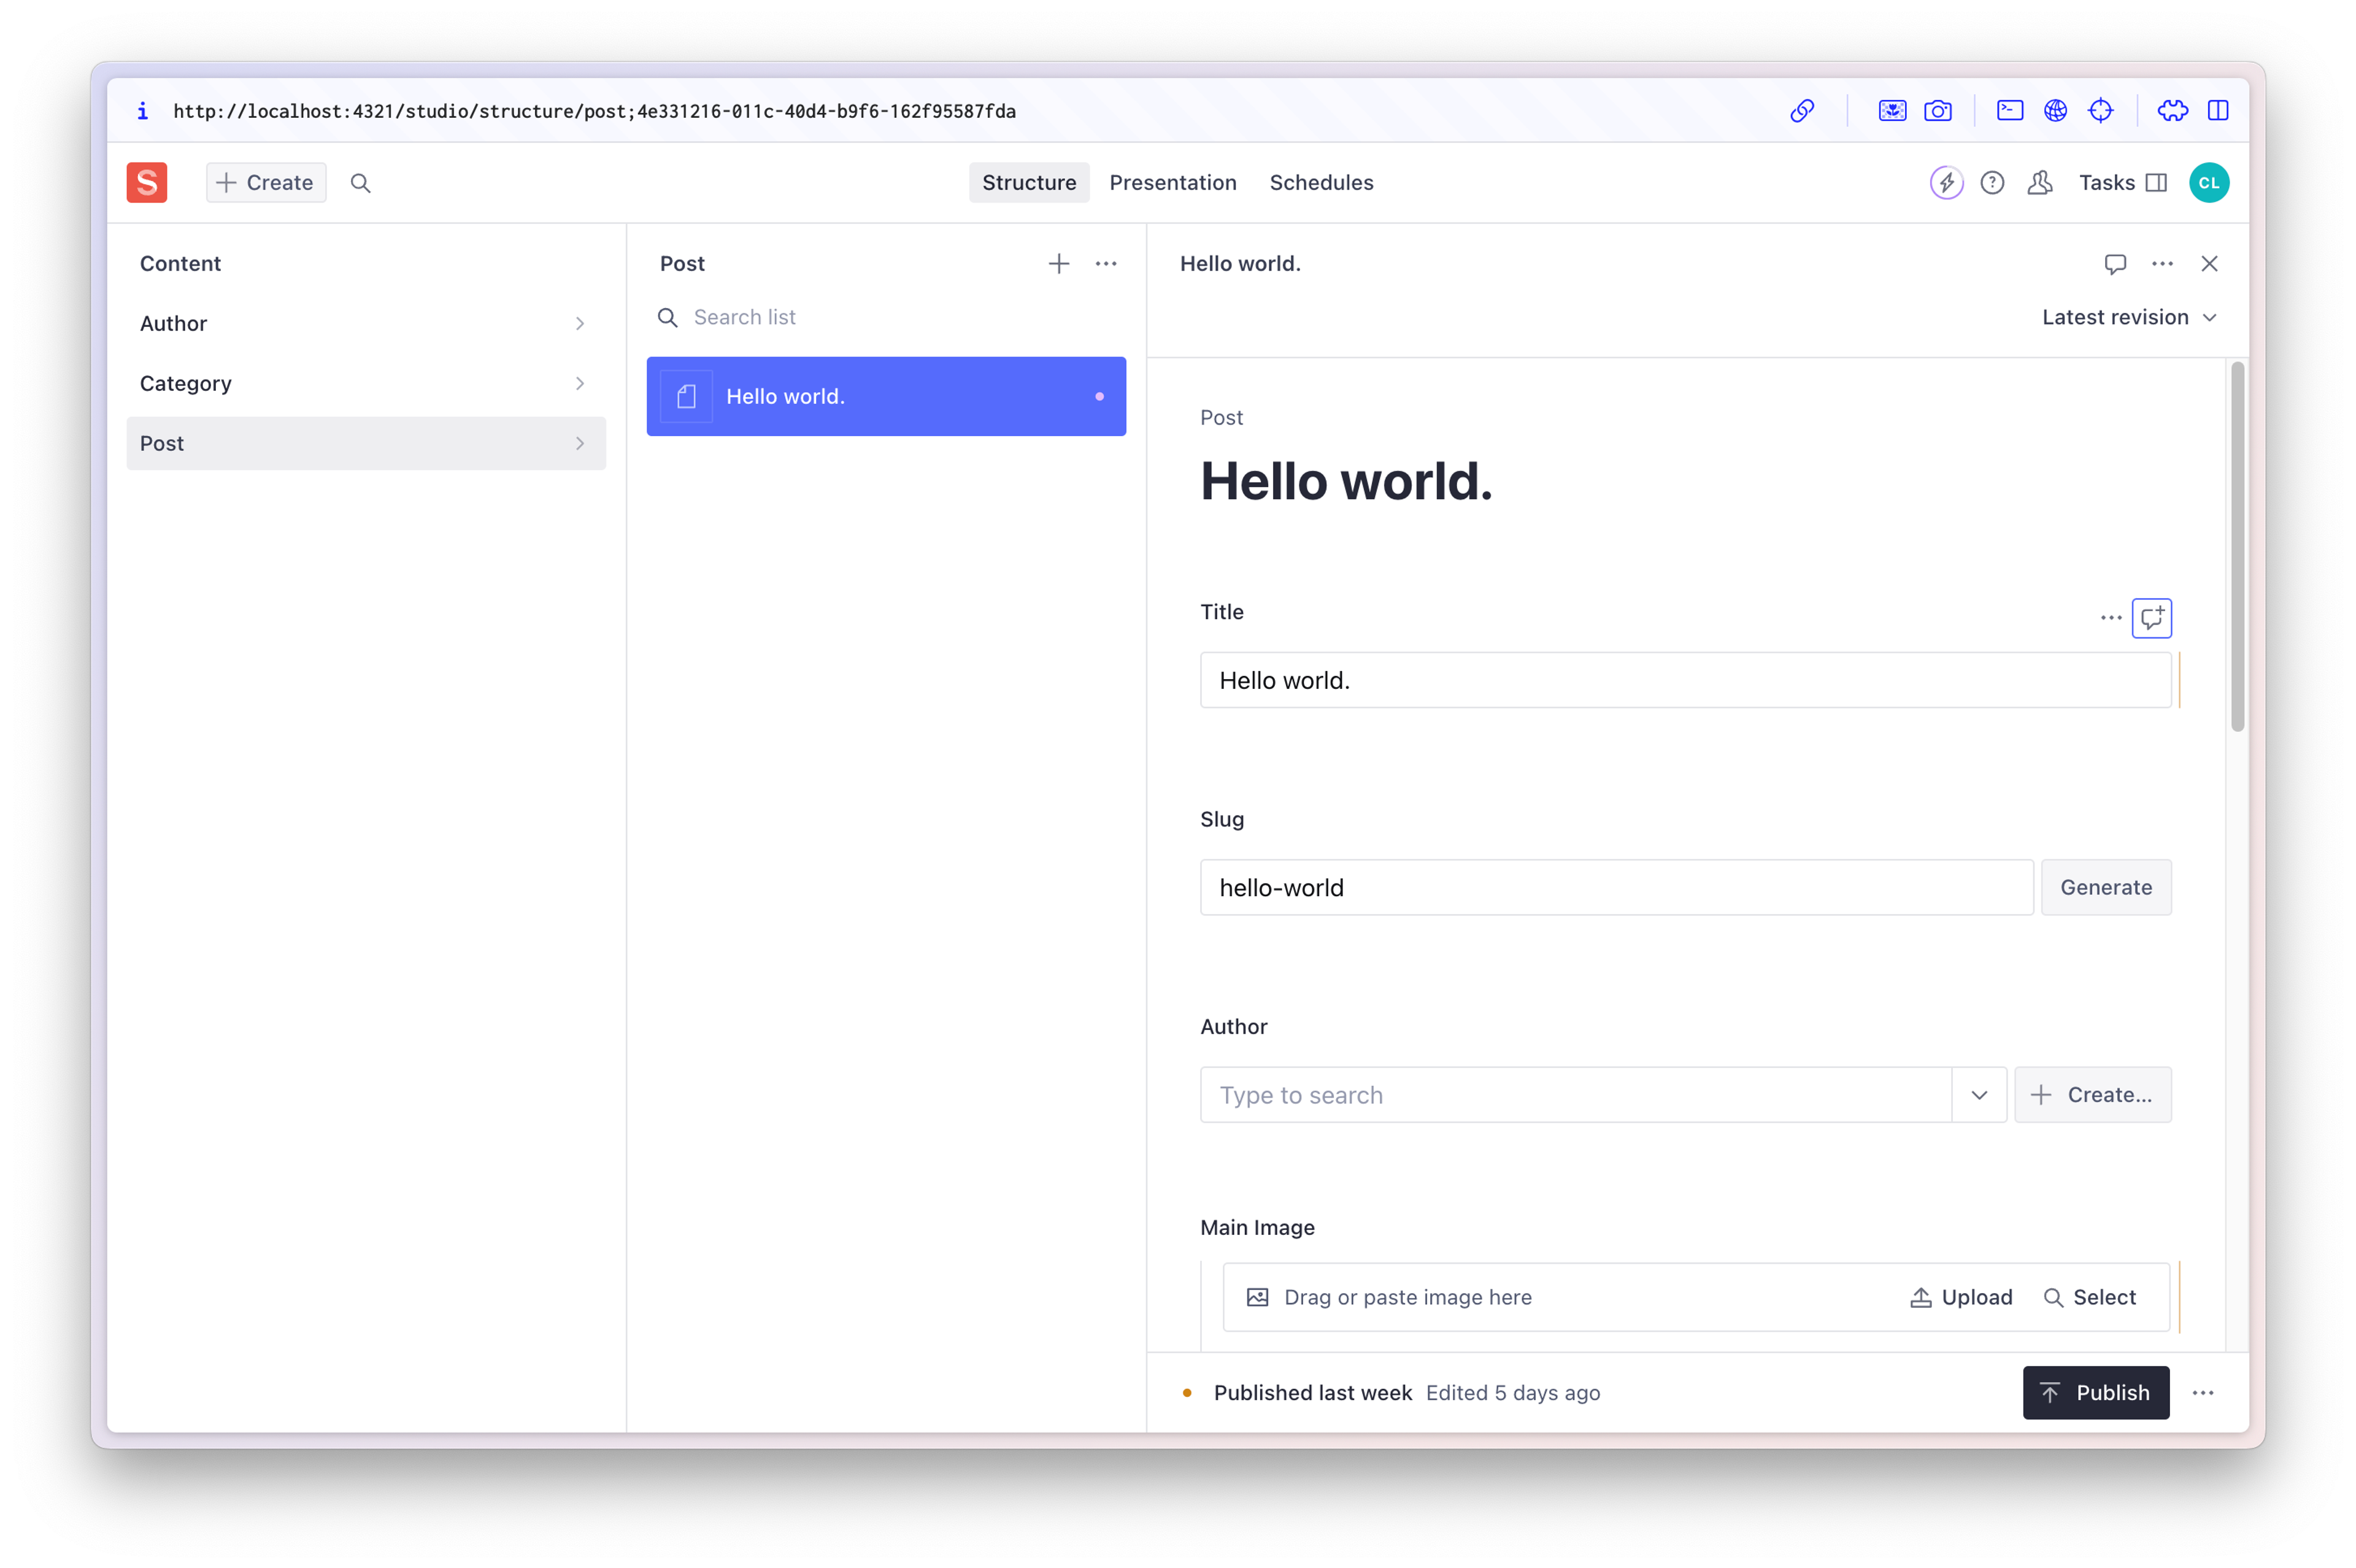
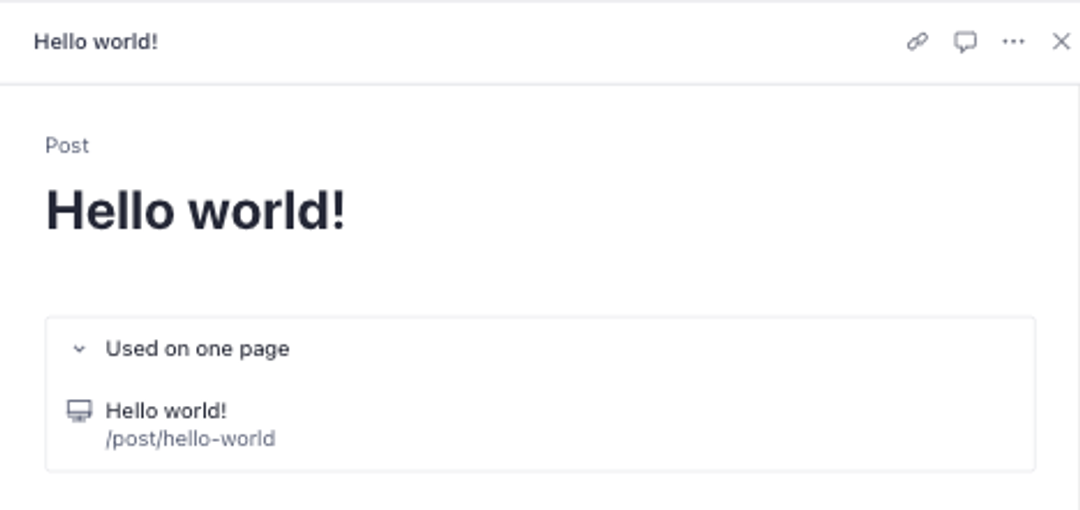
Create some example content
Create a post titled “Hello world” inside your Studio. At the slug field, press “Generate” to make a slug. Then press “Publish” – this makes the content publicly available via the API.
With the content created, the next step is to return to your Astro site and set it up to display your content.
Set up a blog post route in Astro
When you selected A basic, minimal starter template while creating this project, your Astro site was generated with only one route: an index page. To surface posts on our site, you'll want to create routes for each post. In Astro, routes exist as files on the file system in src/pages and are picked up by Astro as routes.
You could manually create routes for each post, but your posts are dynamic: when everything's up and running, you probably want to publish new content without pushing code. Astro, like most web frameworks, offers dynamic routing to make your life easier: you can create one route to catch them all using parameters.
In your blog's schema, every post has a slug, the unique bit of the URL (eg “hello-world” for your “Hello world” post). To use a slug parameter in the route, you must wrap the filename in brackets. So, if you want your posts route to be /post/slug, you need to create a folder called post, which contains a file named [slug].astro.
In [slug].astro, you need to export a function called getStaticPaths that returns an array of objects. In our case, at the minimum, each object needs to include slug in its params. To get started, use this as the contents of your [slug].astro file:
---
// ./src/pages/post/[slug].astro
export function getStaticPaths() {
return [
{params: {slug: 'hello-world'}},
{params: {slug: 'my-favorite-things'}},
{params: {slug: 'summertime'}},
];
}
const { slug } = Astro.params;
---
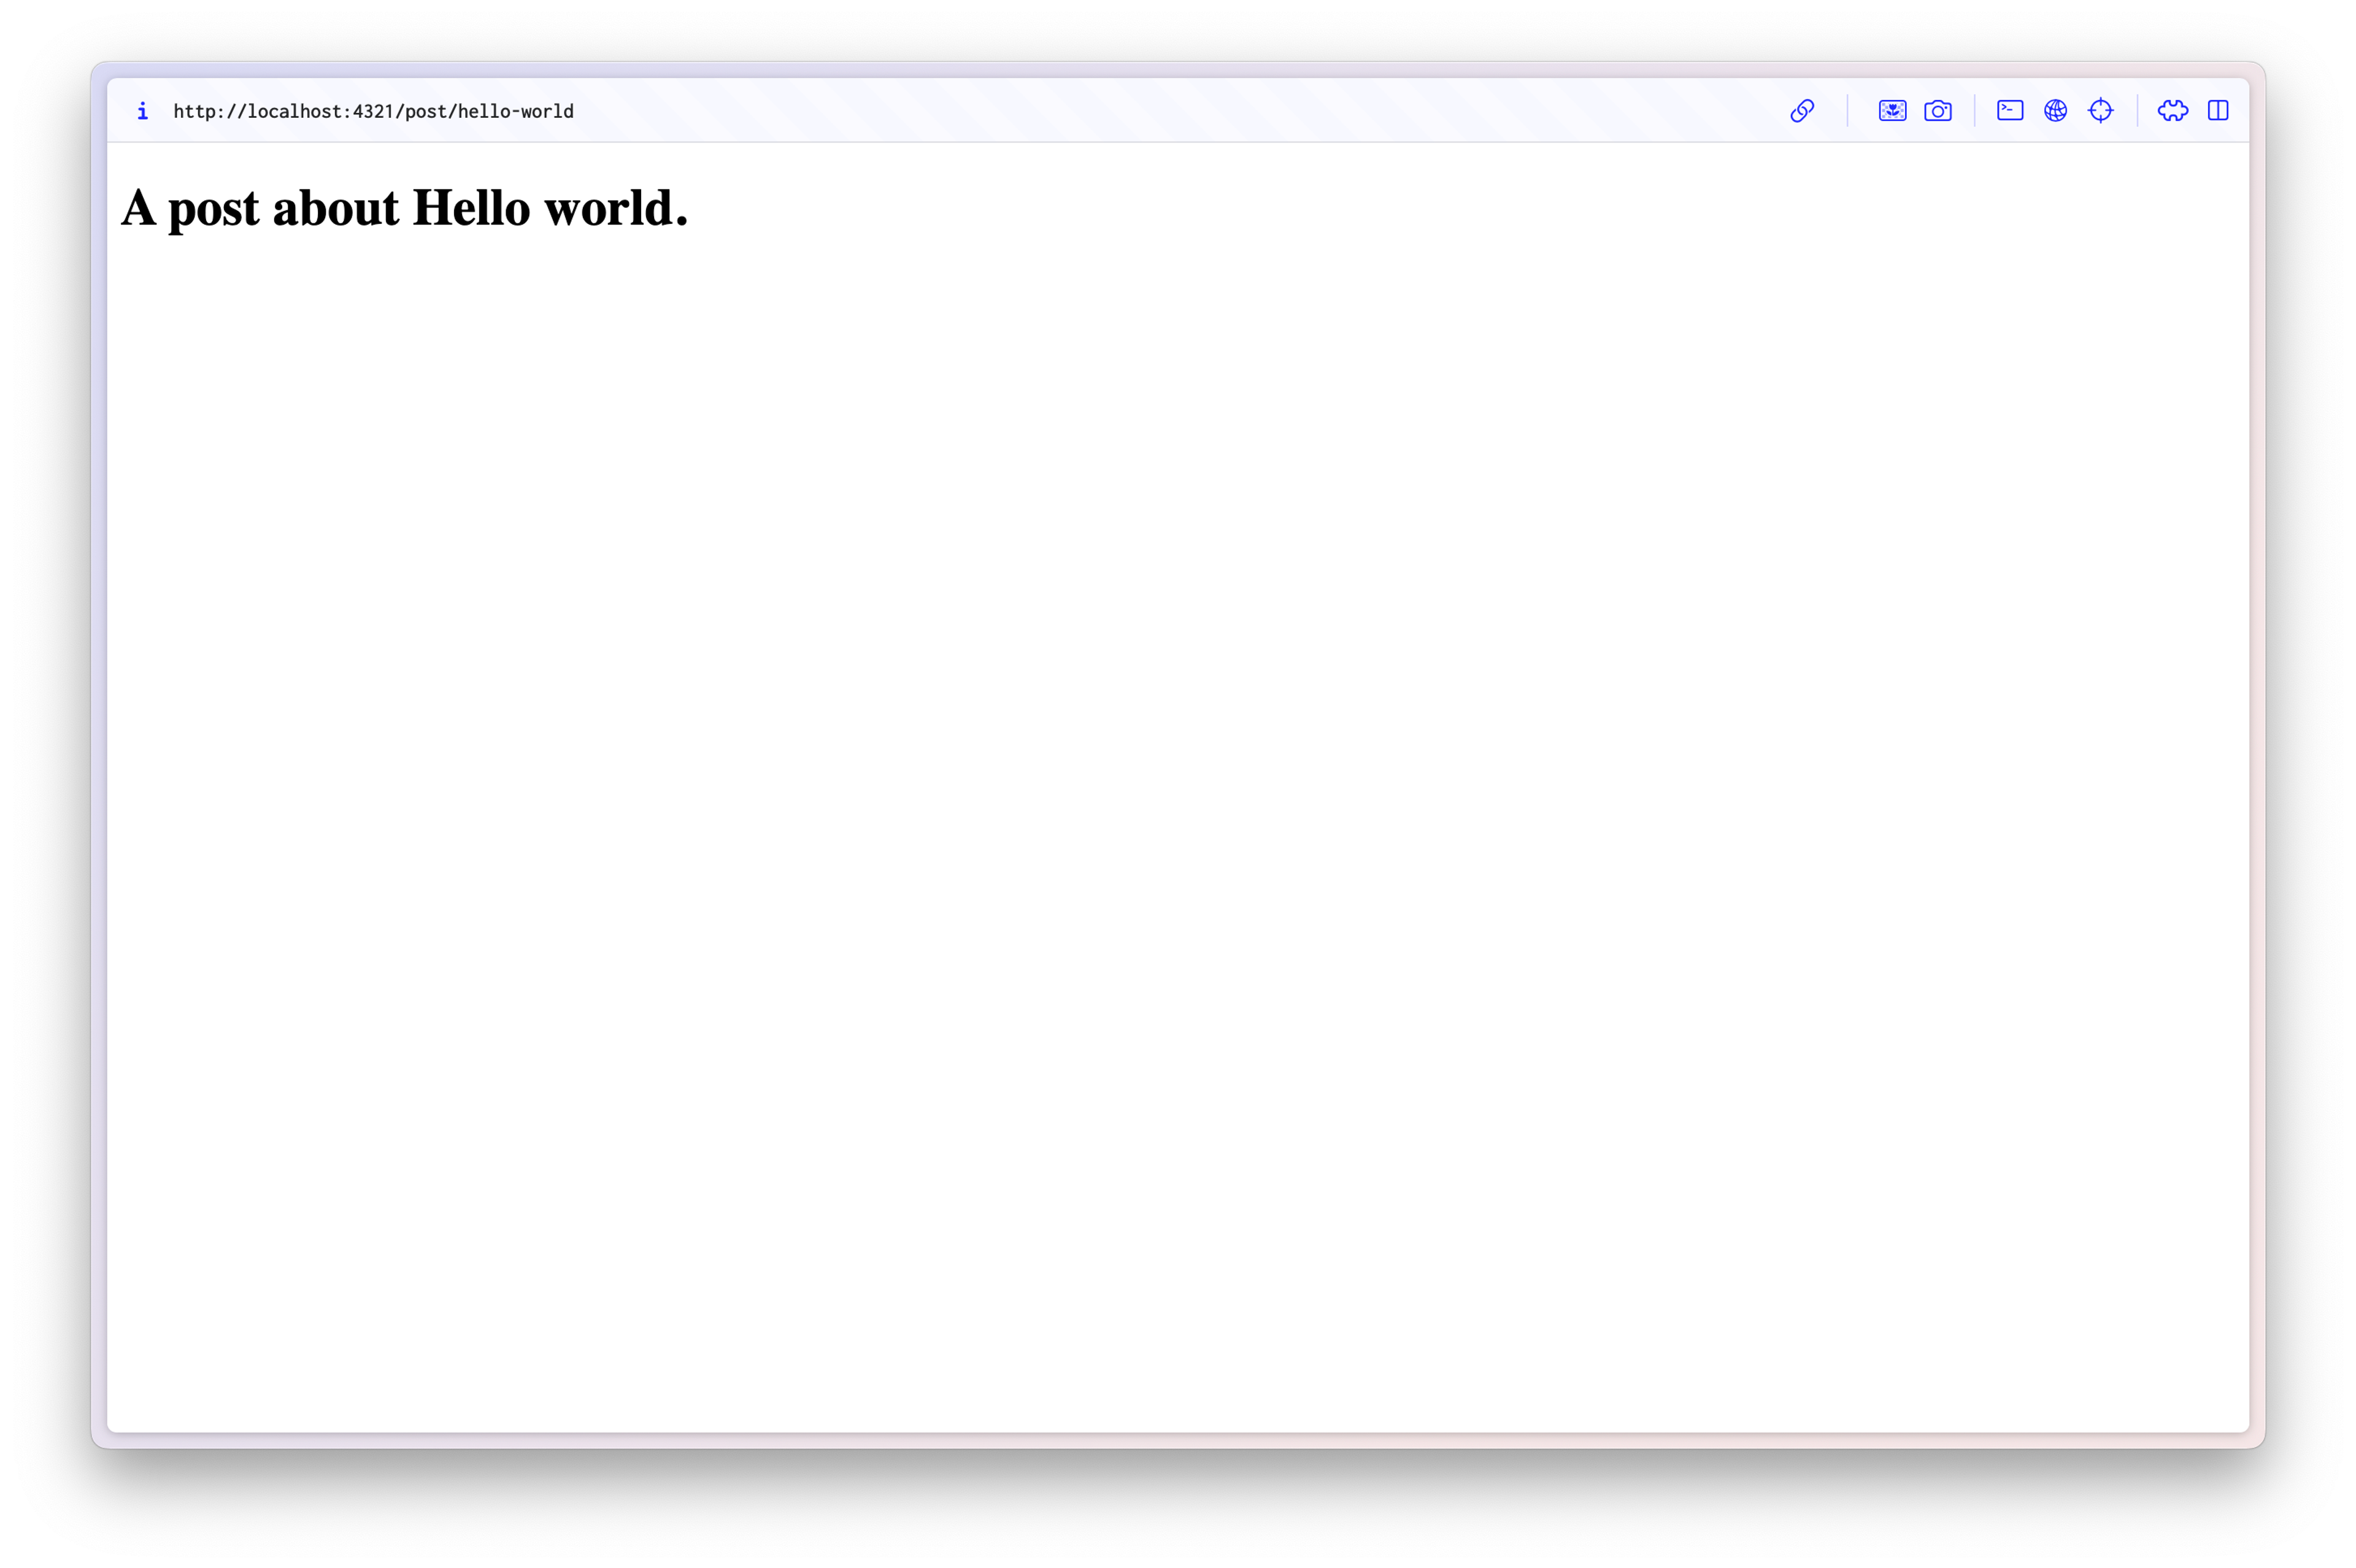
<h1>A post about {slug}</h1>This code sets up the data in this route within the code fences (---). Data returned from getStaticPaths is available in the Astro.params variable. This is a bit of magic the framework does for you. Now you can use the slug in your template. In this case, it results in a heading that contains whatever the slug is.
With the example above, Astro will generate three files, 'hello-world', 'my-favorite-things', and 'summertime' in the production build, with a heading that includes the slug. You can now browse to these on your local server. For instance, localhost:4321/post/summertime will display the heading “A post about summertime”.
Of course, you want to display more than just the slugs, and you don't want to hardcode the slugs in this file. Let's get your data from Sanity and dynamically populate your post routes with your content.
Integrate your blog posts from Sanity in Astro
Create a new directory at ./src/sanity called lib and add a new file load-query.ts:
// ./src/sanity/lib/load-query.ts
import type { QueryParams } from "sanity";
import { sanityClient } from "sanity:client";

export async function loadQuery<QueryResponse>({
  query,
  params,
}: {
  query: string;
  params?: QueryParams;
}) {
  const { result } = await sanityClient.fetch<QueryResponse>(
    query,
    params ?? {},
    { filterResponse: false }
  );

  return {
    data: result,
  };
}
You may ask "Why wouldn't I use the client directly in my Astro template?" and that's a very valid question. We're setting up a wrapper around the Sanity integration's client to make implementing Presentation later easier, but if you don't plan to use Presentation you can feel free to just use the client directly in your Astro files.
Head back to your [slug].astro file, import the loadQuery function, and use it to fetch your posts' slugs, like this:
---
// ./src/pages/post/[slug].astro
import { loadQuery } from "../../sanity/lib/load-query";

export async function getStaticPaths() {
  const { data: posts } = await loadQuery({
    query: `*[_type == "post"]`,
  });

  return posts.map(({ slug }) => {
    return {
      params: {
        slug: slug.current,
      },
    };
  });
}

const { slug } = Astro.params;
---

<h1>A post about {slug}</h1>
Within the code fences, we export that same getStaticPaths function as before, but we've made it automatic so that we can wait for the data before returning the posts. With the loadQuery function, we fetch the posts using the Sanity client's fetch method (note: this is Sanity's fetch, not the Fetch API).
The argument we're passing into this fetch function, if you've not seen this syntax before, is a GROQ query.
The GROQ syntax in this tutorial can be read like this:
*👈 select all documents[_type == 'post' && slug.current == $slug]👈 filter the selection down to documents with the type "post" and those of them who have the same slug to that we have in the parameters[0]👈 select the first and only one in that list
Now you need to fetch the right blog post given a certain slug. Update [slug].astro with the following:
---
// ./src/pages/post/[slug].astro
import { loadQuery } from "../../sanity/lib/load-query";

export async function getStaticPaths() {
  const { data: posts } = await loadQuery({
    query: `*[_type == "post"]`,
  });

  return posts.map(({ slug }) => {
    return {
      params: {
        slug: slug.current,
      },
    };
  });
}

const { params } = Astro;

const { data: post } = await loadQuery({
  query: `*[_type == "post" && slug.current == $slug][0]`,
  params,
});
---

<h1>A post about {post.title}</h1>
So that's it! You should now be able to see the title of your "Hello World" post under /post/hello-world.
"Why not return the post during getStaticPaths?" - another excellent question dear reader. Similar to the reasoning for wrapping our client in loadQuery, we're fetching data outside getStaticPaths to allow it to refresh when using Presentation. If you don't plan to use Presentation you can return all the data in getStaticPaths.
Render images and block content
Now that you've seen how to display the title, continue to add the other bits of our posts: block content and images.
Background
With Sanity, your blog posts are part of your content model. They can be set up to be whatever you want, but we've used some boilerplate blog post schemas. Your post's title is a string, the published date is saved as a datetime and so on. Sanity has specific tooling for images and block content, so we'll add those first.
Images
When you use the image field type to allow users to upload images in your Studio, the images are uploaded to Sanity's CDN (the Asset Pipeline). It's set up so you can request them however you need them: in specific dimensions, image formats, or crops, just to name a few image transformations. The way this works is that the image is represented as an ID in your data structure. You can then use this ID to construct image URLs.
Use the image URL builder from the @sanity/image-url package for this. First install the dependency:
npm install @sanity/image-urlpnpm add @sanity/image-urlyarn add @sanity/image-urlbun add @sanity/image-urlCreate a new file inside ./src/sanity/lib called url-for-image.ts:
// ./src/sanity/lib/url-for-image.ts
import { sanityClient } from 'sanity:client';
import { createImageUrlBuilder, type SanityImageSource } from "@sanity/image-url";

export const imageBuilder = createImageUrlBuilder(sanityClient);

export function urlForImage(source: SanityImageSource) {
  return imageBuilder.image(source);
}
As you set up block content in the next step you'll use this function to performantly render your images
Block content and rich text
The blog template saves your blog content in a array field of the block type. This will give you block content with rich text, which Sanity saves in a structured format called Portable Text. From Portable Text, you can generate Markdown, HTML, PDFs, or whatever else you want. It's very flexible. For this tutorial, you'll convert your Portable Text content to Astro components with the astro-portabletext library:
npm install astro-portabletextpnpm add astro-portabletextyarn add astro-portabletextbun add astro-portabletextIf you're using TypeScript it may be helpful to include the types for Portable Text:
npm install @portabletext/typespnpm add @portabletext/typesyarn add @portabletext/typesbun add @portabletext/typesThen, for convenience, create an Astro component to render our Portable Text for us. Create a new file called PortableText.astro inside of ./src/components:
---
// ./src/components/PortableText.astro
import { PortableText as PortableTextInternal } from 'astro-portabletext'
const { portableText } = Astro.props;
---

<PortableTextInternal value={portableText} />
This will render our Portable Text blocks, but we haven't yet added a component to handle any custom blocks we added to the Portable Text field, like image.
Create a file called PortableTextImage.astro in the same components folder:
---
// ./src/components/PortableTextImage.astro
import { urlForImage } from "../sanity/lib/url-for-image";

const { asset, alt } = Astro.props.node;

const url = urlForImage(asset).url();
const webpUrl = urlForImage(asset).format("webp").url();
---

<picture>
  <source srcset={webpUrl} type="image/webp" />
  <img class="responsive__img" src={url} alt={alt} />
</picture>
This component will pass the relevant node from the Portable Text content, and we use our urlForImage function to calculate the asset URLs to display. Now, you can register this component to be rendered when PortableText encounters an image block:
---
// ./src/components/PortableText.astro
import { PortableText as PortableTextInternal } from 'astro-portabletext'
import PortableTextImage from "./PortableTextImage.astro";

const { portableText } = Astro.props;

const components = {
  type: {
    image: PortableTextImage,
  }
};
---

<PortableTextInternal value={portableText} components={components} />
Update [slug].astro to use the PortableText component to render the post content:
---
// ./src/pages/post/[slug].astro
import { loadQuery } from "../../sanity/lib/load-query";
import PortableText from "../../components/PortableText.astro";
export async function getStaticPaths() {
const { data: posts } = await loadQuery({
query: `*[_type == "post"]`,
});
return posts.map(({ slug }) => {
return {
params: {
slug: slug.current,
},
};
});
}
const { params } = Astro;
const { data: post } = await loadQuery({
query: `*[_type == "post" && slug.current == $slug][0]`,
params,
});
---
<h1>A post about {post.title}</h1>
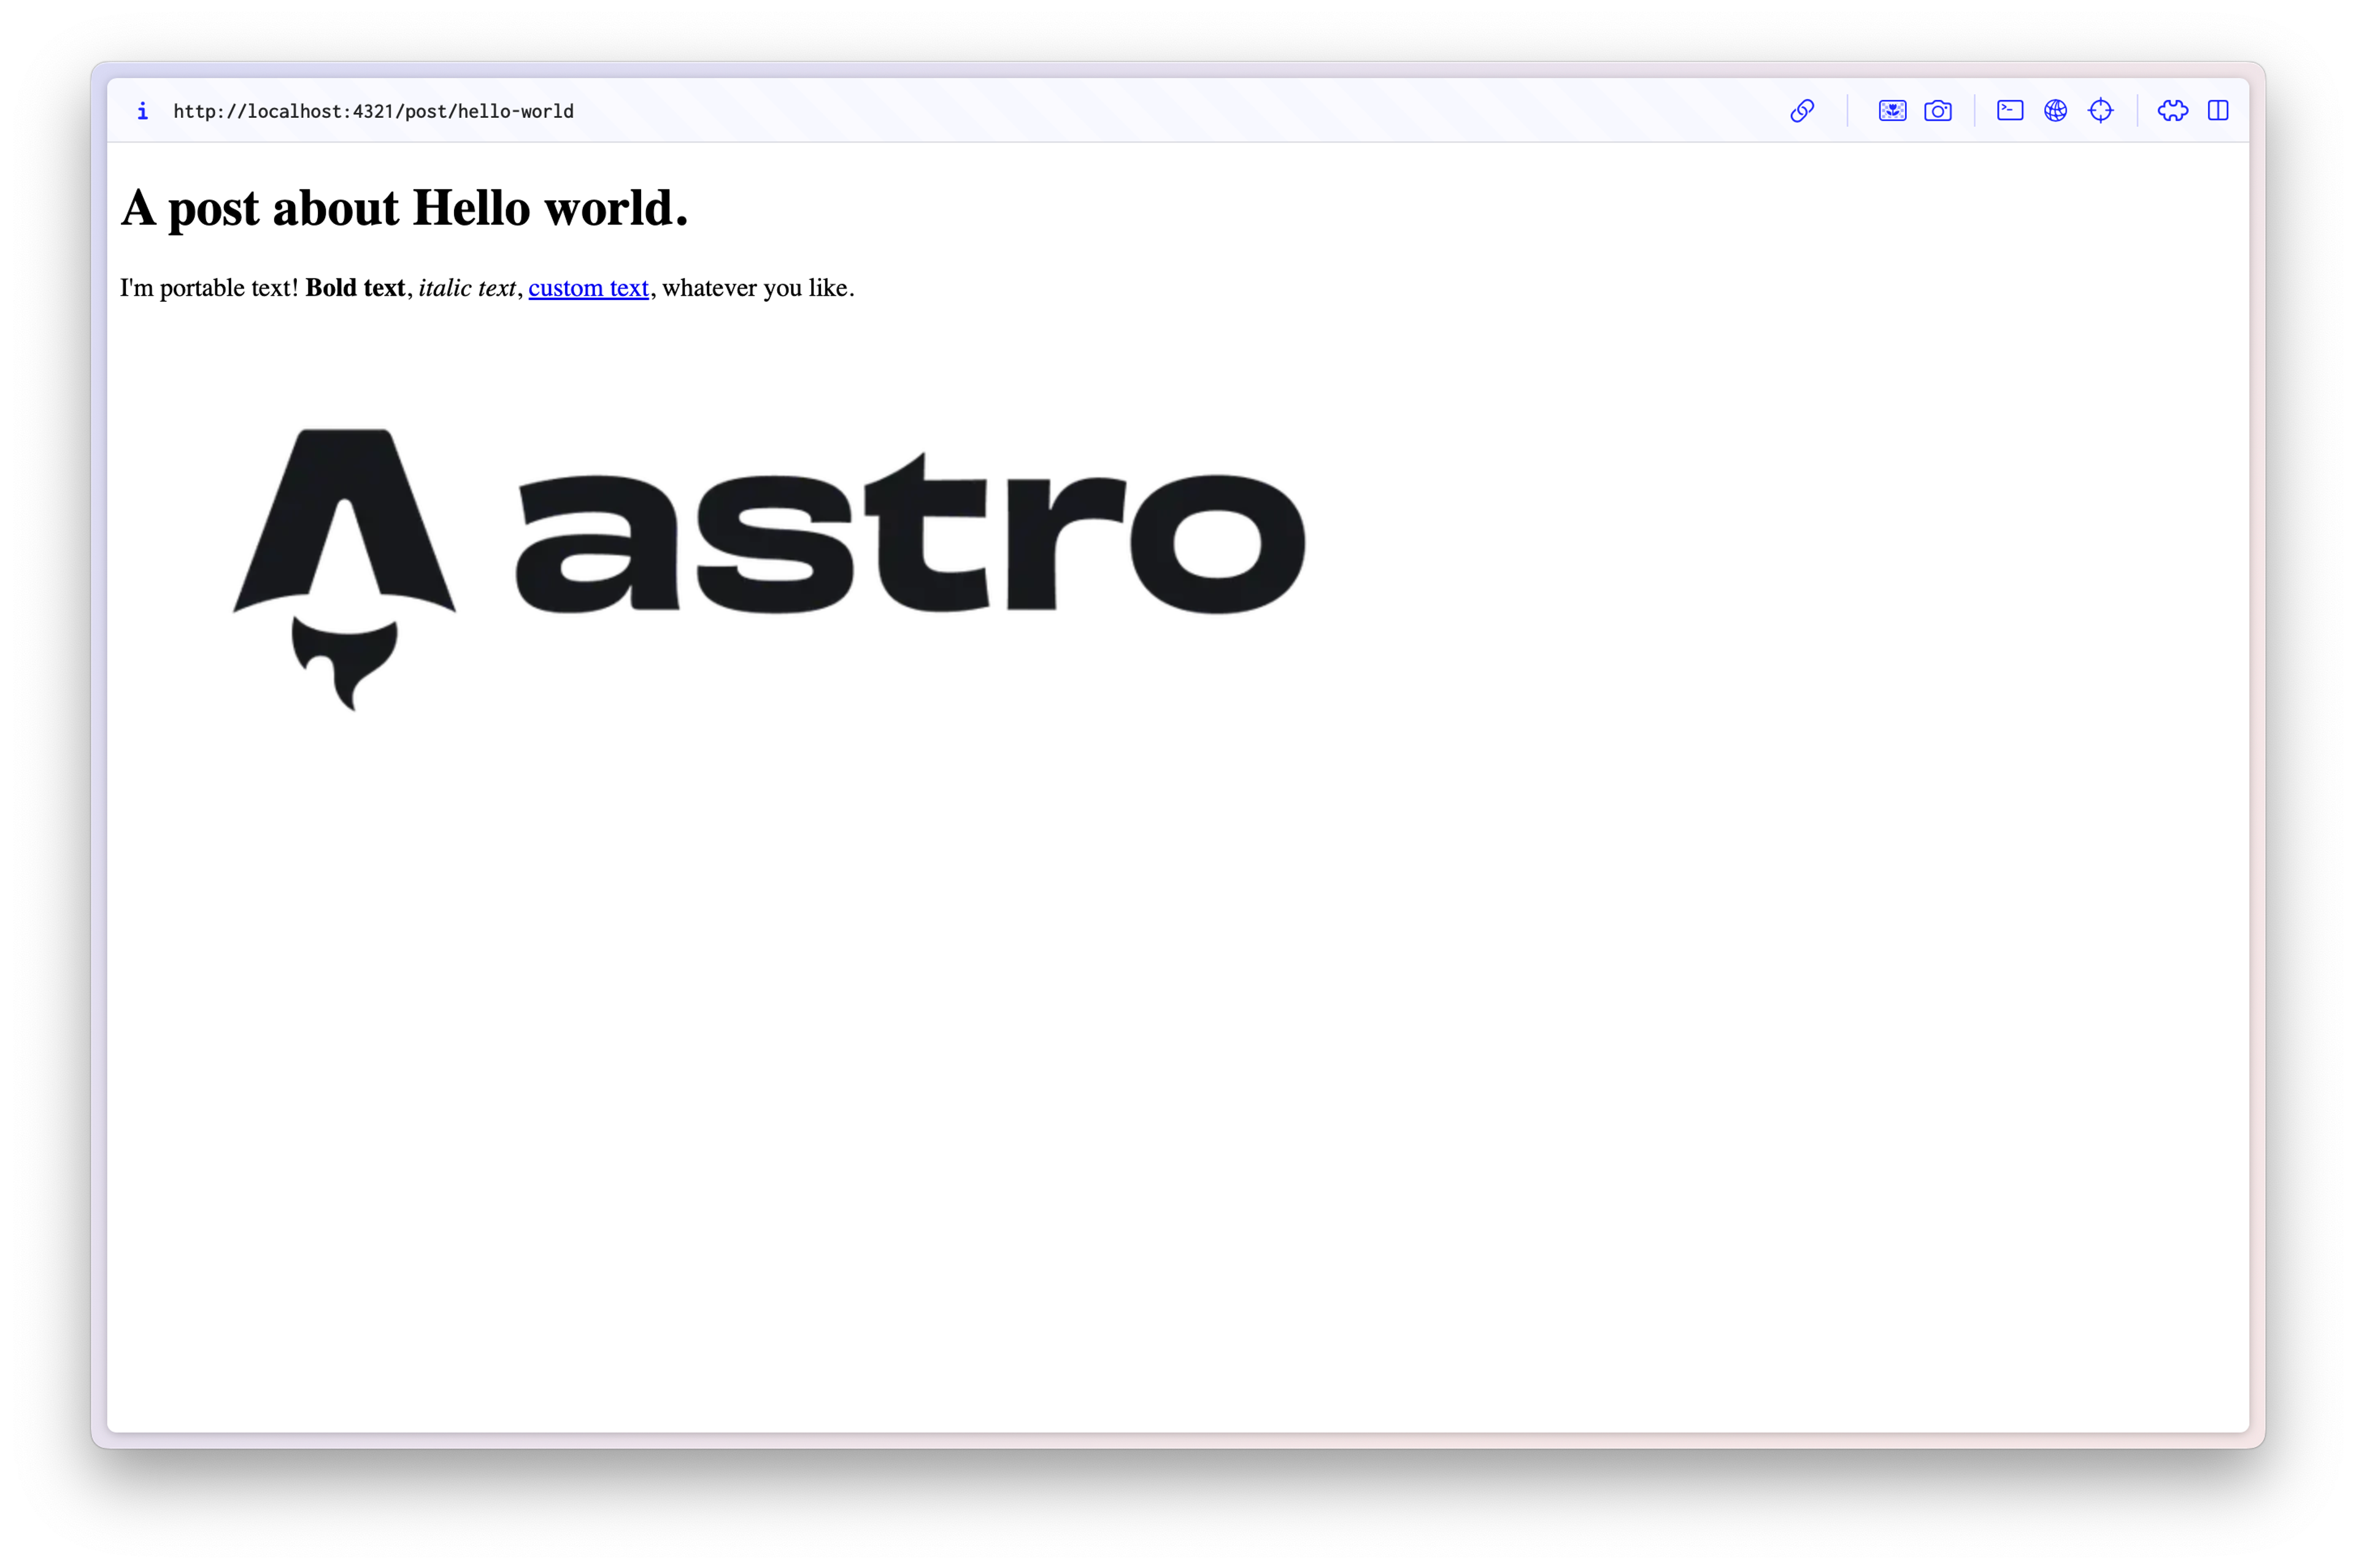
<PortableText portableText={post.body} />This uses the PortableText component we just added renders any content you've added, including links, images, and headings. This is an example of what it could look like:
Enable the Presentation Tool
Live Visual Editing is made possible via Sanity's Presentation Tool. To enable the Presentation Tool, we'll follow the steps outlined in the documentation for the Astro integration. The Presentation Tool provides two key benefits:
- Overlays - All content stored in Sanity has an overlay added that when clicked brings users directly to editing that content in the Studio
- Live mode - Edits made in the Studio are reflected on the front-end to provide authors immediate feedback
Create a layout file with the VisualEditing component
Update the Layout.astro file inside the src/layouts directory with the following:
---
// ./src/layouts/Layout.astro
import { VisualEditing } from "@sanity/astro/visual-editing";

const visualEditingEnabled =
  import.meta.env.PUBLIC_SANITY_VISUAL_EDITING_ENABLED === "true";
---
<!doctype html>
<html lang="en">
  <head>
    <meta charset="UTF-8" />
		<meta name="viewport" content="width=device-width" />
		<link rel="icon" type="image/svg+xml" href="/favicon.svg" />
		<meta name="generator" content={Astro.generator} />
		<title>Astro Basics</title>
  </head>
  <body>
    <slot />
    <VisualEditing enabled={visualEditingEnabled} />
  </body>
</html>

<style>
	html,
	body {
		margin: 0;
		width: 100%;
		height: 100%;
	}
</style>
In Layout.astro you're importing the VisualEditing component, which enables overlays and live mode for the Presentation Tool. Note the visualEditingEnabled constant tied to an environment variable PUBLIC_SANITY_VISUAL_EDITING_ENABLED set to true. If you haven't already, update your .env file to include this variable. When you're ready to deploy your site you'll want to have this variable set to false in production, but have another environment that's a copy of production with this variable set to true.
Update your [slug].astro template to be wrapped in the new layout:
---
// ./src/pages/post/[slug].astro
import type { SanityDocument } from "@sanity/client";
import { loadQuery } from "../../sanity/lib/load-query";
import Layout from "../../layouts/Layout.astro";
import PortableText from "../../components/PortableText.astro";

export async function getStaticPaths() {
  const { data: posts } = await loadQuery<SanityDocument[]>({
    query: `*[_type == "post"]`,
  });

  return posts.map(({ slug }) => {
    return {
      params: {
        slug: slug.current,
      },
    };
  });
}

const { params } = Astro;

const { data: post } = await loadQuery<{ title: string; body: any[] }>({
  query: `*[_type == "post" && slug.current == $slug][0]`,
  params,
});
---

<Layout>
  <h1>A post about {post.title}</h1>
  <PortableText portableText={post.body} />
</Layout>
Update your index.astro template to be wrapped in the new layout:
---
import Layout from "../layouts/Layout.astro";
---

<Layout>
  <h1>Astro</h1>
</Layout>
Update settings in astro.config file
Update the Sanity integration settings in astro.config.mjs to include stega.studioUrl
// astro.config.mjs
import { defineConfig } from "astro/config";
import node from "@astrojs/node";

import sanity from "@sanity/astro";
import react from "@astrojs/react";

import { loadEnv } from "vite";
const { PUBLIC_SANITY_PROJECT_ID, PUBLIC_SANITY_DATASET } = loadEnv(
  process.env.NODE_ENV,
  process.cwd(),
  "",
);

// https://astro.build/config
export default defineConfig({
  output: "server",
  adapter: node({ mode: "standalone" }),
  integrations: [
    sanity({
      projectId: PUBLIC_SANITY_PROJECT_ID,
      dataset: PUBLIC_SANITY_DATASET,
      useCdn: false, // See note on using the CDN
      apiVersion: "2025-01-28", // insert the current date to access the latest version of the API
      studioBasePath: "/studio",
      stega: {
        studioUrl: "/studio",
      },
    }),
    react(),
  ],
});
Adding this to the configuration allows the overlays to link to the appropriate place.
Generate a viewer token
In Sanity, drafts are considered private and are not accessible without a token.
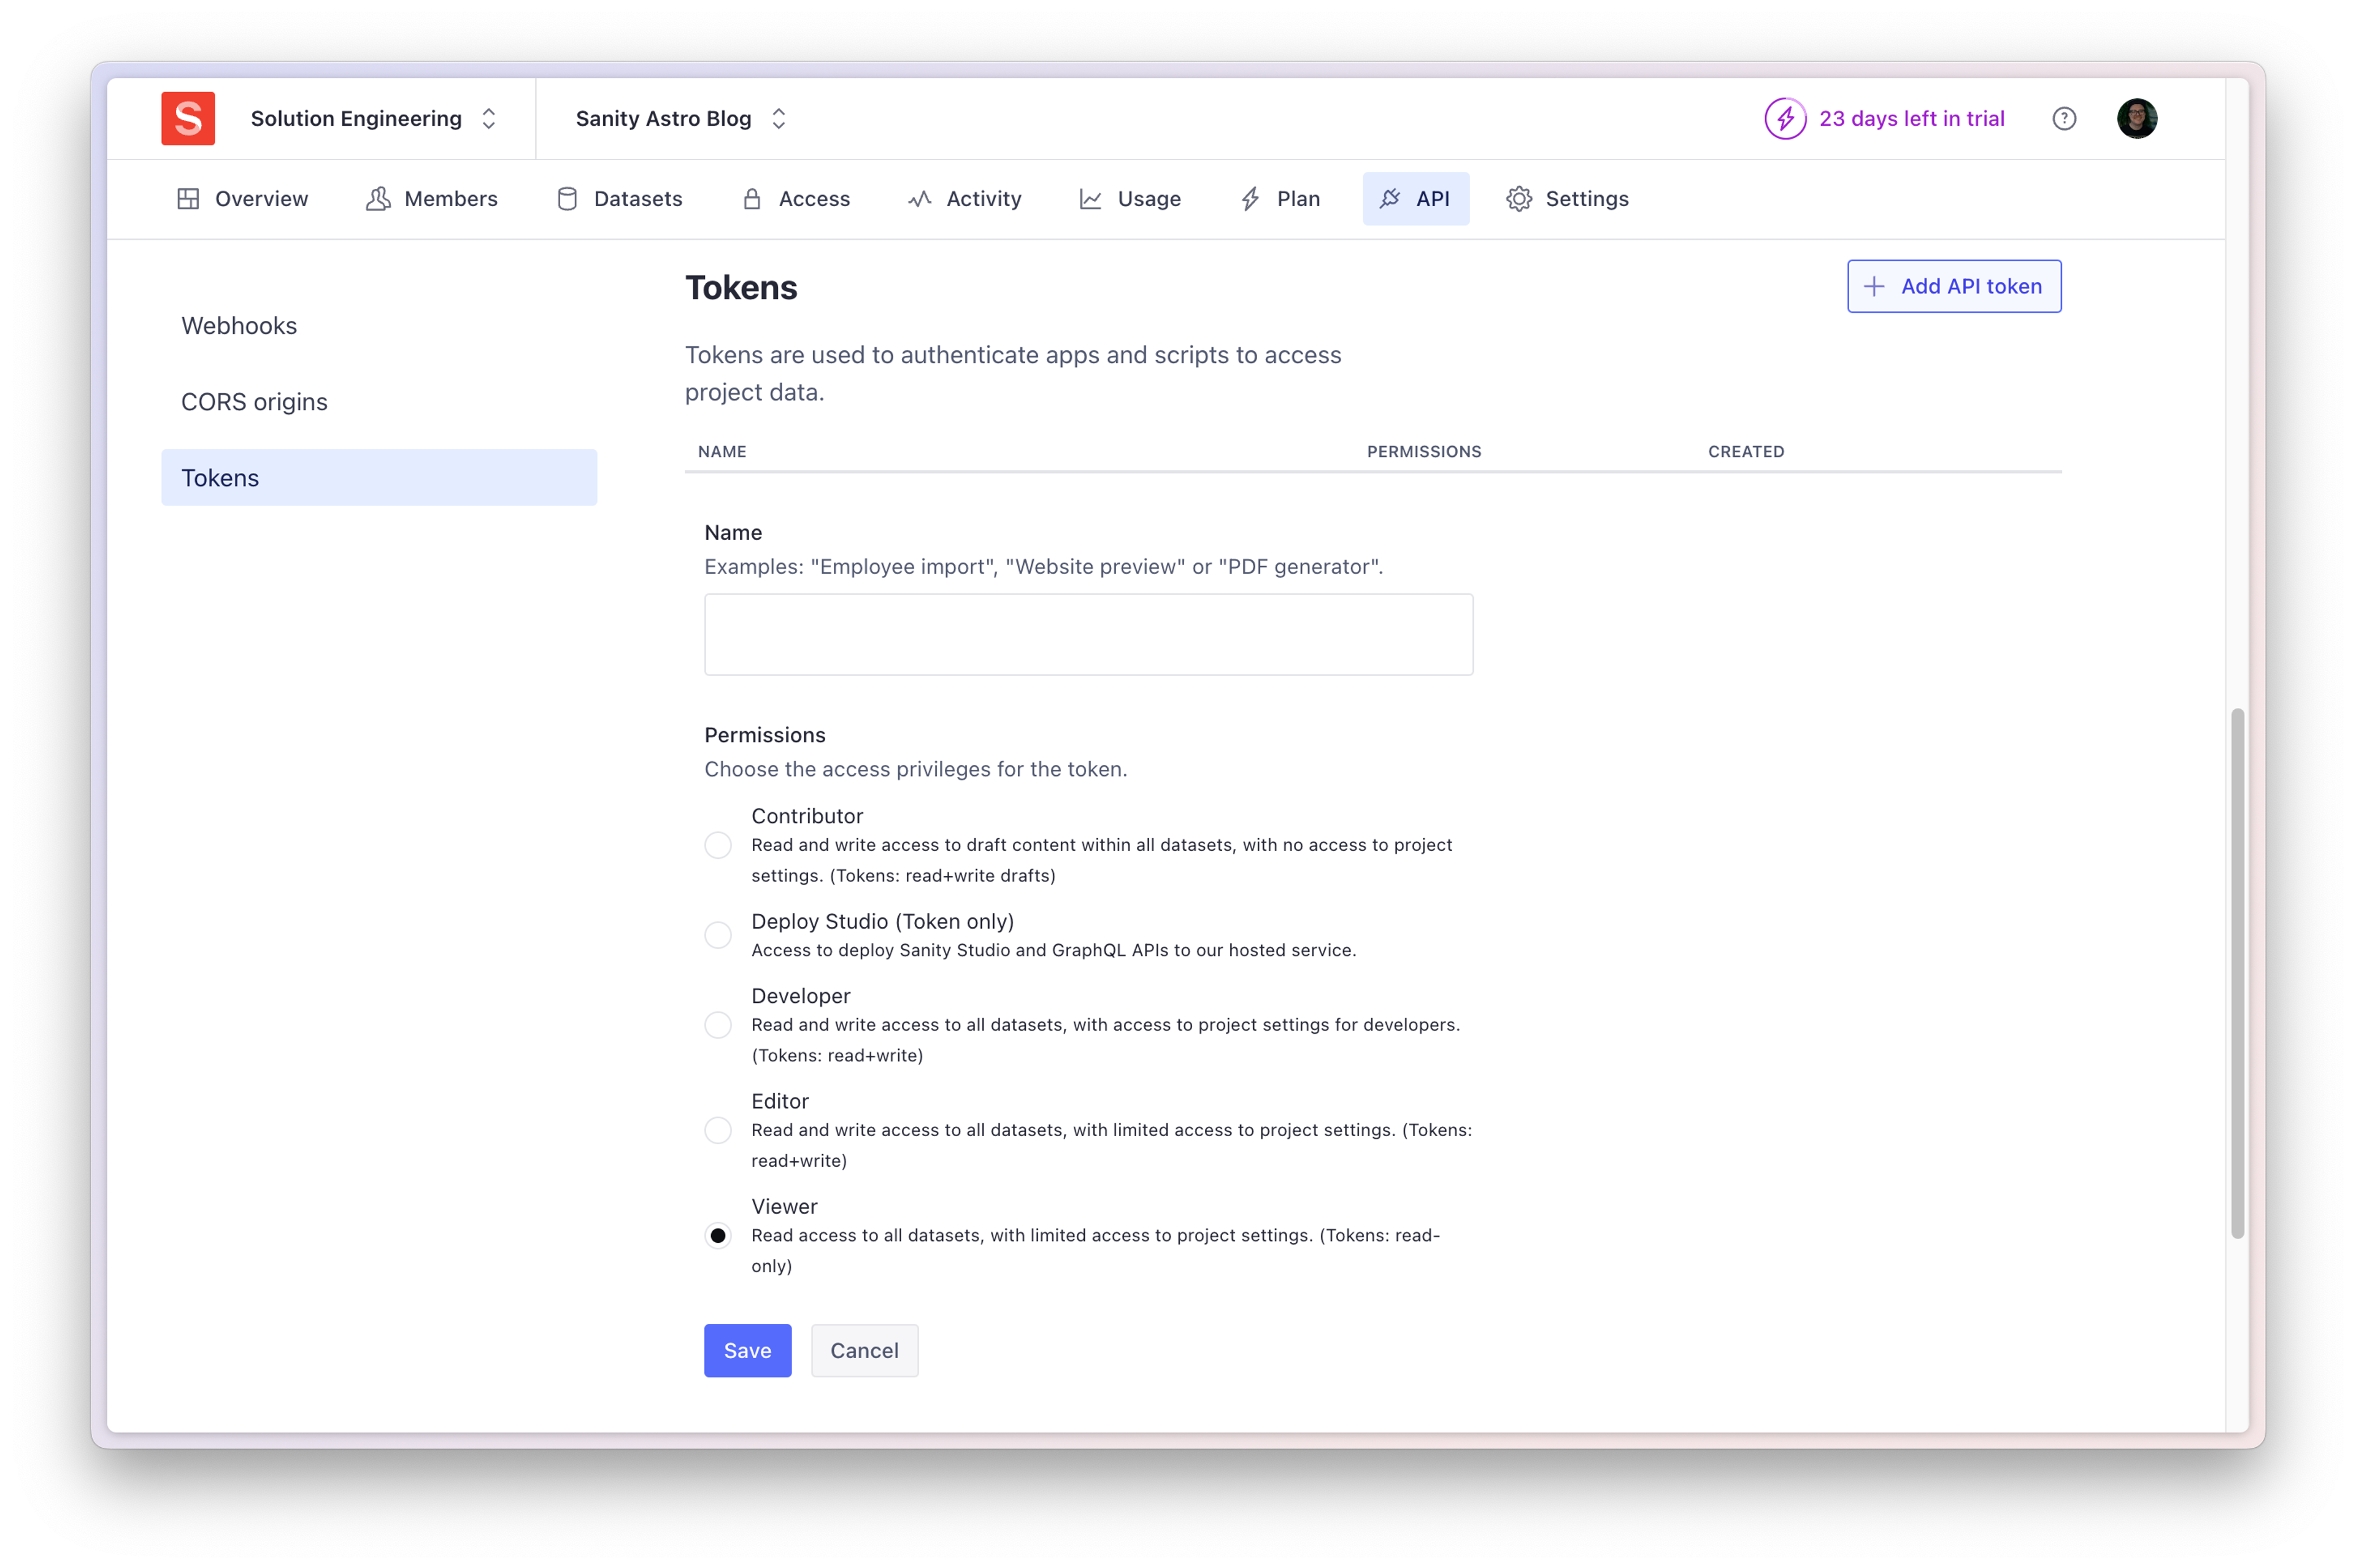
In the top right of the Studio click on your user avatar, and click "Manage project"
In your manage dashboard, navigate to "API" and down to "Tokens". Click "Add token", give it any name you wish, ensure it has "Viewer" permissions, and click "Save"
Add this token to your .env file with the name SANITY_API_READ_TOKEN.
Update loadQuery to work with the Presentation Tool
Update ./src/sanity/lib/load-query.ts to the following:
// ./src/sanity/lib/load-query.ts
import { type QueryParams } from "sanity";
import { sanityClient } from "sanity:client";

const visualEditingEnabled =
  import.meta.env.PUBLIC_SANITY_VISUAL_EDITING_ENABLED === "true";
const token = import.meta.env.SANITY_API_READ_TOKEN;

export async function loadQuery<QueryResponse>({
  query,
  params,
}: {
  query: string;
  params?: QueryParams;
}) {
  if (visualEditingEnabled && !token) {
    throw new Error(
      "The `SANITY_API_READ_TOKEN` environment variable is required during Visual Editing.",
    );
  }

  const perspective = visualEditingEnabled ? "drafts" : "published";

  const { result, resultSourceMap } = await sanityClient.fetch<QueryResponse>(
    query,
    params ?? {},
    {
      filterResponse: false,
      perspective,
      resultSourceMap: visualEditingEnabled ? "withKeyArraySelector" : false,
      stega: visualEditingEnabled,
      ...(visualEditingEnabled ? { token } : {}),
    },
  );

  return {
    data: result,
    sourceMap: resultSourceMap,
    perspective,
  };
}
There are a few things going on here, you're:
- Modifying the
perspectivesetting in the client to usepreviewDraftswhen Visual Editing is enabled - Returning a
resultSourceMapfor the overlays to know where to link to - Passing the token to the client to view drafts and enable Stega encoding (which powers the overlays)
Add the Presentation Tool to the Studio
Update your sanity.config.ts file to include the Presentation Tool in the plugins
// ./sanity.config.ts
import { defineConfig } from "sanity";
import { structureTool } from "sanity/structure";
import { schema } from "./src/sanity/schemaTypes";
import { presentationTool } from "sanity/presentation";

export default defineConfig({
  projectId: import.meta.env.PUBLIC_SANITY_PROJECT_ID,
  dataset: import.meta.env.PUBLIC_SANITY_DATASET,
  plugins: [
    structureTool(),
    presentationTool({
      previewUrl: location.origin,
    }),
  ],
  schema,
});
Note the previewUrl, set to location.origin due to the Studio being embedded in your existing Astro app. If your Studio and front-end were hosted at different URLs you would update this value to point to the hosted front-end.
If you navigate to http://localhost:4321/studio/presentation you should see the Presentation Tool, and if you put the path to your blog post (/post/hello-world) in the tool's address bar you should see your front-end with overlays that bring you directly to your blog post.
Add a document location resolver
The Document Locations Resolver API allows you to define where data is being used in your application(s), and it also allows you to quickly preview a document from the Structure.
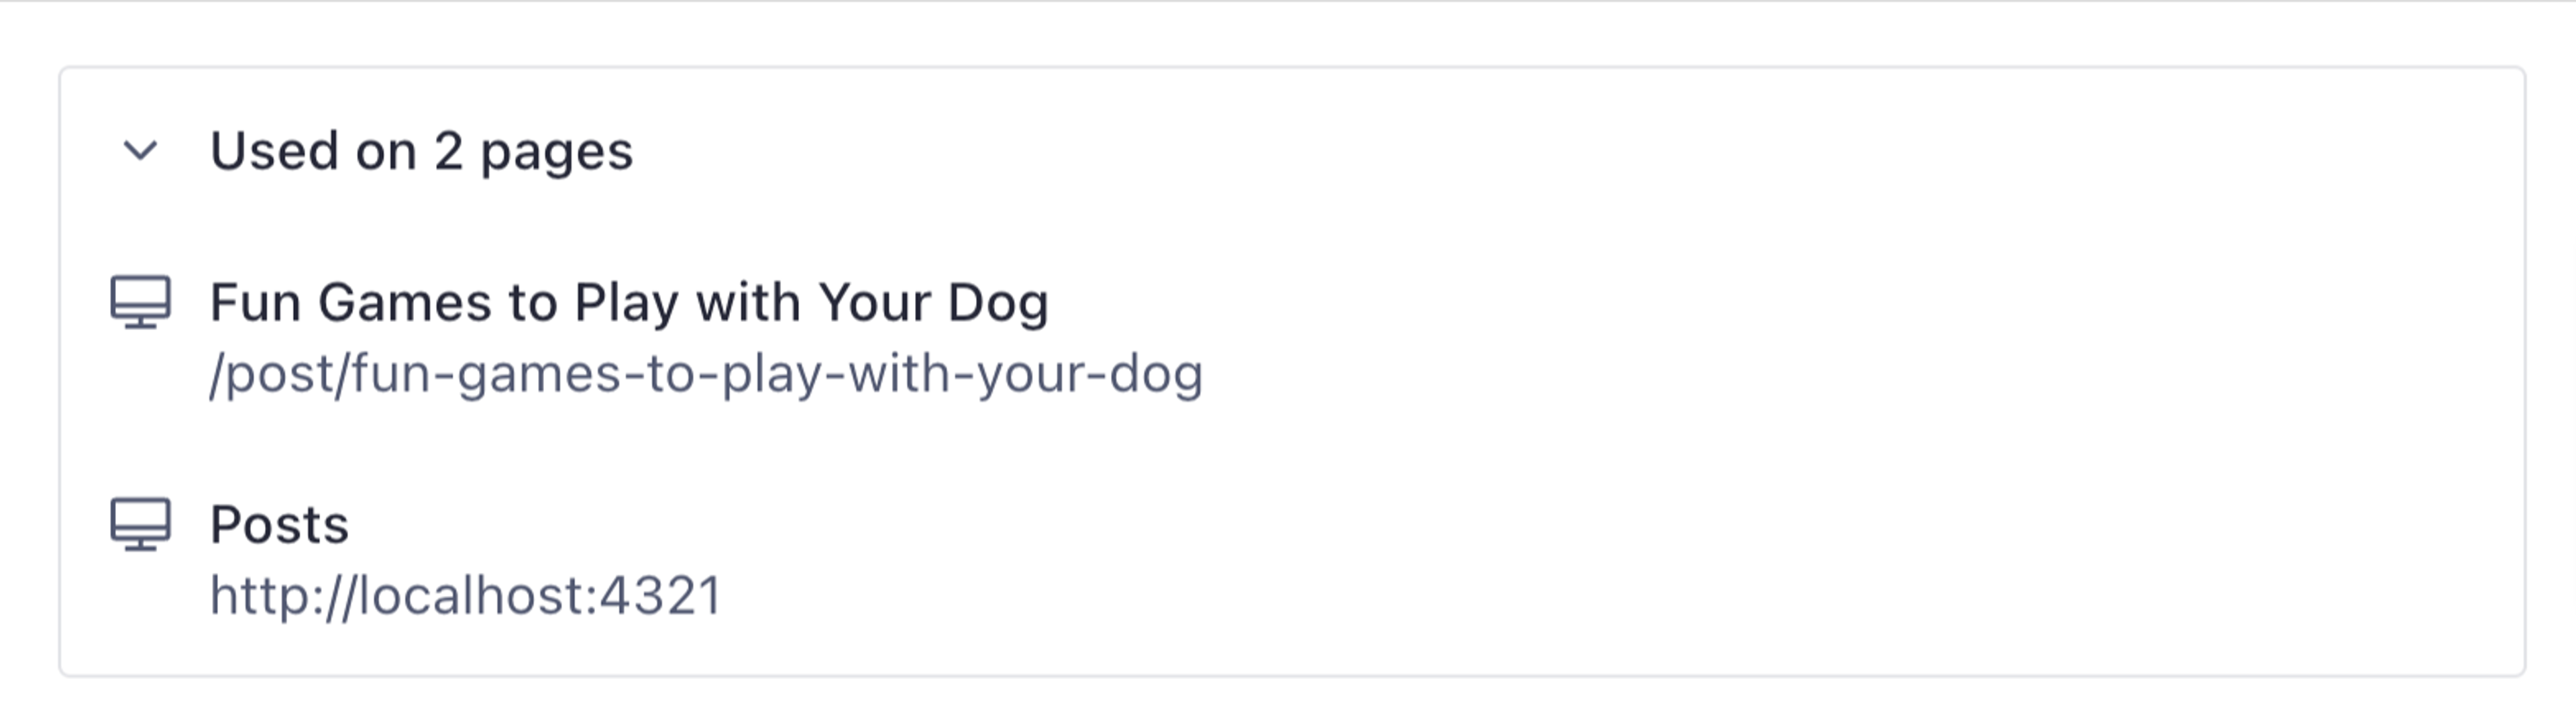
For example if you have an author document open, enabling locations puts a widget at the top of the document with links to all documents on the site where this author is linked to.
Create a new location resolver
Create a new file in ./src/sanity/lib/ , called resolve.ts
// ./src/sanity/lib/resolve.ts

import { defineLocations } from "sanity/presentation";
import type { PresentationPluginOptions } from "sanity/presentation";

export const resolve: PresentationPluginOptions["resolve"] = {
  locations: {
    // Add more locations for other post types
    post: defineLocations({
      select: {
        title: "title",
        slug: "slug.current",
      },
      resolve: (doc) => ({
        locations: [
          {
            title: doc?.title || "Untitled",
            href: `/post/${doc?.slug}`,
          },
        ],
      }),
    }),
  },
};
Add the location resolver to the Studio
Update your sanity.config.ts file to include the Location tool (resolve) inside the presentationTool
import { defineConfig } from "sanity";
import { structureTool } from "sanity/structure";
import { schema } from "./src/sanity/schemaTypes";
import { presentationTool } from "sanity/presentation";
import { resolve } from "./src/sanity/lib/resolve";

export default defineConfig({
  projectId: import.meta.env.PUBLIC_SANITY_PROJECT_ID,
  dataset: import.meta.env.PUBLIC_SANITY_DATASET,
  plugins: [
    structureTool(),
    presentationTool({
	  resolve,
      previewUrl: location.origin,
    }),
  ],
  schema,
});
Now each post document in your Studio should include a link to open it in the Presentation Tool
Enable vite overrides (if needed)
With the release of Astro v6, there are some in-progress compatibility updates. If you’re experiencing issues with visual editing, add the configuration below.
Several transitive dependencies of `@sanity/visual-editing` are CommonJS modules that Vite doesn't automatically pre-bundle. Without this, the `VisualEditing` component fails to hydrate in the browser with errors like:
export default defineConfig({
  output: "server",
  adapter: node({ mode: "standalone" }),
  integrations: [
    // ...
  ],
  vite: {
    optimizeDeps: {
      include: [
        "react/compiler-runtime",
        "lodash/isObject.js",
        "lodash/groupBy.js",
        "lodash/keyBy.js",
        "lodash/partition.js",
        "lodash/sortedIndex.js",
      ],
    },
  },
});
This will likely be fixed in upcoming versions of @sanity/astro.
This is a dev-server-only issue. Production builds (astro build) are unaffected because Rollup handles CJS-to-ESM interop during bundling. The optimizeDeps config only controls Vite's dev-server pre-bundling step, where individual modules are served to the browser on demand. It's still important to include because developers will hit these errors immediately when running npm run dev.
Demo of Visual Editing with Astro
Next steps
And there you are: you now have an Astro site to display our blog content and a Sanity Studio to manage it. It uses Astro's dynamic routes feature to generate static files for each of the blog posts in your Studio that you can host wherever. You're only getting the content at build time—when people read your content, they're reading the version built when your build process last ran.
Feel free to ask us questions on Discord, or however else you might find us.