Schema UI - Next.js Sanity Starter
A Next.js starter template with Next.js 15, Tailwind CSS, shadcn/ui, and Sanity CMS with Live Editing. Get production-ready React components with matching Sanity schemas and queries. Build dynamic pages faster while keeping full control over customization.
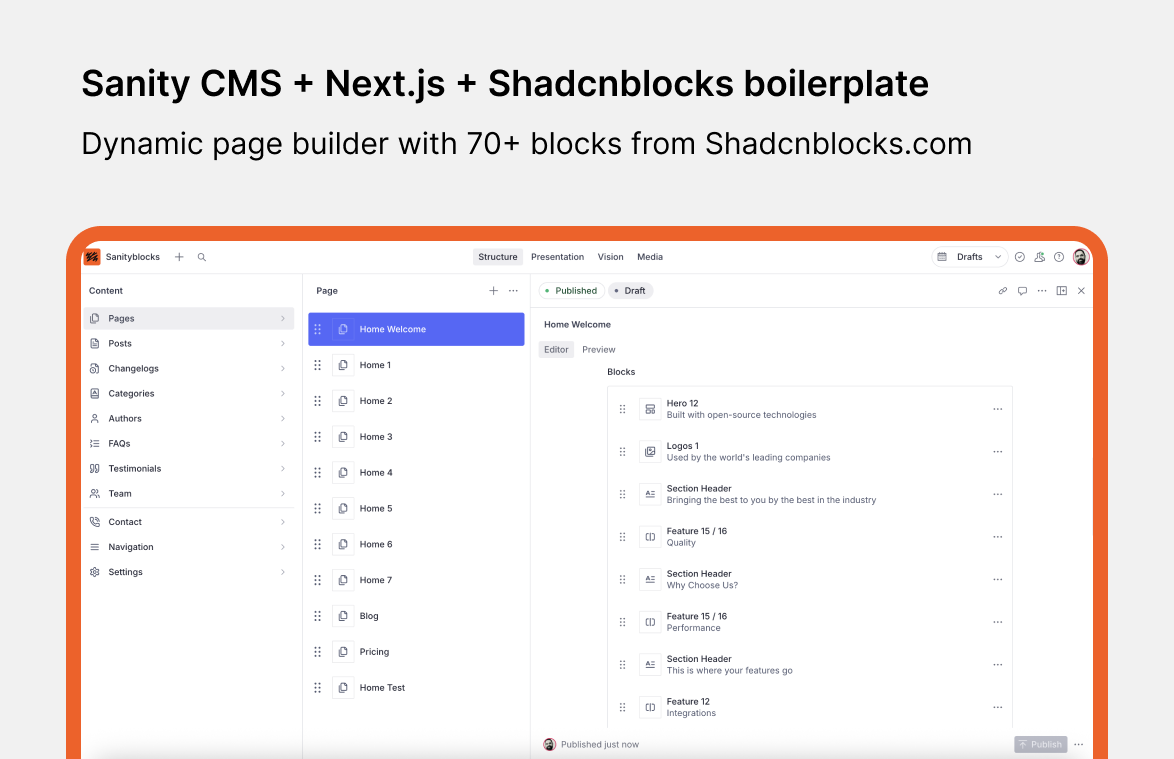
Schema UI - Next.js Sanity Starter Template
This starter is a part of Schema UI project, a comprehensive page builder that provides production-ready React components with pre-built Sanity schemas and GROQ queries, enabling rapid development of content-driven websites with Sanity CMS and Next.js. Content Agent & MCP ready.
Monorepo: The template now uses a pnpm workspace with a frontend/ (Next.js) app and a studio/ (Sanity Studio) app in one repository. Older guides referred to a single app folder; here, schemas and sanity CLI commands live under studio/, and the site lives under frontend/. Root scripts run both together (pnpm dev).
![]()
Docs | Components | Demo
For this monorepo, set the Vercel project Root Directory to frontend and add NEXT_PUBLIC_STUDIO_URL (and other vars from frontend/.env.local.example) in the project settings.
Monorepo layout
| Path | Role |
|---|---|
frontend/ | Next.js app (pages, API routes, sanity.types.ts from TypeGen) |
studio/ | Sanity Studio (sanity dev, sanity deploy, schema.json extract) |
Install and dev commands are meant to be run from the repository root unless noted.
Getting Started
Installing the template
1. Initialize template with Sanity CLI
Run the command in your Terminal to initialize this template on your local computer:
npm create sanity@latest -- --template serge-0v/next-js-sanity-starterSee the documentation if you are having issues with the CLI.
This command will:
- Create a new Sanity project
- Add API Read Token
- Configure CORS origin for http://localhost:3000
- Set up environment variables
- Clone the repository
- Install dependencies
Alternative: clone the monorepo
If you prefer not to use the CLI bootstrap:
git clone https://github.com/serge-0v/next-js-sanity-starter.git
cd next-js-sanity-starter
pnpm install
Then create a project in Sanity Manage, add CORS origins for http://localhost:3000 and http://localhost:3333, and copy frontend/.env.local.example → frontend/.env.local and studio/.env.local.example → studio/.env.local, filling in project ID, dataset, and tokens (see Environment variables).
This project uses pnpm. To install pnpm globally:
npm install -g pnpmFor dataset import and Studio deploy, log in to the CLI:
pnpm install --global sanity@latest
sanity login
2. Run the template locally
From the repository root:
pnpm devThis starts the Next.js app and Studio together. To run only one workspace:
pnpm dev:frontend    # frontend only
pnpm dev:studio  # studio only
3. Open the app and sign in to the Studio
- Open the Next.js app at http://localhost:3000
- Open the Studio and sign in. In this monorepo, Studio runs at http://localhost:3333 when you use
pnpm devfrom the root (not at/studioinside Next.js). Use the same service (Google, GitHub, or email) that you used when you logged in to the CLI.
Set NEXT_PUBLIC_STUDIO_URL in frontend/.env.local to http://localhost:3333 locally, and SANITY_STUDIO_PREVIEW_URL in studio/.env.local to http://localhost:3000, so draft mode and Presentation previews resolve correctly.
Adding content with Sanity
1. Import Sample Data (Optional)
Import the demo dataset to get started with sample content. In the monorepo the archive is studio/sample-data.tar.gz. From the studio directory:
cd studio
sanity dataset import sample-data.tar.gz production --replace
Be careful with the --replace flag: it replaces existing data in the dataset.
2. Publish your first document
The template comes pre-defined with a schema containing Author, Category, FAQ, Page, Post, and Testimonial document types (and additional types such as Navigation and Settings in the Studio).
From the Studio, click "+ Create" and select the Page document type. Go ahead and create and publish the document.
Your content should now appear in your Next.js app (http://localhost:3000)
3. Extending the Sanity schema
The schema for the Page document type lives at studio/schemas/documents/page.ts (legacy single-repo path: sanity/schemas/document/page.ts). You can add more document types to the schema to suit your needs.
4. Adding new components
This template includes components aligned with the Schema UI library. Visit Schema UI Docs to learn how to add new components.
Deploying your application
1. Configure CORS settings
Add your production URL to the CORS Origins in your Sanity project settings to allow your deployed site to communicate with Sanity. Also add your deployed Studio origin (for example https://your-hostname.sanity.studio) if you host Studio separately.
2. Deploy to Vercel
Deploy your website to Vercel:
- Create a new repository on GitHub.
- Push your code to GitHub
- Create a new Vercel project
- Connect your GitHub repository and import the project. For this monorepo, set Root Directory to
frontend. - Copy the environment variables from
frontend/.env.localand paste them to your Vercel project settings. Vercel supports pasting all variables at once. IncludeNEXT_PUBLIC_STUDIO_URLpointing at your hosted Studio URL (no trailing slash). - Deploy
3. Deploy Sanity Studio (sanity deploy)
Recommended: host Studio on *.sanity.studio.
- Set production values in
studio/.env.local(or in CI — see below). - From
studio:
cd studio
sanity deploy
After the first deploy, set SANITY_STUDIO_APP_ID from the CLI output so later deploys skip the hostname prompt.
4. GitHub Actions (Studio)
The repo includes .github/workflows/deploy-studio.yml: it deploys Studio when studio/** changes on master or develop.
Configure GitHub Environments (Production for master, development for develop):
- Variables:
SANITY_STUDIO_PREVIEW_URL,SANITY_STUDIO_PROJECT_ID,SANITY_STUDIO_DATASET,SANITY_STUDIO_HOSTNAME,SANITY_STUDIO_API_VERSION,SANITY_STUDIO_APP_ID - Secret:
SANITY_AUTH_TOKEN(Sanity Manage → API → Tokens, deploy-capable token)
See the workflow file for the exact names checked during deploy.
5. Deploy Studio to Vercel (optional)
Create a separate Vercel project with Root Directory studio and the same studio environment variables as in studio/.env.local.
Inviting collaborators
Now that you've deployed your Next.js application and Sanity Studio, you can optionally invite a collaborator to your Studio. Open up Manage, select your project and click "Invite project members"
They will be able to access the deployed Studio, where you can collaborate together on creating content.
Configuring Resend (optional)
To use the newsletter form, you need to configure Resend.
- Create a new Resend account
- Create a new API key
- Copy the audience id
- Set the API key and audience ID in
frontend/.env.localasRESEND_API_KEYandRESEND_AUDIENCE_ID(or in Vercel project settings)
Sanity TypeGen
To generate the types, run the following commands from the studio folder (where sanity.cli.ts lives):
cd studio
npx sanity schema extract
This generates schema.json in the studio folder.
npx sanity typegen generateThis generates frontend/sanity.types.ts (output paths are set in studio/sanity.cli.ts).
From the repository root you can use the workspace shortcut:
pnpm typegenRun TypeGen whenever you change schemas or queries so the frontend stays in sync.
Workspace commands
Installing packages
Frontend:
pnpm add <package-name> --filter frontendStudio:
pnpm add <package-name> --filter studioRoot:
pnpm add -w <package-name>Updating dependencies
Update all packages in all workspaces:
pnpm up --latest --recursiveUpdate specific workspace:
pnpm up --latest --filter frontend
pnpm up --latest --filter studio
Environment variables
All environment variables and their descriptions:
Next.js (frontend/.env.local):
NEXT_PUBLIC_SITE_URL- your website url. For example,https://yourwebsite.comwithout trailing slash. Used for sitemap.ts , robots.ts , and for client.tsNEXT_PUBLIC_SITE_ENV- specifies the environment type (development/production) and affects metadata configuration. Setting this to "development" prevents search engine indexing, which is useful for staging environments (e.g.,staging.yourwebsite.com).NEXT_PUBLIC_STUDIO_URL- your Sanity Studio url. For example,https://your-sanity-hostname.sanity.studioorhttp://localhost:3333locally, without trailing slash. Used for Draft Mode (Open in Studio URL).NEXT_PUBLIC_SANITY_API_VERSION- your Sanity API version. You don't have to use specific dates, any past or present date is valid, and today's date will always give you the latest version - no need to check release history. For example: YYYY-MM-DD.NEXT_PUBLIC_SANITY_PROJECT_ID- your Sanity project ID. For example, abc12345.NEXT_PUBLIC_SANITY_DATASET- your Sanity dataset name. For example, production.SANITY_API_READ_TOKEN- your Sanity read token for Next.js to fetch data.RESEND_API_KEY- your RESEND api key for the newsletter form.RESEND_AUDIENCE_ID- your RESEND audience id for the newsletter form to store contacts.
Studio (studio/.env.local):
SANITY_STUDIO_PREVIEW_URL- your Next.js site url for preview. For example,https://yourwebsite.comorhttp://localhost:3000locally, without trailing slash. Used for Draft Mode in Presentation Tool or iframe preview.SANITY_STUDIO_PROJECT_ID- your Sanity project ID. For example, abc12345.SANITY_STUDIO_DATASET- your Sanity dataset name. For example, production.SANITY_STUDIO_HOSTNAME- your Sanity Studio hostname forsanity deploy(unique on.sanity.studio).SANITY_STUDIO_API_VERSION- your Sanity API version (same guidance as above). For example: YYYY-MM-DD.SANITY_AUTH_TOKEN- your Sanity auth token for Studio deploy via GitHub Actions. Generate in Sanity Manage → API → Tokens with deploy permission.SANITY_STUDIO_APP_ID- your Sanity Studio app ID from the firstsanity deploy; avoids repeated hostname prompts.