SanityPress
A pre-configured Sanity Studio on Next.js designed for rapid and scalable website development. The last template you’ll ever need—for good.
SanityPress (with TypeGen)
Zero setup stress. 100% type-safe.
An improved successor to the acclaimed Next.js + Sanity.io starter template—now with auto-generated TypeScript types from your Sanity schema and GROQ queries.
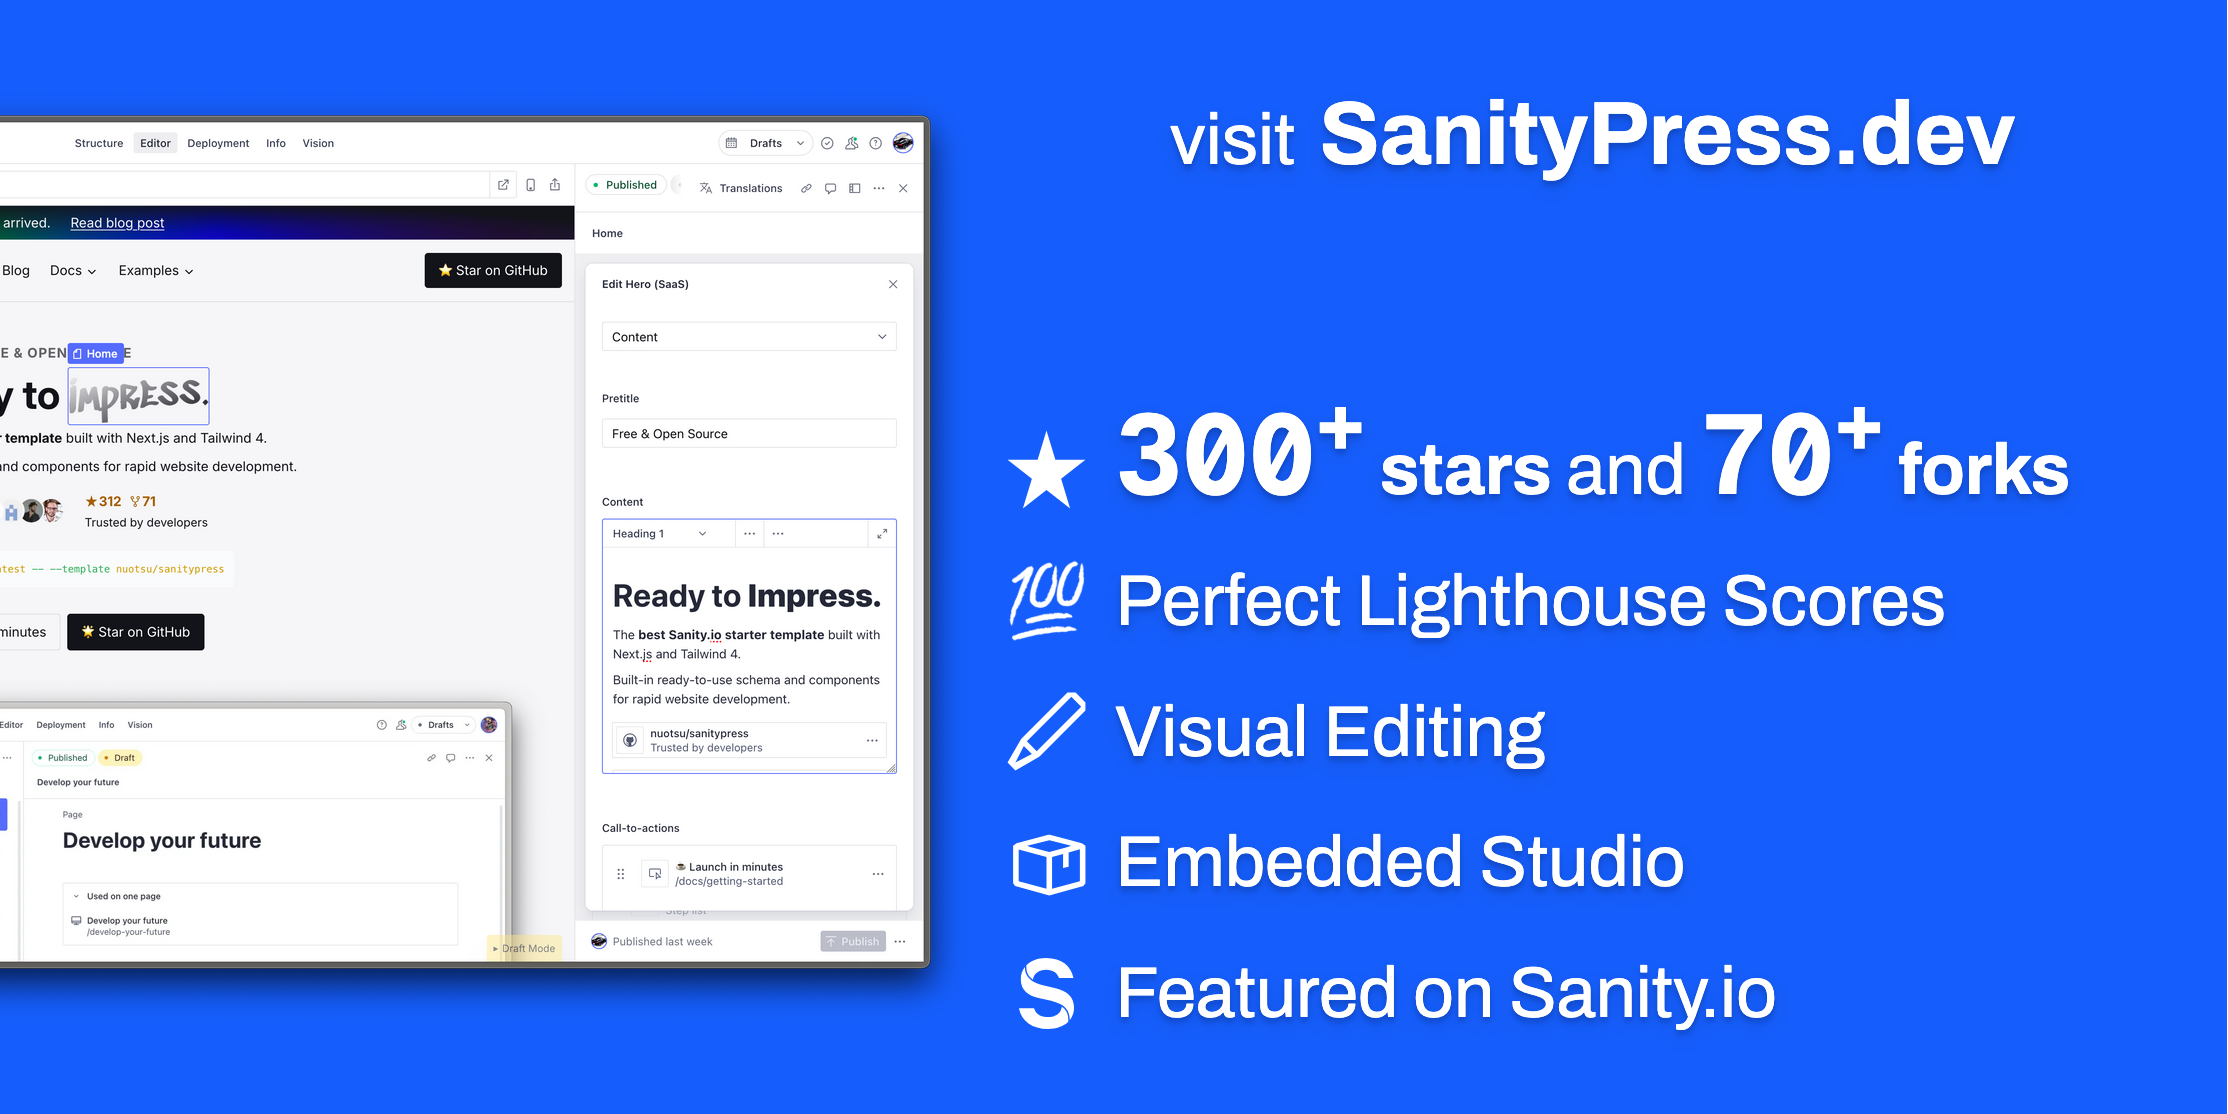
Get started | Read more about TypeGen | View on Sanity.io
Key Features
- Next.js 16 (App Router, Server Components, TypeScript) with Tailwind 4
- Improved successor to the acclaimed SanityPress starter template (over 400 stars)
- GROQ TypeGen for your Sanity Schema types
- Perfect PageSpeed Insight scores
- Live Content API with Visual Editing
- Optimized images with Next Image component and Sanity CDN
- Auto-generated sitemap.xml and blog RSS feed
File Structure
SanityPress
├─ src/
│ ├─ app/              # Next.js App Router
│ │ ├─ (frontend)/     # Public-facing site
│ │ │ ├─ layout.tsx    # Frontend root layout
│ │ │ ├─ not-found.tsx # 404 page
│ │ │ ├─ [[...slug]]/  # Catch-all for all standard pages
│ │ │ ├─ blog/[slug]/  # Individual blog post pages
│ │ │ ├─ blog/rss.xml/ # RSS feed endpoint
│ │ │ └─ api/          # API route handlers
│ │ │ │ ├─ draft-mode/ # Enable/disable Sanity draft mode
│ │ │ │ └─ og/         # Open Graph image generation
│ │ ├─ (studio)/admin/ # Sanity Studio (CMS editor UI)
│ │ └─ sitemap.ts      # Auto-generated sitemap
│ ├─ modules/          # Colocated modules (one folder per Sanity module `_type`)
│ │ └─ <module-name>/
│ │   ├─ index.tsx     # Frontend component
│ │   ├─ schema.ts     # Sanity schema
│ │   └─ query.ts      # GROQ projection (only if needed)
│ ├─ ui/               # React components
│ │ ├─ modules/        # ModulesResolver + <Module> wrapper
│ │ ├─ blog/           # Shared blog UI helpers (filters, previews, etc.)
│ │ ├─ header/         # Header, navigation, megamenu
│ │ ├─ footer/         # Footer and link list
│ │ └─ ...             # Shared components (CTA, Img, Logo, etc.)
│ ├─ sanity/           # Sanity CMS configuration
│ │ ├─ schemaTypes/
│ │ │ ├─ documents/    # Top-level content types (page, blog.post, site, navigation…)
│ │ │ ├─ objects/      # Reusable field groups (cta, link, metadata…)
│ │ │ └─ fragments/    # Shared helpers (define-module, modules field)
│ │ ├─ lib/            # Queries, GROQ fragments, fetch helpers, image builder
│ │ ├─ ui/             # Custom Studio UI components
│ │ └─ ...             # Sanity files
│ ├─ lib/              # Shared app utilities and env helpers
│ ├─ hooks/            # Custom React hooks
│ └─ types/            # Global TypeScript declarations
├─ public/
│ ├─ module-thumbnails/ # Studio insert-menu previews (`<module-name>.webp`)
│ └─ ...               # Favicon and other static assets
├─ .env.*              # Environment variable template
├─ next.config.ts      # Next.js configuration
├─ sanity.config.ts    # Sanity Studio configuration
├─ sanity.cli.ts       # Sanity CLI configuration
└─ package.json
Getting Started
1. Initialize the project
Click the Sanity template link -- OR -- install with the Sanity CLI:
npm create sanity@latest -- --template=nuotsu/sanitypress2. Set environment variables
If initialized via the Sanity template link, the .env.local file should be created automatically.
If initialized via the CLI, duplicate the .env.example file as .env.local and assign the variables to your project:
# .env.local
NEXT_PUBLIC_BASE_URL="https://example.com" # your website's domain

NEXT_PUBLIC_SANITY_PROJECT_ID="abcd1234" # Sanity project id
NEXT_PUBLIC_SANITY_DATASET="production" # Sanity dataset name

SANITY_API_READ_TOKEN="..." # API token with "Viewer" permissions
⚠️ Required: Set NEXT_PUBLIC_BASE_URL to your production domain.
3. Install and start local server
Install required packages and dependencies with your desired package manager (e.g. npm, pnpm, deno, bun, etc.).
npm installOnce installed, run the development script:
npm run devThen open:
- Next.js frontend: http://localhost:3000
- Sanity Studio: http://localhost:3000/admin
4. Add content in your Sanity Studio
Publish the required documents: site and page (with the slug "index"). Otherwise, you’ll just see a blank page on the Next.js frontend.
What you'll need:
| Document | Slug or Path | Usage | Required? | Notes |
|---|---|---|---|---|
site | Global settings | Yes | ||
page | index | Homepage route | Yes | |
page | 404 | Not found route | ||
page | blog | Blog listing route | Add the Blog index module | |
global-module | blog/ | Blog post template | Add the Blog post content module |
Alternatively, you can run the following command to import a demo dataset with the required documents:
sanity dataset import demo.tar.gz📸 See what the Sanity Studio backend looks like on the Screenshots page.
5. Set up deployments
Add a Vercel (default) or Netlify widget to enable deployments from the Studio.
6. Customize
Adjust frontend styles to your liking, edit or add new schema and modules, etc.