Published January 21, 2022
Login with Netlify & Write Data to Sanity
By Joe Bacal

This demonstration app allows front-end users to sign-up, sign-in, and create, retrieve and delete their own data in a private Sanity datastore, without using the Sanity API key in the browser, and without having a Sanity login.
Database access, user authentication, and deployment are taken care of by Netlify and Sanity's various libraries and integrated services. This intentionally-simple app is an example of one way to integrate them.
In this guide I'll describe the front-end user and Sanity admin experiences, and illustrate the mental model that has made sense to me as I stitch things together. You can test out the live app and/or view the complete repository on github.
Sign Up
User and Admin Experiences
Front end users can quickly sign up for an account and start to write and retrieve data. This account will not be a Sanity user account, but rather a user account hosted and authenticated by Netlify Identity.
When the new user clicks the "Sign Up" button, Netlify's pre-built identity widget opens up. They fill out basic information, and receive a confirmation email. Once they click the confirmation link they are returned to the app where they see the note-writing interface is now available.

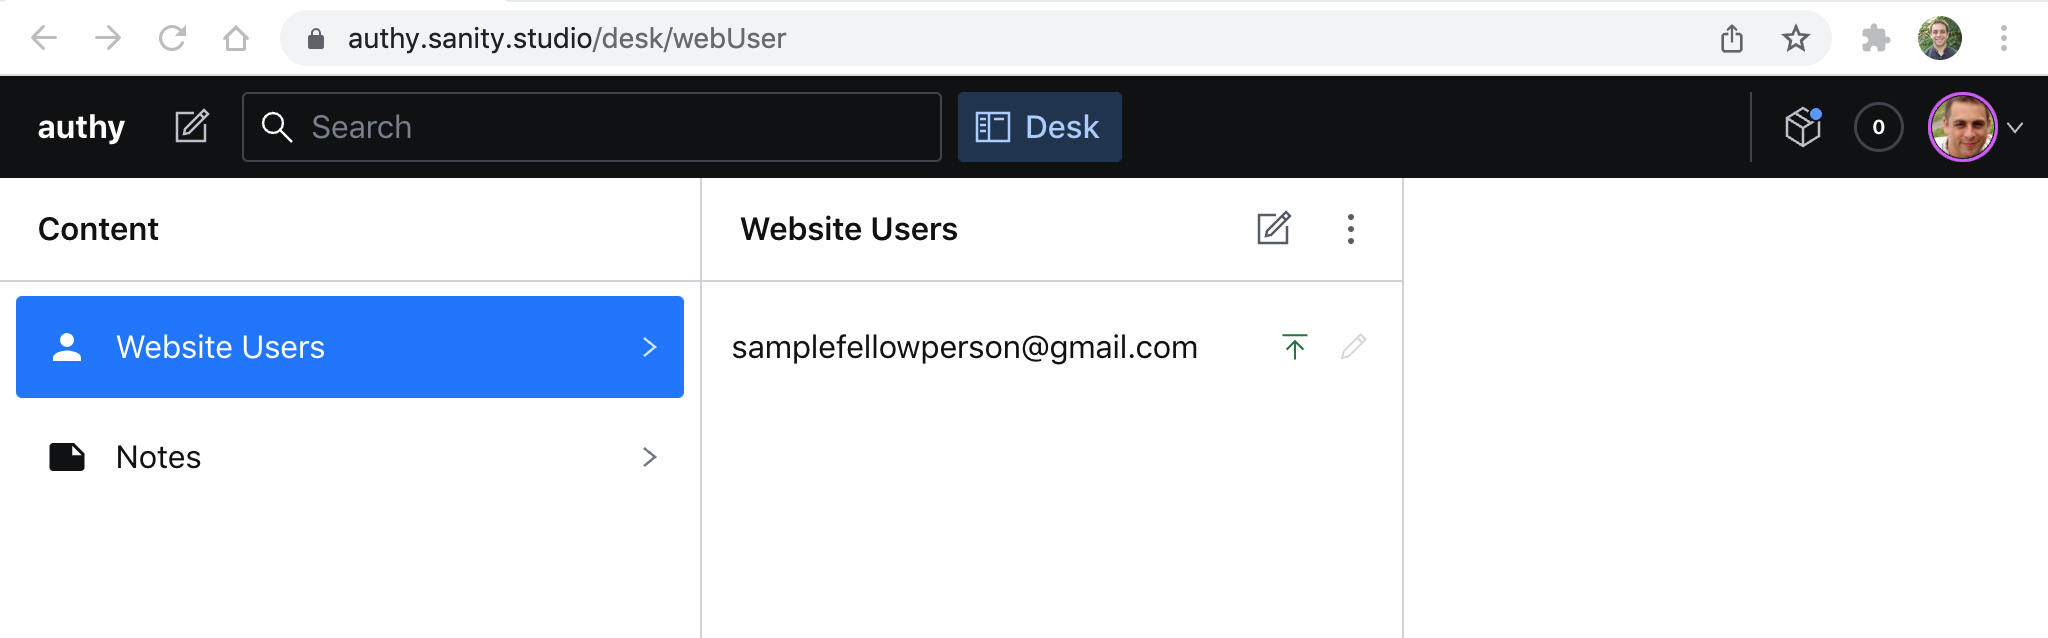
Meanwhile, a Sanity studio admin can now see a new "Website User" document has been created in Sanity.
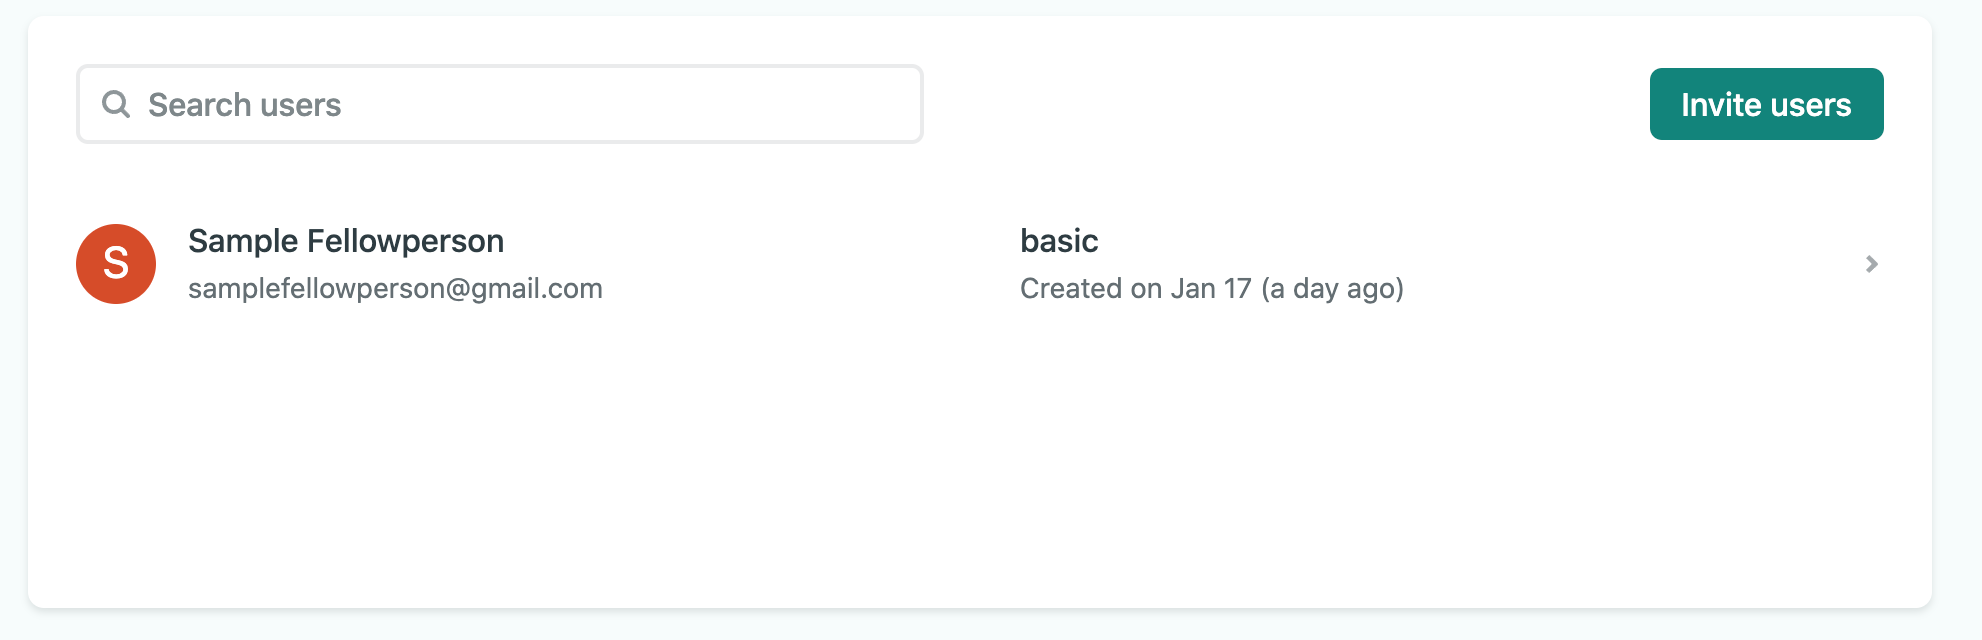
Likewise, a Netlify admin can see the user in Netlify.
Mental Model
What happened behind the scenes to make that happen? Here's a diagram that I created to understand what is certainly far more complex at the platform level.
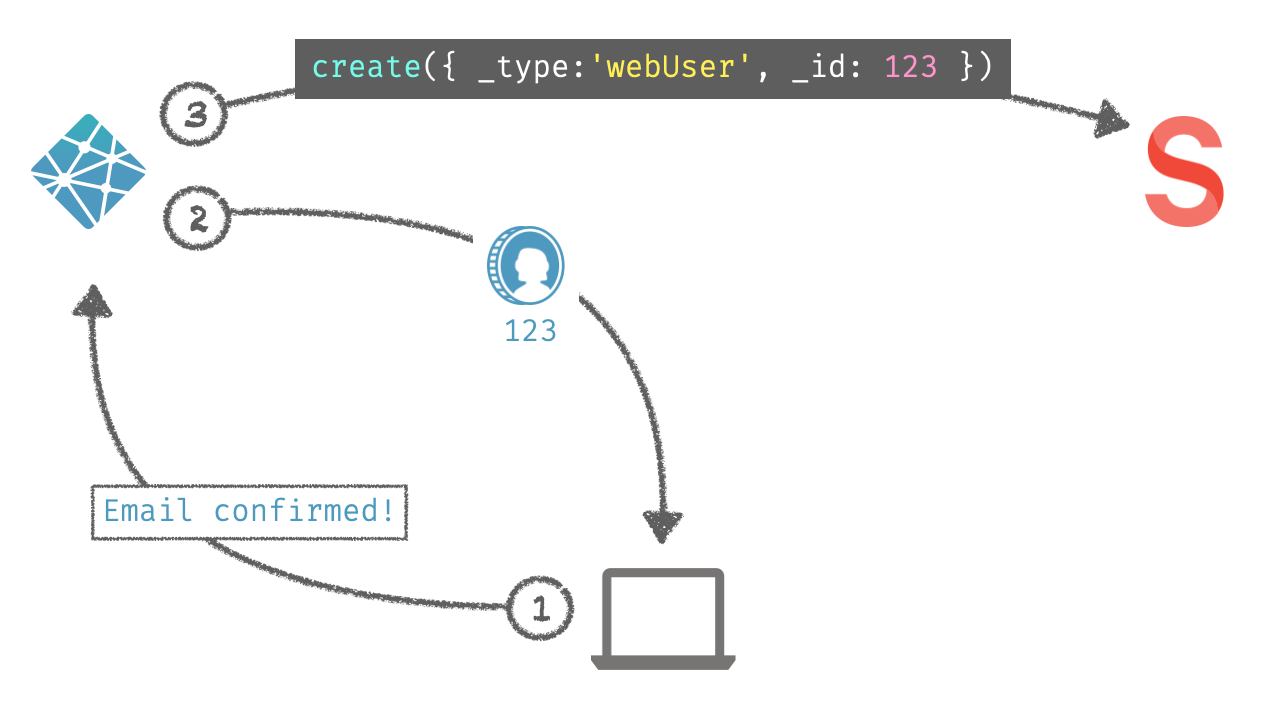
- The new front-end user-to-be clicks the email confirmation link sent by Netlify.
- Netlify sends the new user's browser session a shiny new JWT (token) which contains all the important things the front end needs to know about the user:
- The username and email they signed up with
- A unique ID generated by Netlify
- Any metadata we want to assign them (more on that later)
- At the same time — since we have outfitted Netlify with the API key to our private Sanity datastore via an
.envvariable — we can send that new user data over to Sanity with a request to create a newwebUserdocument.
Code Highlights
All of the front end work here (#1 and #2 above) is handled by the Netlify Identity widget. Getting the widget in an app is as simple as creating a div with a data-netlify-identity-menu property, and including the JavaScript from Netlify that will render it there.
<!-- excerpt from index.html -->

<script src="https://identity.netlify.com/v1/netlify-identity-widget.js" /></script>

<div class="data-netlify" data-netlify-identity-menu></div>
For #3, where we copy any new user's basic data over to Sanity, we need to write a small server-side (a.k.a. "serverless") function that will do just that.
Netlify provides a number of hooks for identity events that we can use. We can access those hooks by simply naming a function after the event. So, we create a function called identity-signup and presto, we have a function that will fire whenever someone signs up.
Inside the function we'll have access to the event object which contains all the information we need about the new user. We can also use this spot to add any metadata the user should have in Netlify - and will thus be included in their tokens whenever they log in.
// exccerpt from /netlify/functions/identity-signup.js

const handler = async function (event) {
  const data = JSON.parse(event.body)
  const { user } = data


  //prep metadata for future tokens
  const netlifyResponseBody = {

    app_metadata: {
      roles: ['basic'],
      app_other_thing: 'some app value'
    },
    user_metadata: {
      ...user.user_metadata,
      user_other_thing: 'some user value'
    },
  }

  // prep object for sanity client
  const doc = {
    _id: user.id,
    _type: 'webUser',
    email: user.email,
    fullName: user.user_metadata.full_name,
  }

  try {
    // make request to Sanity
    const result = await client.createIfNotExists(doc)
    .then((res) => {
      console.log('SANITY RESPONSE: ', res)
    })
    return {
      statusCode: 200,
      headers: { 'Content-Type': 'application/json' },
      body: JSON.stringify(netlifyResponseBody),
    }
  } catch (error) {
    return {
      headers: { 'Content-Type': 'application/json' },
      statusCode: 500,
      body: error.responseBody ||
        JSON.stringify({ error: 'An error occurred' }),
    }
  }
}

module.exports = { handler }
We now have a user document in Sanity to match our Netlify Identity user. Their unique ids match 1:1 on both platforms, so we'll always know what value to pass from one platform to the next when we need to find out something about a given user, and we'll be able to use that unique id within our Sanity datastore to create references to the Website User.
Reads and Writes
User and Admin Experiences
Now that the user is logged in, has a token, and has a document to match their identity, we can allow them to read, write, and delete their own notes. On the Sanity side, admins will be able to see notes created with a reference to the user that wrote it.
Mental Model
The pattern for any mutation request, whether it is to create, read, or delete a note (I'm saving update for the next installment) is similar. The diagram below is a simplified version of the request to retrieve all the notes that reference the logged-in user. It's basically a picture of what happens as a result of this function in the repository.
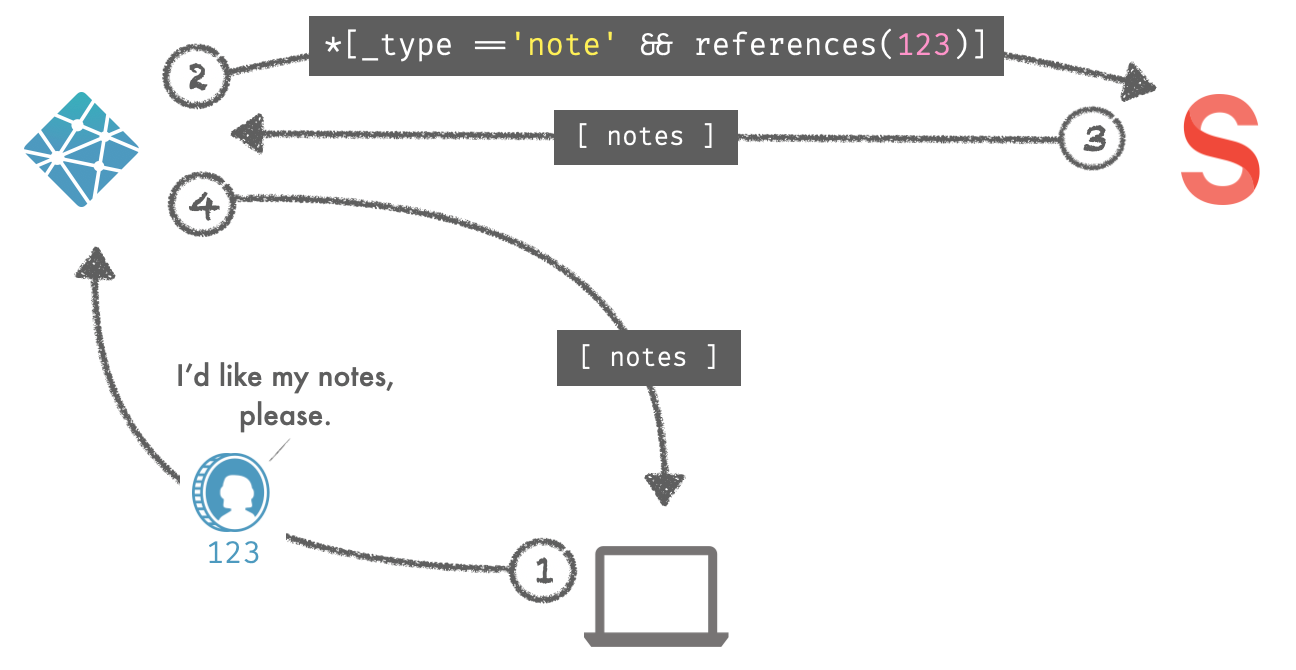
- The front-end app makes a request for all the user's notes - sending the users token along so Netlify can be sure the user is really logged in, know who they are, and check things like roles or other metadata before doing anything else.
- The token checks out, so our function makes a request to Sanity for the users notes.
- Sanity returns the notes data to the Netlify function
- The function returns that data to the browser
Incredibly, all of this happens within two shakes of a hastily put together loading animation.
Code Highlights
The front end makes a fetch request to our server-side function, user-notes, with the token in the Authorization header.
// excerpt from lib.js

await fetch(`/.netlify/functions/user-notes`, {
  headers: {
    Authorization: `Bearer ${theToken()}`
  }
})
.then((response) => {
  // use data in response to make the notes in DOM
})
Our server-side function has access to information in the token (as well as other details of the request) in the context parameter. We can test to see if the request came from a logged in user, and what the user's role is.
// excerpt from /netlify/functions/user-notes.js

const handler = async (event, context) => {

  const uId = context.clientContext.user.sub
  const uRoles = context.clientContext.user.app_metadata.roles

  if (!uId) {
    return {
      statusCode: 401,
      body: JSON.stringify({
        data: 'no go',
      }),
    }
  }

  if (uRoles[0] !== 'basic') {
    console.log('No basic role!')
    return {
      statusCode: 401,
      body: JSON.stringify({
        data: 'no go',
      }),
    }
  }

  // if we have made it this far we can continue on
If our function hasn't returned out because of a lack of a token then we go ahead and fetch that users notes from Sanity. Before sending it back to the browser, we'll package it up in a nice, easy to digest object that includes the note's id so we can target it for deletion someday with a click, and with its updated time so we can order things if we want to.
// excerpt from netlify/functions/user-notes.js

const query = `*[_type == "note" && references("${uId}")]{
  title, _updatedAt, _id
}`

let notes

await client.fetch(query).then((r) => {
  notes = r.map((n) => {
    return {
      title: n.title,
      updated: n._updatedAt,
      id: n._id
    }
  })
})

return {
  statusCode: 200,
  headers: { 'Content-Type': 'application/json' },
  body: JSON.stringify(notes)
}
The function for writing a new note for the user is very similar except that we accept the users input sent with the event, and then build up a new document for a note, including a reference to the user.
// excerpt from /netlify/functions/create-note.js

const handler = async (event, context) => {

  const noteText = event.queryStringParameters.note
  const uId = context.clientContext.user.sub

  /* testing of token not shown here */

  const newNote = {
    _type: 'note',
    title: noteText,
    belongsTo: {
      _type: 'reference',
      _ref: uId
    }
  }

  try {
    const result = await client.create(newNote).then((res) => {
      // you can see this in the Netlify function logs
      console.log('RESULT FROM SANITY: ', res)
    })

   // error or return results of the transaction in case we ever need it
Houston, we have CRUD
As promised, this is a demonstration app and has a litany of missed optimizations, non-DRY code, unhandled errors, and out-in-the-open DOM manipulations. It's here as a proof-of-concept, but not as a starter app. I hope it helps you see what can be made possible by the incredible amount of functionality we get for free in these services.
Also, conspicuously missing from all of this is the U in Create, Read, Update, Delete. I have left Update functionality out of this version for simplicity's sake. Once we are updating data in place, potentially in real time, we enter into a new world of possibilities with real-time updates, and I'd like to do that justice and not let its potential complexities throw a shadow over the basic idea.
I hope this is helpful if you are just stepping into Sanity or the Jamstack in general, and if you do decide to try the app out to see if it really works, great, just know I'll be deleting data and users periodically!
Sanity – The Content Operating System that ends your CMS nightmares
Sanity replaces rigid content systems with a developer-first operating system. Define schemas in TypeScript, customize the editor with React, and deliver content anywhere with GROQ. Your team ships in minutes while you focus on building features, not maintaining infrastructure.
Sanity scales from weekend projects to enterprise needs and is used by companies like Puma, AT&T, Burger King, Tata, and Figma.